
Great Uses For Slug May 24, 2004
The Versatile Slug in FCP
Great Uses For Slug May 24, 2004
The Versatile Slug in FCP
By Andrew Balis
Slug? You know, the video generator that is simply black video filler (and audio filler as well).
Aside from its various applications, like using it to substitute temporarily for another clip, or identify a specific duration, we can also use slug to simplify certain tasks, making our lives just a wee bit easier.
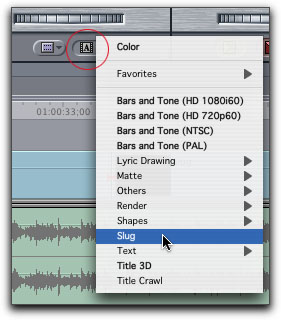
First off, slug can be called up a few different ways:
The following is not an exhaustive list of other uses for slug, just my favorite six.
1. Deleting Gaps
This one is my favorite. In a perfect world, if a gap exists in the Timeline, we can click in it to select it, and press Delete and all the following clips shift left (ripple) to close the gap.
Selecting gap |
After deleted |
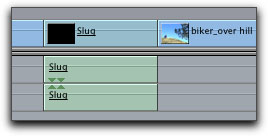
But this feature only works whenever the gap exists across all tracks. If there is audio on another track, FCP will not close the gap and a warning will appear on the screen.
This gap doesn't exist on all tracks |
FCP is attempting to preserve the sync relationships of the following clips. If you want to delete the gap anyway, there are other choices.
In these scenarios, you can grab the clips after the gap, and drag them left, or you can lock the audio track then delete the gap, or my preference: turn the gap into a clip which can then be ripple deleted, whether or not the gap exists across all tracks.
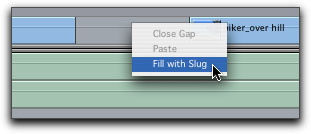
To do this, Control/click (or right/click on a two button mouse) in the gap which brings up a contextual menu. Choose the option Fill with Slug.
Now that the gap is a clip, click on it to select it and press Shift/Delete.
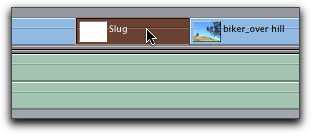
The slug will be removed, and the following clips will ripple left.
Since FCP applies different rules to gaps vs. clips, the simple solution is to treat the gap like a clip, in this case slug, which FCP will remove and ripple the Timeline, regardless of sync.
2. Temp Clips and Replace Edit.
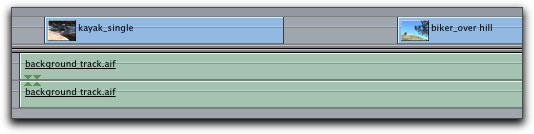
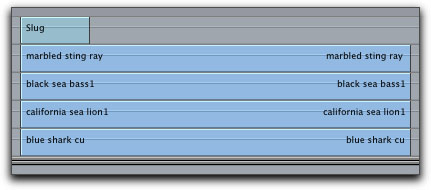
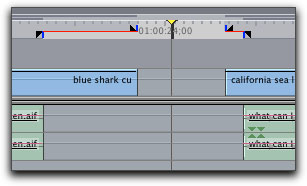
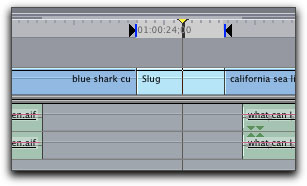
When working on adding video clips to the Timeline, and adding them in sync to the audio or music already in the Timeline, like with a music video or a sports montage, you will find using slug with the feature Replace edit is perfect for this. After the audio is in the Timeline, add slug to the video track only, like the following illustration.

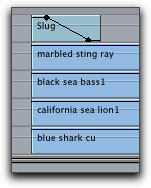
Then use the razorblade tool to divide the slug into smaller pieces, although the exact cut points don't matter at first. Its just a way to make smaller temporary clips to replace.

Then find an audio cue in the Timeline that the incoming video should be in sync with. Leave the Timeline playhead at this position.
Open the video clip in the Viewer and leave the playhead at the point that should be in sync with the Timeline audio. Then simply drag the clip to the Canvas and drop on Replace. The slug will be replaced with the new clip.
Even better, the clip is added in sync to that part of the Timeline. To adjust the In or Out of the new clip, use the Roll tool.
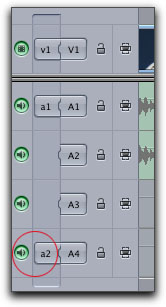
3. Targeting Timeline Tracks with the Voice Over Tool.
The Voice Over tool in FCP uses the Patch Panel to determine where a newly recorded track is placed in the Timeline. Normally, you would place the Source control for A2 (channel 2) across from the Timeline track where you want to place the recorded audio.
Move this control up or down to the desired Timeline track |
If you don't specify, then FCP will use the last targeting that was used. Here's the problem: if there is no audio clip in the Viewer, there is no way to target A2 to the track you desire, because the Source controls in the Timeline are simply a reflection of what is currently opened in the Viewer. So, if a video clip is in the Viewer, or the Viewer contains an audio clip that's only one mono track, you will have no A2 Source control in the Timeline to move to an appropriate track.
Solution: open a two-track audio clip into the Viewer. There's nothing more handy than the Video Generator pop up button in the Viewer to call up slug, which has one video and two audio tracks.
Video Generator button |
Once the slug loads into the Viewer, an A1 and A2 Source Controls will be available in the Timeline. Again, make sure you move the A2 Source to the appropriate track, as the Voice Over tool ignores the A1 Source control.
4. Fade Up On Multiple Tracks.
When multiple clips start at the same point in the Timeline, and are all visible on the screen together (like a split screen), and you desire for all tracks to fade in at the same spot, we can use slug to get the job done.
Place slug above the video tracks to be faded in, as shown below.
Since the slug is on a higher track, all that's seen at this point in the Timeline is black. If we fade "down" on the slug, we actually fade "up" on the video clips. Turn on the Clip Overlays button in the Timeline, and use the Pen tool to create a fade as shown next.
Additionally, you can Control/click over both the keyframes and choose Smooth from the contextual menu to create a "smoother" fade in.
One last note, whenever the Viewer is "empty", its not really empty. The Viewer always loads slug by default whenever there is no opened clip in the Viewer. You can use the slug from the "empty" Viewer just as if you opened it from the Video Generators.
Note If You Are Using a Version Of FCP Prior to Version 4.5, Read On.
5. Mark Gap.
Depending on the nature of the gap, FCP may mark a split edit in the Timeline when you try and use the Mark Clip feature, found in the Canvas (or the keyboard shortcut X).
To resolve this, fill the gap with slug as mentioned above. Then place the playhead anywhere over the slug. Press X. the section is properly marked with In and Out points.
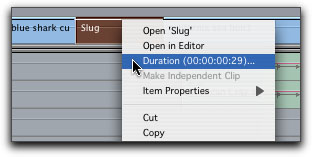
6. Find Duration of Gap.
In FCP 4.5, you can quickly find the duration of a gap using Mark Clip, as the duration of the gap would then be found in the Duration field in the Canvas. If you aren't using FCP 4.5, then, similar to above, start by Control/clicking in the gap and choose Fill with Slug. Then Control/click over the slug which brings up a contextual menu. Notice that the current duration is listed in this menu near the top.
By Andrew Balis
copyright © www.kenstone.net 2004
© 2000 -2004 Apple
Computer, Inc. All rights reserved. Apple, the Apple logo, Final
Cut Pro, Macintosh and Power Mac
are either registered trademarks or trademarks of Apple. Other
company and product names may be trademarks of their respective
owners.
All screen captures, images, and textual references are the property and trademark of their creators/owners/publishers.