
White Paper - Apple Soundtrack July 28, 2003
Apple Soundtrack - Music To Video Editor's Ears
By Dan Brockett
White Paper - Apple Soundtrack July 28, 2003
Apple Soundtrack - Music To Video Editor's Ears
By Dan Brockett
The Value Proposition
Final Cut Pro 4.0 now includes a new loop based music composition tool called Soundtrack. At the time of writing this article, Apple has just announced that Soundtrack will also be sold as a stand-alone application and will retail for $299.00. For those of you who may be just starting out with video editing and Final Cut Pro, let's go over, in order of expense, the methods most video editors use to obtain music for their projects.
Licensing Commercial Music $$$$$
 When you hear a cool new song on the radio or MTV, you might think that it would work great for that wedding video, independent film or corporate video project you are editing. The problem is, without obtaining copyright permission and a synchronization license from the owner(s) of the music, you are breaking copyright law. Because of the high costs involved, licensing commercial music is not practical for most low to medium budget projects.
Composed Music $$$ to $$$$
Hiring a composer for film and video projects is becoming more rare as budgets shrink and the popularity of library music and music composition software grows. A composer is still the optimum way to end up with a killer music soundtrack, but you pay for it. Hiring a professional composer is usually expensive and can be time consuming.
Needle Drop $$ to $$$
![]()
If you cannot afford a composer, you generally end up going with stock music from a music library. I have used several different music libraries and the quality of the music ranges from okay to pretty good, but still, the average library music cue runs $75.00 to $150.00 per "drop" (each single use of a track within a project) for most non-broadcast usage.
Buyout $
![]()
There is another type of library music called "buyout" music, but, honestly, in my experience, buyout tracks are usually pretty low quality. Buyout music means that when you buy the CD, you can use as many tracks of the music, as many times as you want, for the one buyout price. These CDs usually range in price from $45.00 to $85.00 each. The main problem with buyout is that the music is usually pretty generic and often badly composed and performed. Often times, all of the music sounds the same.
Do-It-Yourself $$$

With the popularity of music composition and editing programs like Acid Pro, Reason, Phrazer, Sonicfire Pro, some video editors have "taken things into their own hands" and created their own music soundtracks from scratch. If you are not musical, none of these programs will make you a musician, but you can often obtain good enough results to use in low to no budget projects or as temp tracks before hiring a composer or before looking for appropriate library music. Or you can actually create some pretty great music, if you have the chops.
Enter Soundtrack
Apple has seen the video editor's dilemma with music and has introduced Soundtrack. You are going to love creating tracks in Soundtrack! One of the nicest things about Soundtrack is that it was truly created it with Final Cut Pro users in mind. Another cool thing is that Soundtrack ships with over 4,000 high quality loops included for free. What is a loop? A loop is a musical audio file that contains rhythmic patterns that you can cut, paste, chop and extend to fill any amount of time. We'll discuss this more in-depth later on in the article.
It's Mine, All Mine, I Tell You!
One of the best things about Soundtrack is that any music you create in Soundtrack is yours and you are free to use the compositions in your own projects, sell them or share them as you see fit. If you get tired of the loops that shipped with Soundtrack, you can also buy other loops, even loops created for other programs and they will work with Soundtrack. For example, you can even record your own loops and Soundtrack will adapt them to work perfectly along with commercial loops. As we explore Soundtrack together, you will see how if you are a Final Cut Pro user, Soundtrack shares many of the same
characteristics and workflow as Final Cut Pro. Soundtrack easily passes the "can I get this going without looking at the manual?" test. But much like Photoshop, this is a deceptively simple program that can be used on a very basic level by the beginner or at quite a bit higher level by an advanced user. Let's take a look at Soundtrack and how you create music with it for your projects.
About Music Basics and Vocabulary
 Soundtrack does include controls to switch key, tempo by beats per minute and several other musical parameters. It will be a distinct advantage for you to have a basic understanding of music terms and methodology before you begin creating in Soundtrack. Knowing a lot about music is not required, but much more of Soundtrack's power will be unlocked if you at least understand the terms the program uses. To cover even the basics about music theory and music vocabulary is beyond the scope of this article. I would highly suggest reading the "Audio and Music Basics" chapter of the Soundtrack owner's manual and there are dozens of great books on the market for learning basic music theory. As with most other things related to producing video, audio and music, the more you know, the better your foundation to produce work that is creative and professional.
The Main Features
Input and Output Integration with FCP 4.0
Apple created Soundtrack to seamlessly integrate with FCP 4.0, so Soundtrack accepts reference QT movies and plays them back in sync with the Soundtrack timeline. Soundtrack is a separate application from FCP. The two applications work very well together. Soundtrack accepts QT and sound files with embedded metadata for scoring markers from FCP. Soundtrack also exports .wav and .aiff files that FCP can easily import.
Scoring Markers
When using Soundtrack to score a video that includes FCP scoring markers (available in Final Cut Pro 4.0), Soundtrack recognizes and displays the scoring markers in the Timeline. You can also add time markers, and use them as cue points to precisely synchronize the music to the action. Intelligently using these markers can really help a project musically and using markers can save time, too.
Real Time
You work on Soundtrack projects in real time, adding and editing
audio while the project is playing. You hear the results of your changes immediately. This is a very powerful feature for increasing efficiency and optimizing your time. Be forewarned though, Soundtrack is addictive and you can eat up large periods of time without even realizing it. To me, this is the sign of a great application, when full day spent using it feels like two or three hours ;-)
Import Additional Loops Soundtrack includes a huge collection of loops. Loops are short, rhythmic music samples that can repeat seamlessly. Soundtrack is compatible with a wide variety of existing loop libraries, including those created for use with Sonic Foundry's ACID, a popular PC-based loop composition program. There are some great loop libraries available by top studio musicians as well. How cool would it be to have your favorite drummer's drum sounds on your soundtrack? This is powerful stuff and once again, raises the bar on the potential quality of your music.
Intelligently Manages Thousands Of Sounds
The Media Manager, a part of the Soundtrack interface, provides powerful file browsing and search features, making it easy to locate loops and one-shots by instrument, genre, mood, or other search criteria. What's a one-shot? One-shots contain sound effects and other non-repeating audio. It can be difficult to find sounds you are looking for when you have thousands of them to sift through. Apple delivered great functionality with the creation of Soundtrack's Media Manager
Ease of Use
Soundtrack lets you effortlessly mix loops recorded at different tempos and keys, automatically matching loops to the project tempo and key, allowing you to freely combine loops from different sources in a single project. Even non-musicians can come up with decent sounding tracks and those of you with a musical ear can create some pretty great sounding stuff.
The Fun Stuff - Effects, Effects, Effects!
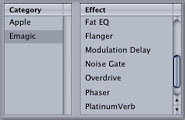 The loops included in Soundtrack should really be thought of as just a starting point. Where you will be able to really inject creativity and personality into your Soundtrack compositions is through the effective use of audio plug-ins. Soundtrack includes high-quality effects plug-ins from Apple and Emagic that you can use in your projects. You can also install additional third-party effects in the Audio Units plug-in format. The Emagic plug-ins are ported directly from Logic, Apple's top of the line audio program. These plug-ins sound great and will let you really customize and optimize sounds.
Non-Destructive Editing
This should sound familiar to all FCP users. All of the edits you make in Soundtrack are nondestructive, allowing you to freely try out changes to audio files without altering the original file, and to use the same file in multiple projects.
Setting Up Your System
By this point in the article, you probably want to just start working with Soundtrack and learning about how it works. Before we jump in though, we need to discuss your system's setup and hardware. As you may be aware, there are specific hardware and OS requirements for Soundtrack and there are several different ways for you to get audio in and out of your Mac, so let's cover them briefly.


You can refer to the Soundtrack .pdf owners manual for much more in-depth information about sample system configuration, audio interfaces, audio connections, mixers and monitoring. You must make sure that your system is setup for optimum quality and that your audio signal path is laid out correctly so you don't have to deal with mysterious audio issues and problems later, under the stress of project deadlines.
A Guided Tour
The Workspace
In Soundtrack, you do most of your work in two main areas: the Media Manager and the Project workspace. The Media Manager and the Project workspace can appear in a single window or in separate windows, depending on the layout you choose and the type of monitor setup you have. As with most Apple media applications, there are distinct advantages to a dual monitor setup or a widescreen setup like a Cinema Display.
File Browser
The File Browser displays the disks connected to your computer. You can use the File Browser to navigate to your audio and video files on your hard drives. Once you locate the files you want to use, you can preview them in the File Browser and drag them from the Media Manager to the Timeline.
Favorites
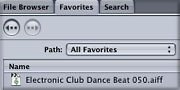
You can store frequently used items in Favorites, so that you can easily access them directly. You can also preview files in Favorites and drag them to the Timeline.
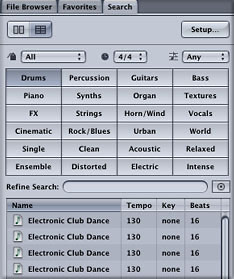
Search
![]()
When you have thousands of loops and one-shots to search through to try to locate a specific sound, you need a system that can sift through the data quickly and simply. Using Search, you can search for audio files based on a variety of criteria, including instrument, genre, mood descriptors, and other categories. You can also search using specific keywords. Once you locate the files you want to use, you can preview them in Search or drag them to the Timeline.
Preview Area

The lower part of the Media Manager contains the Preview area, with controls for previewing audio files. The Preview area also displays information about the file, including the file path, tempo, key, and number of beats. The Preview controls and information are available in all three Media Manager panes.
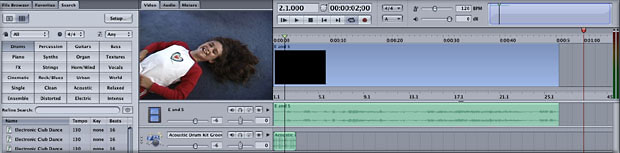
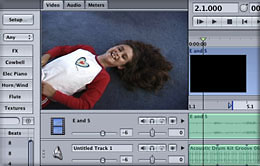
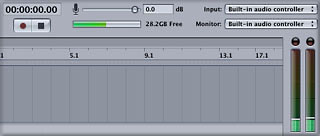
Project Workspace
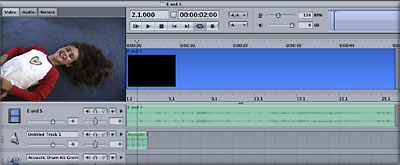
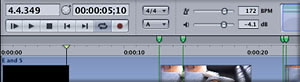
The Project workspace is where you arrange your Soundtrack projects. It includes the Timeline, which contains tracks where you place and edit your project's loops, and also includes the Viewer, track controls for each track, Timeline controls, Beat and Time displays, transport controls, master controls, and the Global Timeline view.
Playhead
![]()
The playhead shows the point in time currently playing from the timeline.
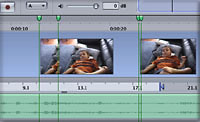
Time Ruler
![]()
The Time ruler displays the units of time in the Timeline, in either standard time format or video timecode format.
Video track
When you add a video to your project, the video clip is displayed in the video track, starting at the beginning of the project. Each project can have only one video track.
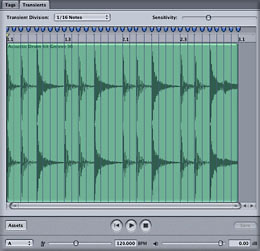
Beat Ruler
![]()
The Beat ruler displays the units of time in the Timeline, in a musical format of measures, beats, and beat divisions.
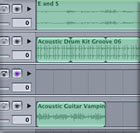
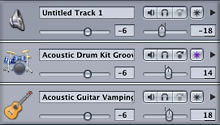
Audio tracks

The main area of the Timeline contains the project's audio tracks. Each audio track extends from the beginning to the end of the project. You can have up to 127 audio tracks in your project.
Audio clips
Audio clips are the basic building blocks of a Soundtrack project. You add audio clips to a project by dragging them to an audio track in the Timeline at the position you want them to begin playing.
Gridlines
The Timeline features gridlines that mark divisions of time corresponding to the Beat ruler (measures, beats, and beat divisions). The scale of the gridlines changes, depending on the zoom level. At the maximum zoomed-out level, the gridlines display measures or even groups of measures; at the maximum zoomed-in level, the gridlines display beats or beat subdivisions.
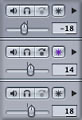
Track envelopes
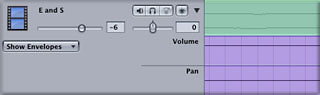
Each track has envelopes for volume and pan, which let you automate volume and pan changes for the track. When you display a track's envelopes, they appear in a row below the track in the Timeline.
Master envelopes
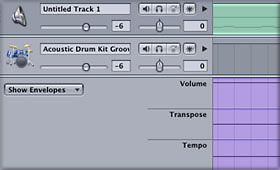
Clicking the Master Envelopes button displays the master volume, transpose, and tempo envelopes in a row below the audio tracks in the Timeline. You use the master envelopes to automate changes for the project's overall volume, key, and tempo over the course of the project.
Viewer
The Viewer has three panes, Video, Audio, and Meters. Each pane displays different information about your project. Click the Video, Audio, or Meters tab to display the corresponding pane in the Viewer.
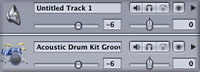
Track Headers and Track Controls
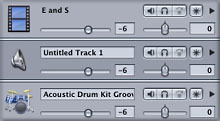
Below the Viewer are track headers for the audio tracks in the Timeline. Each track header contains a track icon, track name field, and a set of track controls.
Timeline Controls
![]()
The lower-left corner of the Timeline contains controls for various aspects of Timeline display and operation.
Beat Display and Time Display
![]()
In the upper-left corner of the Project workspace are the Beat display and Time display. Both show the current playhead position, using two different formats.
Transport Controls
![]()
Below the Beat and Time displays are the transport controls. You use the
transport controls to control playback of your project, and to open recording sessions.
Master Controls
To the right of the transport controls are the master controls. You use the master controls set project properties and control overall project volume.
Global Timeline View
![]()
To the right of the master controls is the Global Timeline view. The Global Timeline view displays a miniature view of the entire project. A black vertical line indicates the playhead position, and a rectangle shows the portion of the Timeline currently visible in the Project workspace.
Effects Window
You add effects to your project and adjust effect parameters in the Effects window. You can open the Effects window by clicking the Effects button in any track header, or by choosing Window>Effects.
Single Take and Multiple Take Recording Windows
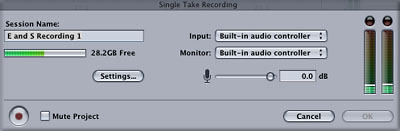

You set recording parameters and manage recording sessions in the Recording window. The recording window changes depending on whether you open a single take recording session or a multiple take recording session.
Overview of How It Works
The second method is to put a music score to an already cut scene or project. This type of workflow is more common on dialogue driven or narrative types of scenes.
There are also variations on these two workflows or you could even use both methods within a single project. The end result is that, like Final Cut Pro, Apple has tried to make Soundtrack as flexible as possible in order to give you as much choice as possible about how you want to create music for your project.
Layouts
Soundtrack gives you a variety of preset window arrangements called layouts, so that you can optimize your workspace for different tasks and different display sizes. You can choose for the Media Manager and the Project workspace to appear in separate windows or together in a single window. In the single window layout, you can choose to hide the track headers and the Viewer, the Media Manager, or all three, so that the Timeline fills the entire screen.
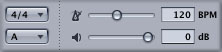
Project Tempo
![]()
The tempo sets the rate of the basic beat value for the project. When you add audio files to a project, their tempo is matched to the project tempo. The tempo range is from 60 to 200 beats per minute (bpm). The default tempo is 120 bpm (which equals two beats per second). See what I mean about learning about music?
Project Time Signature
![]()
The time signature sets the basic beat value and the number of beats in each measure. A project can have only one time signature. The default time signature is 4/4 (four beats per measure, with a quarter note as the beat value).
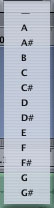
Project Key
![]()
The project key sets the root note (or tonic) for the project. When you add audio files to your project, their key is matched to the project key. You can set the project key to any note of the chromatic scale (from A through G#), or to None (-). The default key is A.
Project Sample Rate
The project sample rate determines the number of samples per second Soundtrack uses for audio playback and export. When you add audio files to your project, their sample rate is matched (up sampled or down sampled) to the project sample rate. The available sample rates are 32 kHz, 44.1 kHz, 48 kHz, and 96 kHz. The default is 44.1 kHz, which is the standard for CD-quality audio recording. For those of you working with DV, change this to 48KHz in your Soundtrack settings so you don't mismatch sample rates when using the music you've created in Final Cut Pro. FCP 4.0 does handle mismatched sample rates better than ever, but why put the extra overhead on your processor?
Supported Audio File Formats

You can add AIFF and WAV files to a project. Soundtrack recognizes file tags in AIFF and WAV files intended for use with loop-based music applications, including WAV files tagged for use with Sonic Foundry's ACID. You can also add QuickTime audio files; however, playback quality may not be as good as if you used uncompressed AIFF and WAV files. MP3s must be converted to AIFF or WAV format before being imported into Soundtrack.
Using Search to Locate Files
![]()
Using Search, you can search for audio files based on a variety of criteria, including musical instrument, genre, time signature, mood descriptor, time signature and scale type. You can also search using specific keywords. Click the Search tab to display the Search pane in the Media Manager.
Previewing Audio Files in the Media Manager
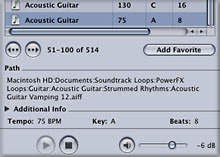
Once you locate an audio file you want to use in your project, you can preview the file in the Media Manager. When you preview audio files, Soundtrack matches the file being previewed to the project tempo, key, and sample rate.
Adding Audio Files to the Timeline

Once you've located and previewed an audio file you want to add, you drag the file to the Timeline to add it to the project. When you drag an audio file to the Timeline, Soundtrack adds an audio clip created from the audio file. An audio clip does not contain the actual audio data; instead, it contains a reference to the file stored on disk. Editing an audio clip in the Timeline does not change the source audio file. This is the essence of non-destructive editing.
Ease of Use
If all of this is sounding a bit intimidating, you should know that Soundtrack is extremely easy to use. If you need to make a loop longer or shorter in length, you merely drag the end of the loop to the desired length within your composition. Once you have selected and previewed a loop you want to use, you merely drag it into your composition, exactly where you want to use it. Even though Soundtrack gives you a lot of power, it is extremely intuitive and easy to use.
Snapping
Snapping in Soundtrack basically functions the same way that snapping in Final Cut Pro does. When you move and resize clips in the Timeline, you usually want them to start and end at a musically meaningful point in time, such as a measure or beat. To synchronize clips with a video, you may also want to position them in line with the ticks on the Time ruler. Soundtrack includes a snapping feature which causes clips, the playhead, and other items in the Timeline to "snap" to the nearest Snap To position.
Transposing Audio Clips
When you drag an audio clip to the Timeline, Soundtrack transposes the clip to the project key. You can transpose individual clips to another key to create chord progressions from the same audio file or to achieve other musical effects. You can transpose a clip to any interval from one octave above (+12 semitones) to one octave below (-12 semitones) its current key.
Changing a Loop to a One-Shot
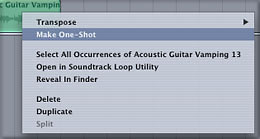
Some audio files may not be suitable for looping. Discrete, non-rhythmic sounds (such as a single cymbal crash or drum beat) work better as one-shots than as loops. Sound effects and other non-musical sounds, such as dialogue or sound effects, also work better as one-shots in many cases. You may also decide that some audio files just don't sound right when looped. To change a loop to a one-shot, just control-click on it in the timeline and chose, "make one-shot" from the menu.
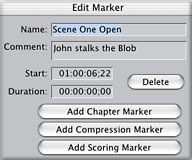
Working With Markers
Markers have a variety of uses in the Timeline. For example, you can use markers to
Working With Video in Soundtrack
When you are trying to match music to specific visual cues that occur in a video track, you can import the video clip and the clips audio into Soundtrack. You can import a video file by dragging the file from the Media Manager or from the Finder. If you are importing a video file from the Media Manager, you can drag the file either from the File list or from the Preview area. You can import only one video file into a project. Soundtrack supports standard QuickTime-compatible file formats. You can import a QuickTime movie (.mov) or an MPEG-2 (.m2v) video file into a Soundtrack project. Video files using NTSC, PAL, and other codecs supported by QuickTime can be imported into Soundtrack. Imported video files can be up to four hours in length.
Soundtrack displays Final Cut Pro scoring markers included in a video file imported from Final Cut Pro. You can add time markers at points in time corresponding to specific timecode positions in the video clip, and align audio clips with markers using the snapping feature. When you add a marker to a project containing a video, the video clip displays the frame of the video that occurs at the marker's position in time.
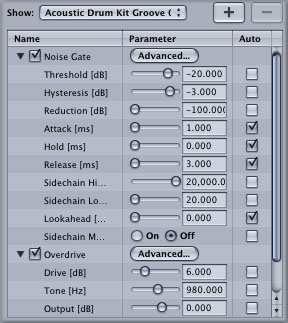
What About Effects Plug-Ins?
Soundtrack includes a generous assortment of effects plug-ins, both from Apple and from Emagic. The easiest way to learn what the effects do and how to best use them is to just dig in and try them out. It does take some time, but you find it time well spent. There is not enough space in this article and not enough bandwidth available to demo every audio plug-in effect that is included with Soundtrack, but at least we can list all of the effects and provide you with a few "before and after" samples of the most commonly used plug-ins to hear what exactly the effects do.
Soundtrack includes the following audio plug-ins:
|
Bandpass GraphicEQ Hipass Lopass LoShelfFilter Fat EQ, Subbass PeakLimiter Compressor Noise Gate |
Delay MatrixReverb Soundtrack Reverb Modulation Delay PlatinumVerb Stereo Delay Tape Delay Chorus Ensemble Flanger |
Phaser BitCrusher Clip Distortion Distortion Overdrive Phase Distortion Soundtrack Autofilter Autofilter Tremolo |
I am just going to go through a few of the most commonly used filters. I will provide before and after clips and screenshots of the parameters I set to obtain the sounds you will hear.
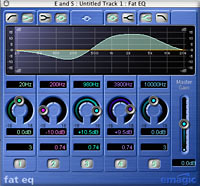
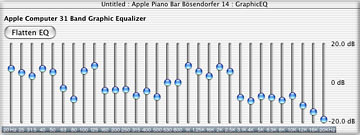
Apple 31 band EQ
Emagic Platinumverb
Apple Flanger
Emagic Tape Delay
Soundtrack's audio effects plug-ins are really nicely done and add a lot of depth and creativity to what you can accomplish within Soundtrack. I played with these effects for hours and they are a lot of fun and can really help with you express your creative vision for how you want your project's music to sound. Unlike the audio filters in Final Cut Pro, which are designed more to solve audio problems, the filters in Soundtrack are designed to enhance, warp and create entirely new sounds and feels. The key is to just dig in and mess with them. Set up a loop, hit play and open an effect. Listen to what the default setting is doing, then go from there and just tweak until your ear is content. There really is no right or wrong way too use these filters per se, all that matters is how your creative application of the effects make your music sound and how that sound makes your audience react.
If you are used to working in Final Cut Pro, envelopes in Soundtrack provide the same kind of control as keyframes. The difference is that in Soundtrack, you can edit envelopes at a finer level than you can edit keyframes in Final Cut Pro, allowing extremely precise control when using automation. This sounds more complex than it is in actual usage. Once again, Apple thoughtfully made this area of functionality in Soundtrack similar to Final Cut Pro.
Track Envelopes
Master Envelopes
Recording Audio in Soundtrack
Recording a Single Take
Recording Multiple Takes
Previewing Takes
Soundtrack Loop Utility
Mixing Your Soundtrack Composition
Balance track volume levels
Set track pan positions
Shape the music with effects
Create dynamic changes with automation
You accomplish these steps by working on two levels: You use track controls, effects, and envelopes to shape the sound of individual tracks (the steps traditionally performed using the channel strips on a mixing board), and you use master controls, effects, and envelopes to shape the sound of the overall mix (the steps traditionally performed using the master controls on a mixing board).
Exporting Your Soundtrack Projects
Distributing a Project and Its Media Files Together
About Tags
Both AIFF and WAV file formats can include tags. Libraries of audio files created for use with loop-based music software are usually tagged, and Soundtrack recognizes the tags used in most popular file formats.
You can add and change tags using Soundtrack Loop Utility; you can also tag multiple files, a process known as batch tagging. The set of tags you can manage using Soundtrack Loop Utility includes all of the tags in WAV files tagged for use with Sonic Foundry's ACID, as well as additional tags.
More advanced users may grumble that Soundtrack is too simple and user friendly and in being so, is missing too many tools. Honestly, this product is not aimed at highly skilled musicians and producers, they will be much more satisfied with more sophisticated music making tools such as Cakewalk, Logic, Reason, Digital Performer and others. Soundtrack is squarely aimed at the average video editors who need effective, customized music cues to complete their video projects on time and on budget. Soundtrack is not unique in the fact that what you will get out of it depends on the skills and talent that you put into it. I have already downloaded several compositions from the Internet from other Soundtrack users and I am amazed at what musicians (with a lot more musical talent than I have), are doing with Soundtrack.
The most important point to make about Soundtrack is that besides being highly useful, easy to use and really, in a way, inventing a new category of software, Soundtrack is just a blast to use! I find that I really use applications that are fun a lot more than applications that are just "tools". This application alone makes the upgrade to Final Cut Pro 4.0 more than worth the cost. In my opinion, Apple has a winner with Soundtrack.
Dan Brockett is an independent television producer/writer/director based in Camarillo, Ca. Dan is a guide on 2-Pop and the vice president of the Los Angeles Final Cut Pro User Group.
Big Little Films, Inc. ™
Soundtrack Effects Plug-In Demos
Bosendorfer
EQ'd Bosendorfer
EQ should definitely be one of your most often used effects. Almost any loop or one-shot can benefit from the careful application of EQ. What I have done here is to apply some heavy mid-range boost and some high cut to make my "normal" sounding piano loop a bit more "Phantom of the Opera" like, much more appropriate for a horror movie or suspense type of feel. Of course, as you will learn, music, effects and your choices of them are mainly designed to evoke a specific feeling or emotion from your audience.
Funkmaster Drum Kit
Funkmaster with Reverb
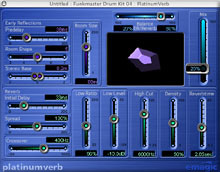
Emagic's included reverb plug-in, called "Platinumverb" is quite nice. I played with the room size and some of the timing parameters to give this funked up drum loop a little more drama and personality. Just remember, with time-based effects like reverbs and delays, a little goes a long way. If you apply this effect to more than one or two loops in a composition, you main mix will turn into a mushy wash of sound.
Guitar Chordal Camp
Flanged Guitar Chordal Vamp
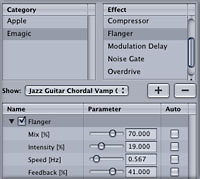
Flanger is an effect that can give instruments or voices a nice, airy kind of sound. Flange is kind of a cross between chorus and phase shifting and it works well with many kinds of electric guitars. Here, I've applied it to a jazzy guitar chord progression. You can hear how it turns this somewhat conservative jazz lick into something perhaps a bit more contemporary sounding. Flange was also a heavily used effect in the 80's New Wave sound and was popularized by musicians like Andy Summers of The Police.
String Section
Tape Delay String Section
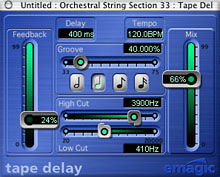
While tape delay will not be a very commonly used effect, this example will show you what can be accomplished with a little imagination and the careful application of certain effects. Notice on the first sample, String Section, this is a simple, repeating figure that is fairly clean and straightforward. With the addition of tape delay, I have turned this String Section loop into a much more suspenseful, repeating figure that has an accelerated pace and feels much more urgent. We have actually re-written the piece by adding in echoes of what the original loop was. Tape delay was made popular by rock guitarists like Jimmy Page and Robert Fripp in the 60's and 70's. In those days, a tape delay was an actual box that contained a recordable tape loop and allowed the player to record loops and then play along with them. This effect is a digital version of that same box called an Echoplex. I played with the delay settings to match the tempo of the loop.
Getting a Grasp on Automation and Envelopes
You can dynamically change the volume, tempo, and key of a project, and the volume and pan position of individual tracks, over time. In FCP, this is referred to as keyframing but in Soundtrack, it's known as automation and envelopes. Automation offers a powerful way to add drama and interest to your projects. Soundtrack provides envelopes for individual track volume and pan, and for master transposition, tempo, and volume. You can also add envelopes for track and master effect parameters so that you can automate changes to effects over time.
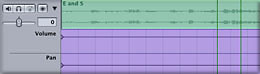
Each track has envelopes for volume and pan. When you display a track's envelopes, they appear in rows below the track in the Timeline.
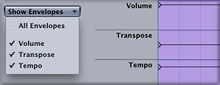
Each project has master envelopes for volume, transposition, and tempo. When you display the master envelopes, they appear in rows below the bottom track in the Timeline.
You can record your own audio in Soundtrack and add it to your projects. You record audio by opening a recording session for either a single take or multiple takes. When you record a single take, the take is added to the project when you finish recording. When you record multiple takes, you can preview the takes you've recorded, save them to disk as loops or oneshots, and add them to the project. In both cases, the recording session and any saved takes are saved as stereo AIFF files that can be turned into loops using Soundtrack's Loop Editing Utility. More on this later.
Single take recording lets you record audio quickly and add it to a project, much like the VO tool allows you to do in Final Cut Pro. When you finish a single take recording session, the recorded audio is added to the project at the point in the Timeline where you started recording. The session is automatically saved to the session location set in the Recording pane of the Preferences window.
Multiple take recording lets you record a series of performances or takes over a region you define in the Timeline. After recording, you can preview takes, save takes or selections as loops or one-shots, and add takes or selections to the project.
After recording multiple takes, you can preview them in the Multiple Take Recording window to determine which takes you want to save or add to your project.
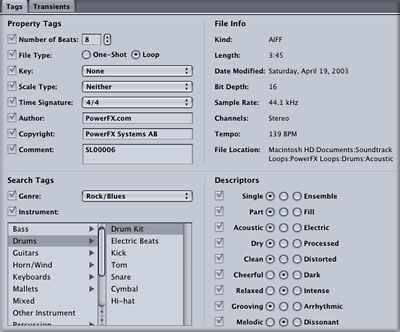
Using Soundtrack Loop Utility, a companion application included with Soundtrack, you can add tags to your recorded files to optimize them for working in Soundtrack. Tags are the way that Soundtrack identifies a loop's length, key, tempo, etc. In order for Soundtrack to be able to manipulate, a loop must be "tagged". Take a look at the Loop Utility window and you'll get the idea.
Once you are satisfied with your basic musical ideas within Soundtrack, the next step is to do a final mix and output the project. The following steps are a typical workflow for performing your final sound mix. You will typically find yourself doing at least some of these functions, as you created your mix, so chances are you are not truly starting from scratch by the time you reach this point.
The loops and other audio clips you add to the Timeline may have very different dynamic levels. When you mix a project, you balance the relative volume levels of each track, so that each track can be heard in the overall mix, and so that key parts are more prominent in the mix.
People perceive music as taking place in a three-dimensional space, which can sound like a real physical space (for example, a concert hall or a recording studio) or an imaginary one. When you mix a project, you give each track a place in the stereo field, and use reverb and other effects to help create a sense of real or imaginary space.

Many styles of music make use of effects. When mixing a project, you can add effects both to individual tracks and to the overall mix. Using the variety of effects available in Soundtrack, you can modify the sound and character of a project in both subtle and dramatic ways.
You can use automation to add dynamic changes to different aspects of the mix over time, creating musical interest and drama. The mix can become part of the arrangement, contributing to the feeling and development of the music.
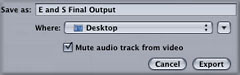
Once you have created a final mix of your project, you can export the project mix to a stereo AIFF file. You can export individual tracks to a stereo AIFF file, or to paired mono AIFF files. If your project includes a video, you can also export a project to a new QuickTime movie file. You can import the AIFF file into Final Cut Pro (or any other video application that supports AIFF files) to add to a video project, or into a digital audio application such as Logic for further processing. You can also burn it on a CD or DVD, or open it in iTunes and convert it to an MP3 file, which you can distribute over the Internet.
You can save a project with all of the media files it uses together in the same folder. Saving the project and its media files together is useful when you want to move the project from one computer to another in order to continue working on it, or to archive the project and media for later use. This would be similar to saving an entire Final Cut Pro project for use on another computer.
The loops and one-shots you use in Soundtrack can include metadata called tags. Tags provide information about the audio recorded in a file. Soundtrack uses tags in one of two ways:
Soundtrack, while not perfect by any means, does represent an entirely new way of working with music for video editors. Remember, this is version 1.0 of the application so I predict a lot of improvements in the next few years. As most musicians and most sound engineers are aware, a large percentage of popular music is repetitive and because of this, loop-based composition software is a very viable method for creating video soundtracks. When you weave music into a video, film or multimedia project, the music is usually what brings most of the projects emotion to the viewer, along with the dialogue and sync sound, so we understand the importance of music in our overall productions, yet amazingly, many projects are still produced with bad music. If you are a video editor, Soundtrack may not fill all of your musical needs, but Soundtrack can be a powerful addition to your musical toolkit.
5235 Mission Oaks Blvd - Suite 373, Camarillo, Ca. 93012 USA
(805) 388 4689 E-Mail: dan@biglittlefilms.com
copyright © kenstone.net 2003