
White Paper September 24, 2001
Special Film Effects from DV
Using Eureka Plugins
By Steve Sullivan
White Paper September 24, 2001
Special Film Effects from DV
Using Eureka Plugins
By Steve Sullivan
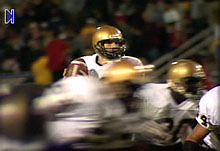
Before Special Film Effect |
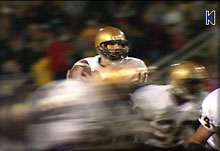
After Special Film Effect |
I have been editing and producing videos for just over 15 years. The past three years I have had the opportunity to work with film footage. At the risk of overstating it: While an event captured on video is documented, the same event captured on film can be monumental. This 'bigger than life' look has been my motivation to try to find a way to emulate the look of film in my video productions. My goal was to bypass the brash reality of 30 frame, 60 field video. Most of the paths I have taken led to fairly weak imitations of a true film look. Many of these "looks" had some pretty serious side effects, including, but not limited to: image blur or lag, nauseating strobe, stair step artifacts, and static grain.
As happy as I was with my new Final Cut Pro system, the hope of finding the evasive "film look", seemed bleak at best. I had just about given up my quest when I stumbled onto an article in the "White Papers" on Ken Stone's web site. The article by Shawn Bockoven is titled, "Making Video Look Like Film". Needless to say, it got my attention. (If you haven't read this article, or read it lately, I highly recommend doing so. There are some modifications that have been posted to the article recently that improve the results tremendously.) The article also reveals some Quicktime Pro secrets for adding dust, hair, and color options that can be used with the Eureka plugins.
Ramping
I know what you're thinking. We're into paragraph 3, and still no mention of the famed Eureka Plugins. Okay, here it is. While Shawn's film look was the best that I have seen (including the expensive L.A. version), there were still some subtleties of film that I hoped to imitate, in conjunction with the newly found film look. The first of these film qualities was ramping. This is the ultra-cool phenomenon that takes place when the film camera is started, and stopped. Unlike a video camera, which records the first frame of a shot at the same speed as every other frame, the film camera actually accelerates to the speed that it is set up to shoot, and decelerates to a stop. If the camera is set to shoot 24 frames per second, the first and last 24 frames of film takes longer than one second to run through the gate. This has two effects on the developed film as it is viewed.
First, since the initial 24 frames was actually 'recording' a longer period than one second, that second, when viewed at a constant speed begins fast and decelerates to actual speed. The opposite is true for the last 24 frames. The film, when viewed at a constant speed, accelerates from 24 fps.
Second, since the lens exposure and shutter speed was set to run at 24 fps, each frame that is exposed before the film reaches 'speed' is overexposed to some degree. The first frame is extremely overexposed, and each subsequent frame is overexposed to a lesser degree until the film reaches 24 fps.
The old favorite, "dip to white", is about as close as I could come to simulate a film ramp... UNTIL NOW!
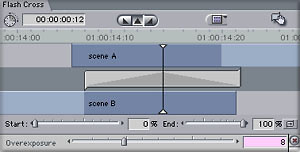
The Eureka plugin "Flash Across" is the ticket. The effect actually gives the look of graduated overexposure going into, and coming out of a cut. When this effect is combined with Shawn's film look (and a little speed change on either side of the transition), the results are incredible. To get your free copy of the Eureka Plugins, go to: http://www.kenstone.net/fcp homepage/eureka.html
Here's how it works:
1. Choose 2 scenes with a good amount of motion. For starters, let's just use 4-5 second clips. (Make sure you have at least 2 seconds handle on each end of the 2 clips)
2. Open a new sequence and call it "Eureka test".
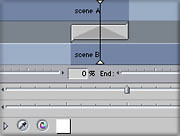
3. Drop the 2 clips into the timeline end to end. Add 2 seconds of 'slug', and drop the same 2 clips into the timeline again. (We will place the new effects on the last 2 clips only. This will allow you to see side by side the results of our test.)
4. Highlight the transition between the first 2 clips, and choose dip to color from the effects menu.
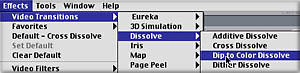
Double click on the transition in the timeline. The effect will appear in the viewer window. Click on the 'color' square, and change the color to white. Highlight the duration box in the top left corner of the viewer, type in 12 frames, and hit enter. You have now applied the "old" version that we will compare to our new Eureka look. The rest of our work will be on the last 2 clips in the sequence.
5. Place the scrub bar on the last frame of the first clip, and mark this as your 'out'. Type in -6, and press enter. Mark this as your 'in'. (This will make the duration 7 frames) Match this frame by typing F. This will place the exact frame from the first clip in the viewer. Mark this as your 'in' in the viewer, and type +14. Mark this as your 'out'. Now click and drag the clip from the viewer to the canvas, and drop it into the fit to fill window. You have now doubled the speed at the end of the first clip of the sequence.

6. We will now double the speed of the first portion of the second clip. Place the scrub bar on the first frame of the clip, mark this as your 'in'. Now type +6, hit enter, and mark this as the 'out'. (This will make the duration 7 frames) Type shift O to go the the 'out' point, and type F. This will match the frame in the viewer. Mark this as your 'out' in the viewer. Type -14, hit enter, and mark this as the 'in'. Now drag the clip from the viewer to the canvas, and drop it into the fit to fill window.
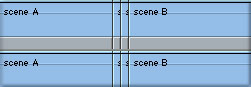
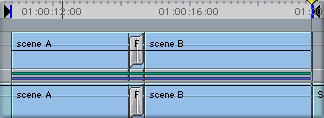
7. We will now duplicate everything to the right of the 2 second slug, and place it on the V2 video level, directly above itself. Place the cursor in the timeline above the first clip to the right of the slug. Control click and select add video track. Leave the cursor in the same position, and click and drag down and to the right to highlight all of the video to the right of the slug.
Type command C to copy the clip. Now place the scrub bar at the first frame of the highlighted portion of the sequence, and highlight the V2 box at the left end of the timeline. Type command V to duplicate this portion of the sequence directly over itself.
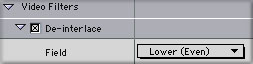
8. Highlight each of the bottom (V1) clips, select de-interlace from the effects menu. (Effects - video filters - video - de-interlace) Double click on each of the four lower clips, open the filters tab and select Lower (even) for the field parameter.
9. Repeat step 8 for the top (V2) clips, with one exception. Instead of selecting the Lower (even) field, select the Upper (odd) field in the filters tab.
10. Set the opacity of each of the V2 clips to 50%.
11. Highlight the transition between the two 7 frame clips on V1. Select Eureka's Flash Across from the effects menu. Double click the transition to load it into the viewer, and set the duration to 12 frames. Now set the overexposure to a value of 8. (You may want to try some other values for the overexposure, but I have had the best luck between 5 to 10)
12. Repeat step 11 for the transition between the two 7 frame clips on V2.
13. Render the entire sequence.
Eureka!!! (This seemed like the appropriate exclamation) After all these years of searching and settling we finally have a high quality film look complete with a nice ramping simulation. I know this seems pretty labor intensive, but once you have done it a few times the process is much quicker, and the results are well worth the time.
When I first tried the Eureka plugins I was working on a project for NFL Films, so all of the footage I had available was 16 mm film footage. I tried the FlashAcross effect on a 32 frames per second iso of a Jerry Rice TD catch. I cut out a couple of seconds near the middle of the play, and added the effect there. At the end of the play was a natural film ramp. I had several people watch the sequence without telling them about the effect. The only question they had was why the cameraman had stopped and restarted the camera during the play. The 2 'ramps' looked identical.
Film Grain
While Kodak has done everything they can to minimize it, another quality of film that the Eureka plugins addresses is film grain. The slower the ISO (ASA) of the film, the less prominent the grain. The faster the ISO (for dimly lit scenes, or high speed frame rates), the more prominent the grain. Unlike video, where the 'grain' of high gain acquisition footage is more of a static grain matte, film grain is dynamic. Every frame of film has its own unique grain configuration.
This ever changing 'texture' of film has been next to impossible to achieve in the video world. Not that I haven't tried! I once went so far as to have an over exposed reel of 16 mm film transferred to video. I then tried to key the film grain over video footage. (To answer your question, 'No I wasn't... I don't even drink! It just seemed like a good idea at the time.') What I did learn was that it was a pretty effective way to add hair, film scratches, and dust to video footage. Doesn't it seem odd that we strive to imitate even the imperfections? But then, I guess dust on a frame of film is a little more aesthetically pleasing than a clogged video head.
Eureka's Film Grain 1.2 plugin, when viewed at full opacity, looks like an impressionists' interpretation of a colorful group of angry fire ants. (I live in Texas, and it's the first thing that came to mind.) The location of the 'ants' changes with every frame. Well that's not exactly true. The location actually changes every field, but I have de-interlaced the grain, and the difference is imperceptible. Definitely not worth the trouble.
Here is the test:
1. Add 2 more seconds of slug to the end of our "Eureka Test" sequence.
2. Mark an in point at the head of the section of our test sequence that contains 2 video tracks. Mark an out point at the last frame of the 2 video tracks.
3. We will now export this segment of our sequence and import it as a self contained movie. Highlight the V2 track at the left end of the timeline. Select from the file menu, export>Final Cut Pro movie.
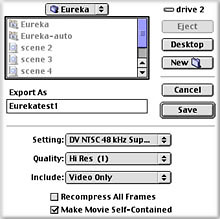 4. In the dialogue box, open the capture scratch Eureka folder. Type in the "export as" box Eurekatest1.
5. Beneath the "export as" box, change the "settings" to DV NTSC Superwhite. The "quality" setting should be at high resolution, and set the "include" setting to video only. Click Save.
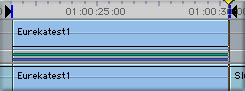
6. We will now import the self contained movie back into the browser. Select from the file menu, import>file. Locate Eurekatest1 in the Capture Scratch folder, and click open. The new clip will appear in the browser.
7. Double click on the new Eurekatest1 clip in the browser to load it into the viewer.
8. Now drop this clip onto the V1 track at the end of the final 2 second slug in the timeline. Move the scrub bar somewhere within the clip, and type X to mark the clip in to out.
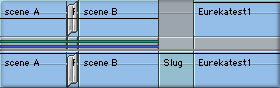
9. Highlight V2 on the left end of the timeline, and overwrite the Eurekatest1 clip directly over itself.
10. Click on the upper clip in the timeline, and select from the effects menu, video filters>Eureka>Film Grain 1.2. Place the scrub bar within the clip in the timeline. WOW! That looks a little too grainy.

11. Double click on the highlighted clip to load it into the viewer. Open the Filters tab, and adjust the grain amount to 20. (The higher the value, the more subtle the grain. The full range, 1-100, is very usable.) For black and white video, uncheck the black and white box.
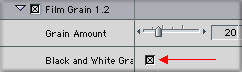
12. Open the Motion tab in the viewer, and change the opacity to a value of 6. Type option R to render. (Increase the opacity to 9 or 10 for a more prominent grain.)
Now is a good time to view our entire test sequence from head to tail. Notice the 'texture' of the last clip. It's subtle, but it does enhance the effect. Another thing I noticed is that when the film grain was applied the clip darkened a bit. This isn't necessarily a bad thing, as it seems to tone down the harsh whites, and hot spots.
Keep in mind that adding this film grain effect to a 30 minute program is no more work on our part than applying the grain to this 8 second test. The render time will be longer, but I just view that as an opportunity to become more proficient at other skills... Like putting.
Jiggle (sprocket wear)
If you are anything like I am (cheap), you have probably waited for the dollar movie version of at least some feature films. By the time this well used reel of film makes it to the budget cinema, several things have usually happened to the film. It has been scratched, burned, spliced (this is starting to sound suspiciously similar to a Melissa Ethridge song), and generally abused. (Okay, now it sounds exactly like a Melissa Ethridge song.) Some of the damage, as a result of multiple runs through a projector, is inflicted outside of the frame on the edge of the film strip. Not unlike a roll of film that you use in your 35 mm still camera, the edge of the film has perforations that run the entire length of the strip. As these 'perfs' are repeatedly engaged by the sprockets on the projector to advance the film, they gradually begin to widen. Most of the damage is done at the head of the reel, or after a splice, where the sprockets don't smoothly match the perfs. The result is a jumping, or jitter on the screen. The 'jitter' usually lasts only a few seconds, until the sprocket and the perfs match again.
I worked on a sports documentary about Sammy Sosa after his big home run battle with Mark McGwire. The video spanned his entire life, including his childhood in the Dominican Republic. Since Sammy came from an incredibly poor family, there were very few relics from his past. Really, all we had to work with was a handful of pictures. On a trip to San Pedro de Macoris (Sammy's birth place), we shot some video footage of some kids playing baseball. One of the boys had a makeshift bat, made from a branch of a tree. He looked pretty similar to the pictures that we had of Sammy as a boy, so we used a little poetic license, and the next thing we knew, he was Sammy. To pull off this effect we used a film look, complete with heavy grain, faded color, and sprocket wear. We did this on a $100,000.00 plus SoftImage DS system, and it worked like a charm. We can now achieve this same look using Final Cut Pro, and the Eureka plugins.
For this test we will export the last segment of our 'Eureka Test' sequence that contains the film grain, re-import it and add the 'jiggle' effect.
1. Add 2 more seconds of slug to the end of our "Eureka Test" sequence.
2. Mark an in point at the head of the section of our test sequence that contains 2 video tracks (the film grain segment). Mark an out point at the last frame of the 2 video tracks.
3. We will now export this segment of our sequence and import it as a self contained movie. Highlight the V2 track at the left end of the timeline. Select from the file menu, export>Final Cut Pro movie.
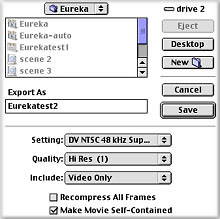 4. In the dialogue box, open the capture scratch Eureka folder. Type in the "export as" box Eurekatest2.
5. Beneath the "export as" box, change the "settings" to DV NTSC Superwhite. The "quality" setting should be at high resolution, and set the "include" setting to video only. Click Save.
6. We will now import the self contained movie back into the browser. Select from the file menu, import>file. Locate Eurekatest2 in the Capture Scratch folder, and click open. The new clip will appear in the browser.
7. Double click on the new Eurekatest2 clip in the browser to load it into the viewer.
8. Now drop this clip onto the V1 track at the end of the final 2 second slug in the timeline.
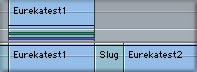
9. Now we'll cut the new clip, and add the 'jiggle' effect.
10. Place the cursor on the first frame of the new clip in the timeline and type +29. Hit enter. Select the razor blade from the tools palette, and cut the Eurekatest2 clip at the location of the scrub bar.
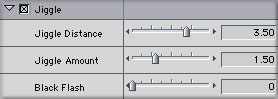
11. Double click on the new 1 second clip in the timeline. Select 'jiggle' from the effects menu. (Effects>video filters>Eureka>Jiggle)
12. Open the Filters tab in the viewer and change the jiggle distance to a value of 3.50, and the jiggle amount to 1.50. Now render the effect.
To really punctuate this effect you can add film projector sound as the clip begins, and fade that audio out after several seconds. The sound of a 16 mm projector changes as the leader passes through the mechanism, and the film begins. Place this audio change so that it coincides with the end of the 'Jiggle' effect.
If you want to continue the 'jiggle' over an extended period, you will probably want to reduce the jiggle amount, and jiggle distance in the filters tab. While the effect, in moderation, really helps sell the film look, it can become distracting.
* Interesting side note: I applied the Jiggle effect to some text, just to see what would happen ... It looked cool! Make the jiggle amount and distance fairly large, and add a smaller value of black flash in the filters tab. While this has nothing to do with the film look, it is a great tool for a quick and wild text animation.
Chroma Glow
The final Eureka plugin that lends itself to the look of film is Chroma Glow. I don't really think this is a phenomenon that happens naturally with motion picture film, but it does create a nice surreal effect when combined with Shawn's film look, and the previously mentioned Eureka plugins. The effect subtly radiates any chosen color within a clip. While it could be used with any color that is present in a given clip, I have found that the plugin is best suited for white, and off-white tones.
1. Add 2 more seconds of slug to the end of our "Eureka Test" sequence.
2. Now highlight the entire "Jiggle" segment that we just completed by placing the cursor above the short (jiggle) clip in the timeline. Click and drag the cursor down and to the right to include the second clip in the jiggle segment.
3. Place the scrub bar at the end of the 2 second slug that we just added in step 1.
4. Type Command C to copy the highlighted selection. Now type Command V to paste it at the end of our sequence.
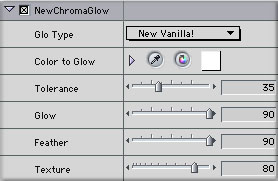
5. Select from the effects menu, video filters>Eureka>New Chroma Glow. You have now applied the effect to both of the new clips in the timeline. (I suggest using this, rather than Chroma Glow)
6. To change the values of the effect, double click on the first of the 2 clips. Click on the filters tab in the viewer, and change the values as follows.
* click on the color picker and choose the lightest color in the scene.
(choose the color in the Canvas window)
* glo type - New Vanilla!
* tolerance - 35
* glow - 90
* feather - 90
* texture - 80
7. Repeat step 6 with the second clip, duplicating the values exactly.
8. Now render the effects.
As you view the last two sections of the timeline (jiggle' and 'chroma glow'), you will notice a pretty huge difference in the look of the clips. You will probably also think back to my description of this effect, and wonder why I used the word 'subtle'. This passing thought might in turn lead to a complete loss of any dwindling flicker of credibility I had left. The implications could be devastating! (And this was going so well.)
The fact is, you may never use this effect with the values anywhere near as high as we tested in this section. For most applications I have found that the glow and texture settings can be set at about 1/2 to 1/3 the value that we used in our test. The feather setting can also be adjusted down for the "subtle" look that was mentioned earlier.
Like the 'jiggle' effect, Chroma Glow can be applied to text. The result is best described with the Photoshop term "outer glow". It is a great way to use white, or light colored text over a light colored background.
* * * * *
There are 10 more Eureka plugins at your disposal. I didn't see a use for them in the 'film look' arena, so I basically left them alone. Considering the effectiveness of the plugins that we just used, I would imagine that the other 10 are worth checking out.
With the lofty costs of film stock, processing, and transfers, it's nice to know that there's a low budget alternative that can achieve a surprisingly similar look.
By Steve Sullivan
Steve Sullivan is an independent shooter/producer, who specializes in sports productions and documentaries featuring athletes from the NFL, NBA, Major League Baseball, PGA, and NASCAR. Clients include: NFL Films, Athletes in Action, and Fellowship of Christian Athletes. Steve lives in Dallas with his wife Traci, and two children, Angus, 4, and Brianna, 2.
copyright © www.kenstone.net 2001
All screen captures, images, and textual references are the property and trademark of their creators/owners/publishers.