The simplest and most straightforward method for changing the speed of a video clip in Motion is to change the way Motion interprets its frame rate:
1. Open the Project pane (F5) and click on the Media tab (or, you can just press Command-4 to go directly to the Media tab of the Project pane - for more info on navigating Motion's interface with keyboard shortcuts, see my article here.)
2. Select the source clip that you want to speed up or slow down
3. In the Utility pane on the left, click the Inspector tab. There are four tabs inside the Inspector - the fourth is called the Object tab, and its name changes depending on what is selected. It should now say "Media". That's right, we have two tabs with the same "Media" name - it's ok. Click it to select it. (Note: a handy keyboard shortcut is Shift-F, which will bring up both media tabs for you in one step)
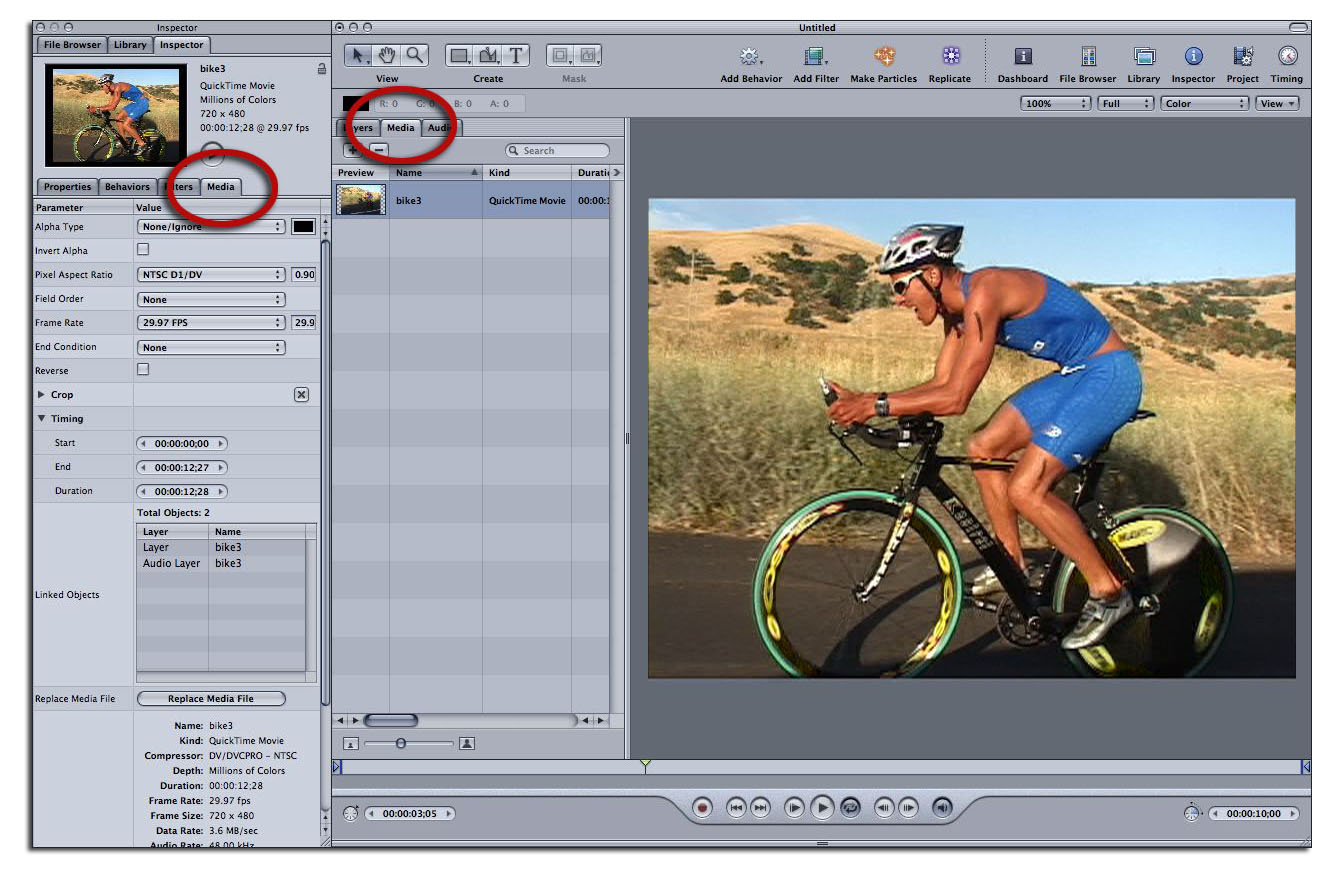
Figure 2. To reveal the Frame Rate parameter, first select the clip in the Media tab of the Project pane - then click the Media tab in the Inspector.

Figure 3. The Media tab of the Inspector (not to be confused with the Media tab of the Project Pane!).
The Media tab of the Inspector contains several parameters that control how Motion thinks about, or interprets, the media that you have imported into your project, such as how transparency information is handled (Alpha Type), aspect ratio, field order, frame rate, and end condition. Using the Frame Rate parameter, you can select one of the presets or choose Custom and enter your own frame rate. To slow down the clip speed, enter a lower number than the rate at which it was shot (in the case of this NTSC-DV clip, 29.97 FPS). For example, to slow a this clip down to about half its regular speed, select 15 FPS.
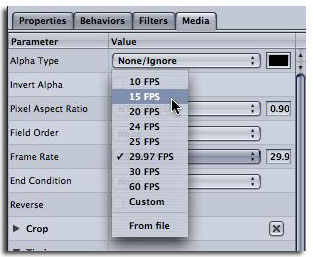
Figure 4. Choose a frame rate from the list or chose Custom to set your own. "From file" reverts back to the original frame rate in case you forget what it is.
Movie 2. Frame Rate changed to 15 frames per second (FPS) in Motion. Click on the movie to play.
Pros and Cons of changing clip speed with the Frame Rate parameter
Using the Frame Rate parameter to change clip speed is quick and easy, and on most systems you'll continue to enjoy Motion's awesome real-time playback capabilities. However, there are a couple of drawbacks: first, the quality of slowed-down footage will be less than ideal because Motion is simply duplicating frames in order to create the new frame rate. This duplication process becomes particularly noticeable at slower frame rates as the footage appears more and more steppy or jerky when playing.
Movie 3. Frame Rate changed to 10FPS. Click to play. Notice the jerky motion.
The second drawback is that the Frame Rate parameter is constant - that is, it applies a constant frame rate to the entire clip. That's fine, but if you want the clip to have several different speeds at different time, you would need to reimport it for each speed you want to apply, and then sync the clips up manually in the Timeline - a laborious process. And you can't apply any kind of variable speed change: in other words, you can't make a clip speed up and slow down. But if all you need is a quick way to apply a constant speed change, the Frame Rate parameter is a good way to go.
Option 2: Using the Scrub Filter
Thought you couldn't do variable speed time remapping in Motion? Well, it turns out you can, but it may not be obvious at first glance. But by keyframing the Scrub filter you can acheive predictable and variable speed changes on your footage.
Movie 4. Time remapping with Motion's Scrub filter.
Here's one way to do it:
1. Select the clip you want to speed change.
2. Click the Add Filter button on the toolbar at the top of the Canvas and select the Scrub filter from the Time category.
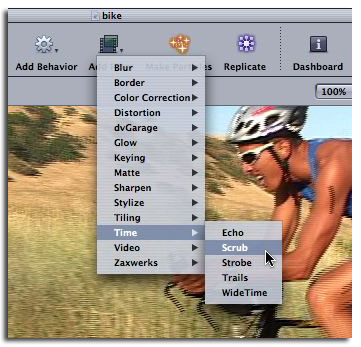
Figure 8. Applying the Scrub filter to a clip.
3. Press F3 to bring the Filters tab of the Inspector forward.
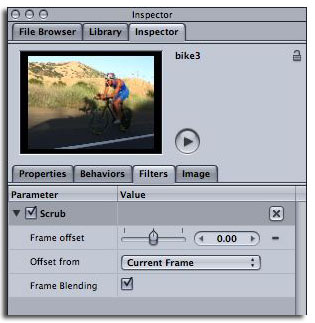
Figure 9. The Scrub Filter has just three parameters: Frame offset, Offset from, and Frame Blending.
Let's have the bike race towards us, then slow down and move slightly backwards, then move forwards slowly.
4. Change the "Offset from" parameter to "First Frame".
5. Make sure your playhead is at the beginning of the clip (pressing Shift-I with the clip selected will get you there), then Option-click on the Animation menu to set a keyframe.
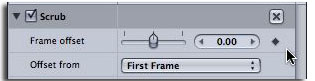
Figure 10. Option-clicking the Animation menu (the little dash in Fig 9) sets a keyframe at the beginning of the clip. The solid diamond indicates that the playhead is currently parked on a keyframe. If the playhead is not on a keyframe, the diamond is hollow.
If you play the clip now, you'll notice that nothing happens: because every frame has zero offset from the first frame, we only see the first frame when the clip plays. In other words, at any point in time, the frame that is showing is zero frames away from the first frame, which is the first frame.
6. Move to the point in time where you want the clip to change speed from high speed to freeze frame.
7. Option-click the Animation menu to set another keyframe. (Note: it's critical to first set the keyframe before changing the value of the parameter)
8. Click and drag in the "hot box" for the Frame offset parameter to the right to find the frame that you want to be showing at the current playhead location. Don't worry if it's not perfect, we'll adjust it in the next step. You want the frame offset amount to be more than the current frame location. For example, if you are on frame 60 (two seconds in) and you set the frame offset to 120 (4 seconds), then the frame that would normally play at four seconds will now play at 2 seconds - twice as fast as normal.

Figure 11. Hot-scrubbing the Frame offset value.
9. Play back the timeline. If you don't like what you see, press F6 to open the Timing pane. In the timeline tab, the keyframes are visible within the Scrub filter bar below the clip to which it has been applied. You can click and drag directly on the second keyframe to change the point in time where that particular frame shows up. Think of it this way: you are dragging a specific frame of the video to a new location. The rest of the video will speed up or slow down before that frame depending on where you drag it.
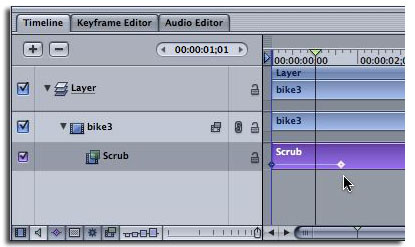
Figure 12. Moving a keyframe in the Timeline.
Now the video moves at high speed between the first two keyframes, then freezes for the rest of the clip. Let's have the cyclist go backwards a bit, then go forwards in slow motion.
10. In the Timeline, place the playhead somewhere before the second keyframe. Make sure the Scrub clip is still selected, and press Shift-K to jump to the keyframe.
11. Click the Current Time field in the Timeline and enter "+ 1." to move forward 1 second after the last keyframe (make sure you include the period after the 1).
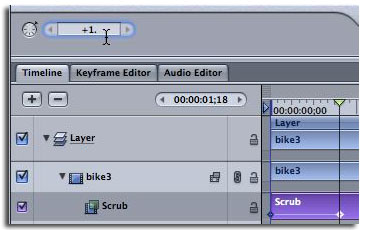
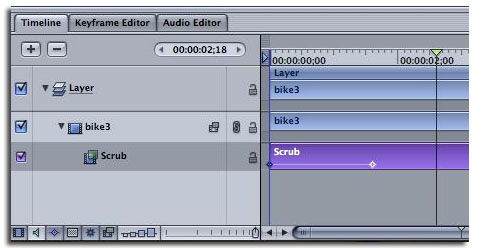
Figure 13. Moving the playhead in the Timeline by entering a value in the Current Time field. The + symbol tells Motion to add this value to the current playhead location.
12. Back in the Filters tab of the Inspector, option-click the Animation menu for the Frame offset parameter to set a new keyframe. Now scrub backwards just a bit in the hot box to show an earlier frame at this point.
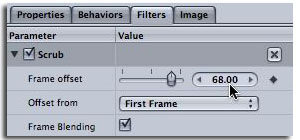
Figure 14. To make the footage go backwards, click and drag left in the hot box to enter a lower value. Observer the footage playing backwards as you scrub to find the best point.
13. Now, move the playhead further down to where you want the slow motion section to end. Let's say about two second further down.
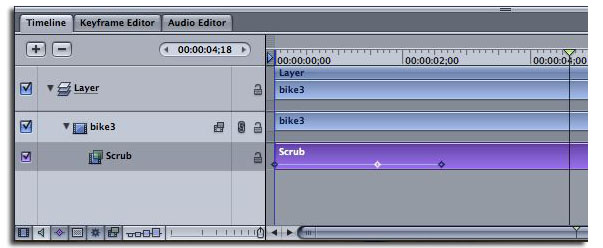
Figure 15. Moving the playhead two seconds beyond the last keyframe.
14. Set another keyframe from the Frame offset. Then, drag the hotbox to find the frame that you want to move to the new location. Remember: set the keyframe first, then, change the value.
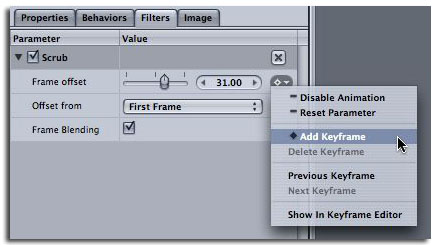
Figure 16. Setting a new keyframe before changing the value. Here, we set the keyframe by selecting Add Keyframe from the Animation menu. You can of course just Option-click on the keyframe symbol.
15. Adjust the new keyframe in time as desired by dragging it in the Timeline.
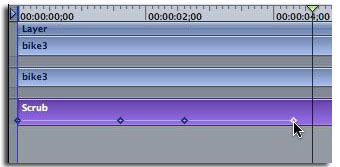
Figure 17. Dragging the keyframe in the Timeline changes when that specific frame appears.
Now the rider races into view, freezes for one second, then moves in slow motion. You can add one more keyframe to have him speed back up to normal speed using the same method as described above.
16. To make the transitions at each speed change smoother, click the Keyframe Editor tab in the Timing pane (press F6 to open the Timing pane, or Command-8 to go directly to the Keyframe Editor). Click the Animation menu (the little dash) for Frame offset and select Interpolation > Continuous.
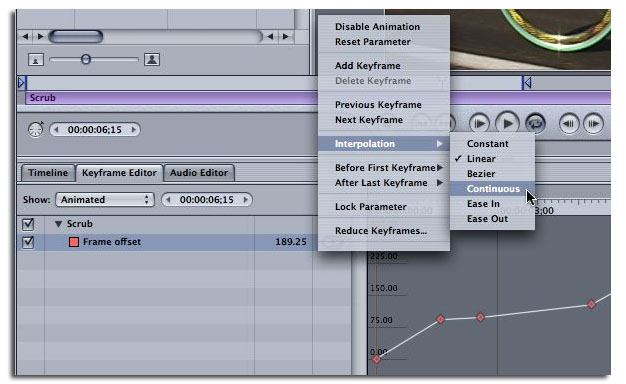
Figure 18. Smoothing out the speed changes by applying a different keyframe interpolation.
That's it! You should have a nice little time-remapped clip, thanks to the Scrub filter! It takes a bit of getting used to, but once you do it's not so bad. Also try playing with the "Offset from" set to "Current frame".
Pros and Cons of changing clip speed with the Scrub filter
The big plus of the Scrub filter is that it allows for variable speed changes. You are able to work inside of Motion and you get the realtime feedback as you work without rendering. The Scrub filter also has the option to turn on Frame Blending, which can make slowed-down footage look smoother by combining different opacities of existing frames to create new ones, instead of simply duplicating frames. On the downside, the way the filter works definitely takes some getting used to. Finally, although the Frame Blending option is helpful, footage that is slowed down significantly will still start to look a bit odd because of the lack of motion information.
Option 3: Using Final Cut Pro
You may be using Motion as part of a larger workflow that includes other applications in Apple's Final Cut Studio. In particular, the powerful integration between Final Cut Pro and Motion allows you to easily "roundtrip" sections of sequences (or even entire sequences) between the two applications. Since editing in FCP and then round-tripping sections of the edit to Motion for adding titles and effects is such an effective workflow, you may want to consider making your speed changes inside Final Cut Pro using FCP's time remapping feature.
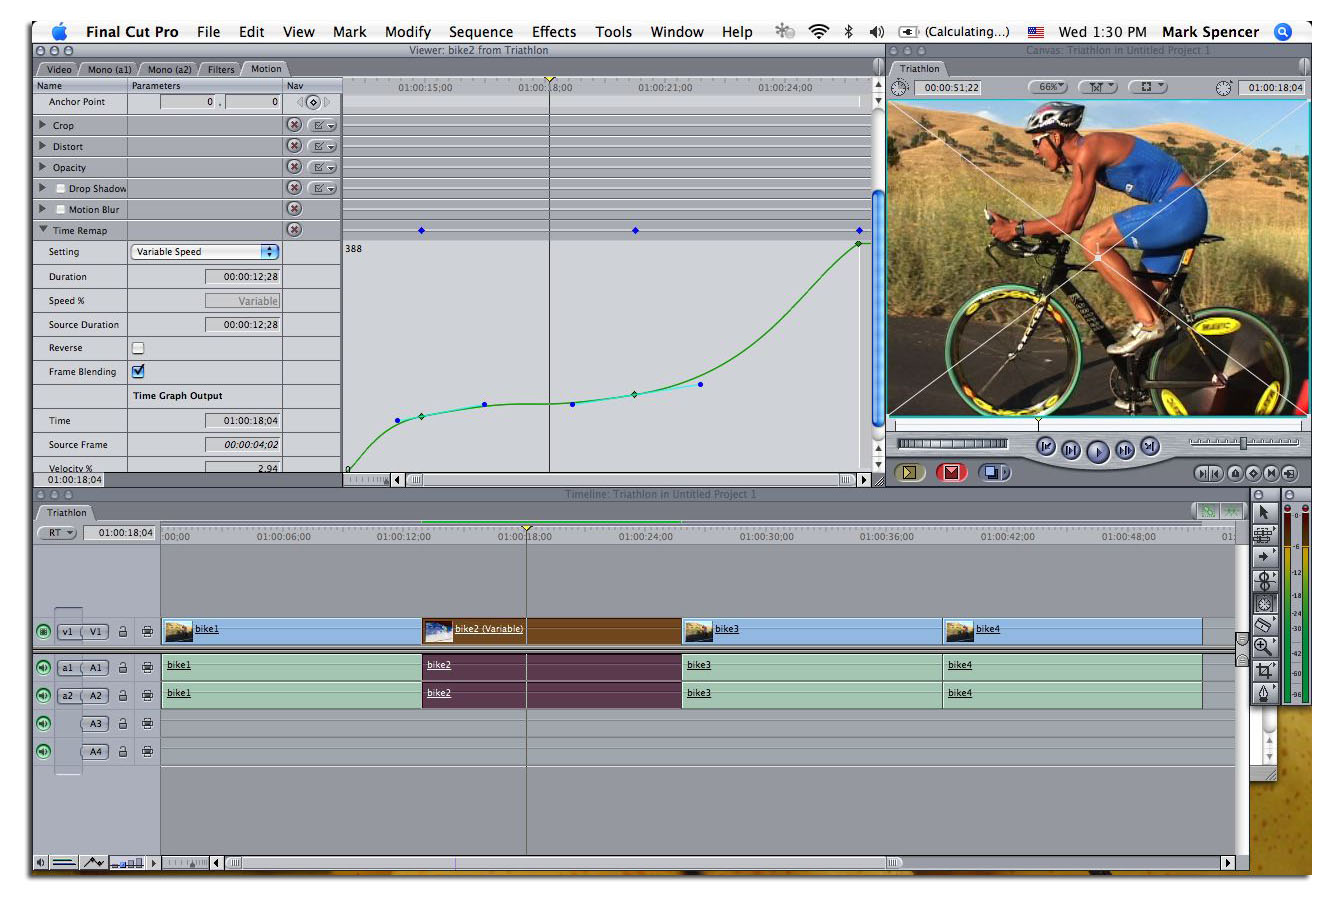
Figure 19. Time remapping in Final Cut Pro.
There's a problem, though - if you change the speed of a clip in FCP and then use the Send to Motion command, you'll be disappointed to discover that the clip in Motion has lost its speed change. That's because, although any transformations you have made to your clip in the Motion tab of FCP (such as scale, rotation, position, and cropping) will be retained on the trip to Motion, speed changes don't go along for the ride.
But if you are comfortable with Final Cut's time remapping, you can do your work in FCP and still do your other effects work in Motion without losing your time changes - you do this by first "baking in" the time remapping.
1. In FCP, do your time remapping and select the time remapped clip in the sequence. (For details on how to perform time remapping in Final Cut Pro, please refer to the online documenation, which is quite good.)
2. Choose File > Export > Quicktime Movie (not "Using Quicktime Conversion")
3. In the Export dialog, choose a location for your clip. Make sure that "Make Movie Self-Contained" is checked. You may also want to select "Video only" since speed changes don't affect audio.

Figure 20. Exporting a self-contained Quicktime movie to "bake in" time-remapping.
4. Back in FCP, import this new clip.
5. Superimpose the new clip on top of the existing clip: Load the new clip into the Viewer; in the Timeline, place the playhead somewhere over the original clip. Make sure your patch panel is set to the track containing the original clip. Press F12 to perform a superimpose edit. Then, turn off the visibility of the original clip by selecting it and pressing Control-b. This way, if you find you need to tweak your speed changes, the original speed-adjusted clip is still available.
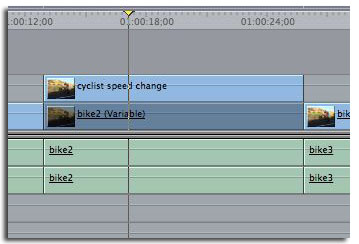
Figure 21. Superimposing the new clip on top of the original, and toggling off the visibility of the original, so you have access to the original if you need to make speed change adjustments.
6. Now you can send your time-remapped clip to Motion for other work (filters, titling, etc.) and your speed changes will carry over into Motion.
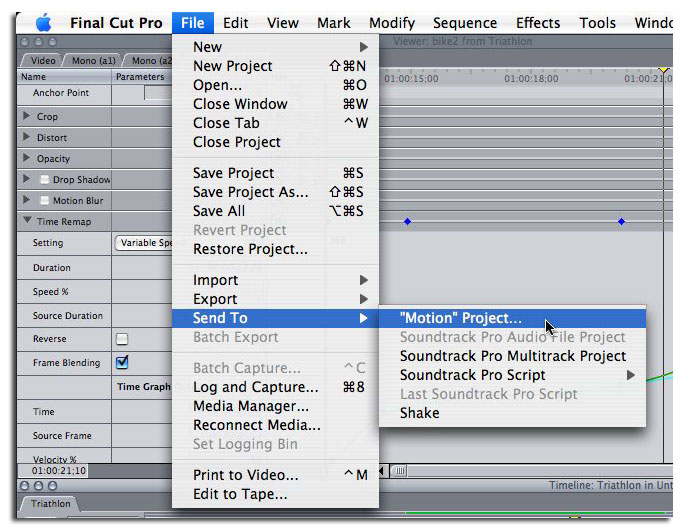
Figure 22. Sending FCP clips in a sequence to Motion.
Pros and Cons of using FCP for time remapping
Final Cut's interface for time remapping is more full-featured and (somewhat) more intuitive to use than the Scrub filter in Motion. And if you are already using Final Cut for your edit, it may be faster and easier to make your adjustments there. Plus, for constant speed adjustments, you can simply choose Modify > Speed and enter the percentage change you wish to make.
On the downside, it takes more time (and disk space) to export/import self-contained movies, and if you need to modify your speed changes, you'll need to go through the whole export/import dance each time you make a change. And, Final Cut uses the same method for displaying slowed down footage through duplicating frames and blending frames together to create new frames (if "Frame Blending" is checked) - so very slow motion will start to suffer.
Option 4: Using Plug-ins
Have you seen those car commericals where the car zooms up fast, then goes into super-slow-mo, still looking crisp and beautiful? Perhaps you've tried to do the same thing using one of the above methods and have found you just can't get your footage to look as good. The car commercial acheives this result by shooting with a film camera (or perhaps a Varicam) that is overcranked - that is, shooting at a frame rate that is higher, sometimes much higher, than 24 or 29.97FPS. Therefore, they have many more frames to work with: if they shoot 120FPS, they can slow down the footage in post to 25% of the original speed, and still have 30 frames in every second - creating a beautiful, fluid feel.
Your footage, however, was shot at 23.98 or 29.97FPS, and all Motion or Final Cut can do is duplicate or blend those frames together to get new frames. So what to do? Well, if you are after better-looking slow motion, there is a plug-in for FCP that evaluates your footage frame by frame and actually creates brand new frames based analysing the motion in existing frames to create new frames. You find more information here:
Twixtor from RE:Vision Effects, Inc.
On the plus side, this plugin can create some beautiful slow-motion effects. However, you will pay for that beauty in both time and money: the cost of the plug-in, plus some signficant rendering times. Also, the quality of your results is dependent on the type of footage you are using - motion estimation is a complex science and some scenes work better than others. But if you do a lot of slow-motion work, this plug-in may be the best solution for you.
Option 5: Using Compressor and Final Cut Pro
As a final option, you may want to consider the new Optical Flow technology built into Compressor 2, which shipped as part of Final Cut Studio (released in April of 2004). The render times can be quite long, but if you own at version 5 or higher of Final Cut Pro or version 2 of Motion, you already own Compressor, and the results are quite impressive.
Movie 5. Performing a frame rate upconversion in Compressor before time remapping in Motion or Final Cut Pro gives us additional frames to work with, resulting in smoother motion.
While designed primarily to enable high-quality format conversions (e.g., NTSC to/from PAL, HD to/from SD), you can use this technology to create new frames in your footage so that when you slow down the footage, more frames are available which results in smoother motion. Here's an overview of one possible workflow:
1. Bring your clip into Compressor. Set it to export in the current codec (e.g., DV-NTSC), but then increase the frame rate (e.g., 59.94 to double the rate of DV-NTSC video).
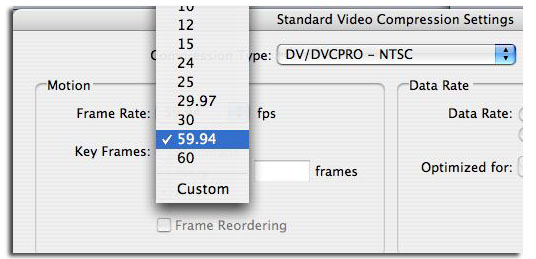
Figure 23. Increasing the frame rate in Compressor.
2. In the Frame Controls section of the Inspector, set Frame Controls to Custom, Output Fields to Progressive, and the Deinterlace to Best. Set the Rate Conversion to Better ("Best" takes much longer to render, so you may want to do a test of a small section of a clip at "Best" to see if the increase in quality over "Better" is worth the additional render time).
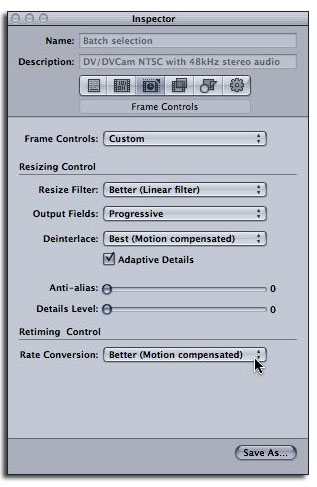
Figure 24. The Frame Control settings in Compressor's Inspector pane.
3. Submit your batch and render away.
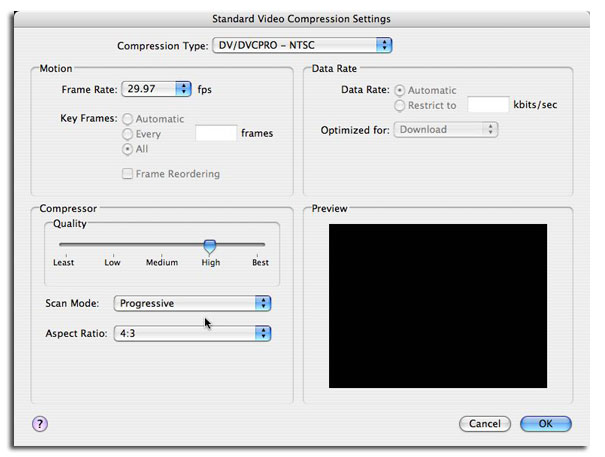
4. In Final Cut, create a new sequence, then go to Sequence > Settings and change the frame rate to match the frame rate you chose in Compressor (59.94 in our case). Alternatively, you could bring the clip into Motion and choose Edit > Project Properties to change the project frame rate.
5. Import the clip into FCP and drop it in the sequence. It shouldn't need to be rendered. If it does, recheck your settings. If you are working in Motion, just import the clip.
6. Time-remap your clip. The results should be significantly smoother.
7. Export the time-remapped clip using the DV-NTSC setting at 29.97FPS.
The new version of Compressor offers us an interesting alternative to creating higher-quality time-remapped footage without shooting with an overcranked camera. You can acheive impressive results without the need to purchase any additional software. However, it's a multi-step process for every clip you want to speed change, and the rendering times are signficant.
Summary
Well, there you have it - 5 differents ways to change the speed of a video clips using Final Cut Studio, with a focus on using Motion. By trading off quality, cost, and render times you should be able to determine the best path for your projects.
If you are just working in Motion, for most projects simply changing the Frame Rate parameter will allow you to speed up or slow down a clip and provides decent results. If you want variable speed changes, use the Scrub filter.
If you are working with both Final Cut Pro and Motion, I'd recommend doing your speed changes in Final Cut Pro, then export/import and replace the clip before sending to Motion for other effects work. If you want higher quality slow-motion, try out increasing the frame rate with Compressor first. However, if you plan to do a lot of slow-motion work, I recommend checking out the the Twixtor plug-in for Final Cut Pro.
Quicktime movie notes: All the movies samples in this article originated with a DV-NTSC clip shot at 29.97fps and encoded with h.264 at 29.97FPS.
Mark Spencer is a freelance producer/editor, Apple-certified instructor for Final Cut Pro, DVD Studio Pro, and Motion, and the author of the Motion Visual Quickstart Guide from Peachpit Press. Mark also maintains applemotion.net, a resource for Motion users.