DVD SP 2 January 26, 2004
Subtitle Buttons Over Video
Creating an Easter Egg with DVD Studio Pro 2by: Alex Alexzander
Introduction
The question has come up a number of times regarding placing a temporary button over the video track that would allow the person viewing the video to click Enter and follow an action. Some refer to this as an Easter Egg. Creating a function such as this is very simple to do; however, it is important to understand that some rules apply to this procedure, and ignoring them can cause a lot of confusion within your subtitle track efforts. I'll keep this as brief as possible and help guide you through this little minefield.
Brief Overview
Creating a button over a video track uses the advanced overlay method of button assignment. Advanced overlays use four shades of gray or four colors. The four shades of gray are 100% white, 33% black, 66% black, and 100% black. The four-color overlay, also known as the chroma method, uses white, red, blue, and black. These four shades of gray or four colors are shared pre-mapped to the subtitle text colors as shown below. The image below shows that the normal state is shared by the text subtitle. The Selected, and Activated selection states are grayed out for now, since this is not a button.
Key MapBecause of this pre-mapping of shades of gray or chroma, you will need to follow a few guidelines when creating your overlay button graphic. A key color of 100% black is used for the text subtitle text itself. There are two outlines in the subtitle stream: Outline 1, and Outline 2. Most of the time these are level 15 for Outline 1 and levels 7 or 8 for Outline 2. When creating your PICT overlay map, keep those color settings in mind. Remember that both the image and the text in the subtitle stream share the exact same color assignments for the normal state.
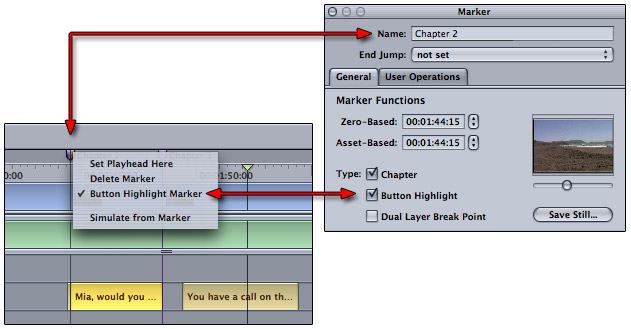
Another issue you must understand is that subtitle pictures are set between two kinds of markers. The first one is a Chapter Marker / Button Highlight Marker. The second one is a Chapter Marker. Take a look at the two markers below. You will notice that Chapter 2 has a multi-colored marker. Notice how it differs from Chapter 3's solid purple color. In order to place a subtitle image into our subtitle stream, it is very important to have both of these markers already defined in advance.
Subtitle pictures share the exact same timecode as text subtitles. That means, if I want a subtitle image to last for 5 seconds, the text that joins the subtitle must also be 5 seconds. In fact, every subtitle on every single stream at that timecode location must also be 5 seconds.
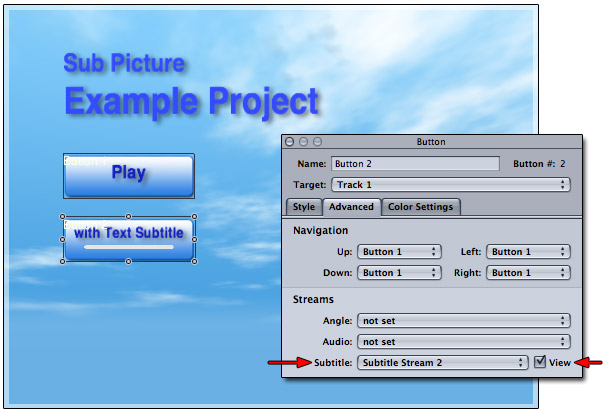
When dealing with this type of functionality, remember to set the forced view on the subtitle streams. I have two streams in my project. S1 is nothing more than the subtitle overlay, and S2 is text subtitles with the overlay images. You may set any button to forced subtitle view by selecting the button's own property inspector and using the Advanced tab as shown above.
With these facts behind us, let's get started with this brief tutorial.
Getting Started
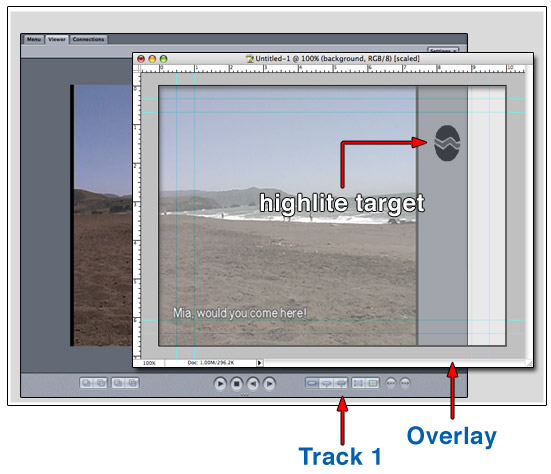
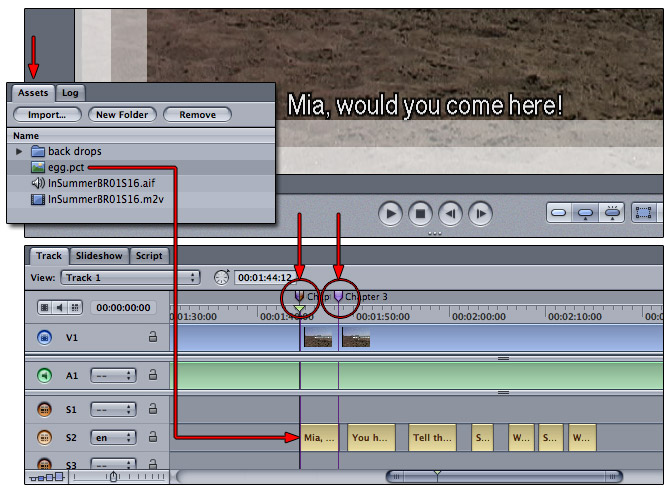
I want to create an image over my video track that will take the viewer to a new location, be it another track, menu, script, or otherwise. Some call this kind of function an Easter Egg. In the spirit of the Easter Egg, my graphic is an egg. We're going to add this egg to my video track and along the way explain some of the pitfalls to look out for. This is an extremely easy procedure and won't last too long at all. Below we see my target video track, and I have a PICT overlay, which I have imported into my asset bin inside SP2.
Using my Track 1 timeline I have entered a few text subtitles. The overlay map I wish to use as my button cannot be added on top of existing text. Text may be added to the subtitle overlay, and that text will share the same timecode length as the overlay image I want to use for my button overlay. Because of this, we must be careful with our overlay button. Where we choose to place this button requires planning. In my timeline below I have placed two markers on either side of an existing text subtle. These two chapters are called Chapter 2 and Chapter 3. I am almost ready to add my PICT overlay and create a floating button over my video track, but first I need to define the first marker as a special button highlight marker.
Right-mouse click or control-click on the first of the two chapter markers to gain access to the floating option menu for this chapter marker. I have selected Button Highlight Marker. Take note that in the property inspector, Button Highlight and Chapter, are both selected items for this marker. The next marker in the timeline image as shown below is simply a chapter marker. Once we have defined the first marker as a button highlight marker, and set an ending boundary with an ending marker, we are then ready to drag our PICT overlay between the two markers. This will set our overlay map, allow us to enter a text subtitle, and create our button with assigned Jump To property.
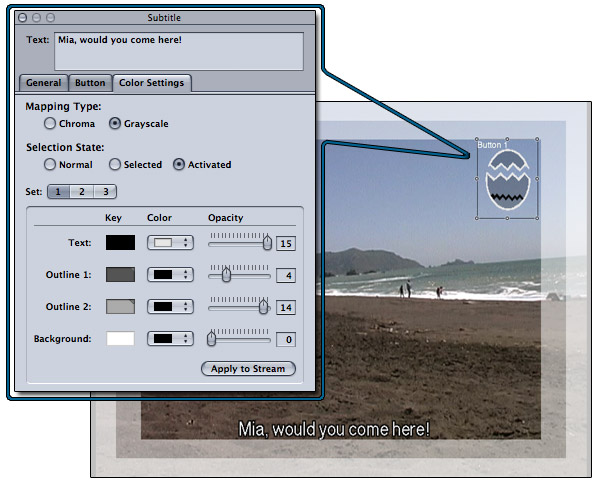
I drag that PICT file between the two markers on my S2 subtitle track where my text subtitles are. This resets the text subtitle I had between these two markers. I will have to re-enter that text. I now have my overlay map and I can re-enter the text characters again. You can always copy the text in the subtitle prior to dragging an overlay into it, and then simply re-paste the text once the overlay is set. Once this is done you are free to set the selected and activated states. Remember, as described in the overview, you share something in common with the text subtitle. The text subtitle and your overlay's normal state share the exact same color levels. If you change the normal state of this button overlay, you will change the subtitle text color properties along with that. For that reason, we give thought to what levels of gray we use in the image prior to designing the overlay. The only levels we will adjust are the selected and activated levels, which will not alter the normal color of the subtitle text.
We now draw our button box around the egg image. Like any other button, we change the selected and activated color states of this button assignment as well as the default button and target asset. Use the color settings tab to set the color states and the button tab to select the Jump To property.
As stated in the overview, the overlay we set here is exactly the space between the two markers. We cannot have the overlay image extend into two different text subtitles. This creates a problem if you would like the subtitle button to exist someplace where the text subtitle is short. The viewer might not have time to act on your button over video option. There is a way to solve this problem, and it will require some extra work on your part.
Looking at the image above, I would like to extend my subtitle button past the gap depicted by the first blue arrow and to the end of the next text subtitle depicted by the second blue arrow on the right. The first step toward that goal will be to create the markers between these two areas. In the image above, the Chapter 3 marker will serve as a start point for the gap between the two text subtitles. I will only need to add two more markers. I will place these two markers at the start and end of the next text subtitle.
Note the red arrows above. You can see I modified the chapter markers even further. The first three red arrows are pointing out that those three markers are now Chapter / Button Highlight markers. Each of those three markers are multi-colors, purple and brown to indicate that they are both Chapter Markers and Button Highlight Markers. The purple arrow all the way right is a regular chapter marker which is the single color of purple. This marker is used to define the end boundary of the last button over video overlay.
The green arrows at the bottom of the graphic point to all three sections we now use with the overlay button over video. The first is our original text subtitle where we just added the subtitle image. The second green arrow shows that we filled in the gap between these two subtitles with a subtitle button over video. The third arrow shows that we added the same overlay button over video a third time. We now have text that is properly set to the voice in the scene complete with a gap between the subtitles. The entire timecode length between the two text subtitles has our button over video now. We have simulated a single button with three cells. Since we cannot have the one subtitle overlay extend into another text subtitle, we instead made cell boundaries that span the first two text subtitles as well as the gap between those two text subtitles.
As before, we must also draw the button around the overlay image in both of these new button over video overlays we have just added. Just as before, we must set the highlight states and the Jump To navigation assignments so that the button has the same function through each of these three cells.
You will note that I left the subtitle stream above this one empty throughout this tutorial. I do this because this will serve as our option for no subtitle text. We still need to add the button over video overlays here; otherwise the user could decide no text is needed and we would lose our button over video. For that reason, I have two subtitle streams. Both of these subtitle streams have the button over video, however, only one of them has text subtitles in addition to the button over video overlay. Anytime we have text in any subtitle stream, we need to work around the text boundaries in timecode. These subtitle button over video overlays have boundaries that are all stream inclusive. They simply do not function on a per stream basis.
In the last image above, I added the same button over video overlays. This allows you to allow the user to appear to turn off subtitles, by switching to another subtitle stream where only the button over video overlays exist without the text. Notice in S1 how there is no text in the gold bars, however in S2 there is text indicating that text subtitles exist in S2. S2 holds our subtitle text and overlays, while S1 only holds subtitle overlays. You can see however, that the overlays in S1 and S2 themselves match in timecode in the timeline as defined by the universal markers at the top of the track timeline. Again, this shows that adding overlays to any one subtitle stream is always done by setting a universal marker which runs through every subtitle stream. The boundaries you set in any one subtitle stream are applicable in all subtitle streams. Setting a 5-second button over video in S2 for example, defines S1 with the same boundary. Since the purpose of the subtitle is only to offer varying language text, this is a perfectly acceptable rule to follow and shouldn't have a negative effect on your project.
[Top]
©Copyright 2004 Alex Alexzander All Rights Reserved