July 24, 2006
Create a photo index for a stock footage compilation
By Brian Taylor
This tutorial is a result of my needing to create
a photo index for a stock footage compilation. I needed stills
representative of the video shots that had been compiled so the
client could see what they were getting before I had sent the
footage as well as have a visual index of the tape's contents
for their archives. This saves having to pop the tape in and
scan through to determine it's contents.This also winds up being
useful for your own records if you ever had to go back and verify
what you'd actually sent a client, or as a quick reference for
the tapes in your library--because it's one thing to have a vague
recollection of stuff you've shot but it's another to see before
your very own eyes--shot composition, lighting, visual quality,
location, --it's all right there in living color! Now, this method
is undoubtedly manual. So if anyone knows how to automate any
of the steps detailed below, please enlighten me!
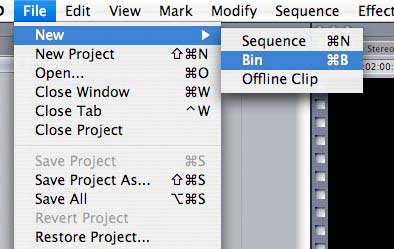
Before you start grabbing frames, create a new bin (CMD-B) in the browser and name it appropriately. This is where you will store your frame grabs. Now create a new folder on the desktop and name it appropriaately--this is where your grabs/frames will be exported.
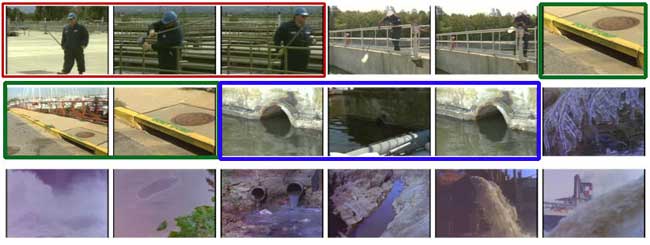
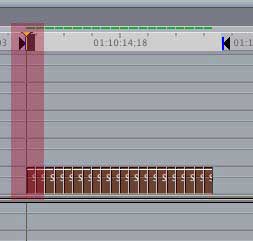
With your video on the timeline, the first step is to drag the playhead through it, selecting representative frames. This is sort of subjective, so pick carefully. For shots that have zooms and pans, pick at least three frames representative of the entire shot -- and later, for the index, you can group these together (see pic) to identify the frames as being a part of a single shot-in some cases it won't be obvious.
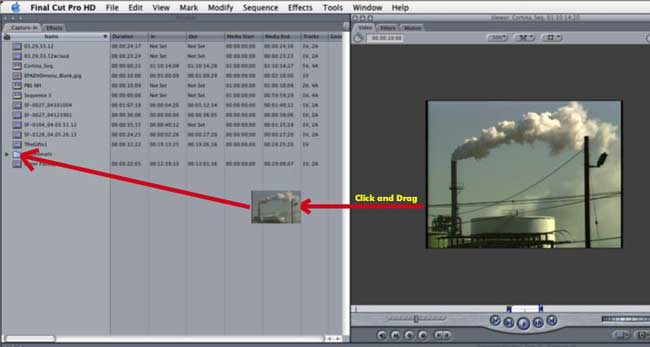
Position the playhead over a frame you feel is representative of the shot and use the key combination SHIFT-N to grab the frame. This loads the frame into the viewer. Drag the frame from the viewer to the bin you created. Repeat until you feel you've grabbed enough frames representative of the shots throughout the video into your bin.
Now, highlight all of the clips in the bin, then drag them to an empty part of the timeline or to a seperate empty timeline. Highlight all of the clips you just dragged to the timeline, CTRL-click or right-click on them and select Duration from the contectual menu, type 01 then click OK.
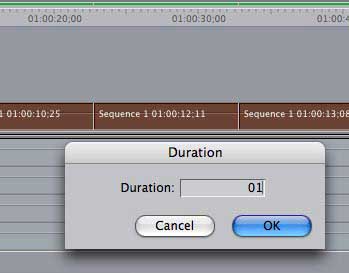
All of your clips will now be set to a duration of 1 frame. Now, position your playhead at the in-point of the first clip, and set an in-point with the I key, then go to the out point of the last clip and set an out-point with the O key.
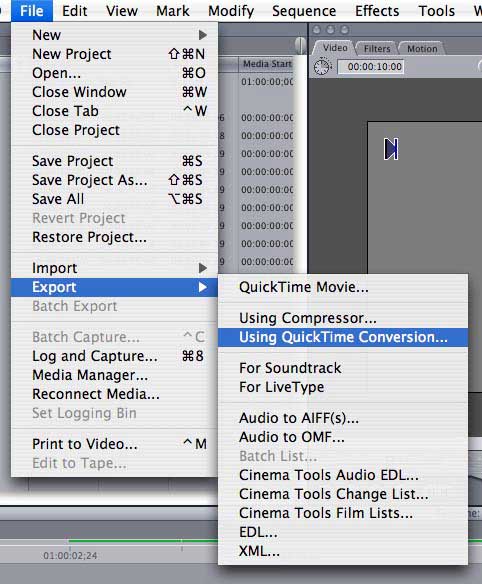
Go to File/Export/Using Quicktime Conversion...
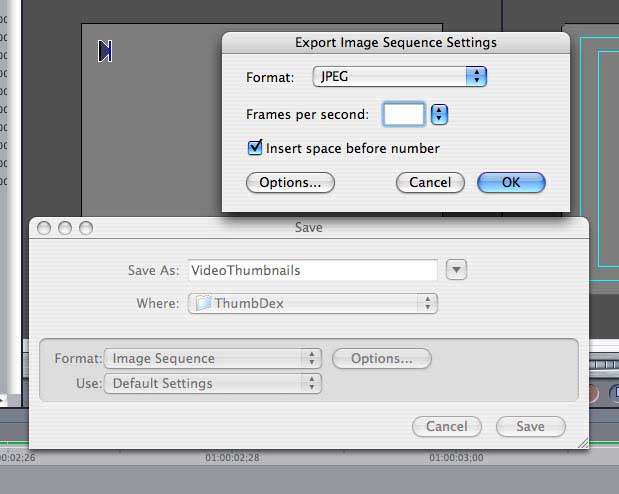
Set the Format to Image Sequence. Click the Options button
and set the file format to jpeg then click OK. Name the
files in the Save As box and select the folder on the desktop
you created earlier as the destination. Click Save.
Your pics will then be exported to the folder you designated and named sequentially From here, what I like to do is drag this folder of pics to iPhoto where an index of sorts will be generated. Sort the pics by name and use the magnifier slide bar on the lower right to size the pictures so that they are all visible. Use the key combination Shift-Command-4 to bring up a cross-hair cursor that will allow you to take a snapshot of all of the pics by dragging a selection box around them. If you have more than will fit on a single page at a decent enough size, you will need to grab multiple pages with the Shift-Command-4 key combination.
Once you release the selection, a file will be created on the desktop, usually labled Picture 1, and Picture 2, and so on if you grabbing multiple sets of pics. The defualt file format for screen grabs will either be PDF or PNG. You can convert these with your favorite image editing application or you can use this simple OSX hack to permanently change the default file format for screen grabs:
Open the Terminal (located at
/Applications/Utilities/Terminal) and type in:
defaults write com.apple.screencapture type image_format
killall SystemUIServer
Where image_format is jpg, tiff, pdf or png. The second line
can be omitted,
However, if it is, you will need to log out and in again for
the changes to take effect.
Detailed instructions on this hack can be found at http://guides.macrumors.com/Taking_Screenshots_in_Mac_OS_X
And that's it! You nowhave an index of
the contents of your video which you can keep with the tape.
If you're really organized and ambitious(and anal) you can import
these pics into the picture field of that database that I know
you've all created that has detailed text entries of all the
footage on all of your library tapes. Right? Huh?
copyright©2006 Brian Baylor
Brian
Taylor is a T.V. Production Specialist at the U.S. Environmental
Protection Agency's Media Operations Office
[Top]