

Feature Article March 25, 2002
Feature Article March 25, 2002
Nimble Nimbuses and Swift Sunsets
Creating Time Lapse Video
By Ben Bryant
As a freelance shooter/editor I am often asked by clients to do the seemingly impossible. "Can you do ... whatever?" The right answer is always - "Yes!" Because in our world literally anything is possible. It's just a question of time and dollars.
One of my most provocative clients is ice sculptor Joe O'Donoghue of Brooklyn, NY. If you watched the 2002 winter Olympics you've seen his work: the ice sculptures for the lead-ins and tags on the Salt Lake games. Not content with "ordinary" though brilliantly creative sculpting, Joe has invented if not a new art form at least a new angle on the ice tray! It's kinetic ice sculpture that hangs on a wall or stands in a room or garden and freezes then melts and refreezes over and over in an endless variety of formations. Pretty cool - pun intended. But, like the hands on a clock, it moves sloooowly! When he called last December to ask if I could radically speed up the process for a video demo I really wasn't sure. What do you think I said?
All of us have seen time lapse photography. There are two or three commercials on tv, as I write, using it. One that comes to mind is a high angle on a city expressway at night with the white headlights of oncoming traffic turned, by time lapse, into ribbons of light on one side of the frame with the tail lights streaking red on the other. It was used extensively in the PBS series "David Attenborough's Private Life of Plants". Just want to be sure we all know what I'm talking about here.
OVERVIEW
Back when I used to shoot really low budget jobs with a Canon A1 Hi8 camera I had experimented with "Interval Recording" as it's called in video. Years before, in film, I'd done time lapse with various single frame cameras and intervalometers but never with my Sony PD150 DVCam. I didn't even know if it had the capability. It does. Time lapse photography remains one area where film has an indisputable advantage over video - the mechanics of advancing the film. You can shoot film one frame at a time but you can not do that with a video camera. Video tape needs to get up to "speed" in order to record and that precludes true, single frame time lapse shooting. What you get in video is short bursts of tape. With the PD150 the duration of the briefest exposure is 15 frames - half a second. Unedited that can make for a rather jerky sunrise and some very bizarre looking stop and go traffic on an expressway.
Before nonlinear editing this was a problem. In analog tape you needed to do some kind of skip frame editing and that's tedious and extremely time consuming. For those of you who started editing with NLE, skip frame editing is exactly what it looks like - you "skip", delete or cut, any number of frames between regularly spaced points in order to either speed up or, in this case, smooth out the shot. By now you've probably realized that the NLE cavalry riding to the rescue is called "fit to fill".
All video cameras don't have this feature but once you get hold of one that does read the manual under the heading "Interval Recording". Then read it again. By the third read it will start to make sense.
"Interval" means the time between shots or how often the camera rolls. A 30 second interval means that every 30 seconds the camera takes a shot, a 10 minute interval means that every 10 minutes the camera takes a shot.
The "record time", as my manual calls it - also known as "shot duration" or "burst" - means how long the camera is actually rolling for each shot. For purposes of this article that will be 15 frames. You can adjust it for longer bursts but I still haven't figured out why you'd want to.
After gaining an understanding of the concept find some subjects for test shoots. I tried several. On a windy day with lots of broken clouds I pointed the lens out a window and set the interval timer at 30 seconds, the shortest interval available on the PD150, one 15 frame take every 30 seconds. I also shot traffic at night, the moon racing across the night sky, a clear sunrise, with a #2 ND filter and I varied the interval timing (taking notes as to what was shot at which interval) and studied the unedited results. My most successful test shoot was the clouds. I tried it at all the available intervals; 30 seconds, one, five and ten minutes. These experiments are crucial. You not only learn how to do it but the information you gain is very useful in determining the best interval for the subject you need to shoot for a client. If it's a seed sprouting and you shoot for a week or two then ten minute intervals may be best. The clouds I shot looked best at one minute intervals. For the sun and moon I found 30 seconds gave the best results.
BEFORE YOU SHOOT - EXPERIMENT & CALCULATE
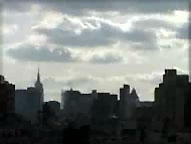
Before Fit to Fill click on picture to start 57 k dnl' 56 k Dial Up |
Before Fit to Fill click on picture to start 212 k dnl' DSL - Cable |
If possible, shoot a test of the actual subject. Most clients, though they may be impatient to get the job done, will appreciate your professionalism when you say you want to shoot a test - especially if it's not going to cost them any more money. The time you spend testing will be a good investment. No matter what the subject or the interval, be prepared for the raw footage to look jerky - not smooth like single frame exposed film. But don't let it bother you because FCP will fix it easily.
|
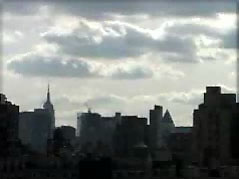
After Fit to Fill click on picture to start 80k dnl' 56 k Dial Up |
After Fit to Fill click on picture to start 1.4 meg dnl' DSL - Cable |
Once you've determined the proper "interval" for the job at hand you need to calculate the amount of tape it will use. I readily admit that even though I've done this many times, the last time I needed to do it I ran into a rock solid mental block. It's simple arithmetic but I could not remember how to do it. In fact that mental block is what inspired me to write this article. If it's a short shoot, less than 12 hours, no matter what interval you choose, even with a 30 minute tape, you're not going to run out. If your camera's shortest interval is 30 seconds and the shortest burst is 15 frames you'll eat up 1 minute of tape for every hour of interval shooting. Here's a basic formula for this calculation and I suggest you create a spreadsheet and run the formula for all the intervals and durations (recording times) available on your camera and run it out to 12 hours. After that you can easily use multiples for longer shoots. And remember where you put the spreadsheet!
Number of shots per hour multiplied by 15 (frames) divided by 30 (fps) equals duration in seconds, times 60 equals duration in minutes.
If your camera has a different shot length (check your manual - "Interval recording > Recording time") use that number in place of 15 and if you're shooting PAL the frame rate is 25.
Number of shots per hour: If your interval is one shot per minute that's 60 shots per hour, every 30 seconds would be 120 per hour and so forth. I know this is obvious but if your mind is anything like mine sometimes the patently obvious becomes obscure.
The Shoot
A number of things about a time lapse shoot are different than normal shooting (whatever that is). Some you can control and some you cannot so I'm going to address the things you must control, how to try to control the things you want to control and how to deal with the uncontrollable.
1) Unless it's a really short one, don't try a time lapse shoot on batteries. Surely I don't need to explain that. But just plugging into a wall socket does not guarantee reliable power. Be sure that the outlet you're using can't be killed short of a neighborhood power failure. Check to see if it's connected to a switch somewhere. I did a time lapse in a loft where people lived and, sure enough, the closest electrical outlet to my camera position was activated (and deactivated!) by a wall switch. Even though the people who lived there assured me that for the next 4 days they would not touch the switch, after getting their permission, I put a piece of gaffer tape over it. Do whatever is necessary to assure that the plug won't get pulled and the cable won't get tripped over. Gaffer tape is very handy in this situation.
2) Protect the camera tripod in some way. Tape it down if you can, surround it with a wall of white cards, maybe. Don't protect it by putting furniture around it unless the furniture is very heavy. Chairs and tables get bumped. How you protect it and with what will be dictated by the site of the shoot but, to badly paraphrase the old expression, don't just let it stand there, do something to be sure it does. Of course if you can hang (mount firmly on something solid that's up away from the traffic) the camera instead of leaving it on sticks that's the way to go.
Some degree of variation in exposure can actually enhance the sense of (rapidly) passing time but you don't want to go excessively bright and you sure can't live with totally dark. It hurts me to say this because in general I hate these things but you may find yourself shooting a subject in an environment where using (Arrgghhh!) auto exposure is appropriate. Think a lot and analyze the situation carefully before resorting to this but it could happen.
My advice is: Light as little as possible and do it with household "instruments" using fresh bulbs. A practical bulb lasts far longer than a 650 or 1K quartz lamp, and it's much cooler. Today's video cameras tolerate all sorts of light and at f1.8 or f2 it's amazing how little light you need to get a solid image. The main purposes of lights in a time lapse shoot are to keep the exposure level within a tolerable range and bring out the details of the subject. Just to be clear; "Lighting" is an artistic technique so illumination is what I'm discussing here.
When you're shooting in a site where people work and/or live do your best to enroll them in the project. Get them on your side. Promise them copies of the completed video, take them to lunch, whatever is necessary to insure their "participation" in the project. You are going to be leaving your setup at their mercy for a day or two, maybe a week or two, and they can ruin it if they don't understand and cooperate wholeheartedly. Place your camera (and lights if you use them) so as to inconvenience indigenous personnel as little as possible while still getting the shot you need. Like variations in light, an occasional quickly disappearing, ghostly image of a passing human can, in some situations, enhance your shot but too much of that can ruin it. If you're shooting in a public place like a courtyard in a corporate headquarters - fuggedabahtit. Live with it.
What to do about the things you can't control? Well, since you can't control them just try not to drive yourself nuts with worry.
When I have a time lapse that runs more than 12 hours I like to go by and take a look at least once a day, a couple of times if I can. It's reassuring to know everything is working, no bulbs are out, the camera hasn't been moved, the plug's still in the wall. And it's good politics to talk with the people who live or work where the setup is. In the worst case you find out sooner if you need to restart - if that's possible.
There may be more "ifs" in time lapse shooting than in any other kind and that can be nerve wracking, especially if the event you're shooting happens just once. The only protections against the many things that can go wrong are multiple cameras and more or less constant monitoring and in most cases these aren't practical. So do all you can to insure a successful completion and try not to let it make you completely nuts.
You've shot, you've screened, you've cried - the footage looks jerky. Well I told you it would! If your subject was something that moves extremely slowly (like ice forming) the jerkiness will be a lot less noticeable than with footage of passing clouds or highway traffic.
If the shooting interval you chose (every X seconds/minutes) would have produced the perfect time lapse for your subject had it been shot at a single frame (as it would with a film camera) then you'll need to do some precise calculating to reduce the actual length of your footage to the length equivalent to that of a single frame shot at that interval. (You may want to read that sentence again.) Lets take 15 frame bursts (my camera's minimum shot duration) to exemplify the formula. At shots of 15 frames your footage will be 15 times as long as you want it to be. So, for example, if you finish with 30 minutes of footage that would be (30 min. X 60 sec.) 1,800 seconds. Divide 1,800 by 15 and you get 120 seconds, divide by 60 and you get 2 minutes.
Create a set of in and out points on a time line* that is 120 seconds long and use a fit to fill edit of the entire 30 minutes. (30 divided by 15 is 2 so the formula was correct!) After it's rendered your time lapse should look exactly as though it was shot one frame every - well, every whatever interval you were working with.
If creating an exact match of the interval is not appropriate it's time for more experimentation. Let's go back to Iceman Joe.
Please note that the movies presented in this article have been heavily compressed for the Web. The finished FCP versions of these movies are of much higher quality, smooth motion and no pixelization.
The Formula
THE 2 MUSTS
WANTS
Once its In the Can
Fit to Fill (Requiem for the Jerks)
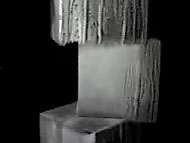
"Cubes" - 9' High click on picture to start 54 k dnl' 56 k Dial up |
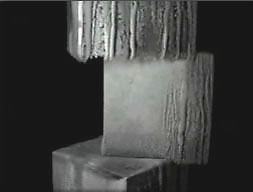
"Cubes" - 9' High click on picture to start 160 k dnl' DSL - Cable |
I shot his kinetic ice sculpture for 72 hours at 1 minute intervals, producing 36 minutes of footage. I was pretty excited when I popped the tape into my deck because I'd never done such a long time lapse shoot before. Looking at the tape produced a real shock! What happened did so so slowly that the tape was unwatchable. So I captured the entire 36 minutes, opened a sequence and did a series of fit to fill edits. I started at 20% length - squeezing the 36 minutes into a 7 minute slot. Then a 5 minute and finally a 3 minute slot.
The action at 7 minutes was still way too slow to watch. The 5 was beginning to be bearable and the 3 minute version worked. What a relief. Love that Fit to Fill!
I laid off the 5 and 3 minute versions to tape and trashed all the ice stuff off my hard drive and then captured the 5 and 3 minute versions as new clips and I was ready to boogie.
I ended up using the 3 minute version in my final edit. Using fit to fill edits of different lengths, I was able to vary the speed, increase it when something took too long to happen (short FTF) and slow it down a little (longer FTF) when something really interesting was going on. I also created a long, slow zoom in using "Scale" (with keyframes) in the Motion tab.
Finishing
One thing I learned from this project is that no matter how visually interesting something may be, sound brings it to life. It may take music or sound effects or a mix of the two. There are several web sites where you can download sound effects. Go to Google and type in "sound effects" (using the quotation marks) and you'll get quite a lot - I just did that and got 454,000, a few more than I needed. I've used sounddogs.com and partnersinrhyme.com and there are many more to choose from. Do some exploring, it's amazing what you'll find.
Depending on the subject and duration of your finished piece, artfully inserting some footage of the surrounding environment may be appropriate. One of Joe's pieces was in the living room of an apartment filled with contemporary art so I shot a lot of that and dropped in brief clips a few times to provide a setting for his work.
Conclusion
You might ask; "With the fit to fill edit tool available, why bother with interval shooting at all?" To which I answer; "72 or 24, or 12, or even 6 hours of tape down to 3 minutes? Need I say more?" Time lapse photography or interval recording video are not suited for all subjects but when they are, the effect can be fabulous. And when used in conjunction with the many creative tools available in FinalCutPro the possibilities are virtually unlimited.
P.S. In this article I have demonstrated the process using 'fit to fill', but the same results can be achieved using the 'Speed' dialog box found in the Modify menu.
Ben Bryant has acted in prime time TV shows and commercials and on
Broadway, sung at the Metropolitan Opera and in Jazz clubs, produced
over 1,000 TV commercials and dozens of industrial films, worked as
First AD on features, produced and directed over fifty TV shows. Now he
shoots, directs and edits video productions of all varities.
Ben Bryant Web Site
copyright © www.kenstone.net 2002