May 26, 2008
By Jude Cotter
I was working on a car show recently, cutting to a very tight deadline, and I had a segment that covered a nicely overheated Holden VE ute. Now, the car looked fine, it was going fast around corners and making lots of nasty noises, but for some reason it just seemed to lack a bit of ... edge. I mean, this thing was a 7 litre V8 punching 507kw and really it looked just like any other ute being flung around by any other maniac.
So I needed to give it some kind of funk. Something that said 'cool' and, as usual, I needed it quickly.
So I thought about what Top Gear - one of my all time favourite car shows - would do, and I immediately knew the sort of look I was going for.
What I needed was the 'Top Gear effect'. This is the grungy, vignetted, slightly cooled colour look that they use on all their supercar footage. If this is unfamiliar to you, do a search on YouTube for 'Top Gear', I'm sure you'll come across some in action on any of the supercar segments. By the way, if you're reading this, Top Gear, great work. Thank you for garnering a budget that would choke a humpback and squandering it on strapping rockets to Minis to fire them off ski slopes. That's entertainment!
Anyway, what I normally would have done would have been to add a vignette, adjust the gamma, add a bit of colour correction and then just copy-paste the effects to all the clips on the timeline. Easy. Except I was using the 2001 version of FCP (2), and that meant there was no vignette and no three way colour corrector, so I was forced to 'think different'.
So now I had a tight deadline, no vignette, and no 3 way colour correction. What to do? It had to be a composite job.
One of my favourite things about FCP is its freedom of movement in the composite arena. Even on this ancient FCP 2 machine, I had access to the composition tools to do this job quickly and easily. In fact, this method turned out to be better than the vignette-gamma-colour one, as you'll see later. Although I first created this effect in a very old version of FCP, this tutorial was made in FCP 6. The good thing about that is that this effect should work for you no matter which version of FCP you are running.
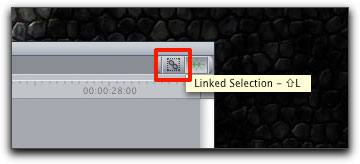
First of all, slip all the clips up to V2. Most people know how to do this effectively, but if you're new to FCP, an easy way is to unlink your audio by clicking the small 'linked selection' button at the top right of your timeline so that it is 'up'. This is so when you shift your video, you audio will not try to shift at the same time and possibly get jammed by other audio on lower lines.
Next, hit 't' once to get the 'select track forward' tool. It looks like a small arrow pointing right. Then click at the head of the first clip you want to shift on V1. This should select all the clips on V1 ahead of the point you clicked on.
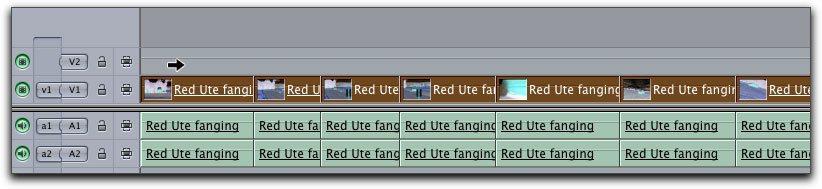
Then, holding shift to restrain your clips from slipping sideways in the timeline and going out of sync, click and drag upwards to move all the clips up one layer. Hit 'a' to reselect your normal arrow tool, then click the linked selection button again to relink your audio and video, if this is how you like it.
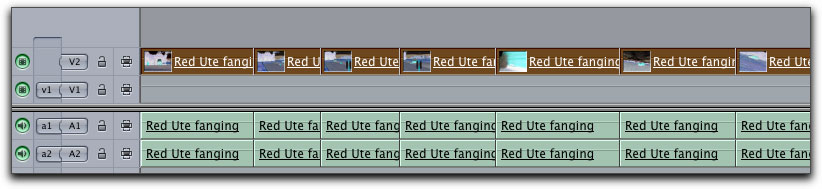
Sweet. Step one done. Now for the vignette.
Since I wanted to darken the edges and brighten the centre of the picture, I decided to add a radial gradient, and use a composite mode to blend the two pictures together.
If that sounds confusing and difficult, take heart. It's not.
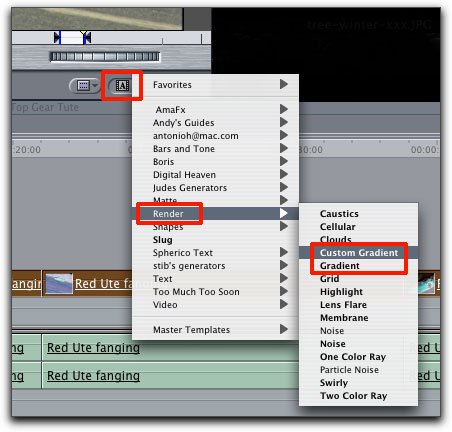
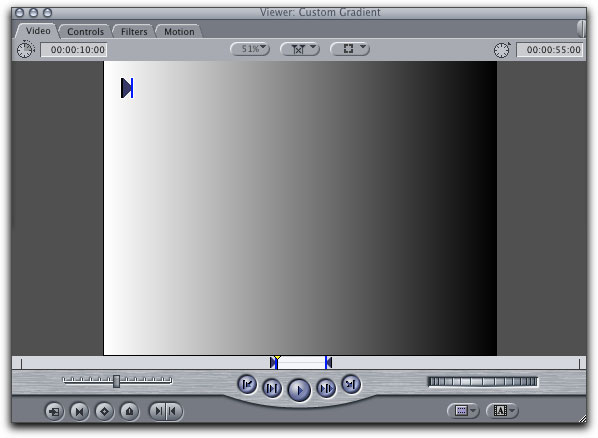
At the bottom right hand of your viewer there is a small button with a capital A on it. This is the 'Video generators' shortcut menu. You can also find this in the 'Effects' tab in the browser. In this menu, find the 'Custom Gradient' generator. Early versions of FCP don't have the custom option, so if this is you, just choose 'gradient' - you will have a few less options, but this will still work.
Now you should have a gradient loaded into your viewer that looks something like this.
Add this to V1 somewhere after your clips on the timeline, then double click it to load the timeline copy into the viewer. Make sure your playhead is sitting over the clip you are adjusting in the timeline, so you can see the results of your changes in the canvas.

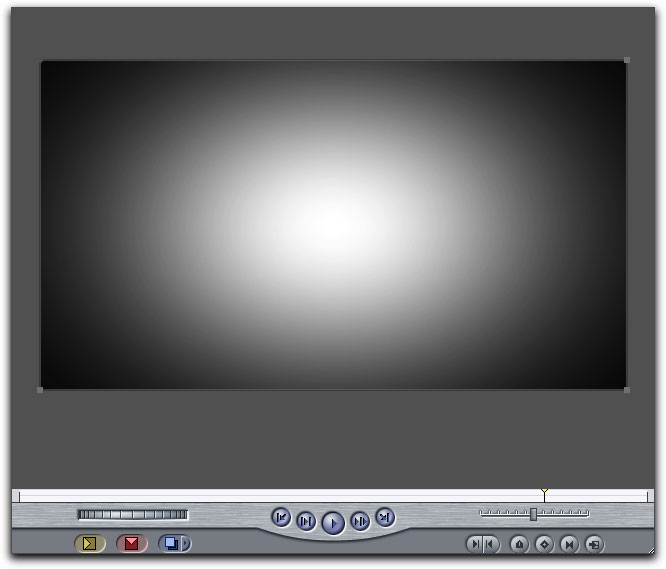
Go to the 'controls' tab and change the shape to 'radial'.

Next, click on the small cross next to 'start' so that the button becomes depressed, go to your canvas and click and hold while you drag around on the canvas. It should look like a spotlight is being waved around on your canvas.
If you let go of the mouse the bright area will be set to the current position, and you will need to click the small cross again to make further adjustments. Set the light to be centered on the canvas, which is 0,0, and turn on the dither and gaussian settings.
When done, it should look like this.
OK. Part two done. Told you this was easy.
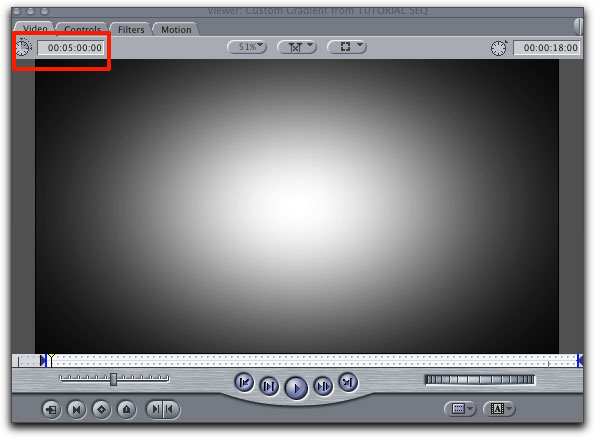
Now slip and extend your gradient so that all the clips you want to be effected have the gradient underneath them. If you need the gradient clip to be longer, just type the duration you need in the top left hand corner of the viewer like in this example, then drag the timeline copy out to be longer.

If this is a bit confusing, you can also just drag extra copies of the gradient to the timeline on V1, butting them up together like this.

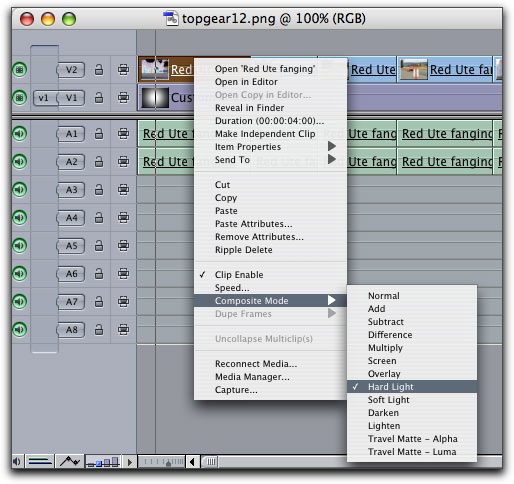
Now for the blending. Locate the first clip on V2 in the timeline that you want to adjust and right click on it, or use control click if you don't have a two button mouse.
From this drop down menu, choose Composite mode > Hard Light.
After render, your clip should go from something like this
[Top]
copyright © www.kenstone.net 2008
are either registered trademarks or trademarks of Apple. Other company and product names may be trademarks of their respective owners.
All screen captures, images, and textual references are the property and trademark of their creators/owners/publishers.