
Range Selection Tool September 22, 2003
Trimming With The Range Selection Tool
In FCP 4By Andrew Balis
Range Selection Tool September 22, 2003
Trimming With The Range Selection Tool
In FCP 4By Andrew Balis
This article focuses on using the range selection tool for a full range of useful trimming and copying scenarios. If you haven't used it before, its the tool that changes the cursor into a crosshair, and is used for selecting a portion of a clip.
![]()
If you have called up this tool before, chances are you've never really found many consistent uses for it. Maybe a couple times you used it to select a portion of a clip to filter only that section. Ok. That's a good use for it, but not something you'll do often.
Well, as of FCP 4, all this has changed. Uses for this tool have been expanded. Its now better, way better. With its new functionality, its now a full, multi-featured tool that can be used in many everyday situations. You can think of it as a combination of the ripple tool, razorblade tool and trimming with in and out points all rolled together in one.
Let's take a quick look at how the tool selects, how its functionality has improved, and then look at a few scenarios where you might just start using this tool instead of other methods.
Selecting
To start out, how does this tool work? Well, I may have over-stated its features. Its really only meant for doing one thing: making a selection. Its how we combine this selection with other functions is when it starts to get interesting.
Making a selection:
1. Select the range selection tool from the tool palette.
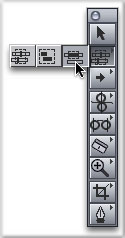
2. Move cursor over a clip in the timeline. The cursor will appear as a crosshair when over a clip.
![]()
3. Click and drag left or right and the selected portion of the clips turns dark brown.
![]()
Lift and Ripple Delete
Once a portion of a clip is selected, you can do a lift edit or ripple delete edit. This is a very handy function. This is something you might often do with the razorblade tool to select and delete a part of a clip, but with the range selection tool its fewer steps.
This is new to FCP 4. Well, not completely. Ripple deleting with the range selection tool is new, and its a huge enhancement.
To lift edit: Select a portion of a clip and press delete.
![]()
The selected section is removed.
To ripple delete: Select a portion of a clip and press Shift/delete.
![]()
The section is removed, and the following clips ripple to the left.
Linked Selection and Range Selection
This may be your next question: how does it work with linked video/audio clips? It works the way you'd expect. If linked selection is on, then you select across video and audio together.
If linked selection is off, or you hold down the Option key before clicking, then you can select just video or audio.
Trimming
A basic one sided trim might normally be a good task for the ripple tool or the razorblade, but its aptly handled just as well with range selection.
1. Turn on snapping (N).
2. Use the playhead to find the point where the clip should begin or end.
3. Select range selection tool (GGG).
4. Position cursor over the clip at the spot of the playhead.
![]()
5. Click and drag to the end of the clip. The cursor will snap to the end of the clip as you drag.
6. Press Shift/delete.
Rippling Across an Edit Point (Two Sided Rippling)
Now to the good stuff. When you lay down long clips in the timeline and then go back to fine-tune the length, you may want a quick way to cut off the end of one clip and the beginning of the next clip all in one edit.
I usually do this with in and out points. I'll find where to cut out of one shot, set an in, then move forward into the next clip finding the spot where I want to come in, and set an out point.

Then its Shift/delete to ripple out the section between the marks.
In these scenarios, I prefer this technique over trimming with the ripple tool. Its less steps and more direct. But trimming with the range selection tool is potentially quicker than either of those methods.
1. Select the range selection tool.
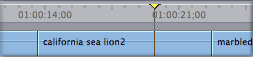
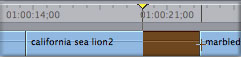
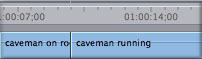
2. Use the playhead to find the point where you want to end the outgoing clip.
3. Click and drag right, selecting from the playhead position, into the next clip, up to the intended in point.

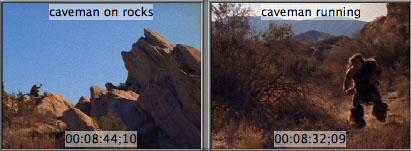
You might be thinking, how can you tell when you reach the right part of a clip to stop dragging? There's something I didn't mention earlier: when you use the range selection tool, the canvas turns into a two-up display, just as it would during trimming operations like ripple or roll. As you drag across a clip and select, the canvas updates to show the current frame. This makes it very easy to pick an "out" point for the trim (or in point).
4. Press Shift/delete to ripple out the selected portion.
On a side note, if you use in and out points to trim, how often do you find yourself fumbling with the auto-select buttons or locking tracks to only trim on the one track? With range selection, you only trim one track and leave other tracks alone.
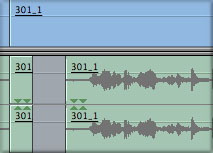
Trimming Across A Gap
Yep. I know it doesn't look like it will, but it does. Select the end of one clip, continue to drag into a gap and then into another clip. Although the cursor "disappears" for part of the drag, it works.
![]()
When you press Shift/delete, the end of the first clip, the gap and the first part of the second clip are all ripple deleted together.
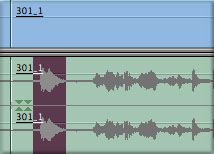
Trimming Interview Style Footage
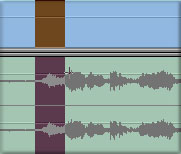
When you are trimming down an interview clip in the timeline to tighten it up and remove pauses or sections when the interviewee goes off on a tangent you want to exclude, you may cut the clip into many individual pieces to remove the extraneous sections. Usually a job for add edit, razorblade or in and out points. But range selection is quicker than any of those methods.
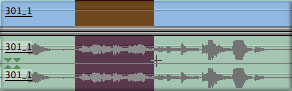
Select the portion to be removed with the range selection tool, using the audio waveforms as a guide. Then press Shift/delete.
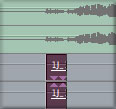
Pulling Out Bad Audio
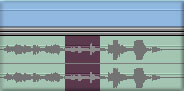
This one is pretty handy when you encounter a pop in the audio, or any momentary, bad pieces of audio like an actor's lapel mic rustling.
1. Choose the range selection tool.
2. Turn off linked selection (or hold down Option key during the next step).
3. Click and drag across the section of bad audio.
4. Press delete (not Shift/delete).
Moving a Selected Section
After a section is selected, it can also be directly moved or copied. This one saves a ton of steps from other methods. No razorblade, no arrow tool, all just with the range selection tool.
1. Make a selection first.
2. Position the cursor directly over the selected portion of the clip.
3. Click and drag the selected portion elsewhere in the timeline.
You can even use range selection to perform a swap edit on only a portion of a clip. A swap edit will remove a clip from one point in the timeline, closing the gap at the original location, and inserting it at a new location. Its an important flexibility to have when re-arranging the order of clips. That a swap can also work on only a selected portion of a clip just makes it that more handy.
To swap a section of a clip:
1. Turn on snapping.
2. Make selection.
![]()
3. Click and drag selected clip, snapping it to another edit point, but don't let go yet.
4. Hold down Option key, the cursor becomes a hook.
![]()
5. Let go of mouse (then Option key).
![]()
Copying With Range Selection
Copying tasks are also easier and more efficient when you need to copy less than the full original clip. Basic copy and paste is no different than copying full clips, simply copy (Command/C) the selection portion of the clip, then move the playhead to a new point and paste (Command/V).
Where it really sings is copying small sections of audio. Whether you are picking a small section of ambience to copy for room tone, or duplicating low-recorded audio, this one is slick.
1. Select the portion of audio to copy.
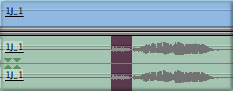
2. Press and hold Shift/Option, then click on the selected audio and drag to another track.
This duplicates the audio directly under the original clip. It can then be moved from there if needed. Also notice that the original clip is left intact. This is so much easier than copy/paste, well, at least fewer steps.
Zooming In The Timeline
One final tip. Its fast and accurate. Select a range of audio waveforms with the range selection tool, then press Shift/Option/Z to resize the timeline so that the selection fills the width of the timeline.
I hope you enjoy some of these techniques. I know I will.
copyright © www.kenstone.net 2003