December 4, 2006
With the Panasonic HVX-200
By Dan Brockett
Why All of The Subterfuge?
Whew! The pilot is wrapped and shipped. It looks and sounds great. We created a "real" network level pilot using the brand new, relatively inexpensive technology comprised of the Panasonic HVX-200 camcorder and P2 card system. It is my hope that by reading this article, you will experience all of the challenges, stress, panic and elation that we experienced in shooting a network pilot, working with brand new, unproven technology. In reading this journal, you will experience everything that we did, except that you can do it vicariously and learn from our mistakes as we as our triumphs. We really went to extraordinary lengths and developed a usable, reliable and viable way of shooting massive amounts of footage using tools that really weren't designed to do this. I hope that you can use our experience to help you streamline your HVX-200/P2 workflow when you shoot your pilot, short film or feature or documentary. The bottom line is that the HVX-200 is an amazing camera and P2 is an amazing technology but both feature some pitfalls that can make the process quite a challenge.
As you read through this article, you will notice that I have been forced to be somewhat vague in the descriptions of certain people, places and events. There are several reasons for this, the main one being that the TV pilot that we shot that is described in this article is still being pitched to various television networks and the producer and director will probably want to strangle me if I name their pilot, the name of the studio or production company that the pilot was shot for, etc. I can tell you that this pilot involves an alien who lands on earth and is discovered by a 20-something loser who has not yet discovered his purpose in life. Their journey leads to a race to save mankind and along the way, hilarity ensues.
Rest assured, everything that you will read in this article really did happen. I took numerous digital photos and kept a production journal so I could reconstruct the entire project from day one accurately. I can be as specific as I want in describing and showing the technical aspects of the workflow. I hope that you understand, you know, it's all big Hollywood rules, non-disclosure agreements and stuff like that?
Out of the Blue
"Production meeting in the conference room!" said Cheryl, my boss's assistant, as she poked her head into my small office. Our executive producer, Paul, had called a middle of the week production meeting. This was not an ordinary, twice-a-week production meeting, you know, the kind of meeting where you are drinking coffee, trying to form recognizable, semi-cognizant thoughts in your head before 10:00 AM? No, this Wednesday morning meeting was obviously important enough that it couldn't wait until the Friday meeting. Seeing as every team member called to this meeting was extremely busy with projects, shoots and deadlines, it was puzzling that this meeting was called mid-week.
I have been working at this production company for the past year and half, primarily producing short-form documentaries for DVDs. Even though I have been mainly producing, writing and directing projects at this company, I have tried to keep my hat in the ring as a cinematographer, shooting all of my own projects as well as shooting many projects for the other producers I work with. My viewpoint in this article is presented from the viewpoint of both a producer/director and as a cinematographer/technical producer, so bear with me as I offer information and commentary from each point of view.
As we sat down to the meeting, my boss Paul outlined that we were taking on a different sort of production than most of the documentaries that we usually produced; this project was a pilot episode for a new comedy for our largest studio client. The project was to be produced for the studio in conjunction with a huge production company owned by an A-list feature film director who you have definitely heard of. That's all I can tell you. It was definitely big league stuff. The producer for the project and director/writer were already attached as they had a development deal with the studio although they had more feature film experience than television experience. The script for the project was decent and seemed like a fairly funny premise. I did notice upon reading the script that it seemed pretty short for a half hour comedy. That was when we learned "significant fact number one!"
Significant factor number one:
This show would basically be improvisational comedy with LONG takes of up to 20 to 30 minutes.
Remember this, it will come into play very soon as we go into production.
On With The Show!
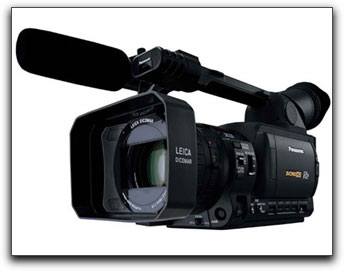
Within a week, we rented a 3,000 square foot production office space near our existing production office space and began hiring crew and auditioning actors. The plot for the comedy was a small ensemble with three main roles and several supporting roles. We acquired our first two HVX-200s during this time and I set to work, learning the ins and outs of the new camera and the P2 system and workflow. From the first time I shot with the HVX-200, I knew that this camera was a significant step forward in both HD production and digital IT-based workflow. But I am getting ahead of myself; let me fill you in about how we arrived at this point.
Prepping The Show
 Three weeks later, the comedy pilot was beginning to take shape with casting sessions underway daily. One of our most experienced producers was assigned to oversee the production needs for the comedy pilot. Each of the project producers from my company still had DVD documentary projects in production but since the pilot already had an out-of-house producer and director attached, our function became more that of a line producer, basically supplying technical and logistical support to the producer, director and DP. Since I serve as the company's staff VideoGeek
At this time, it was announced to me that producer and director had decided that the project should be shot using two of our new Panasonic HVX-200s. It would be a two-camera shoot, entirely handheld, shot in HD for an NTSC 4X3 delivery. The producer and director told me that they wanted an HD master even though the pilot had been specified as an NTSC delivery by the studio. Working in this way, they would have an HD master of their pilot in-hand if the network decided to buy the series and requested an HD delivery.
Significant factor number two: This would be a two-camera shoot, sometimes with three cameras, all hand held, shot in HD for an NTSC 4X3 delivery and the producer and director already decided that the HVX-200 was "it". Yikes!
Staff VideoGeek
tm Almost Panics!At the time this, it occurred to me that this project was beginning to look like a perfect candidate to NOT shoot on the HVX-200. At it's minimum HD resolution, 720 24PN (much more about all of these HD resolution later), each 8GB P2 card would only give 20 minutes of run time. I was told that on previous shows that the director had directed, her improvisational comedy takes typically lasted 20 to 30 minutes. So we would be filling between one and two cards per take, per camera. My mind feverishly started calculating and extrapolating and came up with some wild combinations of cards, cameras, storage that began to look not so very promising. In an average 14 hour shooting day, we could possibly expect the following:
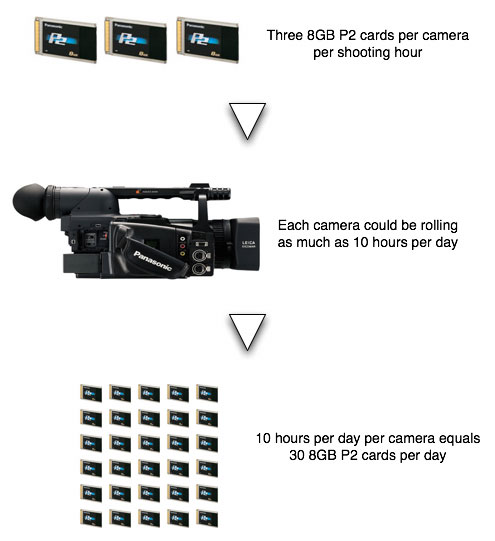
3 cards per shooting hour. In a typical 14 shooting day, the cameras could be rolling as much as 10 hours a day. 10 hours = 30 cards per day, per camera! This gave us the potential of up to 60 8GB P2 cards being shot per day! Extending these calculations to the full week of shooting, depending on if we shot for 5 days or for a full week of 6 to 7 days, we could end shooting about 400 to 500 P2 cards worth of material!
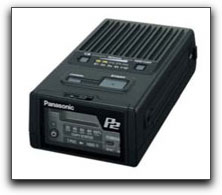
As I pondered this equation, I recounted my experience shooting P2 with the HVX-200 up to this point. The company I work for owns three of the HVX-200s, so lack of camcorders would not be a holdup. We also bought one Panasonic AJ-PCS060 P2 Store, a 60GB field storage unit, for each camcorder. The biggest challenge to the entire workflow that I was seeing was that because of limited availability, we only owned a total of six 8GB P2 cards. I requested that our operations manager commence the hunt for more 8GB P2 cards to purchase or rent.
More About The P2 Workflow
Up to this point, I had mostly been using the HVX-200 and the P2 workflow for shooting one-hour, single camera interviews and b-roll. Because of the radical differences in using P2 versus videotape, the other producers at my company were quite cautious about trying out the P2 workflow on their own projects. By January of 2006, the other five producers that I work with realized that since our clients were beginning to request HD masters for final delivery, they needed to be shooting their projects in HD. All of them were still opting for shooting HDV with the Sony Z1 over trying out the HVX-200 and P2 cards. For our producers, tape seemed much easier and more reliable to deal with.
Many producers in our business are somewhat conservative in switching over to new technology, especially when the workflow and end results are unproven. Nobody at our company had yet successfully completed a project with the HVX-200 and P2. With the stress of shooting in our studio and on location with tight deadlines and budgets, it is natural that producers are somewhat reticent to gamble their precious shoots on a workflow that had not yet been proven to them. Out of the six producers at the company, I am the only one at the company who produces and also shoots most of their own projects so I had a more vested interest in learning the new camera and workflow. Up to this point, I was very unsatisfied with shooting HDV footage with the Sony Z1s. I did not like the look or responsiveness of the Z1. Because of the look and resolution limitations of using Sony's CineFrame mode, I did not like being relegated to shooting interlaced video and I did not like the compression limitations of the HDV format. I wanted to learn about and immerse myself in the HVX-200 and P2 workflow so that I could originate all of my material in a higher quality codec. I wanted to shoot with a camera that created true progressive video images rather than interlaced. In short, the HVX-200 was everything I was looking for. But would it work for this project?
Shooting Options
With the HVX-200, assuming you are shooting HD (the HVX-200 does also shoot MiniDV and DVCPro50 formats), you really have four options for recording the HVX-200's HD output, at least at present. The individual methods are listed below with some of the pluses and minuses of shooting in each method also listed:
1. Shoot on P2 cards
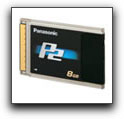
The HVX-200 was designed to shoot on P2 cards from the beginning. The P2 cards work very smoothly with the HVX-200 and most shooters, once they have experienced shooting with P2 cards, do not want to go back to shooting with tape.
Pluses - Smooth, quick, efficient workflow. Availability of "native" frame rates (720 24PN and 720 30PN), which allow maximum shooting time per card. No moving parts to malfunction or break. P2 cards require no maintenance and are very reliable. Instantaneous playback from thumbnails, instant playback of variable frame rates. Light weight and size for action shooting, handheld or Steadicam.
Minuses - High cost of $650.00 per 4GB card and $1,400.00 per 8GB card (these costs have fallen since we shot the pilot). Relatively small capacity and short shooting times. You must be constantly changing, saving and reformatting P2 cards, which requires additional cost and labor over shooting tape. More about how much more labor later in the article.
2. Shoot Directly To Laptop

An alternative to shooting to P2 cards is to shoot directly into a computer. Several programs on both PCs and Macs support live capture to HD.
Pluses - Shooting times are only limited by the hard drive capacity you have connected to your computer. You can also use your laptop's display as a sort of lower end monitoring system as you shoot and capture.
Minuses - Size, weight and hassle. Basically, shooting to a laptop ties the HVX-200 to the computer via a Firewire cable. Extra hassle in lugging, setting up and breaking down a laptop, cables and drives. Reliability is questionable, computers lock-up and crash, P2 cards don't. No time code is recorded to each individual clip so all clips with begin at 00:00:00:00 time code. Shooting handheld or Steadicam while tethered to a laptop is difficult to impossible. Laptop capture does not support native frame rates so storage capacities per GB are lower and variable frame rates are not possible.
3. Shoot Directly To Focus Enhancements FireStore FS-100
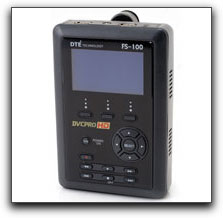
An alternative to shooting to P2 cards or to a laptop is to shoot directly into the Focus Enhancements FireStore FS-100 hard drive recorder.
Pluses - Portability. Size, the FS-100 is considerably smaller and lighter than a laptop and hard drive. Capacity is much larger than P2 cards (100GB for the FireStore FS-100 versus 8GB for the largest currently available P2 card).
Minuses - Cost. The Firestore is relatively expensive although much cheaper per GB cost than P2 cards. Brand new, as of yet unproven technology. Size, weight and hassle. Shooting to the FS-100 ties the HVX-200 to the FireStore via a small and delicate, easy-to-accidentally-knock-out-of-it's-port Firewire cable. Hard drive not as impervious to shock, dirt and moisture as P2 cards are. FireStore has had numerous documented problems with reliability and consistency.
4. Shoot Directly To Panasonic AJ-1200HD
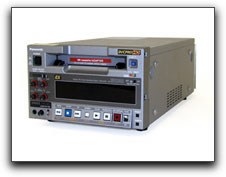
A viable alternative to shooting to P2 cards, to a laptop or to the Focus Enhancements FireStore FS-100 hard drive recorder is to shoot directly into a Panasonic AJ-1200HD Hi-Def DVCProHD VTR.
Pluses - Maximum of 63 minute recording time per tape. No need to archive camera media to hard drive. HD/SDI output from deck for most accurate monitoring.
Minuses - Cost. The Panasonic AJ-1200HD has recently had a large price reduction since Panasonic showed a new replacement, the AJ-1400HD at NAB 2006, but you are still looking at around $21,000.00 with the required FireWire and HD/SDI cards. The replacement deck, the AJ-1400HD sells for about $25,000.00 with the cards. Size, weight and hassle. Shooting to the AJ-1200HD ties the HVX-200 to the deck via a small and delicate, easy-to-accidentally-knock-out-of-it's-port Firewire cable. All DVCProHD tape must obviously be logged and captured in the traditional manner. Once you have worked with P2, logging and capturing are somewhat more of a hassle than capturing P2 footage.
Shooting For The Pilot?
The criterion for shooting this pilot was that all of the footage would be shot on location, handheld. Since the director was shooting with two cameras, sometimes with three, with all cameras constantly circling and framing the talent, recording the camera's output to a laptop/hard drive combo or AJ-1200HD deck would be impossible. At the time we were in production on this series, the Focus Enhancements FireStore FS-100 was not yet shipping so that left us with P2 cards as our only possible recording solution. Based on my shooting with P2 and the HVX-200, I was not confident in trying to shoot this much footage with the limited run times on the 8GB P2 cards. I pleaded with the project's producers to reconsider shooting tape, probably HDV because of the project's limited budget. I told them that while it was possible to shoot P2 with this project's requirements, but we would need additional crew and equipment in order to handle this amount of P2 media. The producer and director calmly listened to my assessment and protests and then reiterated that we were going to shoot with the HVX-200 and P2. My assignment was clear, I had to find a way to make this work. No pressure, a network pilot, brand new gear and an unproven workflow. No problem.
The P2 Card Workflow
Before we proceed with the shoot, let me shed some light for you on exactly how the entire P2 card workflow really works in real life, from the perspective of a Mac user. The P2 experience on the PC platform is a bit different than on the Mac, in some ways, on the Mac, its worse, but in some ways, better.
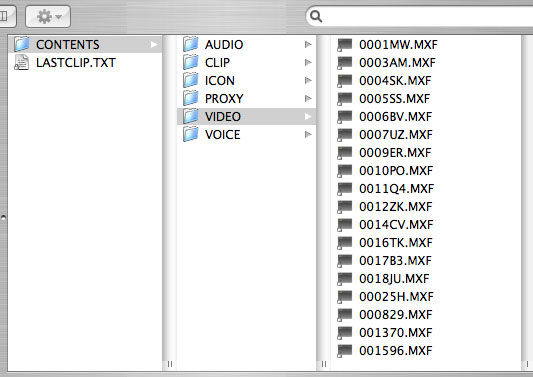
After you shoot and fill a P2 card, assuming you are continuing on with shooting and not using the camera as a transfer device, you eject the card from the camera and either download the P2 card to a Panasonic P2 Store or to a laptop/hard drive. The Panasonic AJ-PCS060 P2 Store is a rugged, simple to use storage unit for the P2 cards that features a shock-resistant 60GB hard drive. The P2 cards are not merely dumped directly to the hard drive in the P2 Store. If they were, you would discover a random assortment of folders containing a very confusing array of sub-folders, .TXT files, .MXF files, .XML files. Below is an image of how the P2 file system lists and categorizes it's various components. P2 cards utilize a relatively new file format called .MXF. Because of the IT oriented workflow of P2, the .MXF files and their supporting other files all combine to become your "camera master".
As of today, Final Cut Pro does not natively support MXF media, it converts media to Quicktime, but I still always recommend archiving the HVX-200s original .MXF files as your "vault master tape" since FCP may someday support native .MXF. AVID does somewhat support MXF media but in an inconsistent manner, depending on platform, software version and AVID system. Our production company is AVID-based so we have been dealing with this for a number of months. AVID and P2 integration, while improving, still needs work and refinement from AVID. New software upgrades promise better and more consistent .MXF support.
The P2 Store actually ingests and stores each P2 card as an individual drive. Because of file allotment issues relating to FAT32 disk allocation, you will only be able to fit seven to eight P2 cards per P2 Store, regardless of how much content you have written to each of the cards. This is a limitation of how the P2 system and the file formatting system for hard drives are designed. Once you have ingested the P2 cards and filled the P2 Store to it's capacity, you then hook up the P2 Store to your computer via a USB 2.0 connection. With a full P2 card, seven or eight different "drives", each labeled "No Name" will appear on your desktop. Transferring each of these P2 card/drives to your archiving medium is as simple as drag and drop in the case of hard drive/RAID or burning to a dual layer DVD or transferring to a DLT tape. Once you have transferred the media from the P2 store, it is a simple and quick operation to scrub the hard drive clean (see image sequence below)
Slowing It Down
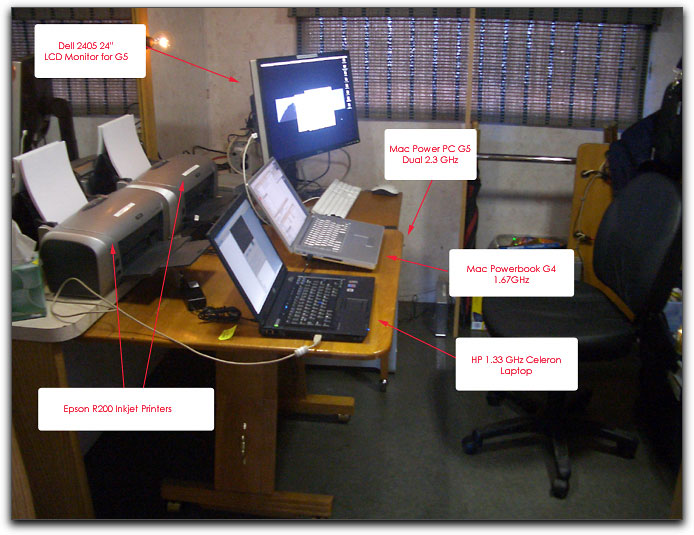
My experience with the P2 Store and the Mac has been one of frustration. The P2 Store so far has been functionally bulletproof and very reliable, but for some reason, downloading media from the P2 Store to a Mac, any Mac, has been very slow. The P2 Store only has a USB 2.0 interface available, no FireWire 400 or 800. There is a small switch on the back of the P2 Store that chooses whether or not the P2 Store verifies the data. Even with the switch turned off, transfers from the P2 Store to the Mac take more than twice as long as just inserting the P2 card into the PCMCIA slot on a Powerbook G4. My experience as far as times are listed below:

- P2 Store to Mac (Dual Core 2.3Ghz G5, 1.67Ghz Powerbook G4 Laptop, Intel Dual Core iMac) 48 minutes per 8GB P2 card with verify data on
- P2 Store to Mac (Dual Core 2.3Ghz G5, 1.67Ghz Powerbook G4 Laptop, Intel Dual Core iMac) 26 minutes per 8GB P2 card with verify data off
- P2 Card to PCMCIA slot on Mac (1.67Ghz Powerbook G4 Laptop) 6-8 minutes per 8GB P2 card
I have tested these methods over hundreds of card transfers and for some reason, transferring from the P2 Store to a Mac seems to take much longer than it should. I don't think that PC users are experiencing the same long transfer times; it may possibly have something to do with Apple's non-standard implementation of the USB 2.0 specifications or there may be other factors at play here, at this point, I was not sure and did not have much time to figure out why it was taking so long.
After analyzing this workflow, it became apparent to me that having a camera assistant standing near the cameras during the shoot with a P2 Store would not work, we would run out of P2 cards quickly during intense periods of shooting long takes. The time it was taking to offload the P2 stores to the computers and drives was just plain too long.
The bright light at the end of the tunnel seemed to be that using a Powerbook G4, I could offload 8GB cards in about 6-8 minutes to a hard drive. The times seemed to vary depending on a bunch of different factors but at the longest, it was taking only about 10 minutes. A way to make this workflow flow was beginning to become apparent but we still had a long way to go for everyone involved to feel secure that the workflow was viable.
Testy, Testy...
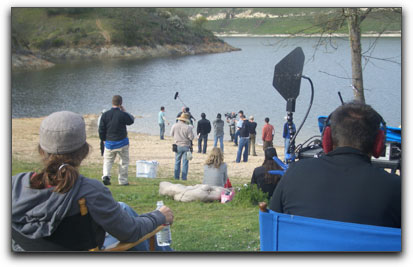
It was decided that in order for everyone involved to feel secure about the P2 workflow, some testing was in order. We decided that not only did we need to test the P2 workflow; we also needed to develop some of the other aspects of the shooting style needed for this unique project. How could the operators support the HVX-200s and obtain reasonably steady shots for the long takes that the director's style demanded? How was the director going to be able to monitor the two or three cameras if the cameras were to be roaming around the set, handheld? What kind of look and visual style did the director and director of photography want to develop? How were we going to keep up with the demands of long, uninterrupted 20-30 minute takes for a week of shooting?
The first order of business was to decide how to physically support the camera. In case you are not familiar with the Panasonic HVX-200, it is a fairly short, squat and hefty package that has always reminded me somewhat of a Sumo wrestler. Since we were going to have at least two and sometimes three cameras rolling at once, roaming all around the set, it became obvious that we needed to find a solution that would allow the operators to comfortably support the cameras for hours at a time, while insuring easy mobility. Steadicam or Glidecam-type support systems would not be practical or affordable for this project so these sorts of options were ruled out.
I own a shoulder support system for my much smaller, lighter Panasonic AG-DVX-100A. The problem was, upon mounting the HVX-200 on my existing shoulder mount, we discovered that the HVX-200 was way too front heavy to be useful. When mounted upon the shoulder, this setup distributed about 90% of the HVX-200s weight on the supporting arm and a mere 10% on the operators shoulder. Once we added matte boxes, filters, wireless receivers and the wireless video transmitter, each camcorder approached about 10lbs in weight. While 10lbs may not sound like a lot of weight, try holding that 10lbs steady for 20-30 minutes at a time, repeatedly, all day.
The DV Rig Pro
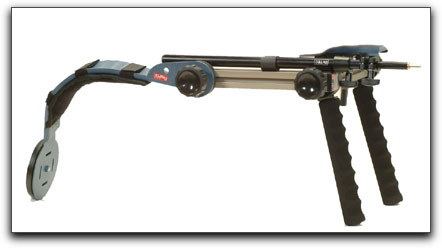
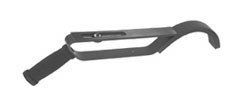
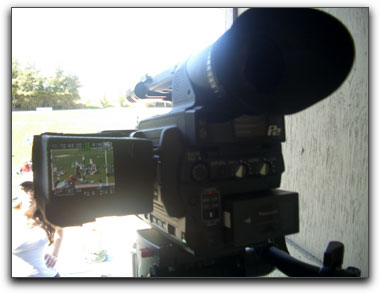
After a few calls to local rental houses, we had some camera support options to choose from. Cut to the chase, we ended up testing and renting the DV Rig Pro from DV TEC If you have never used the DV Rig Pro, or have never even seen one, it is a shoulder mounted, heavy duty professional grade, shoulder mounted camera support system. The one feature that really sets the DV Rig Pro apart from its competition is the inclusion of a shock absorbing support Pod system that consists of a nylon belt with a small pouch that operator wears around their waist and two stage shock absorbing rod that mounts on the bottom the front of the DV Rig Pro itself. The other end of the rod is inserted into a small nylon pouch mounted on the belt. This effectively gives the operator an extra "hand" to support the weight of the camcorder and also really helps to stabilize the entire rig by placing a lot of the weight of the rig onto the operator's hips. Here are a few images of how our camera packages looked when fully rigged.
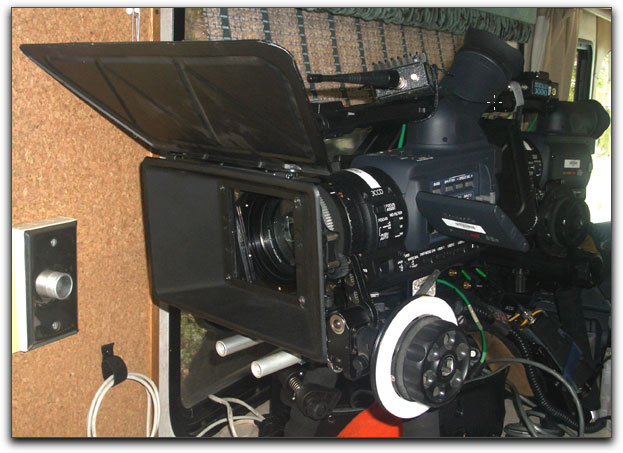
Notice the extra stability from the size and weight of the packages that even allowed the operators to place themselves into some fairly precarious positions to shoot.
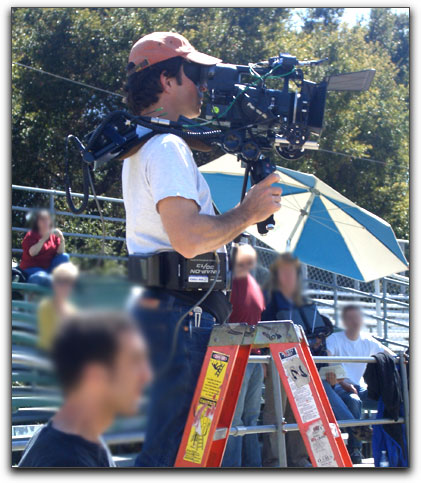
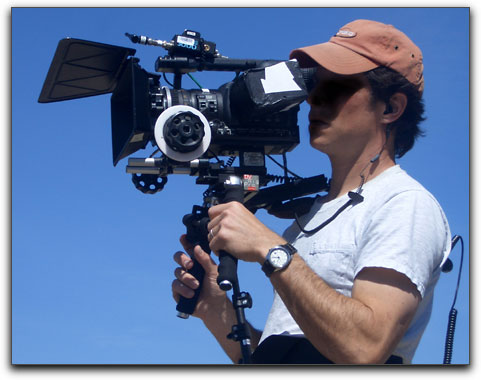
After testing the system out, we determined that the stability of the DV Rig Pro system was going to work out perfectly for our needs. While the HVX-200 features a smaller, lighter prosumer camcorder form factor, when mounted on the DV Rig Pro along with P2 cards, battery, matte box, filter and follow focus, the entire rig felt like and behaved much like a large shoulder mounted professional camcorder. Of course, the ergonomics were quite a bit more awkward, but the package overall felt like a professional camcorder system. More about the rig later.
Going Wireless
The next issue became how would the director be able to monitor and direct the camera operators? With the amount of movement that the operators would be performing, stringing cables from the cameras to a "video village" would be impractical as well as labor intensive. The project's production coordinator told me that a local rental house had already engineered a wireless video monitoring system that had been used for some of the director' previous projects. Eureka! This was going to be easier than I had though it was going to be. A couple of phone calls later; we were unpacking a wireless video monitoring system that was rented for testing the week before our shoot. Unfortunately, I learned that I was to be in charge of setting up and troubleshooting the wireless video systems in addition to the entire P2 archiving and backup system. Up until this project, my experience with wireless video was quite limited so the addition of being responsible for the wireless video was a bit intimidating.
The wireless video system consists of a camera mounted transmitter and a custom dual 8" NTSC 16:9 LED monitoring system. The dual monitor system is mounted on a custom machined aluminum mounting bracket and an Anton Bauer Hytron battery pack DC power system. Fortunately, the HVX-200 offers downconverted NTSC video output for monitoring, although the output is only anamorphic widescreen so if you have a 4x3 NTSC monitor that doesn't support 16:9 playback, you will have to endure squeezed, tall video. This entire rig was mounted on a strap that mounts around the director's neck so that the monitors ended up at waist level. The director ends up "wearing" the monitor system.
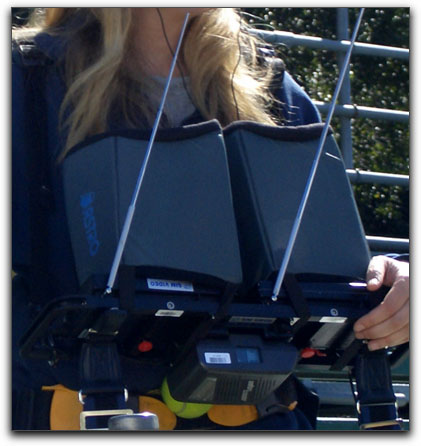
The rental company also included an antennae amplifier system that turned out to be more a nuisance to setup and use than it was worth. Each of the camera-mounted microwave transmitters can be set to transmit on any television channel that can be received in the VHF/UHF range. As I mounted the transmitters to the cameras to test out the range and to check that the systems were working correctly, I wondered how the small transmitters were powered. Nine-volt batteries? Rechargeable batteries? After going through the instructions and checking the cases from the rental companies, we discovered that the transmitters were powered by an Anton Bauer Hytron battery pack. These are fairly large and heavy camcorder batteries. This meant that each operator would also have to wear a battery belt as well as shoulder the DV Rig Pro. This was getting complicated.
We hooked up the HVX-200s composite video output to the video transmitter. After we switched on the transmitter, camera and the monitor system, we were able to receive the pictures from the camera. The pictures were fuzzy, but recognizable. The building that our production offices are located in is a multi-story brick building and cell phone reception is fairly spotty in the location so we thought that the building might have been a factor in the poor reception. We discovered that switching the transmitting and receiving channels helped to improve the signal quality significantly and once we left the building while shooting tests, the reception improved to a quality level high enough to satisfy the director.
Initial tests showed that the DV Rig Pro, coupled with the microwave wireless video system was working out fine. The director of photography, who was also serving as one of the projects camera operators, seemed happy with how the setup was functioning physically. The director seemed content with how the wireless video system was working. The next step was to determine a look for the show.
The DP Experiments
For those of you who may have not ever worked on television shows or feature films, it is not unusual to spend considerable time and money in developing a look for a project. In the world of film, this requires exposure tests, wardrobe and production tests, etc. This is often the time that the look and feel of the production is solidified. In shooting a TV pilot, this process is often becoming truncated, if it takes place at all. I feel that part of the reason for this is because with digital video, you can perform so much adjustment of color, grain, contrast and other characteristics during the postproduction process. In the case of this project, the director of photography was not very familiar with the camera, he was not versed in the HVX menu options and controls. I stepped in to help him and the other camera operators with some guidance on how the camera functions and how the controls affect the picture.
We setup the camera with an 18% gray card for exposure reference and with a focus chart to check for edge-to-edge sharpness. There are many different menu options available in the HVX-200; these settings have been covered in-depth in many other articles on the web. Suffice it to say, after much exposure testing and experimentation we decided basically to keep the HVX-200's setup relatively neutral. We did not boost the contrast, detail and ended up using the Cinelike V setting in the cameras menu. The only slightly unusual parameter we adjusted was to boost the chroma to a +2 level. We were going to be shooting in many outdoor settings and since the production was taking place before Spring was in full gear, we felt that Central California's grassy hills and numerous oak trees would look better with a little bit more color.
Shooting "Naked"? (Relatively)
Upon recommendation from the project's executive producer, we also decided to eschew camera filters other than NDs, ND Grads and Polarizers. The DP was toying with the idea of using some Tiffen White Pro Mist filters to give a sort of gauzy lightness to the images, but in the end, both and he and the director decided that with all of the options to change and craft the look in post-production, shooting to get a great exposure was the most important priority. The ND filters were essential in shooting outdoor exposures that let the camera operate in the mid-range iris level, where fixed lens camcorders typically perform best. The polarizer was to ensure good-looking water shots as the script contained a long sequence that took place at a lake. Using a polarizer helps to reduce glare and reflections around water, glass and other reflective surfaces and as a side benefit, when shooting in the mid-day sun, a polarizer also will make the skies that are washed out to your eye, look bluer and the clouds to look richer.
Scene It!
The scene file system in the HVX-200 functions pretty much identically to the file system on the DVX-100A, with the exception that on the HVX, scenes can be saved, downloaded and uploaded to tiny SD memory cards, the same kind that many digital still cameras use. The DVX-100, while it can save scenes to it's internal memory, does not give you the SD card option. Once we arrived at our desired look, we successfully uploaded the scene file to a formatted SD card and transferred the scene file to the other two camcorders. This feature proved to be quite handy for a three-camera shoot. This sort of function is one of the factors that make the HVX-200 such a useful professional tool.
P2 Mathematics
After shooting some exposure tests, movement tests and makeup tests, we decided to sit down at the round table and really figure out how exactly we were going to make the P2 portion of our workflow function. After shooting the tests, it became apparent to me that there was no way that I would be able to handle this project as the technical producer alone, I would need an assistant. Enter Jeff, a new hire at the company I work with. Jeff was hired as an assistant editor but was game to learn about all aspects of production so I had been taking him on shoots to teach him about the various aspects of lighting, grip work, cinematography and sound so that he will be a more well-rounded in all aspects of production.
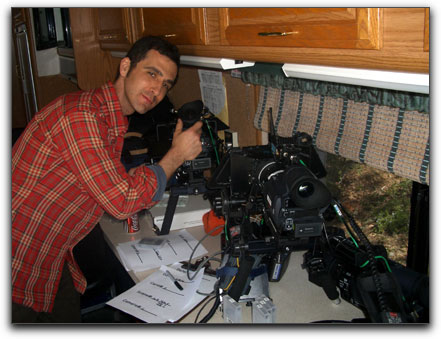
Jeff and I had determined that it would probably work best to establish a P2 "base camp" where all of the computers, monitors and drives were to be located. This location would be secure from weather and the environment and would be large enough to provide space for the entire "P2 village". In addition to the base camp, which would be located in the rear of the main production motorhome, we would need a person on set at all times, to switch out P2 cards as they filled up, provide fresh re-formatted P2 cards, change out camera batteries, wireless video transmitter batteries, clean the lenses, take care of time code issues and also to function as a regular assistant camera person. We both decided that since I was more familiar with the P2 downloading and formatting, it would be best if I served as the post workflow technician in the motorhome and Jeff would serve as the on-set P2 technician. Jeff's other function was to transport the P2 cards to and from our base camp to the set so that I could catalog them and dump them to hard drives.
Anonymous Content
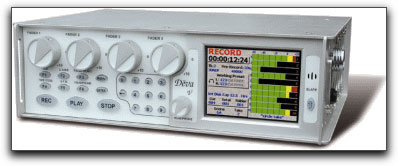
One of the challenges of how the P2 system functions is that files come into the Mac as pretty much anonymous clips. You are pretty much dealing with generic random alphanumeric file names that don't really relate to what you are shooting. We were going to be using a time code slate at the head of every shot. The time code slate would be driven from a time code generator in the sound mixer's Zaxcom Deva.

The Deva is a time-tested and proven professional hard drive-based sound recording system often used on features and in television. The challenge is that the HVX-200, while it can sync to other HVXs time code via Firewire, cannot sync with outside sources as there is not yet a method to turn time code from a Firewire signal into something transportable over an XLR or BNC cable that an audio recorder can interface with.
An Old School Solution
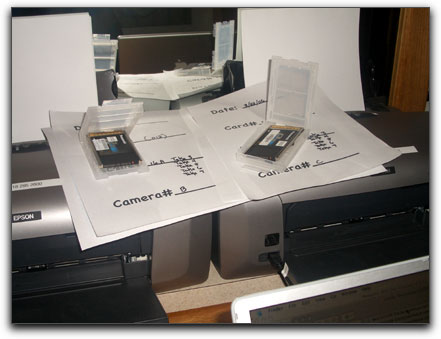
We had to figure out some organizational method that would let us keep track of massive amounts of footage from three cameras. We thought and deliberated about it and came to the decision that Jeff notating which cards had which footage and where from which camera as he removed and traded out the P2 cards was going to be the easiest, most straightforward methodology. The solution we came up with for keeping track of all of these vital records was a simple P2 tracking sheet. Jeff would have a stock of blank P2 tracking sheets on a clipboard on the set. As the P2 cards filled up with footage and Jeff rotated them to and from the cameras, we decided that he would have a dedicated pocket on his jacket, each dedicated to one of the three cameras. When he removed the P2 card from a camera, he would pop the small protection tab (similar to a record tab on a professional video tape) located on the rear of each P2 card. If, by some chance, he mixed up P2 cards, he would know that each card with the tab showing orange was an exposed card that had not yet been dumped.
We decided that once Jeff harvested each of the exposed cards from each camera, he would quickly sit down and fill out the P2 tracking sheet that we had come up with. We also decided that based upon research with other P2 users, it would be very important to attach the rubber protection cap and put the P2 cards back into their plastic cases as we shot. Since we were shooting in outdoor situations much of the time and possibly in the rain, it was essential that the P2 cards be kept as clean and dry as possible. I don't even want to think about what could happen if you put a wet or muddy P2 card into a slot on the HVX-200.
The P2 Tracking Sheet
Jeff and I and our staff producer all discussed what information would be essential to include on the P2 tracking sheet.
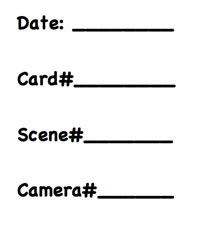
We didn't want to make the sheets too detailed or Jeff would become bogged down with filling one out for each of the hundreds of cards that we would be shooting. We finally agreed that the tracking sheet would contain the following:
- Date Since we were shooting all week, it would be important to know which day the footage was shot on.
- Card Number We weren't sure how many P2 cards we would have available for our shoot but were hoping to have at least ten to twelve and preferably about fifteen to eighteen cards available. We used a Brother P-Touch and labeled each case and card numerically with a large font. Once again, simpler worked out to be better. We thought about dedicating cards to cameras A, B and C but determined that we might need the flexibility of using any of the cards with any of the cameras. This turned out to be a wise decision.
- Scene Number Even though this show was largely based upon improvisational comedy, the script breakdown did show scene numbers, which were thankfully sequential and did not veer into sub-scenes such as "scene 1, scene 1A" types of headings so putting the scene number onto the P2 tracking sheet proved to be a lifesaver in post.
- Camera Number Since we were going to have up to three cameras shooting some scenes but only two shooting others, we decided that identifying each card by the camera that shot it would also be helpful to the post process.
We decided that these four categories would be helpful and essential. When each card was brought to the P2 home base, it would be accompanied by a P2 tracking sheet. The idea of the tracking sheet turned out to be a real lifesaver several times during the postproduction process.
The P2 Viewer
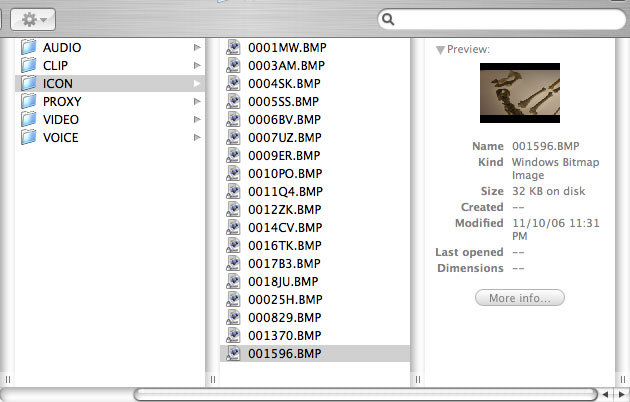
One of my least favorite things about the P2 workflow as it presently exists is that when the files are transferred to the Mac, the only way that you can tell what is on the cards is if you view a P2 icon file or if you open a program that can import P2 media, like FCP or P2 Log from Imagine Products.
In the icon folder, you can at least view small thumbnails of each of the video files contained on the P2 card. This system is reasonably handy when shooting b-roll where you might typically have just one shot of each setup or subject or angle. The bad news is that if you are shooting a narrative based project with repeated takes, the thumbnail file is too small to identify slates and as you might think, when you are shooting repeated action, each of the thumbnails is going to look basically the same. Of course, you can import the P2 files into Final Cut Pro.
I really like how Final Cut handles P2 media. At this point in time, Final Cut handles P2 better and more consistently than AVID does. Unfortunately, importing the P2 media into FCP also turns the media into QuickTime media that is not easily compatible with AVID.
The PC is not my favorite platform to work on, the Mac is. But in the case of working with P2 in the field, Panasonic inexplicably gave the PC a distinct advantage over the Mac, a free P2 Viewer software utility (this production took place before the availability of P2 Log from Imagine Products). The PC formatted P2 Viewer is an easy to use, fairly detailed application that lets you view your P2 media on any laptop PC with a 32-bit PCMCIA slot. We purchased an HP laptop running Windows XP Pro specifically for this project, specifically to use the P2 Viewer. The first time we tried the P2 Viewer software, as a Mac user, I was instantly envious. You can playback P2 media, read all of the metadata written to the P2 cards, check audio levels on all four channels and several other valuable functions. Since we completed this project, Imagine Products has introduced P2 Log with a built-in P2 Viewer and the ability to work with P2 Media .MXF files.
After some quick tutoring from one of our in-house technicians who works with Windows as much as with the Mac, we were able to learn how to perform screen captures and print them using the PC. For those of you who are real Mac-heads, learning how Windows XP functions is an interesting exercise.To be fair, Windows XP is better than the Windows 95 experience that I had in the mid 1990s when I switched to the Mac platform but many operations that are very simple on the Mac seem much more convoluted, with two or three times the number of steps required in Windows XP. We were able to play the first clip on each card in the P2 Viewer, verify that the footage was there and that it played without problems, grab a screenshot of it, do some minor color and contrast correction and print them out.
The P2 Tracking Binder
This became part of our P2 Tracking Binder. We decided that not only would the P2 Tracking Sheets be very handy in keeping the P2 media organized as we captured it to drives, but the P2 Tracking Sheets, when combined with the screen captures of the first clip from each P2 card, could be a very valuable organization and tracking tool for the project's assistant editor and editor. This was good thinking on our part, the binders became indispensable during the post process for this project. One of the major drawbacks of the P2 format is that until your P2 media is downloaded and opened in an editing program, P2 media just looks like a random series of folders and files. There is a thumbnail capture of the first frame of video for each clip but oftentimes, these thumbnails turn out to be too small to really check content, especially with multiple takes of scenes where the thumbs would all look basically the same anyway.
Let The Production Begin!
Before we knew it, the week of our production was rapidly approaching. We realized that in a small town like the one we were shooting in, production and camera department staples that were easily obtainable in Los Angeles might be difficult to locate. We gathered every P2 card that we could lay our hands on. Unfortunately this required renting P2 cards from New York, Chicago and Nashville. Even with our far-flung hunt for P2 cards, the most we could gather the day before the production was to commence was eleven 8GB cards. We opted to not rent or look for 4GB cards, as we knew that we would possibly not be able to fit even an entire take on two of the 4GB cards.
As the first day of shooting loomed, we learned of an additional complication. There was rain in the forecast.
![]()
The good news was that we could not shoot our exteriors in the rain so we did not have to worry about buying rain jackets for the cameras but there was rain forecast for the first three of our five shooting days. This meant that we would have to radically re-shuffle the shooting schedule and locations to shoot all of the interior scenes before moving on to the exterior sequences. Situations like this always can always strike fear in the hearts of producers and production coordinators but fortunately, in California, even central California, it is rare to have more than two or three days of rain in a row, without at least a single sunny day in between. We braced for the worst while hoping for the best.
Arriving at the Location
Upon arriving in the town we were to shoot in, we met up at our hotel with the rest of the crew for some briefings on location, schedules and logistics. We then headed for our first location, a small store located in the center of town. The town that we were shooting in is a small rural suburb of a larger town on California's central coast. The area featured a lot of older buildings with small mom and pop type of businesses and was spread out over a fairly wide area for a small population area. As we pulled into town, the rain began so the decision was made to go to "plan B". Plan B turned out to be shooting interiors in a small paintball store.
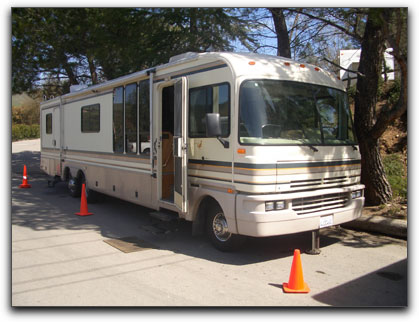
Home Sweet Motorhome
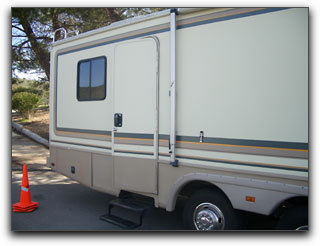
Upon arriving at the paintball store, the crew began to prepare the location. A small storefront with windows at the front, the location required blocking the windows with duvetine, setting up lighting, blocking the actors, etc. As Jeff and I began setting up the camera systems, we got out first look at what was to be our base-camp for the remainder of the week, the main production motorhome. As we stepped out into the pouring rain, we opened the rear door and stepped in to survey the setup. The front half of the motorhome was to be dedicated to production coordinator, line producer and production assistants. The rear of the motorhome was basically a small, empty room and would serve as our P2 Village location.
The main challenge was that there was not a lot of room in the rear of the motorhome. As an RV owner, I am used to figuring out ways to squeeze a lot of stuff into small spaces. I had brought my G4 PowerBook (more on this later), a PC laptop, my dual 2.3GHz Power PC G5 tower, my 20" Apple Cinema Display and ten LaCie hard drives, ranging in size from 250GB to 500GB. Besides all of this gear, we also had to bring cables, two inkjet printers, uninterruptible power supplies (UPS) and lots of other small miscellaneous gear to make it all work.
The Flow
Below is a description of how we envisioned our P2 workflow progressing in the back of the motorhome. As soon as a card was filled, the orange safety tab on the card would be switched over to become visible. The orange tab would serve as a reminder that the P2 card contained video. As soon as the card was dumped and re-formatted, I would flick the orange protection tab back to black, meaning that the card was empty and re-formatted. When you are dealing with stacks of P2 cards, I cannot emphasize enough that simplicity and repeatability are essential to keeping track of your shot media.
Each P2 card that was brought to me in the motorhome by Jeff or by the production assistants would be accompanied by a P2 tracking sheet. Upon receipt of the card and P2 tracking sheet, I would set the card and tracking sheet down on a small table. The P2 card would then be inserted into the PC laptop. Using the P2 Viewer utility (remember, this project occurred earlier this year before the P2 Log software appeared and before FCP 5.1.2 was introduced with it's advanced P2 support), I would open the first clip on the P2 card in the P2 Viewer on the PC laptop, do a screen grab and print out the screen grab from the PC. The P2 Tracking Sheet and the P2 Viewer printout would then be attached to the P2 card. This P2 card was then ready to be loaded to the hard drives.
Further on Down the Line
If there was a backlog of cards ahead of this P2 card, the card would wait in line with it's P2 Tracking Sheet and P2 Viewer screen grab until I was able to begin downloading the P2 media from the card. I had brought both my PowerBook G4 laptop as well as my G5 with the hopes that I could dedicate each of them to each camera's cards. I planned on designating the G4 PB to the A camera and the G5 to the B camera's cards. In this way, each camera would be backed up to it's own set of individual hard drives. With the availability of the new MacBook Pros, P2 have quickly discovered that the Card Bus 34 slot that is featured on the MacBook Pros is useless for P2 cards. The older G4 PowerBooks feature a PCMCIA slot that is the correct size to take a P2 card. After downloading the correct Panasonic drivers, you insert a P2 card into the PCMCIA slot, the P2 card shows up on your desktop and you transfer your media.
Since the G5 towers do not have a card bus PCMCIA slot, the plan was to use either our third camera as a P2 reader or we also brought a P2 Store with us for the same purpose. If you have a P2 Store, it can be hooked up to a computer via it's USB 2.0 cable and it will function as a P2 card reader as well. Upon further testing we discovered that while the P2 Store could function as a P2 card reader, the P2 Store is plagued by the same issue that affects it when downloading it's content to most Macs, its exceedingly slow. In tests I performed while on location, I was consistently obtaining download times of almost 45 minutes per 8GB card using the P2 Store connected to the G5. At the same time, I was able to download 8GB cards on my G4 PB in around 8 minutes. It was no contest; I decided to just use the G4 PB as the download computer alone, waiting so long for the G5/P2 Store combination to download was just not keeping up with our needs.
I've Got To Do Something With This G5
While I was not able to use my G5 to download P2 media to the hard drives, I did discover another use for it. As the day progressed, the request came from the project's producer and director that they wanted to see dailies and they wanted to also have stills of the material that we were shooting for the studio publicity people. Fortunately I did have Final Cut Studio installed on the G5. After downloading the P2 media to the drives using the G4 PB, during downtime at lunch and at night after shooting had wrapped, I was able to use Final Cut to screen dailies, export media to make DVDs of the dailies and to printout stills from the days shooting.
What I Learned
We found that the crew really enjoyed seeing the printouts of some of the more visually interesting shots of the day. The small room in the rear of the motorhome soon became covered in a wallpaper of screen grabs of the production as it progressed. These printouts, while not very accurate in regards to video color, proved to be useful in evaluating continuity between setups. The ability to view, manipulate and author DVD dailies and printouts while shooting proved to be a very useful tool. This is one of the tremendous advantages to shooting and working with a data-centric format like P2 over film or tape-based video.
What The Big Boys Do
It has been common for years that certain high-powered feature film directors have an RV or trailer on location that contains an editor and an AVID or FCP system or even multiple editing systems. These directors have the dailies brought in the day after shooting and their editors actually cut a rough assembly of the film during production. As you might imagine, this gives the director instant feedback on continuity, story flow, aesthetics and performance. It is also very nice to wrap up production and to already have a rough assembly of your project. Postproduction schedules in television and film have become tighter and tighter with the advent of more advanced post production workflows, shared media, etc. While we did not have the space and necessary gear setup to actually begin editing as we shot, by the middle of the production it became apparent that it would have been very advantageous to have had an editing system setup and the editor on location beginning to at least rough out the initial assembly. Viewing a rough assembly midway through a production can often let a director and producer know if some of their more experimental shooting is working, if they have adequate b-roll and alternate angle coverage and if re-shoots are necessary because something isn't working.
After experiencing the P2 workflow on a project like this, I can see that the future of production may often contain an editor and laptop as part of the production crew. It is too valuable of a tool and concept to not utilize on some level when budget and logistics will allow it. I can especially see the value of this workflow when shooting improvisational comedy. When we next utilize this workflow on a comedy or improvisational project, I am definitely recommending that we have the editor on location, going through and sub clipping and evaluating the footage as it's shot. Seeing shots in sequence and with cross cutting between scenes, checking continuity, lighting and overall story flow is a great advantage to the tradition of just shooting and checking playback.
Back to the Matter at Hand
As the crew began to block out the first scenes and I finished assembling the P2 Village, the first requests were coming from the set for Jeff and I to come to the set to help in setting up the camera systems. This was to become a recurring theme on this shoot. The P2 workflow, while closely related to the cameras and wireless microwave video monitoring system, is a separate animal and requires it's own labor and efforts to make work. In a more traditional situation, the regular assistant camera operators would have been working with the cameras on set, freeing up Jeff and I to deal exclusively with the P2 workflow. In a normal television production workflow, there also would have been a dedicated technician relegated to the wireless microwave video monitoring system.
In our situation, because this was a pilot, not a network show, Jeff and I were required to pull triple duty as camera technicians as well as wireless microwave video techs as well as the P2 technicians. Now, mind you, I am not complaining, I understand the limitations of working with limited budgets, I am a documentary filmmaker and I like to try to pitch in and help everyone I can. I did tell the producer and director to please try to keep in mind that the P2 technician was probably the most important part of what we were doing though and that they should avoid having us become too distracted from P2 duty to fill in doing too many other positions. As it was, I ended up shooting b-unit camera on the last day of production because of DP availability, which was actually fun. But with Jeff and I out shooting and off of P2 duty, it quickly became apparent just how important having a dedicated P2 technician or two is.
Setting Up on Set
Because the HVX-200 is a relatively new camera, most professional assistant camera operators do not have a lot of experience with the camera. Fortunately, because I had been shooting with the HVX for about three months prior to this project, both Jeff and I know and understand the menus and how the camera operates pretty well.
A tip for those of you contemplating using the HVX in the manner that we were with lots of accessories, whether matte boxes, follow focuses, Steadicam or what have you, never underestimate how long it takes to actually rig up and test the camera and all of it's accompanying systems. Keep in mind that because we were hundreds of miles from our home base, all of the cameras and their accompanying accessories were packed into their individual shipping cases. This means that when we arrived on set, the cameras had to have their matte boxes, follow focus units, microwave transmitters affixed and calibrated. This entire rigged camera then had to be mounted to the DV Rig Pro shoulder mount with all of the power cables, video cables routed and tucked out of the way. It took us much longer to fully rig and test the camera packages than we thought it would.
Check Audio, 1, 2...
After all of that was accomplished, the wireless mic systems that the sound department was using to record ref audio needed to be affixed and setup in the camera menus. The main audio mix was being recorded to the Zaxcom DEVA but we felt that it would save a lot of time and effort to record two channels of combined audio signal directly to the HVX cameras. This reference P2 recorded audio would be used for the off-line and approval process with the DEVA multi-channel audio being used for the final project after picture was locked.
Microwave Trouble
As you may have experienced in production, sometimes schedules are changed at the last moment and sometimes schedules are accelerated. We endured both of these factors on our first day of shooting so Jeff and I were really working at a fever pitch to ready the cameras in time for the first shot of the day to begin. To further complicate things, it was requested that the wireless video signal from the cameras be routed not only to the director's twin LCD handheld monitors but also to the television in the motorhome. Two studio executives were due on set to monitor how the shoot was going. After getting the director's LCDs going, I set to work on setting up a microwave repeater. Unfortunately, this repeater was not available to test when we were back at our office, testing the rest of the system so I had to crack the owners manual quickly to figure out how the repeater/amplifier worked.
We tested the repeater, which still was not working. The repeater had two "shark fin" antennae, which needed to be paced up high on opposing walls on the set. The microwave company had not included long enough cables to go from the two shark fin antennae to the repeater for the room we were shooting in. So we had to abandon the monitor in the motorhome for the executives. We did end up setting up a 24" HD monitor outside the shop, under a pop-up canopy and we just used a traditional BNC cable to tap off of the A camera. So, in the end, while we could not use the repeater, we were able to provide picture to the executives, although they did have to stand outside in the rain, under a canopy, to see the camera feed. Much better than no video tap at all but not the best situation. The shop was very small and there was no room to setup a 24" HD CRT anywhere though so we made do with what we had.
Roll Cameras!
After checking out the cameras, the monitoring for the director, the video monitor for the executives, we commenced with shooting the first scene. With the shooting underway, I left Jeff on set to watch over the DP and camera operators and went back into the motorhome to finish setting P2 Village. The main challenge was the lack of room. The motorhome did contain a flimsy rolling table that I proceeded to affix to the floor using gaffer tape. Keep in mind that all of the computers had to be pretty much either put away at floor level or held down when the motorhome was underway. For those of you who have never ridden in the rear of a motorhome while it's underway, it is usually fairly smooth, but there are definitely opportunities for loose gear to be flung around. In the front of the motorhome, the regular electronic gear like the copier, fax machine and television monitor were all fastened to their respective areas using heavy-duty Nylon webbing, Velcro and double-sided tape. Because our P2 Village was a temporary addition to the motorhome, a large amount of my concern were directed toward making sure that the gear did not become airborne projectiles as we drove from location to location.
Showtime
After setting up all of the computer gear and booting up the computers, I quickly made sure that the printers were working, that the hard drives were freshly formatted and that the temperature and ergonomics were both workable. I awaited the first shot cards to come in from Jeff. As I waited for the first cards to be filled as the cameras on the set to arrive, all of a sudden, the power in the motorhome dipped. I am not sure if you are familiar with the term "brownout"? If not, let me explain, when you see the lights dim, when the power almost goes out, this is referred to a "brownout" as opposed to a "blackout". In many ways, a brownout is more dangerous to electronics than a blackout. At least with a blackout, you are experiencing a loss of power. All of your gear just ceases to work. With a brownout though, items that are rotating, like hard drives, CD and DVD drives, etc. can just crash. It's a very bad thing.
Keep in mind that we were pretty much running off of the motorhome's generator all of the time, we were not able to plug in to AC service. The motorhome we were renting was not very new. In fact, it was rather old although in very good shape. When I inquired what the amp load capacity of the generator was and what the wattage capacity was, the motorhome driver did not know. Seeing as it was pouring cats and dogs outside, I did not feel like making the swim through the torrential downpour to check out the specs on the generator. What was making me even more paranoid was the fact that even though I had the computers plugged into a UPS, the system had crashed anyway during the brownout. That's kind of not supposed to happen, that's the whole reason you use a UPS. At this point, I was a little bit shaken. What if that brownout and computers shutting down had happened during a P2 transfer? Would the card survive? The data on it? The hard drives?
Elementary, My Dear P2 User
As I opened the door from the rear of the motorhome, I noticed that the production coordinator was using the copier. Hmm...copier = big amperage draw. I then noticed that the driver was watching television. Hmm...27" CRT television=big amperage draw. No wonder we had been experiencing brownouts. Between my three computers, multiple hard drives, the copier and the television, and an older low capacity generator, it sounded like a recipe for disaster. I spoke with the driver and the production coordinator and told them not to use the TV or the copier at all. Yes, I was the big bad ogre, but if we lost media during a transfer, then we would have bigger problems than not knowing the score during the Mets game or not making call sheets.
Tip number 2 - make sure that your power sources during P2 transfers are bulletproof. Brownouts and blackouts can spell lost media and unhappy producers and directors and can spell the end of your successful career too.
Incoming
Around this time, I heard a knock on the door of the back of the motorhome. Jeff came in, sopping wet (wet just from the 20 foot walk from the set to the motorhome, it was really pouring) with the first two P2 cards from the set. I asked him if everything seemed to be going okay on set and he replied that it seemed so. He headed back to the set as the director was still rolling. I sat down to try out our workflow for real. While I had tried the individual aspects of the workflow and all of the steps had worked, I had not tried it under the pressure of the real shoot yet. I knew that in about 22 minutes, Jeff would be walking through the door with the next two full cards and that I needed to have these cards dumped, formatted and ready to go. As I loaded the first card into the PC laptop, I opened the file. The first frame of video that was shot was the slate. This became very handy when they were shooting multiple takes with the same actors in the same setup. By looking at the slate rather than the setup, the information on the slate made it considerably easier for the editors to determine which card they were viewing.
Redundancy, Redundancy
As soon as the printout of the P2 Viewer screen grab began from the laptop PC, I then saved the screen grab to the PCs hard drive as a .JPEG file. Once again, thinking about backup and redundancy, saving the screen grab to the drive became a great form of backup when we lost a couple of P2 Viewer printout pages en route to our office. When you are engaged in a process as intricate as television or film production, there are so many opportunities to implement redundant backup. Most people are too lazy or preoccupied to do this but for those who do, it is a very satisfying feeling to have a safety net for when things go wrong. It also makes you a true professional.
Tip number 3 - I then inserted the first P2 card into the G4 PB's PCMCIA slot and began downloading. When copying P2 media, always make a disk image (.dmg) file when the media will be used on Macs. In our case, the media was to be mainly used on PCs so we did not use this strategy since I had not had a chance to test .dmg files on PC AVIDs but the web discussion boards have already been filled with posts from P2 users who have used various copying schemes or worse yet, have imported media directly from the P2 cards into FCP. They then wonder why they are having weird, unidentifiable media issues, blockies, audio glitches, etc. Even though I did not make a disk image, I did copy and paste both P2 folders, Content and Last Clip.txt to an appropriately named folder on the LaCie drives.
Verify
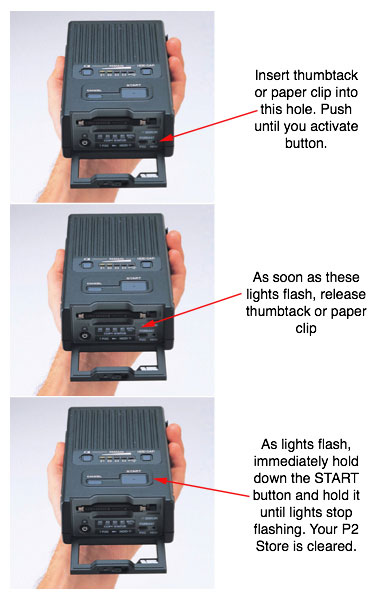
After downloading the media files, I would verify the number of icon and media files in the master Content folder. I would cross reference the folder on the drive with the folder still showing on my G4 PB desktop P2 card folder. This was a last step to double check that I had transferred everything over. Once I was sure that I had successfully transferred everything, I ejected the P2 card. You can use the G4 to "erase" the P2 cards. I have tried it and it works. You simply control click on the Last Clip.txt file and Get Info. In the Get Info display pane, you then uncheck write protect. You can then drag the content and Last Clip.txt folders to the trash can, and then empty the trash. I have been told by Panasonic and several experienced P2 users that clearing cards in this way can result in problems. A P2 card is basically a small RAID and by just deleting the contents, there may be lingering header content that is not visible on your PC or Mac. This remaining content can "confuse" your computer or the camera later when shooting or dumping the next card worth of data. Why risk it? The recommended method for truly reformatting P2 cards is to use the reformat command in either the HVX-200 or using the P2 Store. To reformat using the camera, insert the card to be cleared into the HVX and switch the camera to MCR or thumbnail mode. By then going through the thumbnail sub-menus, you can quickly and easily re-format the card. Same with the P2 Store, insert the card and hold down the P2 format button. Once the indicator lights light up, hold the start button until the indicator lights go out. Takes about 2 seconds to re-format the P2 card. For our shoot, since our third HVX was being periodically used to shoot, I reformatted the dumped cards using the P2 Store. It was bulletproof; we did not encounter one error in more than 400 cards shot.
And the Shoot Goes On...
I won't bore you with writing a detailed day-by-day synopsis of how the remainder of the shoot went because once we got the workflow down, it basically all was the same thing, day in and day out. That's a good thing. The good news is that after the trials of the first day, without exception, all of the remaining shooting days went smoothly.
The P2 format and the HVX proved to be up to the rigors of professional television production. We shot days, nights, interiors, exteriors, on water, in cars, you name it. The P2 cards and the HVX continued on without a problem, creating beautiful, very 16mm-like images.
Without a Net
One area of concern was that our workflow caused us to stay up really late each night. We would take most of the P2 Village back to our hotel room along with the cameras each night because we did not trust leaving this amount of gear in the motorhome overnight, even though there was a security guard in the motorhome. The other reason was that we ended up going through each day without the biggest safety net. That safety net was mirrored RAID drives. Before we left for the shoot, we performed tests on all aspects of the workflow for a few days to make sure that we were covered as far as reliability and safety of the media. With the help of one of our more PC-centric editors, we had managed to setup RAID 1 drive setups on the laptop PC and I was able to easily setup a RAID 1 on the Macs. The challenge was that we were not sure at all if the show was going to be edited on AVID or FCP or on PCs or on the Mac or a combination of both.
Mirror, Mirror
For those of you not familiar with what RAID 1 is, it is basically mirrored drives, which are very safe. Whatever is written to drive 1 is also written to drive 2. To us, this seemed like a good idea for safety and redundancy. Problem was, upon testing we discovered that while it did not double the transfer time to backup P2 to RAID 1, it did increase the P2 transfer time considerably over a transfer to a single drive. It took so much more time on both the PC and the Mac that we had to abandon the idea unfortunately. A true backed up RAID 5 alternative was considered but also abandoned. For safety and for logistic issues, we needed to have two drives of each set of P2 cards and we needed to transfer one set of drives twice during the week from the Central Coast where we were shooting back to Los Angeles while we kept one set for safety and for review of dailies and for grabbing stills for the studio marketing. Traditional RAIDS would not have allowed for this, we needed to make this work with out separate LaCie Firewire drives. The other RAID 1 issue was that when you make a RAID 1, removing one of the mirrored drives tends to freak out the other drive when it looks for it's mate to backup to. During the testing we also discovered mounting issues with the single mirrored drive mounting successfully on any other computer.
The Solution?
It made me extremely nervous to have all of the day's media on just a single LaCie Firewire drive but this was what we ended up with. The P2 Store was too slow to download the cards from so doing a redundant backup would have not been possible. If I would have had another G4 PB to go with the extra set of drives, I probably could have downloaded to the first G4 PB and drives, then the second G4 PB and drives and would have been done. But I did not have a second G4 PB. The solution ended up being simple, yet tiring. At the end of the 12-14 hour shooting day, we would take the P2 Village back to our hotel room, set it all up and clone the drives overnight as we slept. At least this way, in the morning, when we awoke, we were backed up. But that period where we only had the single LaCie with the entire days shoot on it was very nerve racking. It brought me back to the days of shooting film when we would have all of the exposed film in our room, hoping that nothing would happen to it before we could get it to the lab. When shooting in remote areas, this becomes a real concern. If I were doing this project again, I would have rented an additional G4 PB. It's much nicer to just relax and sleep peacefully.
The Post Story
After the whole production portion of the project wrapped, on to post we went. The P2 Tracking Sheet was invaluable in keeping the media organized. Between the Tracking Sheet and the screen grab of the P2 Viewer screen grab, the assistant editor for the project reported very few instances of not being able to track and locate media. We ended up shooting a little over four hundred 8GB cards worth of media with no corrupt clips, lost media or other technical problems.
The finished pilot was successfully delivered to the production company and studio and is still being shopped and pitched for various media outlets.
What Did We Learn?
To recap our entire production experience, we definitely learned some powerful lessons:
The more technology changes, the more it remains the same.
P2 is a huge step forward but also a step back in that we are back to a similar workflow to film. A P2 card is much more like an exposed reel of film than a videotape in the sense that you must do something with it before it can be used. In our case, the P2 cards had to be transferred to redundant hard drives before we could edit the material. This takes resources. Resources like time, labor and multiple systems as well as a location for P2 Village. Now granted, P2 Village is not needed in all cases but for a multi-camera shoot with hundreds of P2 cards, you must be willing to spend the time and effort to do it right or you will lose media and your hair when you tear it out in frustration.
Preparation is essential.
You must make sure that all of your systems work in conjunction with each other. In our case, we had new components show up on set that we had never even seen (the microwave repeater). While I had tested the P2 Store as a P2 slot when using the P2 Store with the G5, I had seen that it worked fine. But I did not test it with a stopwatch against the speed of the same P2 media in the PCMCIA slot in the G4 PB. If I had been more thorough in my preparation, I would have seen this as the problem that it was and I would have been able to react to it and plan an alternative method that would have worked faster and better.
Redundancy with P2 is More Important Than Ever.
I have been shooting with P2 and the HVX now since February of 2006. There have been several instances when having the media backed up to a second drive or to DLT has saved my rear. To me, working with P2 is much more risky than tape in the sense of tape does not become corrupted, while drives and P2 media can become corrupted. Of course, P2 media doesn't get eaten like tapes can but tapes being eaten seems to be a much more rare occurrence. I advise all P2 users to always have at least one form of redundant media backup at all times. In the time since I worked on this shoot, we have had two instances of P2 media becoming corrupt and one case where the media simply disappeared. It's not a perfect bulletproof system but it is better than anything else that has some along so far.
P2 Is A Better Workflow
With my brief experience with this sort of workflow and P2 media, I am sold. I really enjoy working in this way with the instant non-linear access and not having to capture tape. I think that this sort of workflow, whether it's with P2 or some sort of newer, as of yet unthought-of media, it is the best way to streamline the production process. I am currently planning on going into production on my own pilot using basically a similar workflow. I know that the end results will look and sound amazing. Thanks for reading about my experience with P2.
Dan Brockett is an independent television producer based in Los Angeles, Ca. Dan's most recent projects include documentaries for the DVD releases of The Wizard of Oz, The John Ford/John Wayne Collector's Edition Box Set, both for Warner Bros., The Peter Pan Platinum Edition, Disney Treasures Wave 6 for Buena Vista Home Entertainment, NYPD Blue as well as producing and shooting two top rated episodes of A&E's Biography.
copyright © www.kenstone.net 2006
are either registered trademarks or trademarks of Apple. Other company and product names may be trademarks of their respective owners.
All screen captures, images, and textual references are the property and trademark of their creators/owners/publishers.