June 11, 2007
(Final Cut Studio 2)
By Wendy Gribble
Introduction
This article will take you through the process of creating Node Trees in the ColorFX
Room inside Apple's Color, along with a an overview of the FCP to Color round trip
workflow and the special situation of working with interlaced video inside Color. The
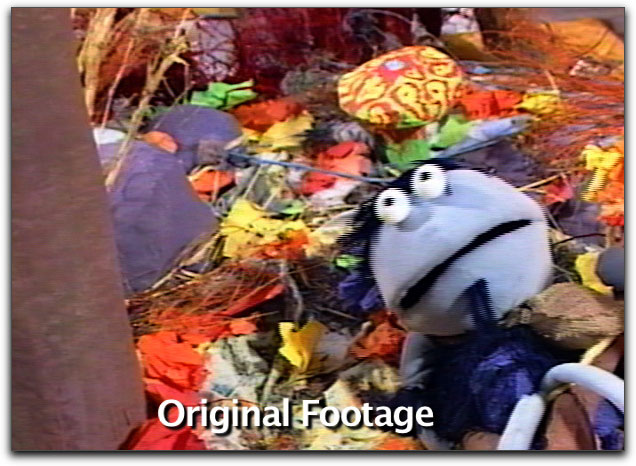
project will involve adding a vignette shaped blur to a sequence of interlaced video
shots. The footage is a chase scene from a puppet video called Zangth Valley, that I codirected
with the incredibly talented puppeteer Alice Chapman. Adding a vignette
shaped blur will fake the effect of a shallow depth of focus. This will direct attention to
the characters within the shot and, hopefully, disguise some of the less-than-perfect
backgrounds.
Getting Footage Ready for Color
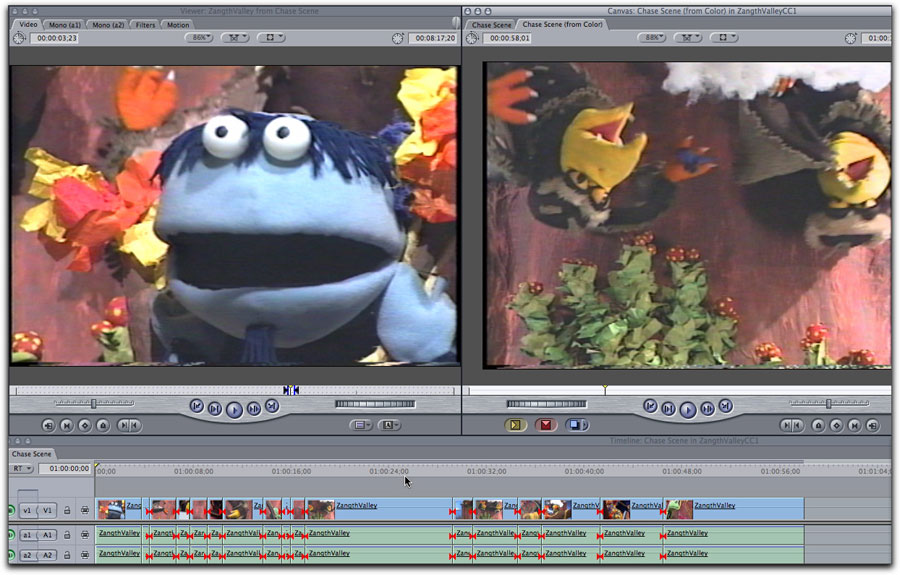
The first step is to edit the shots into sequence. Then the sequence needs to be prepared
for sending to Color. Although Color can handle multiple video tracks, it is easier to navigate the timeline if all the shots are on V1. For composite shots, keep in mind that transitions, filters, generators and titles are not included in sequences sent to Color, but are applied to the footage when it is returned to FCP, when using the FCP to Color round trip workflow. I am working with an edited sequence that
was archived to tape (thanks to modern color correction, I get another chance to polish
the project!) I place my chase sequence, which is a short, cuts only edit, on to the timeline
and use the blade tool to cut the movie into each shot so that when applying color
effects in Color, each shot will appear on its own (otherwise I would have to keyframe all
the color effects at every shot change!).
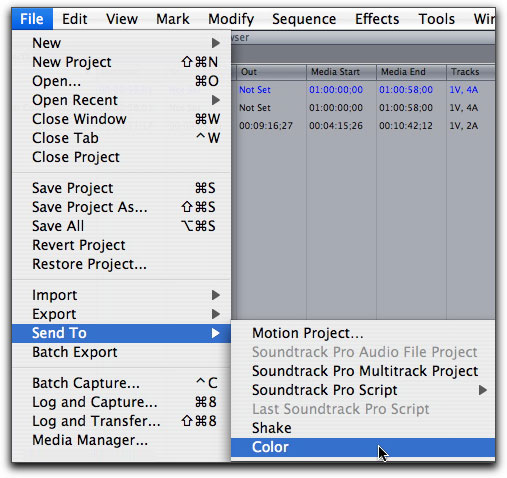
Once the sequence is ready, I select 'File/Send To/Color'. This launches the Color application and creates a new project with the exported sequence. So far, so easy!
I double check to make sure "Deinterlace Renders" and "Deinterlace Previews" are both unchecked in the "Project Settings" window of the "Setup" room, since I am working with interlaced footage and I want it to stay that way to preserve the smooth, interlaced motion.

My video has already been through a primary color correction, so I am skipping the primary and secondary rooms of Color to go straight to the ColorFX room. However, if I were color correcting this project from scratch, I would do the primary color correction before applying any color effects because the ColorFX Room applies its effects after the Primary and Secondary color corrections have been applied to the video.
The ColorFx Room
Select the ColorFX Room by clicking on its tab at the top of the screen.

The Node View will be empty at this point, since we haven't added any nodes, but the following diagram shows the parts of the room (in a two monitor setup):
Node List: this is where all the available, individual, color effects (Nodes) are listed.
Node View: this is the area where you combine Nodes to create effects. Nodes can be dragged and dropped or double clicked in the Node List to add them to the Node View.
Parameters Tab: this is where you set the parameters for each node, if applicable.
ColorFX Bin (not shown): this is where preset combinations of Nodes (Node Trees) can be loaded and saved.
Time Line: obviously, this is the video we are working on. The effects are applied to the shot under the playhead (vertical line)
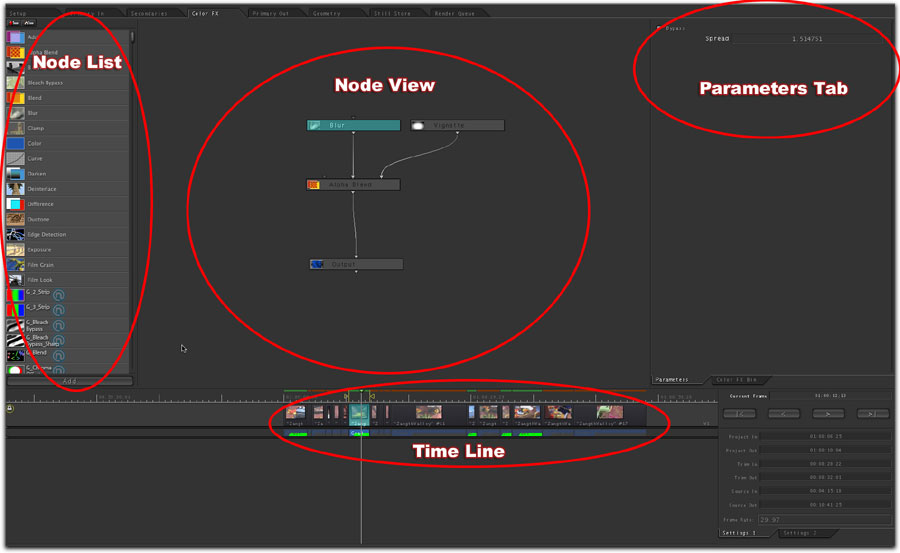
The ColorFX Room is used to apply color effects to the current shot. You cannot combine multiple shots or composite images together. Browse through the ColorFX Bin for a quick overview of the range of color effects that can be created. Loading a Node Tree from the ColorFX Bin erases any Nodes already on the Node View.
Building a Node Tree
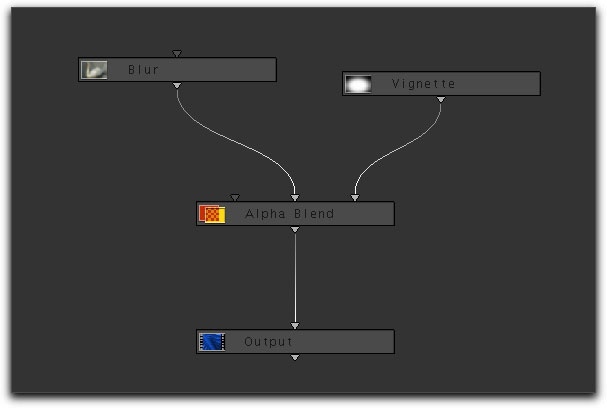
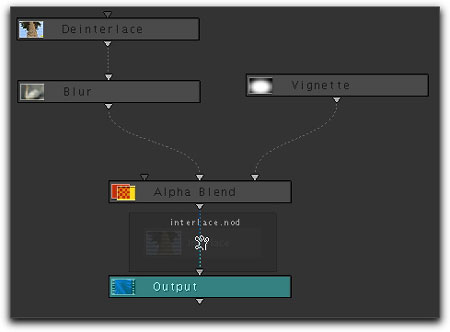
The color effect that I want to create is a vignette shaped blur. I start by dragging the
Blur Node onto the Node View. This adds two Nodes: the Blur Node; and the Output
Node. You must always have an Output Node to pipe the effect onto your video. Color
conveniently provides one when you drag a Node onto a blank Node View (double clicking
a Node in the Node List does not do this and you will have you manually add the
Output Node). If there is no Output Node, or it is disconnected, the color effects will not
be applied nor rendered to your footage.
Next, I drag the Vignette Node onto the Node View. I want to use the Vignette to create a mask for the Blur, so next, I drag the Alpha Blend Node onto the Node View.
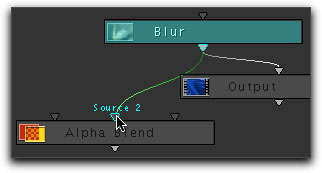 At this point, the Blur Node is connected to the
Output Node. The line connecting them is
called a "noodle". All Nodes have an output
noodle, and most have one or more inputs. I
want to connect the Blur Node to the Alpha
Blend Node. Clicking on the triangle on the bottom
of the Blur Node grabs the output noodle.
Drag this to the center input triangle at the top
of the Alpha Blend Node. If you hover over the input triangle, while dragging a noodle,
the input name will appear, in this case, "Source 2". In the same way, I connect the noodle
from the Vignette to the alpha channel input, the triangle on the far right of the Alpha
Blend Node. The left input on the Alpha Blend, "Source 1" is the image over which the
"Source 2" input gets blended. If this is left blank, the source image is used. To break a
noodle connection,
grab the noodle
from the input connection
and drag to
an empty place on
the Node View.
Nodes can be rearranged
by clicking
and dragging on
them. When adding
Nodes from the
Node List, dragging
a Node over an existing
noodle, will
add the new Node
into the tree at that
point.
At this point, the Blur Node is connected to the
Output Node. The line connecting them is
called a "noodle". All Nodes have an output
noodle, and most have one or more inputs. I
want to connect the Blur Node to the Alpha
Blend Node. Clicking on the triangle on the bottom
of the Blur Node grabs the output noodle.
Drag this to the center input triangle at the top
of the Alpha Blend Node. If you hover over the input triangle, while dragging a noodle,
the input name will appear, in this case, "Source 2". In the same way, I connect the noodle
from the Vignette to the alpha channel input, the triangle on the far right of the Alpha
Blend Node. The left input on the Alpha Blend, "Source 1" is the image over which the
"Source 2" input gets blended. If this is left blank, the source image is used. To break a
noodle connection,
grab the noodle
from the input connection
and drag to
an empty place on
the Node View.
Nodes can be rearranged
by clicking
and dragging on
them. When adding
Nodes from the
Node List, dragging
a Node over an existing
noodle, will
add the new Node
into the tree at that
point.
Clicking on any one of the Nodes I have added brings up its available parameters in the Parameters Tab. Double clicking the Node will cause the Preview window to display the effects of that particular Node, and open its Parameters. It can be useful to double-click a Node to display its output, then single click another Node to adjust its parameters while viewing the output of the first Node. The effect of any Node can be turned off by checking the "Bypass" box in the top of the Parameters Tab of that Node.
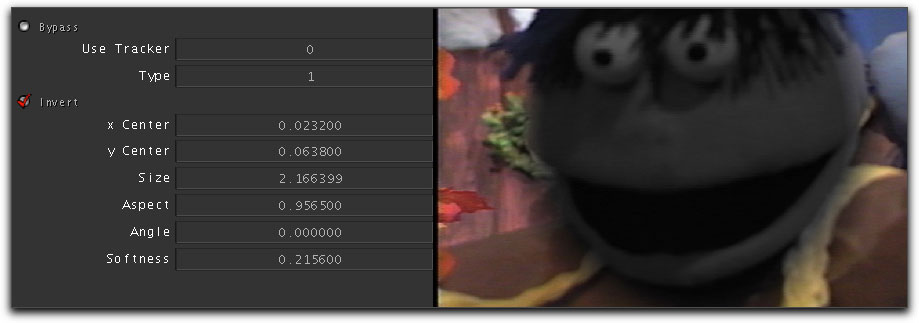
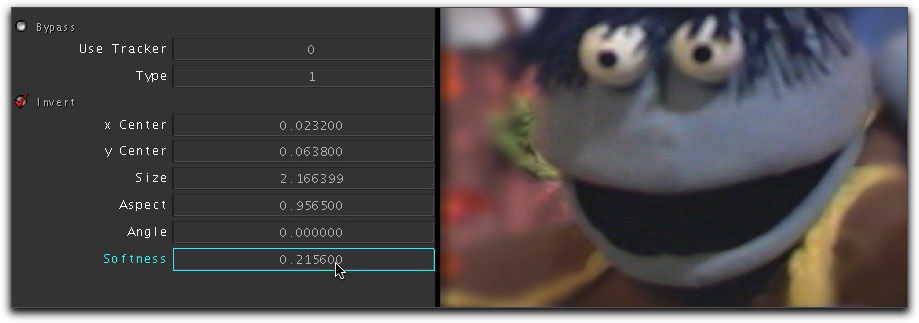
I want to create the effect of a blurred background, while keeping the sharpness of my main characters. I adjust the parameters for 'Size' and 'x/y Center' of the Vignette to create a circle just over the area of my performers. I also need to invert the Vignette and increase the 'Softness'. I adjust the 'Spread' of the Blur Node to get a pleasing blur for my background. The following pictures show the parameters of the Vignette Node and the Preview window. The first has the viewer set to display the Vignette Node (by double clicking on the Vignette Node). This only shows the effect of the Vignette Node. The second example has the viewer set to display the Output Node (by double clicking the Output Node and then single clicking the Vignette Node). This displays the combined Blur and Vignette, which is more useful for adjusting the level of the Vignette's softness parameter.
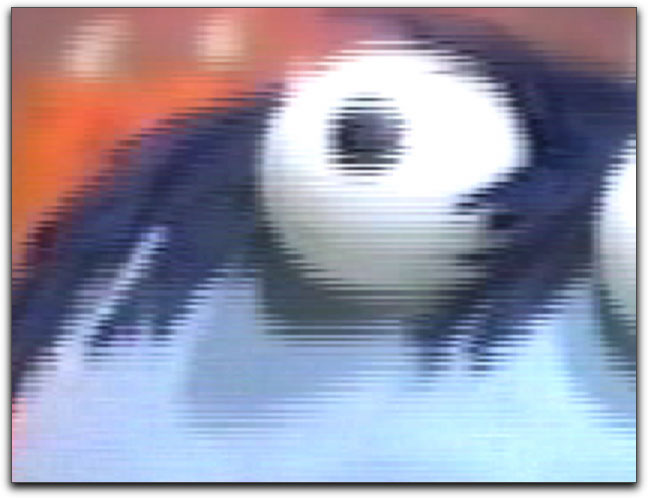
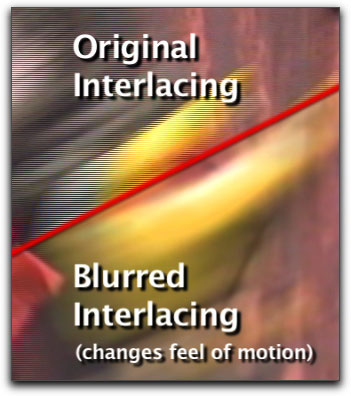
Working with Interlaced Video
There are times when interlaced video is desired, whether for the smoother motion it
can entail in a sports broadcast, or the aesthetic it produces for a news or documentary
show. My little video is interlaced, and I wish it to stay that way. This creates a small
hiccup in the processing because Color works with progressive frames. Color was designed
as a high-end color correction tool, intended to work with progressive
footage. For the most part color correction is the same for progressive video as for interlaced.
It only becomes an issue when working with blurs and denoising effects.The
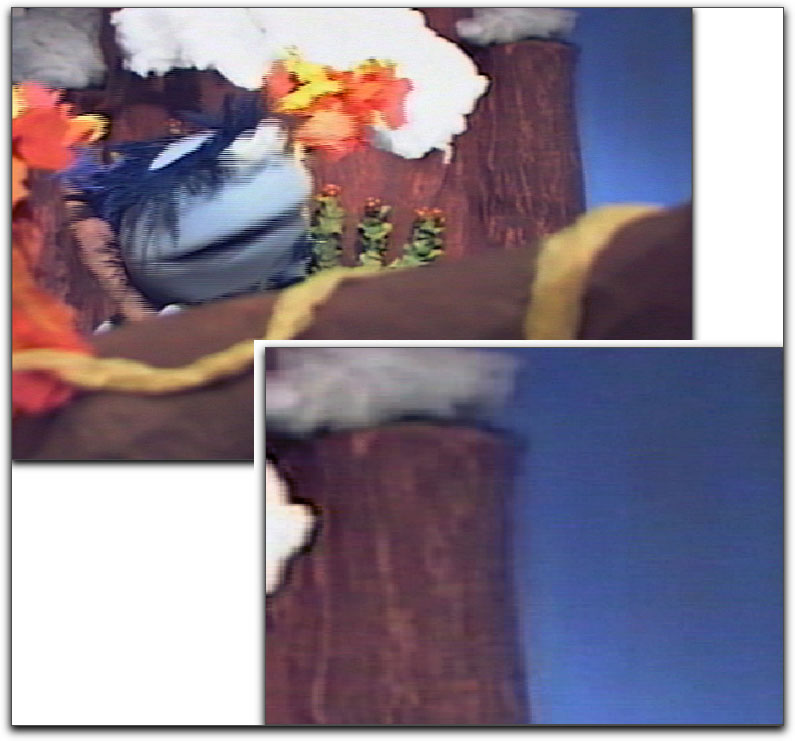
following image shows the combined interlaced fields as they appear in Color.
If I apply my Vignette Blur Node Tree, my fields will get blurred and the benefits of interlacing may be lost.
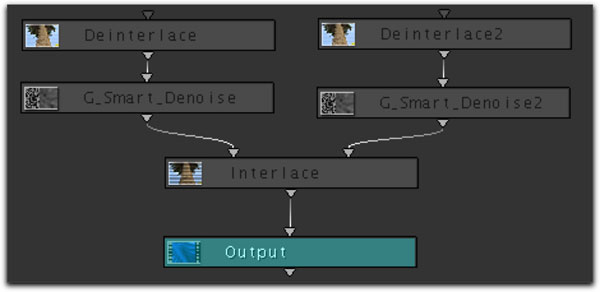
Fortunately Color has the tools to deal with this. The Deinterlace and Interlace Nodes enable me to apply my effects to each field, as a progressive frame and then recombine the post-effect fields back to interlaced video. We will need to have two branches of the Node Tree, one for the even field and one for the odd.
Drag the Deinterlace Node onto the Node View and release it over the input to the Blur Node. This will add the Deinterlace Node with its output going into the Blur Node. On the parameters for the Deinterlace Node, select "Even".
Drag the Interlace Node from the Node List and drop it on the noodle connecting Alpha Blend to Output.
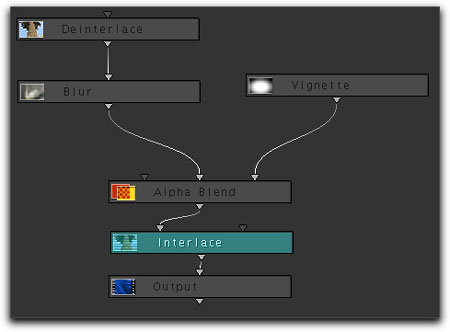
Notice that the Interlace Node has two inputs: the left one is for the even field; and the right one is for the odd field.
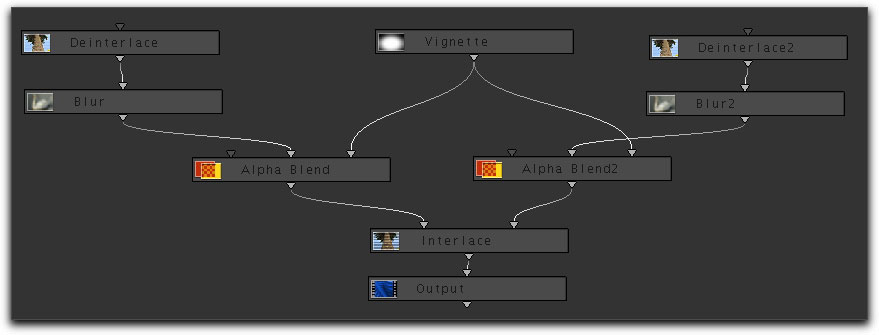
We need to add additional Deinterlace, Blur, and Alpha Blend Nodes for the 'Odd' side of the tree (we can use one Vignette Node for both sides of the tree). The settings for the Blur Node will need to be the set to the same value for both sides of the tree. The second Deinterlace Node needs to be set for 'Odd' in the Parameters Tab. We end up with the following tree:
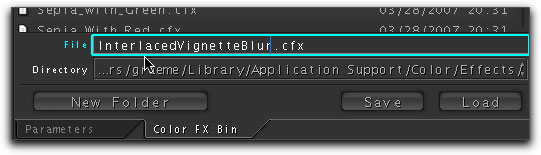 This is probably a good time to save the Node Tree. Click on the ColorFX Bin Tab. This
brings up the list of existing Node Trees and a saving/loading interface. I type an appropriate
name in
the 'File' field, and
click "Save".
This is probably a good time to save the Node Tree. Click on the ColorFX Bin Tab. This
brings up the list of existing Node Trees and a saving/loading interface. I type an appropriate
name in
the 'File' field, and
click "Save".
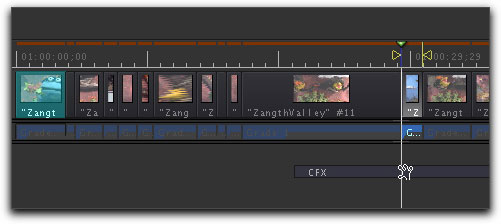
To apply the Node Tree to additional shots, I can move the play head to each new shot and load in my saved Node Tree. Or I can drag and drop the effect in the Time Line. I click on the faint blue track just beneath shot in the Time Line that has the Node Tree I want to copy, then drag to the shot where I want to add the Node Tree. As I drag, there is a hand with a box labeled 'CFX', for ColorFX.
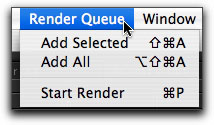
Once all the shots have the Node Tree and have been tweaked so the vignette is in the appropriate place, I add the shots to the Render Queue and set them rendering.
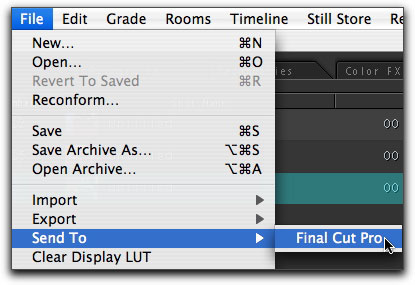
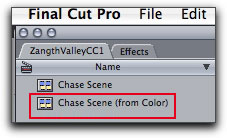
Once the render is done, I need to send the sequence back to FCP. Under 'File', I select 'Send To/ Final Cut Pro'. Color will process the XML and flip me back into FCP. The new sequence appears in the shots bin with "(from Color)" appended to the name.
Conclusion
This overview has shown how to create Node Trees in the ColorFX Room of Color and
touched on the round trip work flow with FCP. I have shown how to work around the
limitations of Progressive frame processing when working with interlaced video. This
workaround is only applicable when applying effects that change the spatial arrangement
of the pixels or image, such as blurs and noise reductions. Color correction that
adjusts levels works just as well on interlaced as on progressive footage.

Color is a very powerful color correction package that was designed for highend use. Thanks to Apple, this tool is now available to a lot more of us to use on our perhaps not quite as high budget productions.
Addendum
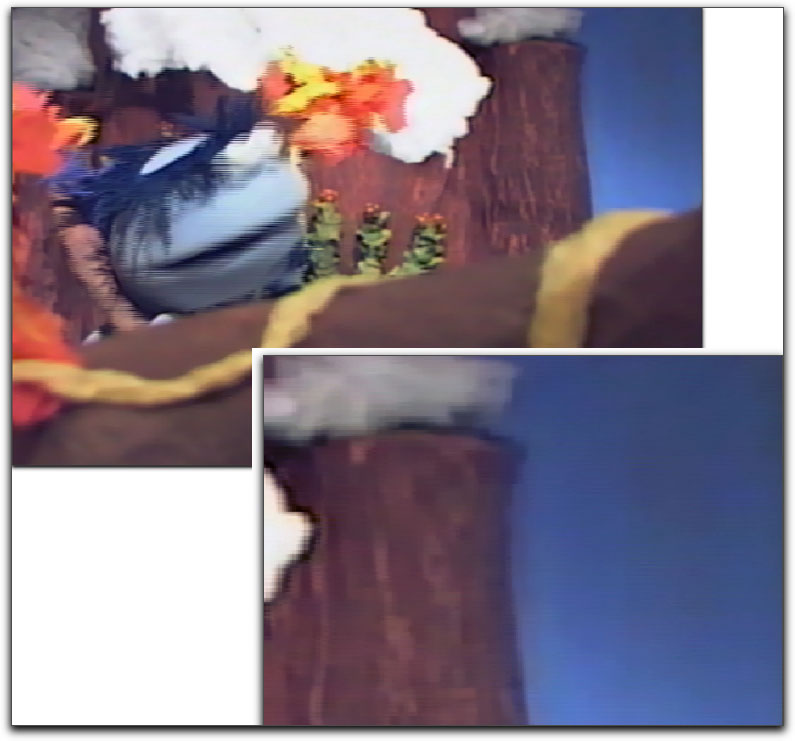
Since interlaced video is only a problem when adding blurs and denoising, I wanted to
show you a denoise Node Tree for interlaced footage.
Here is the "noisy" image:
Notice the blue
sky...
Applying a denoise, such as the Nattress Advanced Plugins for Color, G Smart Denoise, Node removes the noise, but also strips out the interlacing. This is the same problem we saw above with adding a blur to interlaced footage.
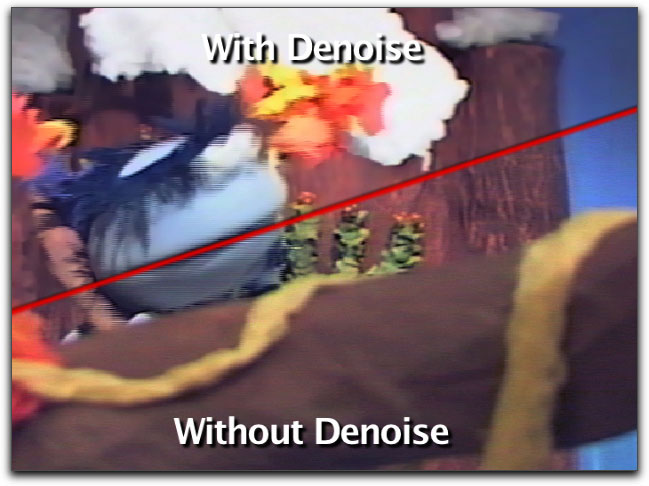
The solution is the same: create a two branch tree and modify each field separately.
The end result removes the noise from the flat blue sky, but keeps the interlacing.

Wendy Gribble studied Film and Video production from York University (BFA 98). She directed television commercials for CTV Ottawa before taking time out to start a family with husband and video guru Graeme Nattress. Wendy now works part time coding plugins and handling the administration of their home business, Nattress Productions Inc., www.nattress.com.
[Top]
copyright © www.kenstone.net 2007
are either registered trademarks or trademarks of Apple. Other company and product names may be trademarks of their respective owners.
All screen captures, images, and textual references are the property and trademark of their creators/owners/publishers.