

October 16, 2006
What's New in Final Cut 5.1.2
By Andrew Balis
A lot of Final Cut Pro users have been waiting for this release to bring more HDV camera compatibility, and streamlined Panasonic P2 support to FCP. This article isn't about that stuff at all. Instead, we'll focus on the other exciting improvements in this modestly named update (just up to 5.1.2 from 5.1.1). A couple bug fixes, a lot of new effects, more interactive video scopes and other goodies.
Navigating Tabbed Windows
First a nod to the nice folk at Apple for this nice new keyboard feature: being able to navigate through the various tabbed windows throughout Final Cut using keyboard shortcuts.

With any window active: Hold down Shift/Command/[ to move left through tabs, or Shift/Command/] to move right through tabs. Cool! So far I'm using the default shortcuts, but I think I'll eventually re-assign them to an easier key combination.
New Effects
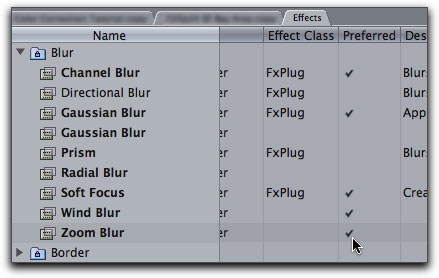
As for effects: Final Cut now supports something called FxPlug. Basically this means FCP can now read and access some filters and generators created for Motion. According to the documentation, if Motion is installed, several of these plugins are installed on your computer, and will show up in Motion and now in Final Cut as well.
What this means for us Final Cut users- new filters, and some better replacements for previous filters. All the new filters show up together with other video filters in both the Effects tab of the Browser and the Effects menu (and new generators in the Effects tab).
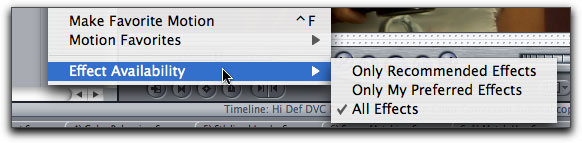
If you click into the Effects tab of the Browser, and start twirling down the arrows next to the different sub-bins, you may or may not be seeing all of the available effects. Go up to the Effects menu to Effects Availability and choose All Effects.
Now in the Effects tab you'll see all the new filters, but some effects will seem to be duplicated. Actually, some are the new effects and some are the original FCP effects. To determine quickly which is which, FCP original vs Motion plugin, look at the Effect Class column in the Browser. If it says the effect is FxPlug, it's the Motion filter equivalent.
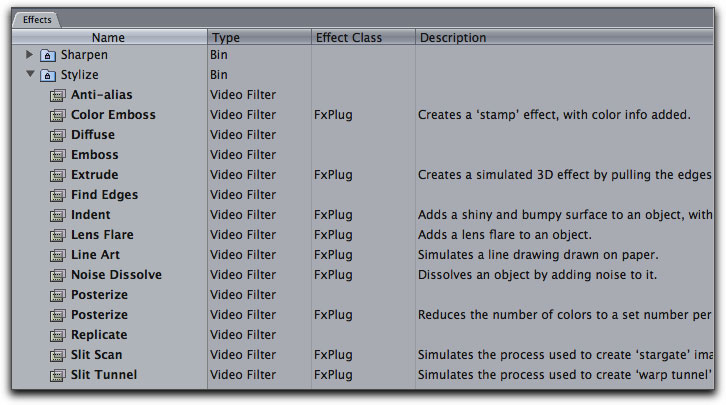
Also helpful, before even applying the new effect, you can also see a concise description of the effect in the Description Column. Nice!
If you don't know how to resize the column to see the full description, just click in between the right side of the column header and the next column (even if there isn't a next column). Drag right to open up the column.
Below is a list of all the new effects filters:
As for the Image Control and Stylize sub-bins, there are way too many new filters to list separately. In Image Control bin: Brightness, Color Balance, Color Reduce, Contrast, Desaturate, Gamma, Gradient Colorize, HSV Adjust, Reduce Banding, Sepia and Threshold. In Stylize bin: Color Emboss, Extrude, Indent, Lens Flare, Line Art, Noise Dissolve, Posterize, Slit Scan, Slit Tunnel, Vectorize Color and Vignette.
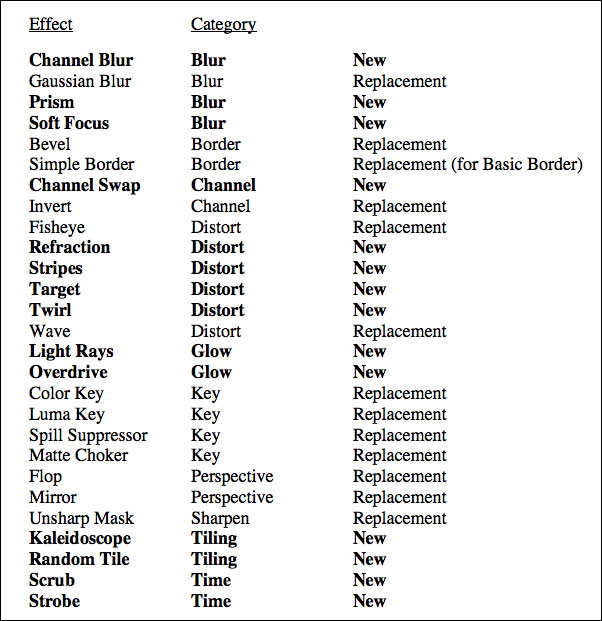
Above I wrote that some of the filters were replacements. What I mean is that some new filters are variations of an effect already available in FCP. In some cases, the Motion plugins have better or more flexible controls, in other cases the older Final Cut plugin has the better controls. Some filters just have different preset values to begin with. Go through and find out which variations of these filters works for you.
Possible issues or limitations of FxPlug support in Final Cut (like problems after rendering in some cases) can be found in a knowledge base article at Apple: FCP 5.1.2: FxPlug Restrictions and Troubleshooting.
For aiding in creating stylized looks, there are a few nice new filters for more "painterly" like effects including Line Art, Indent, Vectorize Color, Overdrive to more subtle flavoring like the Soft Focus filter and the Vignette filter.

|
|

|
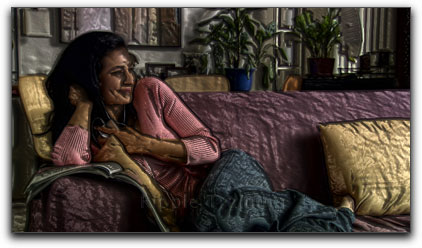
Original image
|
|
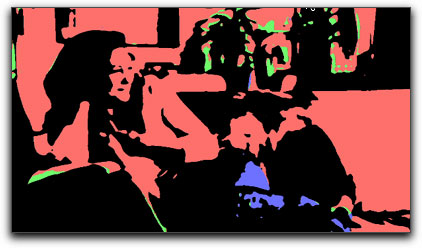
Line Art
|
|
|
|
Indent
(animating 'Light Rotation' a few degrees
creates some interesting results)
|
|
Vectorize Color
|

|
|

|
Overdrive (has an intense vibrating/pulsing effect)
|
|
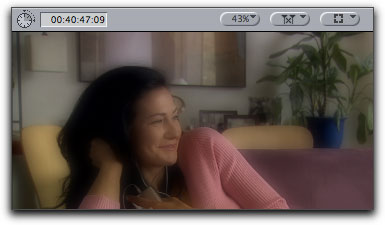
Soft Focus ('Amount' set high for diffusion effect)
|

Vignette (to darken and/or blur the frame's edges)
The Soft Focus filter is a great addition. To get this type of diffusion effect as seen above, in Final Cut I used to composite two clips, one blurred, one sharp, then apply either Screen or Add composite mode. Now I think I'll start using this filter and start pointing people to it as well. The whole effect is done simply and only one clip is needed. Of course there are 3rd party diffusion effects- but this one is good and its free!
Crop- the crop checkbox found in many of the filters works the same as it does in Motion. Its handy to keep the edge of the image from getting cropped or affected in an undesirable manner. This will keep the image's edges pinned to its original borders- in other words: un-cropped. In the example below- the effect of an extreme use of the Soft Focus filter is causing the edges to become slightly darker (actually a little transparent, cropped). But turning on crop lets the edge of the frame remain un-affected, in this case, a good thing.

|
|
|
Without 'Crop'
|
|
With 'Crop'
|
In the new Glow bin, the Light Rays filter could be handy for a variety of scenarios. If you animate its parameters higher (and possibly add a dip-to-white transition at the end), you can create a nice transition in or out of a flashback, "vision", etc.


As for text or graphic effects, the Extrude and Noise Dissolve are a couple filters that can work well to transform the standard Final Cut text generators into something more.

Above the Extrude filter is added to a standard Final Cut text generator (it has a few options for the look of the text and its 3D effect). The next example is the Noise Dissolve filter animated to create an interesting fade out.


Lens Flare can create somewhat realistic lens flares, point source highlights, a sun or other created light sources, etc. Reduce Banding can be used to limit the effects of banding (visible "jumps" from one shade to another along a gradient).
Preferred Effects
Another nice new feature for managing all these effects is something called Preferred Effects. On the Effects tab of the Browser is a new column called Preferred. If you click into the Preferred column for an effect, you're indicating which effects you'd like to see available. All other effects not checked won't show up in the Browser at all.
To now view only your preferred effects, go to the Effects menu > Effect Availability > Only My Preferred Effects. It's a great way to streamline the Browser so you only see the effects you use most often.

Even the bins where there are no effects checked inside don't show up. Cool! This also affects transitions and video generators, so make sure to turn on the ones you use most. This feature doesn't affect Favorites, they'll always show up, whether checked as Preferred or not. To see all effects again, simply re-choose All Effects from the Effects menu.
Video Generators
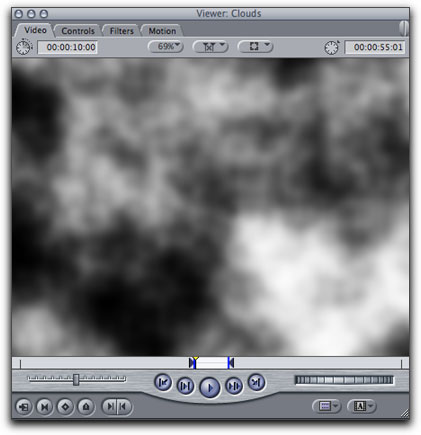
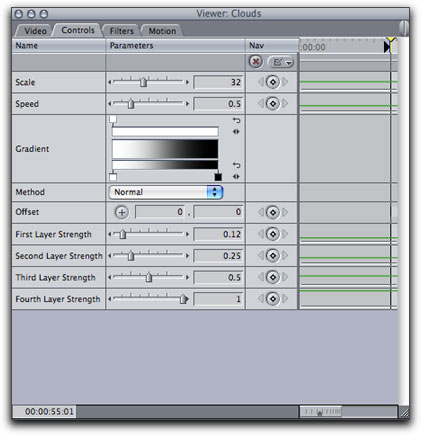
There are many new video generators as well, also found in the Effects tab of the Browser. I'll just point out my favorite here, the Clouds generator found in the Render sub-bin of the Video Generators. Smooth auto-animating generator that can be used as part of a composite as a matte or on its own as a background or other element (the colors can be modified in the Gradient section of the controls). For more info on these controls or any of these effects, check out the Motion documentation (from the Motion Help menu). The gradient controls are covered in the Motion online pdf manual on page 485.
Video Scopes
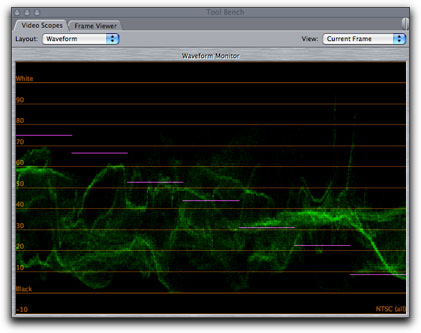
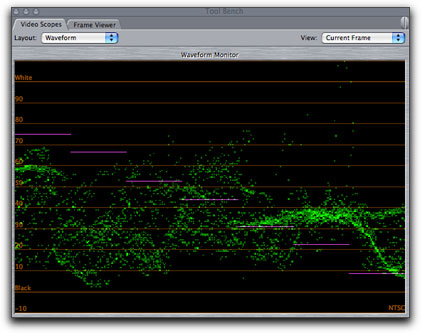
The new video scopes not only look different, but are also "live". The video scopes display updates while video is played back. Very nice. This of course is affected by the speed of your computer and the nature of the effects on a given image. Unlimited RT effects may be intense enough that the scopes freeze while passing over some of those sections of your Timeline. Simply render first in those cases.
Basically, the scopes have two overall display options:
|
|
|
All Pixels
|
|
Select Pixels (fastest)
|
All Pixels displays more scan lines and therefore more information about the image, although exactly how many scan lines are being sampled seems debatable. Apple's documentation "suggests" but doesn't state categorically that they read all scan lines. It doesn't seem so, especially not near the top or bottom of the frame, but my tests aren't that perfect to begin with, so I really can't say for sure. It definitely reads more than before- a good thing to be sure. During playback, only Select Pixels is available.
Select Pixels on the other hand displays the same amount of
information as previous versions of Final Cut, 16 scan lines from
across the image from top to bottom. Although the All Pixels view
shows more lines of information, the view (the traces) can be very
faint and hard to see in some cases, making it hard to read certain
parts of the frame. On the other hand, although Select Pixels shows
less scan lines, it is a brighter view than All Pixels as the "dots"
are bigger and more bold. Switching between the two views has so far
seemed like a good compromise to the seeming darkish limitations of
All Pixels.
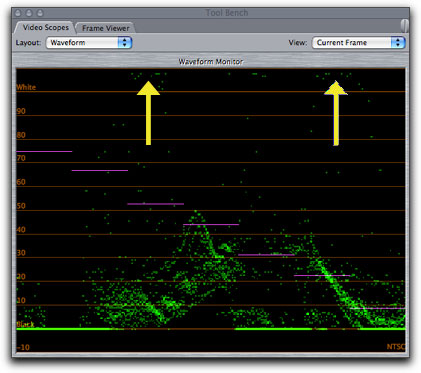
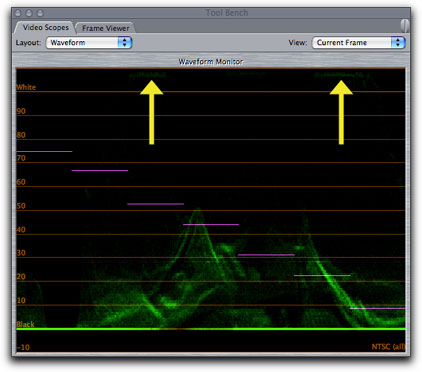
Notice the difference in these two waveform views, both of the same frame of video. The highlights could easily be missed in this case when just looking at All Pixels. Although there are traces there in All Pixels view, they're faint and hard to see.
|
|
|
Select Pixels
|
|
All Pixels
|
On the other hand, All Pixels shows more info, so its sometimes catching something that isn't seen in Select Pixels. One way to change between these two view is in the RT pop up menu in the left corner of the Timeline (as well as the option whether the scopes play live during playback or not).
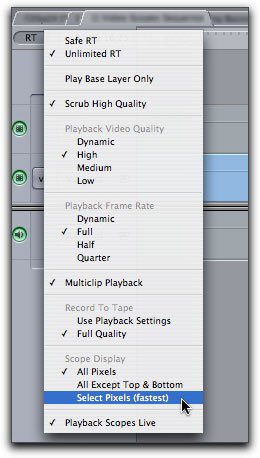
Although I would suggest a quicker way: map these commands to buttons or keyboard shortcuts for faster switching. Go to the Tools menu > Keyobard Layout > Customize. Type in a search for "pixel" or "scope" to bring up options for these two viewing choices.
Bug Fixes
This first is really just a behavior change. The Caps Lock key. When its toggled on in versions 4 and 5 (up until now in 5.1.2), it disables rendering but the display or warning would rarely come up. Since this affects not just effects, but any kind of "updating" in Final Cut like being able to see the 2-up window in the Canvas when Rippling or Rolling or performing other edits. Effects wouldn't update or display and the user was probably wondering why. The culprit to something working wacky was often tied to this key accidentally being turned on. In earlier (not RT) versions of FCP, a warning would appear in the Canvas and Viewer, but not as much in recent times. Now its back in full force all the time, so you'll quickly know why a certain function isn't working as expected.

The second little fix is proper viewing of the Mask Feather filter when you're real time preferences are set to Unlimited RT. For some time now, this filter that feathers the edge of a mask wouldn't display at all in the Canvas if the RT pop menu in the Timeline was set to Unlimited RT. Only when set to Safe RT. Now the feather is visible in either RT mode.
Hope you enjoy the new tools like I am.
Andrew Balis is a cinematographer, editor, post production consultant and Apple certified instructor teaching classes in Final Cut Pro to industry professionals at Moviola Education and UCLA. Andrew has authored numerous books, DVDs and other writings on Final Cut. His latest effort is the best-selling DVD Tutorial Color Correction in Final Cut Pro available at Ripple Training. He also co-authored the Apple Pro Series book Advanced Editing Techniques in Final Cut Pro 4, authored and co-authored the original Apple certified curriculum for beginner, advanced, and effects classes developed at Moviola Education, and wrote the Final Cut Pro curriculum for the Apple Education/CNN Video Journalism classes offered in the K-12 market.
[Top]
copyright © www.kenstone.net 2006
© 2000 -2006 Apple
Computer, Inc. All rights reserved. Apple, the Apple logo, Final
Cut Pro, Macintosh and Power Mac
are either registered trademarks or trademarks of Apple. Other
company and product names may be trademarks of their respective
owners.
All screen captures, images, and textual references are the property and trademark of their creators/owners/publishers.


