June 29, 2014
Ripple Training
By Mark Spencer and Steve Martin
Introduction
Apple has released its 12th update since launching Final Cut Pro X in June of 2011. While not every release has included new features, 12 updates in 3 years is still quite impressive, and Final Cut Pro X has matured remarkably in this time.
This latest release, version 10.1.2, includes workflow improvements and feature enhancements that should be welcomed by editors. Let's see what's changed.
Media Management
That's right - Apple has once again modified how Final Cut Pro X manages your media. First, let's take a look back: in the 10.1 release of Final Cut last December, Apple combined the project library and the event library into a single unified library that contains everything: events, projects, and media.
For an overview of the Final Cut Pro's Library Model, watch the free lesson #1 "Library Model Overview" from our Media Management tutorial.
This change vastly simplified media management while still providing the flexibility to choose to copy your media into the library, leave it in place, or copy it to an external location. However, there were still some limitations. In particular, files that Final Cut Pro generated, like transcoded media and render files, were always stored in the library. Thankfully, this is no longer the case. But before we get to that, let's look at a new pane in the Inspector called Library Properties which you use to set where your media will be stored.
Library Properties
When you create a new Library in 10.1.2, the Library Properties pane opens automatically in the Inspector - even if the Inspector was closed prior to creating the library. This new pane is the key to media management in 10.1.2.
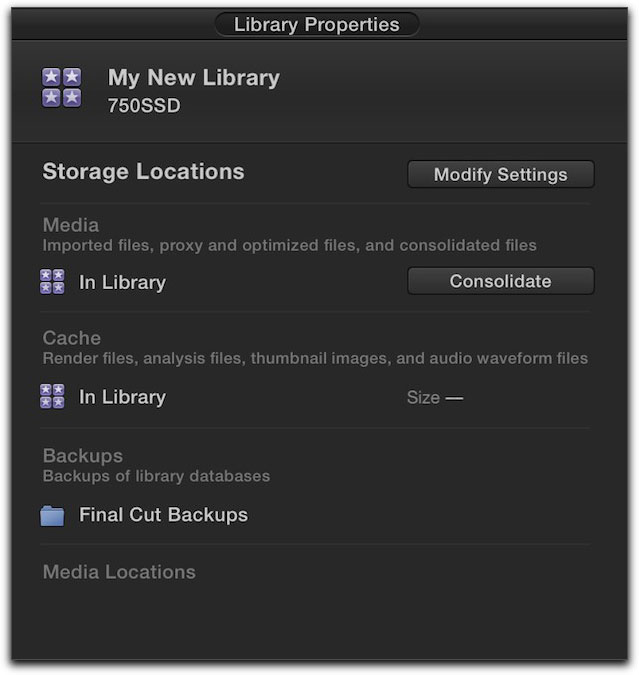
The Library Properties pane of a new library.
At the top of the window is the name of the library and the name of the volume on which it is stored. In the area below Storage Locations you'll see three subsections labeled Media, Cache and Backups.
Media includes not only files you import, including video clips, audio files, and graphics; it also includes transcoded media: the optimized or proxy files you can create either during or after import.
Cache includes render files, optical flow and stabilization analysis files, images of thumbnails, and clip waveforms - basically all the files generated by FCP X except for transcoded media.
Backups is exactly that - the location of your backup files. Remember, these are backups of the library database, not the media, so they are not very large.
By default, your Media and Cache files are stored inside the Library. Moving the pointer over the storage location reveals a tooltip that shows the file path of the media, cache, and backups.
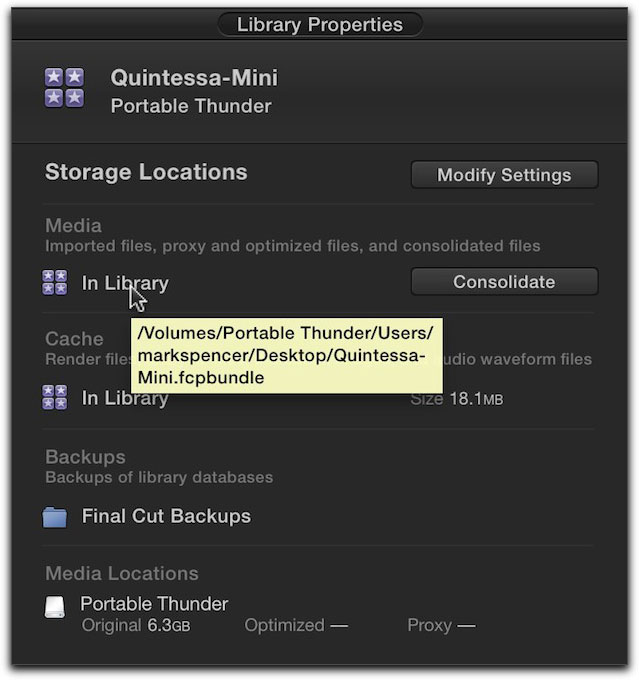
The file path of each storage location is revealed by a tooltip when moving the pointer over the storage location.
Modify Settings
As you might expect, you can change the default locations where Final Cut stores your media, cache, and backup files. You click the Modify Settings button to set the location for each of these three items.
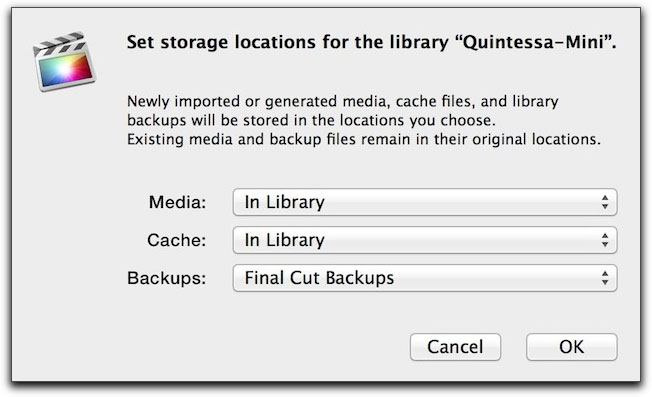
The Modify Settings dialog. Here is where you now set the location for your imported media, cache files, and backups.
Editors working alone will usually want to keep their media and cache inside the library so that their projects are entirely self-contained and easy to move to other drives and to archive. Editors who need to collaborate will want to store their media externally so that it can be shared with other editors.
To learn more about choosing a storage location, watch this free lesson #2 "Choosing a Storage Location" from our Media Management tutorial.
Because you now set the media location using the Modify Settings dialog, when you go to import your media you'll find that the import dialog remembers this target. In fact, you can't change the media location in this dialog like you may be used to. One of the reasons we think this is a good idea, is that by choosing your storage options one time in the Inspector, you no longer need to revisit that decision every time to import more media.
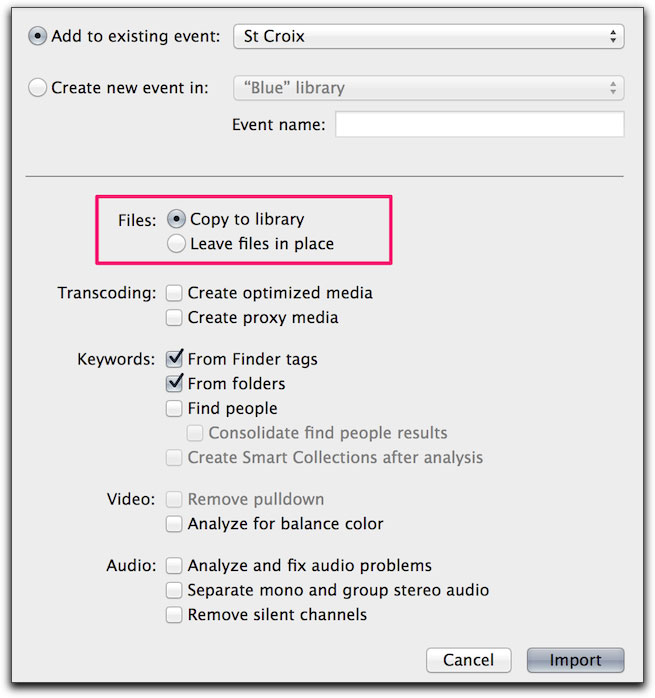
The Import Media dialog. If you choose to copy your media, the copy location reflects the setting in Library Properties.
Consolidating Media
Here is something very important to realize (and it's stated right there in the Modify Settings dialog): making a change to these storage locations sets where the media you import will be copied - but it has no impact on media that has already been imported into your library. To move existing media to a new storage location for an entire library, you use the Consolidate button in the Library Properties pane (note that this command is still available in the File menu, and can be used to consolidate a selected project or event in addition to an entire library).
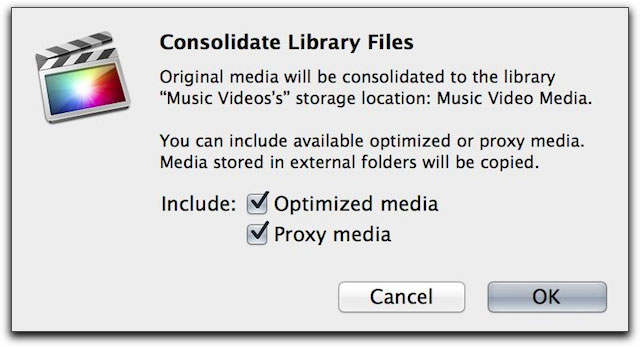
The Consolidate operation, when invoked from the Library Inspector, consolidates the entire Library.
Using the Consolidate operation, you can move not only your imported "original" media, but also any transcoded media - and you can move this media to any location on any drive. By setting an external location and consolidating, you'll create an extremely small library that can be easily shared with other editors who are either accessing the same media on a network or who have a local copy of the media to link to.
To understand the basic guidelines and operations in Final Cut Pro 10.1.2, watch this free lesson #3 "Guidelines and Operations" from our Media Management tutorial.
Media Locations
Once you've imported media into your library, it appears in the last section of the Library Properties window at the bottom called Media Locations. You can see at a glance the volume(s) that hold your media how much media your library contains, including original, optimized and proxy media. This is a great way to tell if you have media on more than one volume.
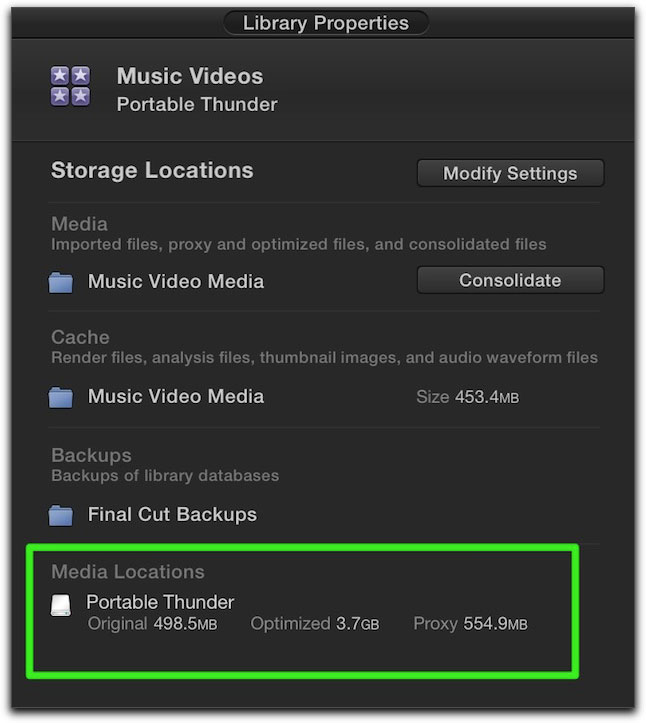
Media locations identify the total file size of original and transcoded media.
Deleting Transcoded Media
Before 10.1.2, if you wanted to delete transcoded media in order to free up disk space, you had to do so in the Finder by opening the library bundle. No longer: the File > Delete Generated Library Files command now includes the option to delete optimized and proxy media in addition to your render files. By the way, you can also use this command on a single project or event instead of an entire library.
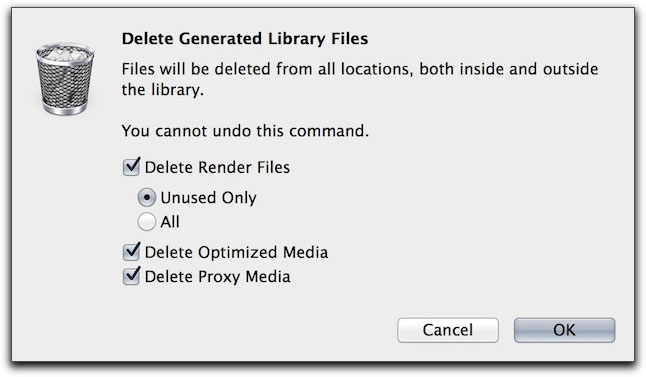
The Delete Generated Files dialog - complete with options for deleting transcoded media.
If only Final Cut Pro 10.1.2 included the option to delete your cache files!
Import Enhancements
If you're a fan of OS X's Finder tags, you're going to love how Final Cut can now create keyword collections based on these tags. For those of you not familiar with Finder tags, you can select single or multiple files, then tag them with a keyword that best suits the content you want to organize. During import, you can choose to have Final Cut Pro create keyword groupings based on these tags.
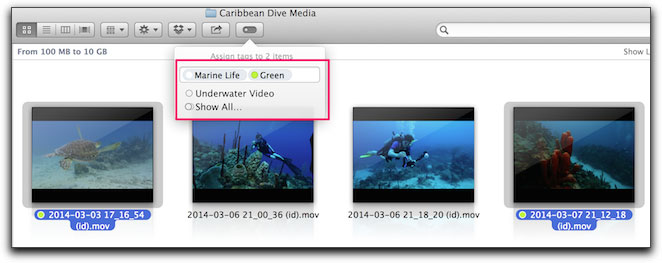
Tagging clips in the Finder.
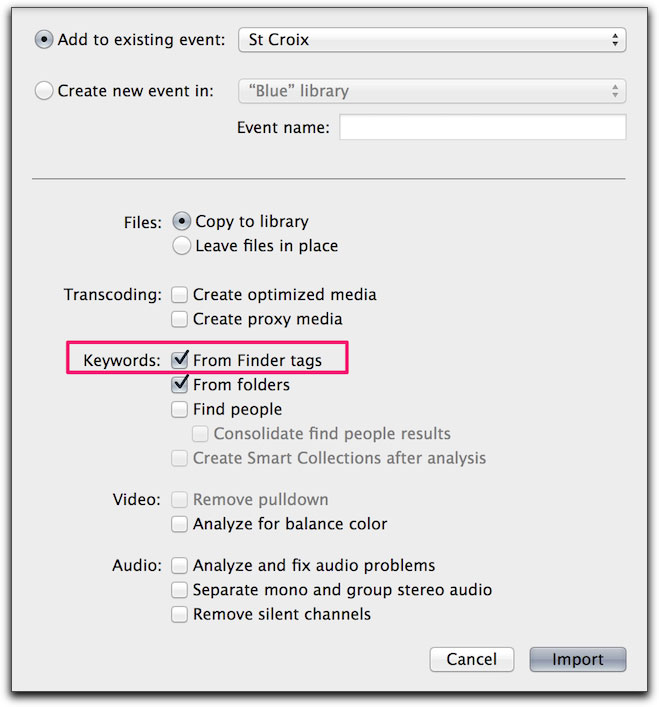
Importing Finder tags.
Once imported, you'll see Keyword collections appear in the event you targeted for the import operation.
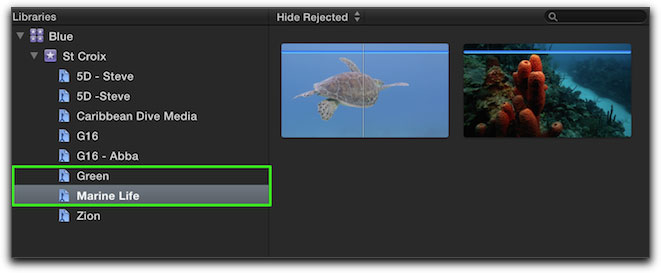
Finder tags as keyword collections.
If you've taken the time to organize your media in the Finder, sometimes you'll find it quicker to drag clips directly into Final Cut Pro. Previously, you could only drag clips into a specific event. Now you can drag clips straight into the Browser. If your clips are Finder-tagged, keyword collections will appear in the event after dropping.
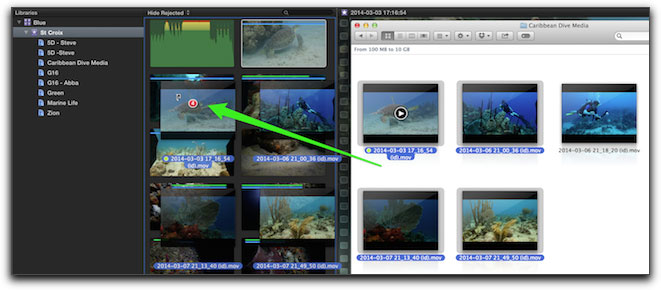
Dragging clips from the Finder to the Browser.
One small feature that has migrated from iMovie is the ability to sift the media on your camera's card in the Import window. If your card has hundreds of clips with both video and photos, this is a real time saver.
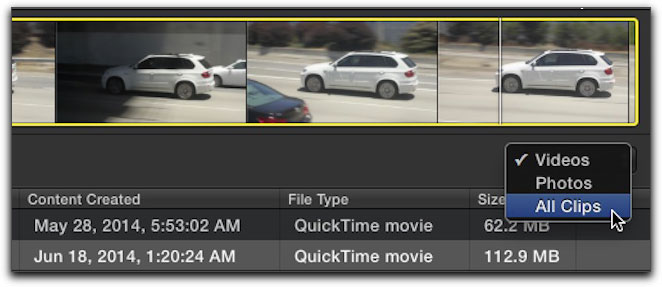
Filtering clips in the Import window.
File Management Changes
Many file-based cameras like Go Pros and DSLRs assign recurring filenames when recording to a cleared card. Therefore you can end up with two different clips that have the exact same file name.
Until 10.1.2, Final Cut dealt with this issue by renaming clips from certain cameras, replacing the original name with a time-date stamp to make them unique.
Now, files are no longer renamed - so you'll now recognize your file names inside Final Cut after importing them. This change should also make it easier for other applications to work with Final Cut through XML.
When you import your media to an external folder, Final Cut now places each imported batch of clips into a separate folder, and it's these folders that now get the date-time name.
You might think that creating additional subfolders would cause havoc when relinking media, but 10.1.2 has gotten much smarter in this regard. Final Cut now drills down into any selected folder or even an entire drive, searching for your files - even if they are stored in multiple folder locations. So relinking strewn-about clips is much faster.

Part of the Relink Files dialog that indicates FCP X has located files deep inside a folder structure,
even though only the top level of the volume was selected.
Organization Enhancements
Do you have a lot of events in your library you need to quickly organize? You can now sort them by Date or Name by right or control-clicking on the event and choosing an option.
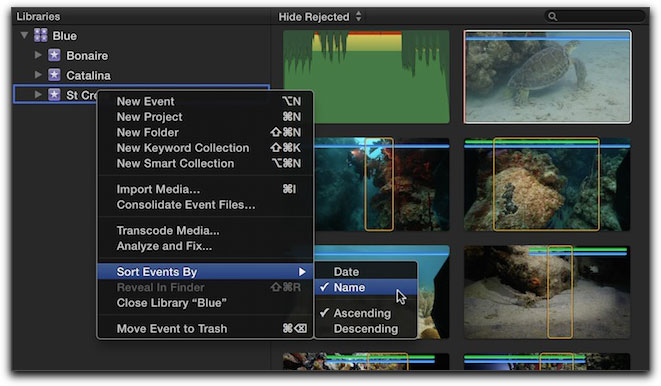
New Event sorting options.
Often during the edit you want to see a list of the clips you have not used in your Project. This option now appears in the Filter Clips menu.
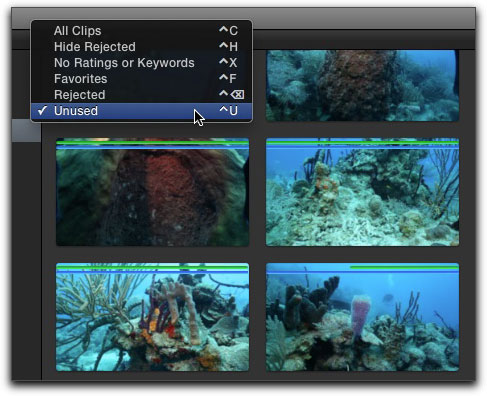
Filtering Browser clip by unused media.
But there is more you can do with this feature. You can perform smart searches and create smart collections based on whether the clip has been used or unused in a project. For example, you might want to create a smart collection that groups all your unused photos or sound effects together.
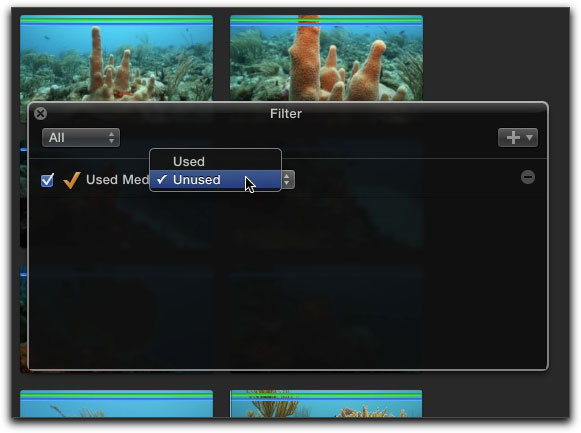
Creating a Smart Collection for unused media.
In addition to standard clips, Used Media Indicators now work on Compound, Multicam and Synced Clips. As in the previous versions, simply choose > Show Used Media Ranges from the View menu.
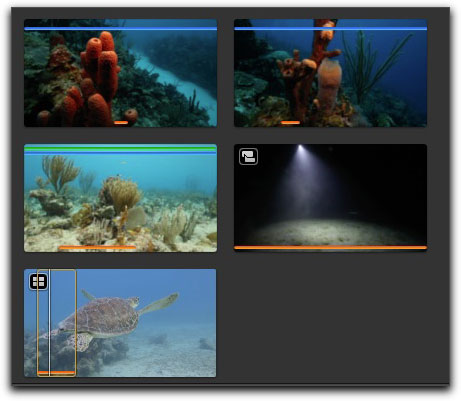
Unused media on a multicam clip.
Audio Enhancements
There is a new feature for adjusting the relative and absolute volume of a selected clip or group of clips. Like Copy/Paste Attributes in legacy FCP, this feature is not "new" but a useful one that has found its way back into the app.
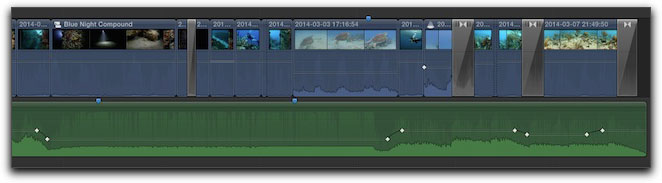
Audio keyframes.
In the image above, audio keyframes have been set to reduce the volume during certain parts of the project. It could be that after the volume changes, the overall volume needs to be boosted or cut to improve the mix or to meet delivery requirements.
With the clip or clips selected, choose an option from the Modify menu. Absolute would be the option you would choose if you needed the entire clip the same volume. An absolute volume change would wipe out any keyframes previously set.
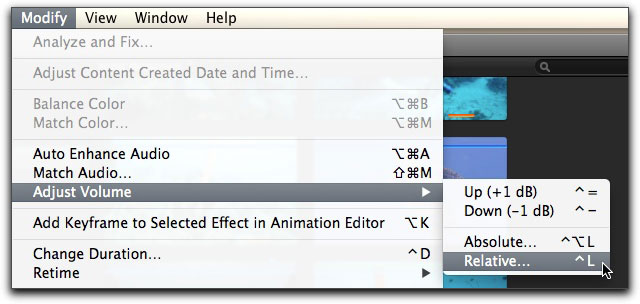
New volume adjustment commands.
With relative selected, the dashboard changes prompting keypad entry. The numbers entered are in decibels and Final Cut assumes positive number by default. Type a minus before the number if you want to reduce the volume by a relative amount.

Relative volume adjustment.
There are also some big changes to the Voice Over tool, (formerly Record Audio). There is now a useful countdown feature so you know when the audio will be "punching in" at the playhead location.
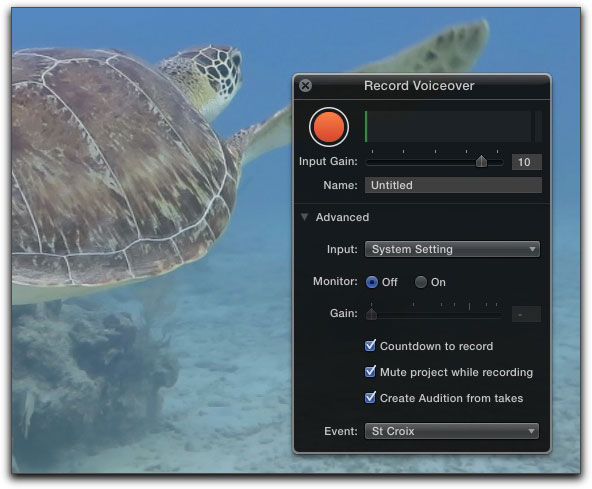
The revamped Voiceover tool.
Even better, after you've recorded the first take, each subsequent take gets placed into an audition clip allowing you to choose the best performance or read.
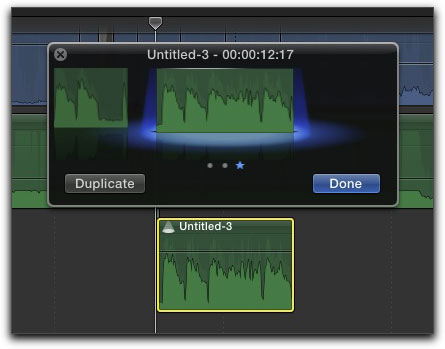
Voiceover takes placed into an audition clip.
Other New Features
XML 1.4
The Export Project XML and Export Event XML commands have been combined into a single Export XML command - this single file contains the information for the selected event (or library) and all the projects it contains. This is version 1.4 and has support for new data types. While you can use XML to share projects with other editors, its primary purpose has always been for sending off projects to third party software like DaVinci Resolve and Autodesk Smoke. To share projects with other editors we recommend using a Transfer Library - a process which we explain in detail in our Media Management tutorial, which has been written from scratch based on Final Cut Pro 10.1.2.
Keyframing Improvements
Keyframing has been improved so that if you have position keyframes with the same values at different points in time, you shouldn't see any movement between them - although I personally have still found ways to make this happen. Linear and smooth interpolations should now be applied both spatially and temporally, resulting in smoother animations.
ProRes 4444 XQ
Final Cut Pro 10.1.2 supports the new ProRes flavored called 4444 XQ, intended for high-end production work.
More
You can now delete your preferences files automatically by holding down the Option and Command keys when launching Final Cut.
Synchronizing clips is faster and more accurate.
If you shoot with ARRI cameras containing custom 3D LUTs, those are imported and can be viewed as realtime effects.
If you work with large libraries, you should find that they open, close, and copy faster.
And while sharing 4K videos to YouTube has been there, you can now do the same when publishing to Vimeo.
Conclusion
As you can see, there have been a lot of improvements made in this latest version of Final Cut Pro 10.1.2. If you want to get a better understanding of how to work with your media in Final Cut, check out our three free lessons from our brand new Media Management tutorial.
Or, check out the Full Tutorial, which covers many media management scenarios you are likely to encounter.
[Top]
copyright © Ripple Training - Mark Spencer and Steve Martin 2014
are either registered trademarks or trademarks of Apple. Other company and product names may be trademarks of their respective owners.
All screen captures, images, and textual references are the property and trademark of their creators/owners/publishers.