August 10, 2009
Ripple Traning -
Click here to view Ripple Training's free tutorial movies
on the new
Final Cut Studio.
By Steve Martin
About this time every 2 years Ken petitions me for my written musings on the latest features of the new Final Cut Pro. By now you've most likely read about all the money shot features such as the new Speed Tools, expanded ProRes family, iChat Theater, etc. My goal is not to regurgitate these features, but rather show you why it's the little improvements that often make the biggest wake in the editorial world's collective conscious. So if you please, below are my top ten most memorable and life-changing enhancements to the new Final Cut Pro 7.
1. Segment Freeze Frames
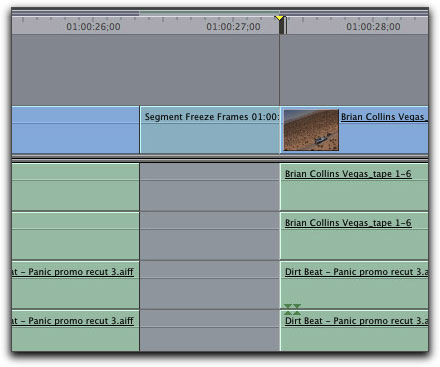
Of all the features getting the most attention are the new speed tools. The Apple engineers have greatly simplified the approach to creating constant and variable speed changes to your clips. I covered these tools in much detail in our free final cut studio tutorials found on my website, so I won't cover them again here. What I want to show you is how to use the new speed segment dialogue to create freeze frames that are much simpler and less time consuming than in previous version of Final Cut Pro. In version 6 and earlier, if you wanted to create a freeze frame, you would park your playhead over the frame you wanted to freeze, press Shift-N to create the freeze, set the duration in the Viewer, then insert edit the freeze into the timeline at the playhead location. The problem with this method is that if there were any audio tracks directly below the inserted clip, they would be split and moved later in time to accommodate the freeze. As you can see in the image below, a yawning gap in your audio tracks would be created by the insert edit.
To avoid this, the workaround for many editors was to lock the audio track by pressing Shift-F5, before inserting the freeze frame. But this was not ideal either, because if there were linked clips to the right side of the inserted clip, these clips would become out of sync. Needless to say, there was not a simple, straightforward method of creating freezes without creating a ton of work. Until now.
Using Final Cut Pro 7's new Speed Segment window, creating freezes is simple and your audio is never affected. In order to see what's going on with the clip's speed, I recommend turning on the keyframe overlay.
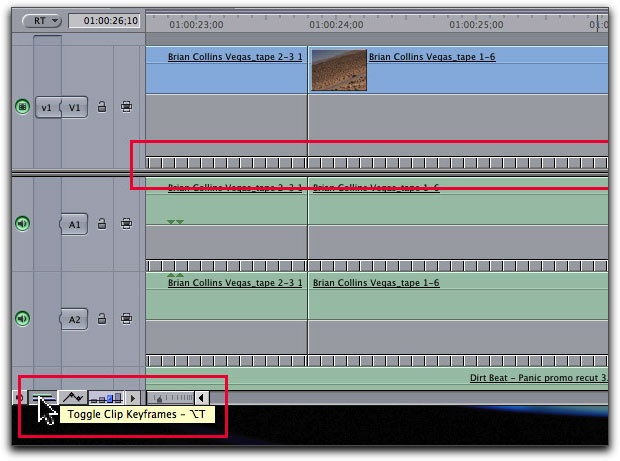
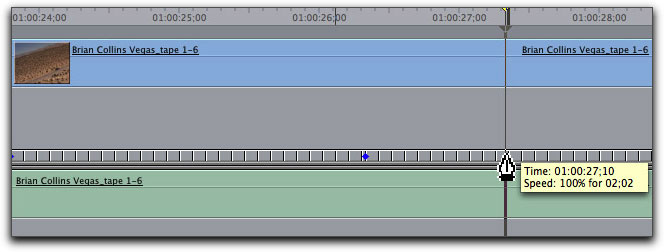
The vertical lines below the clip are called speed ticks and are very helpful for evaluating how your speed effects are being applied and distributed throughout the clip. To create the freeze, make sure your playhead is parked over the frame you want to freeze. Move you mouse pointer into the speed tick zone - your pointer will become a pen icon. Click once to set a speed keyframe.
Let's say you wanted to create a 1 second freeze frame. Press the shift key and tap your right arrow to move the playhead one second later. Create another speed keyframe at the playhead location with the pen tool.
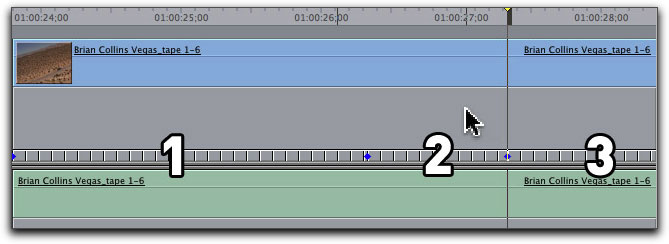
Speed segment are created by pairs of speed keyframes. The first segment falls between the first and second keyframe, the second segment between the second and third keyframe, and the third segment between the third and forth keyframe.
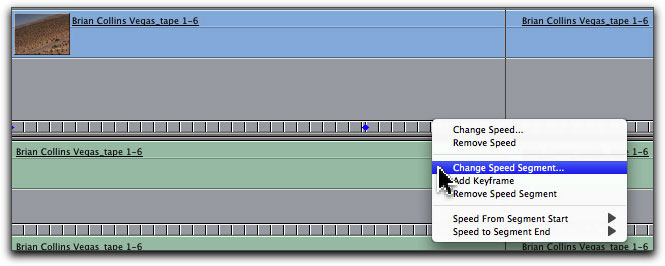
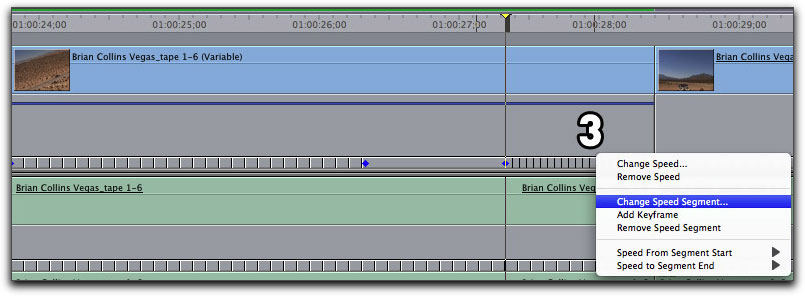
With segments you can control the speed of a particular segment as if it was it's own separate clip. Right-click between the second and third keyframe (segment 2), and choose "change speed segment".
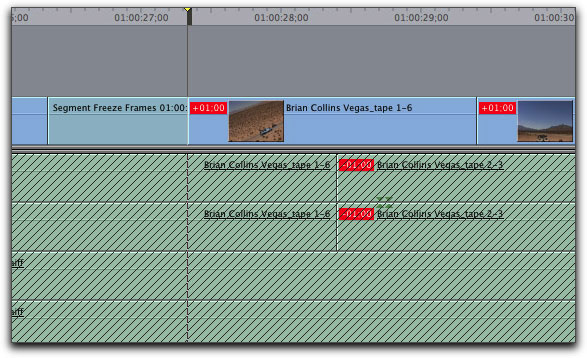
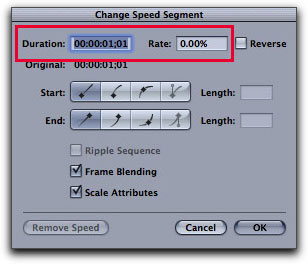
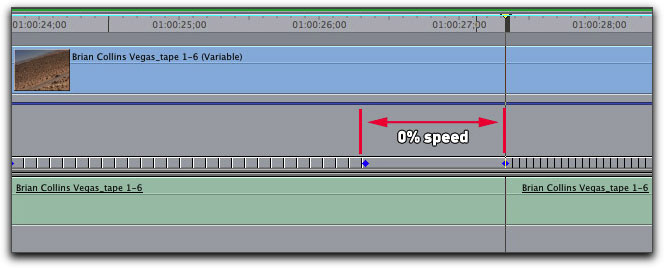
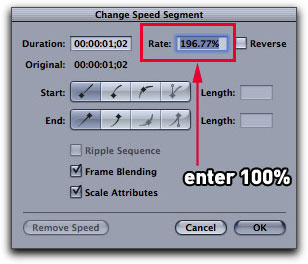
The Change Speed Segment window will appear. In the rate field, enter a zero percentage value and press return.
In the timeline a single elongated tick appears between segment 2 that indicates a freeze. The speed of segment 1 is still at 100% speed, but segment 3, was sped up a bit as indicated by the ticks that are closer together.
Here's why this occurred: clips always have a fixed duration with a fixed number of frames. Lets say for argument sake, that you had a clip that was 300 frames long (10 seconds at 30 fps) . If you set your freeze at frame 275 and held that frame for 1 second, then frames 276 to 300 would need to be compressed or sped up in order to "fit" all 300 frames within the 10 second duration. Because the clip is divided into segments, each one can be treated like a separate clip. Therefore, returning the last segment to 100% is a simple matter. Right click in the speed ticks in segment 3, and choose "Change Speed Segment".
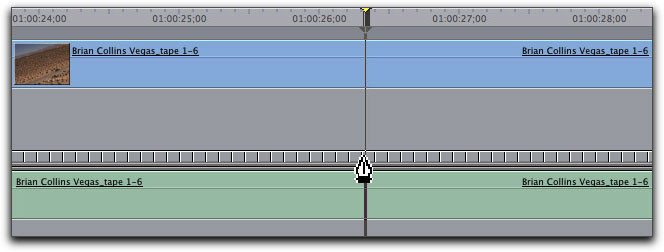
If you look at the ticks before and after the freeze, they are evenly spaced reflecting 100% speed before and after the freeze. And the best part is, the audio is not affected at all. This has to be my favorite new feature.

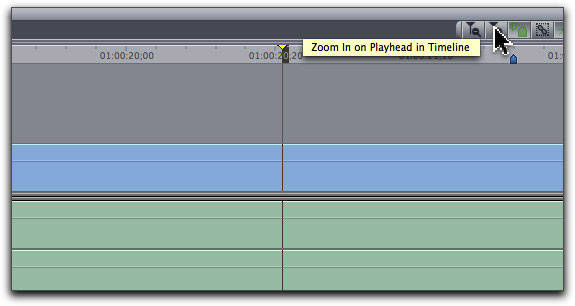
2. Zoom In/Out on Playhead
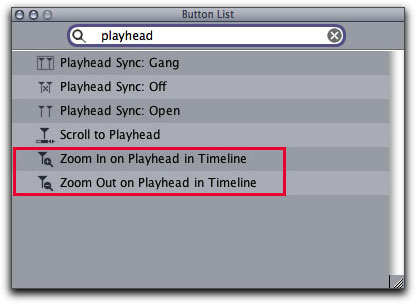
Another one of my favorite little features are some nifty new button shortcuts. With each new version of Final Cut Pro it seems they are running out of room in the menu system, so you'll have to dig them out of the button list window and add them to your button bars. Call up the Button List window by pressing Option-J. In the search field, type out "playhead". There are two new navigation buttons that are very useful when needing to zoom to a particular section of your timeline. - "Zoom In on Playhead in Timeline" and "Zoom Out on Playhead in Timeline".
When added to your button bar and clicked on, they zoom in or out on your playhead. So you're thinking, "big deal, I can do that with my option and plus/minus keys". Yes you can, but if you have any clip or any item selected in the timeline, the zoom will focus on the selected clip not your playhead. I've always had to take an extra step to deselect all my clips (Shift-Command-A) before executing a zoom with the option/+, option/- method. With these buttons, the zoom will always focus on the playhead regardless of what is currently selected in the timeline. So yes, I really like these buttons.
3. Add and Edit Markers on the Fly
Let me show you another button that's awesomely timesaving. In the button list window enter "Marker". In addition to markers now offered in designer colors, there is a new set of buttons for adding and editing a marker in one click. You can either add these markers to your button bar, or you can use the keyboard shortcuts for the marker type. The shortcuts appear on the right side of the window.

Regardless of how you choose to execute the command, what is especially cool is you can add and edit the marker while playing back your sequence in real time. Just start playback, and when you want to add and edit the marker, click the button (or use the keyboard shortcut) and the edit marker window will appear. Enter your text, press return and the playhead keeps on trucking.
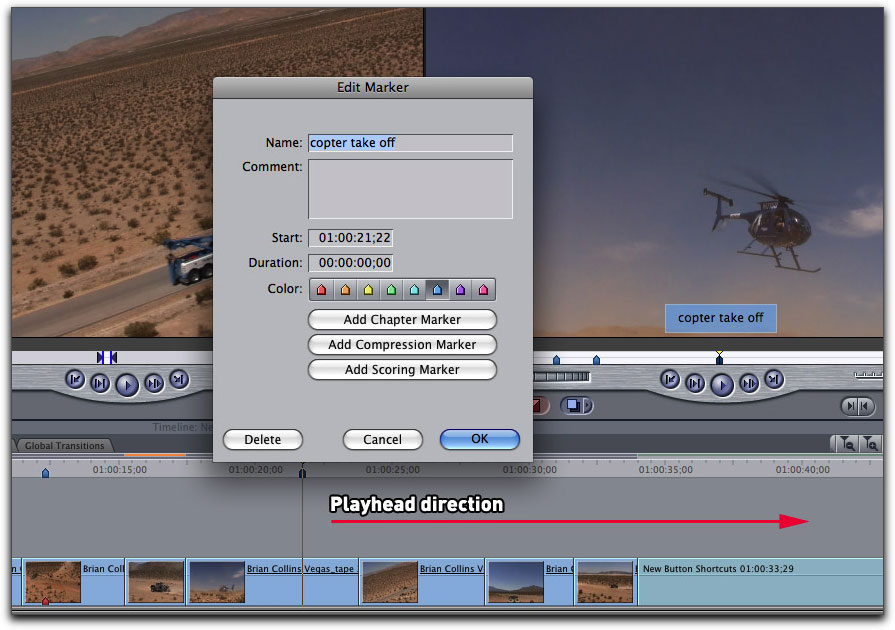
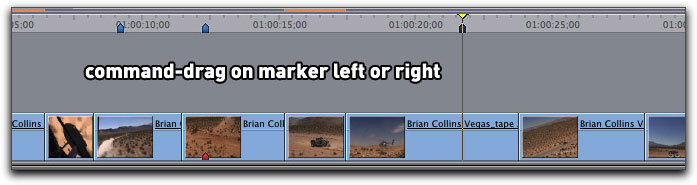
If you didn't have your coffee that morning and we're not able to type as fast as you would prefer, you are not stuck with the marker position because you can now easily move the marker by Command-dragging on it to reposition it.
4. Exporting Markers as Text List
When you're finished, depending on the marker type you were working with, you can export the movie with chapter, compression or scoring markers or any combination thereof. If you are working collaboratively, a feature that has long been needed is a way to export your markers as a tab-delimited file that can be read and opened in Numbers or Excel. With your sequence selected, go to the File menu and choose Export > Markers as Text List
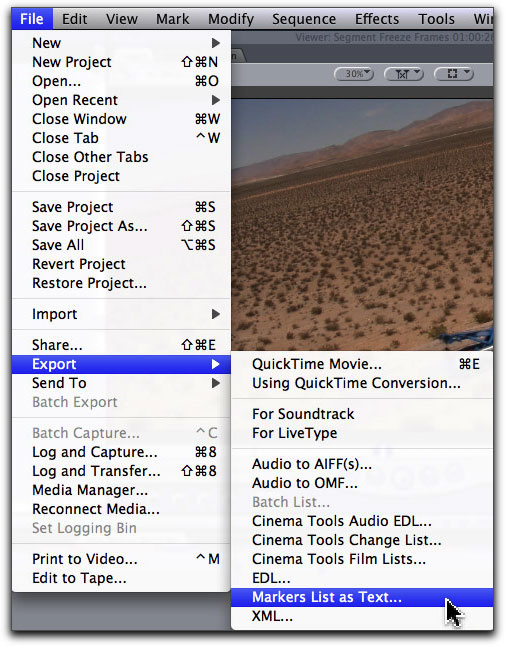
Save the file to your hard drive, then drag the file onto the application icon of Numbers or Excel and it will open as a document with all your marker info.
5. Reveal Affiliate Clips in Front Sequence
Saving the best for last, this next one is truly my favorite - the new "Reveal Affiliates Clips in Front Sequence" command. By now you should know how to locate it in the Button List window. This command, unlike the others, does appear in the menu system. Here's why this command is so powerful. Let's say I wanted to know how many times a particular clip was used in a sequence. Select a clip in the timeline, then choose Reveal Affiliates Clips in Front Sequence from the View menu.

Every affiliate clip becomes selected in the timeline. Not only can you quickly identify how many times the clip was used, you can also drop a filter on any of the selected affiliates and the filter will be applied to all of them.
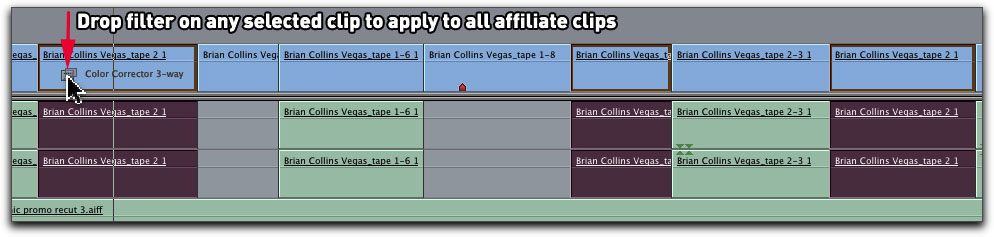
This feature alone will be a boon to colorists who need to apply a corrective filter to affiliates from the same camera roll or reel.
Enhanced Match Framing
Match-framing has always been a staple tool in the editor's toolbox. For those of you who are unfamiliar with this feature, it refers to the editor's ability to park the playhead on any frame in a sequence, and by pressing the F key, call up the clip in the viewer whose in and out points match the sequence clip while parking the Viewer playhead on the exact frame the Sequence playhead is parked on.
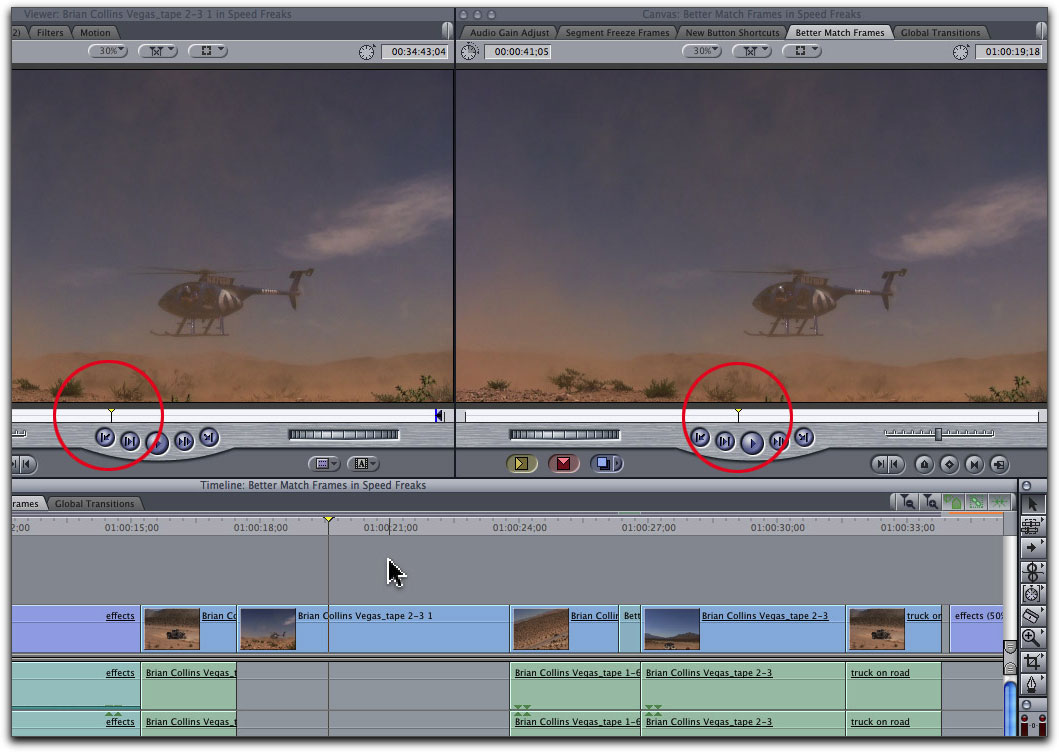
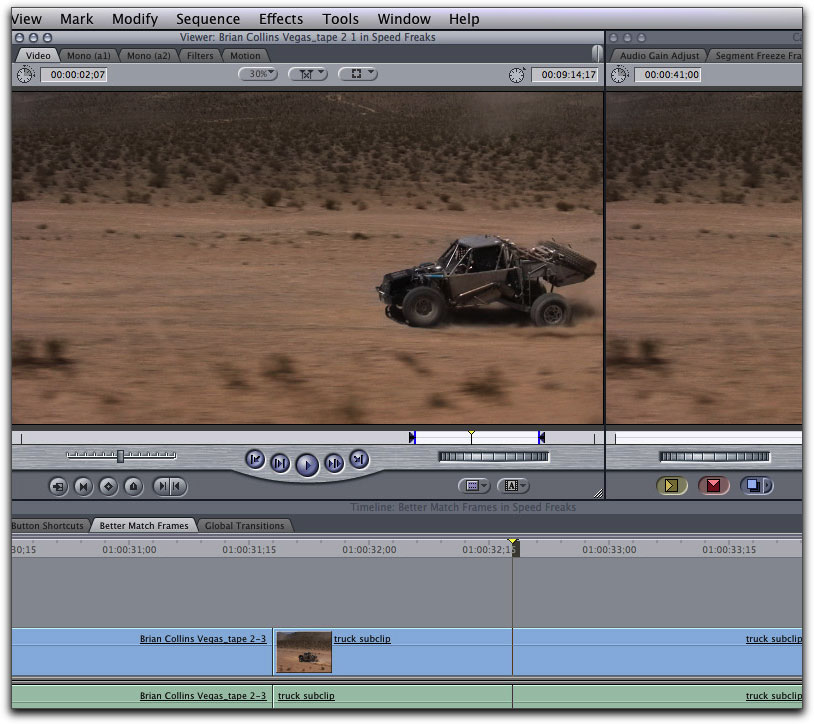
So why would an editor want to do this? There are any number of scenarios that could explain the utility of this feature, but let me just walk you through one of them that is quite common. Let's say for example, that you had a clip edited into your sequence that at the time of the initial edit, a decision was made exclude the audio from the clip. Days later, someone in your creative group, perhaps a producer or director, decided he or she wanted to see the edit with the audio. Without the match frame feature, this would require locating the clip in the Browser, loading it into the viewer and marking the in and out points so they matched the sequence clip. With match frame, all of this happens in one keystroke (f key). In the example below, the playhead is parked on the first frame of the clip to be matched.
Press F to match frame the clip into the Viewer. In the Timeline, make sure your audio and video are patched to the tracks you want to overwrite
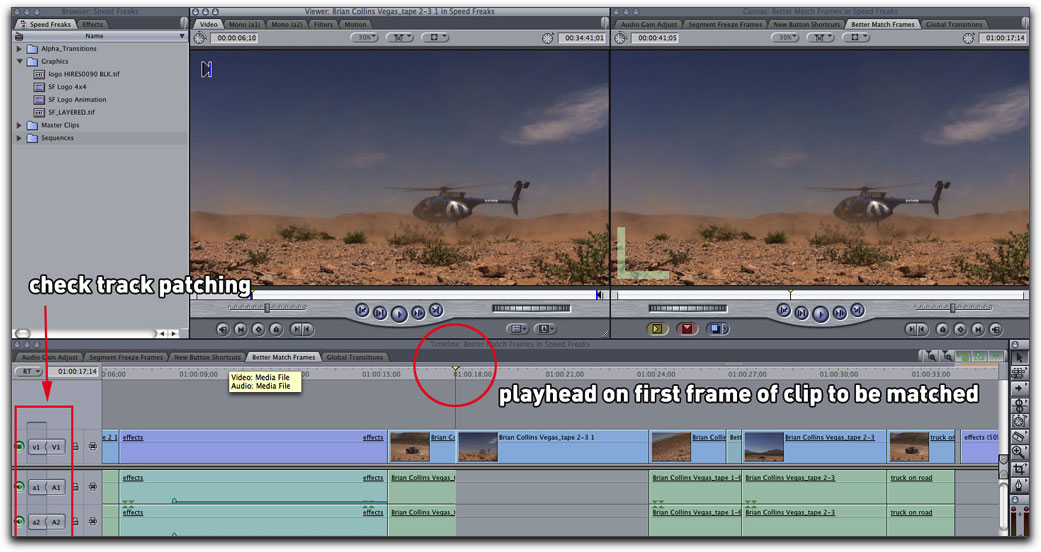
Press F10 to overwrite the clip in the sequence with both video and audio.
I set up this scenario so you can see why the match frame feature is important before I show you how Final Cut Pro 7 has improved on this feature.
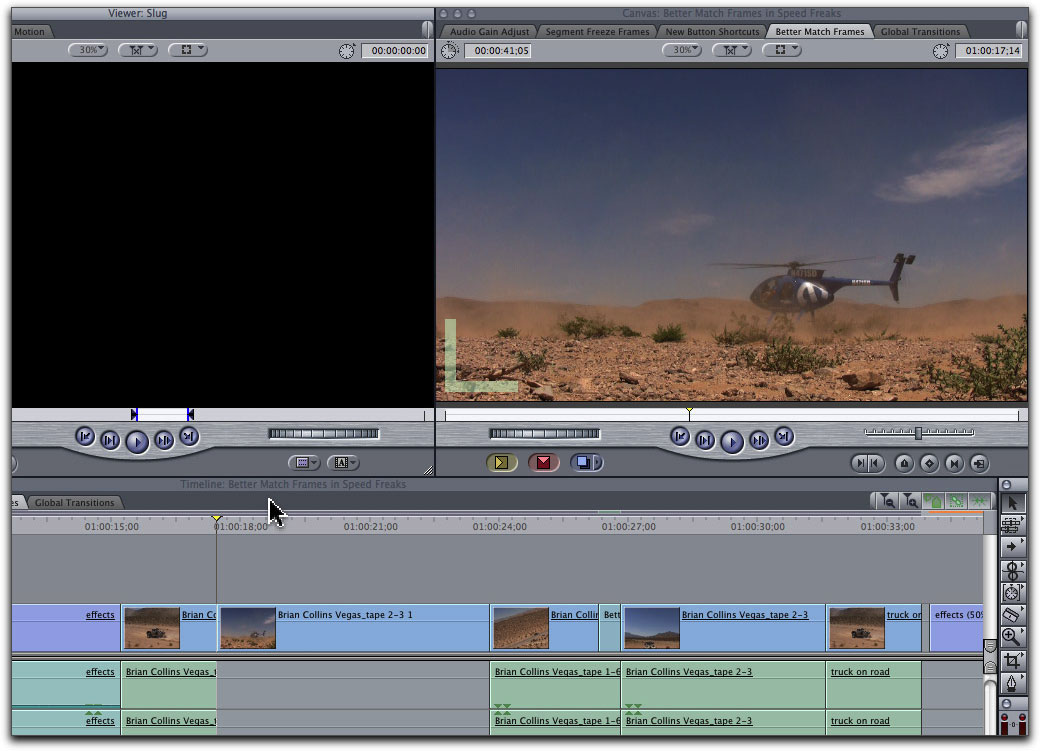
6. Match Frame Freeze Frames
In previous versions of Final Cut Pro, you could not locate and match frame a freeze frame in the timeline. Now any freeze frame can be matched to its original source clip. However, the way you do it is not the typical method. Here I have my playhead parked over a freeze frame. If I press the F key, the freeze frame is loaded into the viewer. This is not what I want. I want the source clip from which the freeze frame was pulled, loaded into the Viewer. From the View menu choose > Match Frame > Source File.
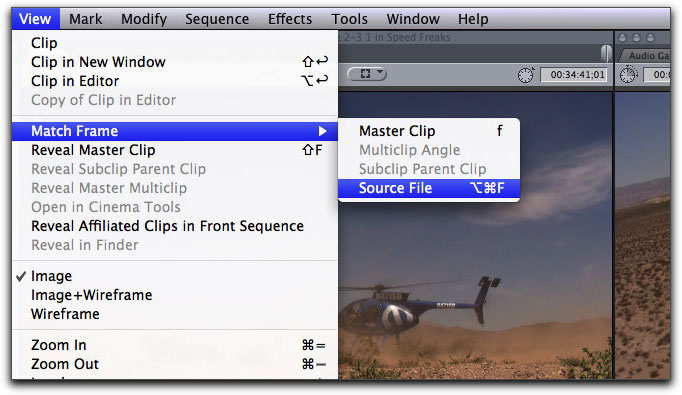
This command locates the master source clip and loads it into the Viewer. Since freeze frames do not have master clips associated with them, the normal match frame command will not work. You must to use the match frame source file command.
7. Match Frame Subclips
Another enhancement to match framing is you can now match frame to a parent subclip. I can't tell you how many editors have begged Apple to include this feature. Here's why it's important: In previous versions, if you created a subclip and edited that subclip into a sequence and then match framed it, the clip that would be matched in the Viewer would be the master subclip, not the master parent clip from which the subclip was created. This is because Final Cut Pro has always reckoned subclips as master clips, not affiliate clips. So when you match frame to them, Final Cut Pro always matches to the subclip. To locate the parent master clip, park your playhead over a subclip in the timeline, then from the View menu choose > Match Frame > Subclip Parent Clip.
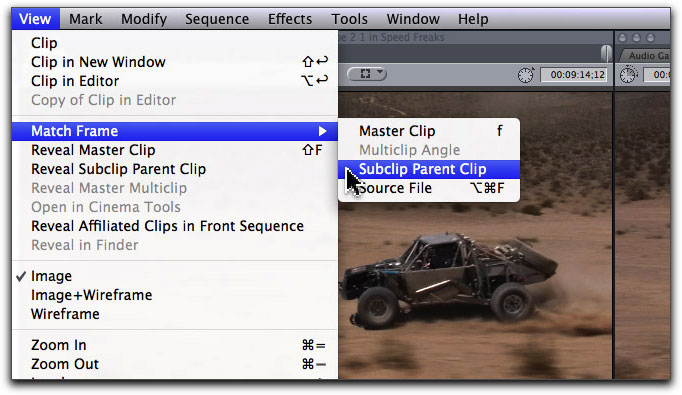
In the Viewer the parent clip is loaded, complete with all the available handle media outside the original subclip boundaries.
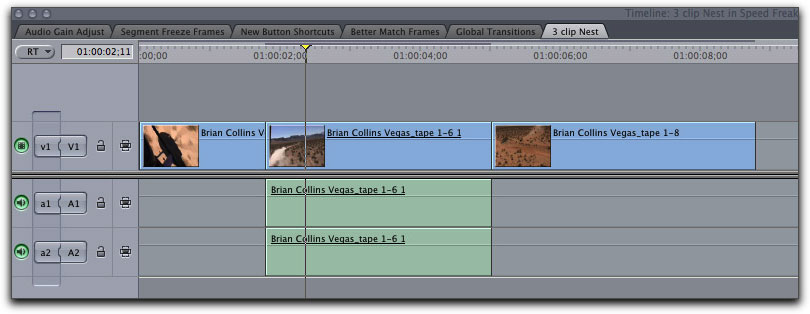
8. Match Frame Nested Clips
Another useful sequence clip that can now be match framed are nested clips (which, for those of you familiar with Final Cut Pro are really nested sequences). If you double-click the nest, the child sequence will called up in its own timeline tab. In the image below, you can see the nest is comprised of 3 separate clips.
Click back on the Parent sequence tab, park your playhead over the nest and press the F key. In the Viewer, the entire nest is loaded as a single virtual clip that can be scrubbed, marked and treated like any other "standard" clip matched into the Viewer.
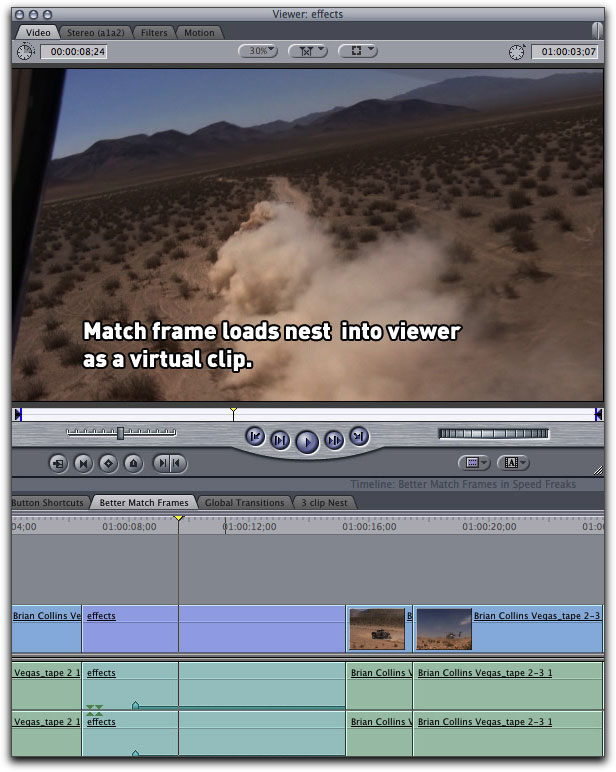
You can apply speed changes, filters, and motion effects to the nest once in the Viewer and even re-edit the nest back into the sequence.
9. Global Transitions
Final Cut Pro 7 allows you to add multiple transitions to your clips in a single drag and drop operation. I've created an extensive movie tutorial on this subject on my website, so I'm not going to cover it again here. Again, my aim is to show you how you might think about using this feature in small ways to speed up your workflow. I've found this feature particularly useful on titles and graphics where I need a quick fade up and fade out on a clip. In the image below I have a logo placed in the V2 track and I would like to create head and tail fades on it.
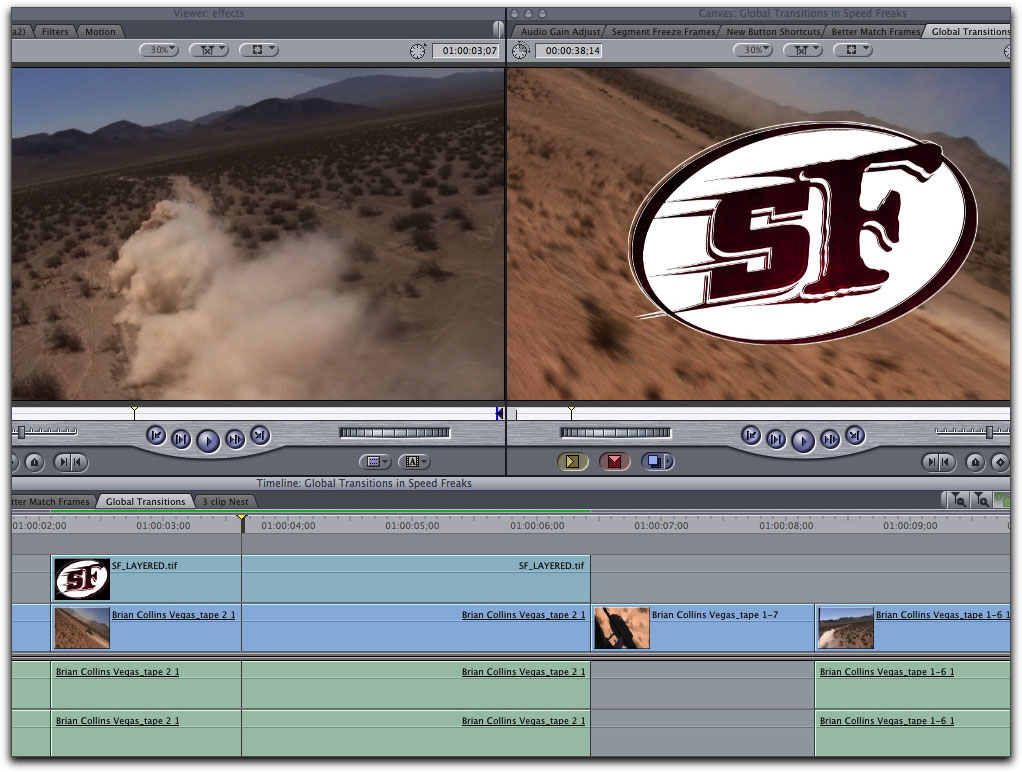
Select the clip in the timeline, then from the Video Transition menu, choose the Cross Dissolve.
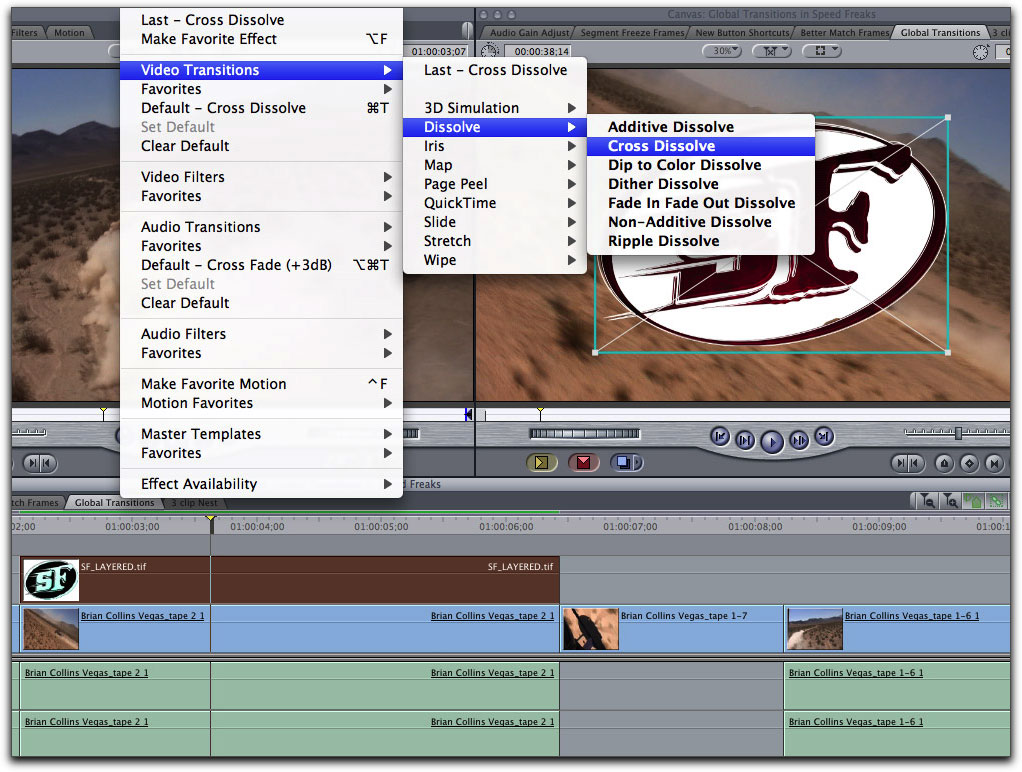
In one gesture, 1 second cross fades are added to the head and tails of my graphic. If I wanted to be really slick, I would create a button for the cross dissolve transition, so I could add the fades with one click.

10. ProRes 4444

If you live or have travelled through the western united states, you will no doubt have discovered In and Out Burger. This particular fast food chain has a burger that does not appear on the menu, but the locals know it by it's name 4 by 4 - and it's a coronary-clogging-heart-stopping 4 patty/4 cheese monster burger. What do burgers have to do with codecs? Well nothing really except that Apple prefers referring to their new high performance production codec as ProRes 4x4 rather than the longer, more arcane pronouncement of ProRes 4, 4, 4, 4. Plus it was lunch time when I was writing this and it made me think of food. The first 3 "4s" in succession indicate the highest possible color sampling and image fidelity. The last "4" represents the lossless alpha channel that is supported by the codec. If you're a cinematographer shooting on a Thomson Viper and Panavision Genesis or similar high end (read expensive) camera, this codec will be your choice because it provides visually lossless images at data rates that can be played back on off the shelf Macs. But I'm not a cinematographer, and that's not why I like it. Simply stated, I'm tired of using the Animation codec to render out animations from After Effects and Motion only to have them chug along at 3 frames per second (even with unlimited RT turned on). With 4x4 not only can I play back my animation in real time on my Mac, but ProRes 4x4 includes a lossless alpha channel making it the perfect choice for sharing my rendered animation with other content creators. Even better, if I render out my movies from Final Cut Pro or Motion, they will playback in Final Cut Pro 6.0.6 projects. You will however need to have QuickTime 7.6.2 or later installed in order to play back a movie rendered in ProRes 4x4.
So there you have it. Perhaps not life-altering but these new features should allow you a few extra minutes of your life back at the end of the day. You can see all the free 'new feature movies' of Final Cut Studio at Ripple Training.

Steve Martin runs www.rippletraining.com where you can download QuickTime tutorials and purchase tutorials on DVDs covering all of the Final Cut Studio applications. He is also a lead instructor for Apple's certified training program and has taught workshops at NAB, Macworld, DV Expo, and the American Film Institute.
[Top]
copyright © www.kenstone.net 2009
are either registered trademarks or trademarks of Apple. Other company and product names may be trademarks of their respective owners.
All screen captures, images, and textual references are the property and trademark of their creators/owners/publishers.