October 26, 2009
By Philip Hodgetts
Introduction
In my "What is XML" article there was some attention to what you can do with XML. Ironically, most of the forward-looking suggestions from Apple that came with the release haven't eventuated. The best database integration is with Apple's own Final Cut Server, rather than Filemaker; no script-based editing tool has presented itself and version tracking is still a fairly manual process without Final Cut Server or a third party utility.
So, even though most of the fanciful ideas haven't turned up (yet), there are dozens of third party applications that add functionality to Final Cut Pro using XML to communicate with Final Cut Pro. I'll get to them later in the article, but first let's look at what you can do with Final Cut Pro XML with nothing more than a text editor.
The good thing is that you don't have to understand XML to use it!
Modifying XML Files in a Text Editor
XML files are plain text files. They are both computer readable and human readable (well, technically a human "geek" can read them). Because they're text files we can manipulate them in a simple text editor using search and replace features.
IMPORTANT:TextMate, like the free TextWrangler, recognizes XML and displays it with the text laid out so it is much clearer how the XML is structured. TextMate is a text editor for coding types, but it works for normal humans as well.
When I say a text editor I do not mean Microsoft Word! That's a Word Processor and those files carry a lot more information that should never be found in an XML file because it will cause the XML file to stop working! We must use a Text Editor. You can use Text Edit (comes with the Mac), TextWrangler or BBEdit to save clean text, but my preferred tool would be TextMate.
Export XML, Import XML
For any of these examples, the basic workflow is to export an XML file from Final Cut Pro by selecting the items to be exported, if you want to limit to just one Sequence or Bin(s), or with nothing selected to export the entire project. Once the file has been modified, it is imported (as XML) back to the same, or a new, Final Cut Pro project.
Hands off the tags!
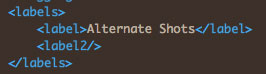
Each item of information in an XML file is identified with tags, just like HTML. Each tag has to have an "open" and a "close" even when they may be many lines distant. Leave them intact or you'll make something unreadable by Final Cut Pro.
The data between the tags, as long as it's the right format, can be edited however you like. Between the tags in Figure 1 we can replace the Label with any of the other labels from the project, as long as we know the label name.
Tip: If you have nothing selected in a Bin, then the entire project will be exported in the XML file. If you select only some Bin(s) or Sequence(s), only those Bin(s) or Sequence(s) will be exported into the XML. Limiting the export can make it easier to find specific items.
Change the font of all titles in a project
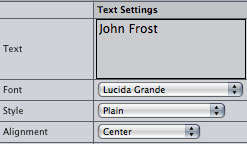
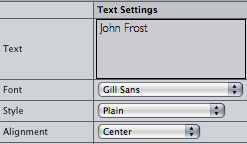
You know how it goes: you got approval for the font at every step but right at the end someone wants the font changed - and you have 87 titles! Final Cut Pro XML to the rescue. Credit where credit is due, I think I first saw this trick when Josh Mellicker demonstrated it at LAFCPUG. You can see the starting title in Figure 2.
- Start by selecting the Sequence in the Project's Bin and then exporting it to XML.
- Open the XML file into a text editor.
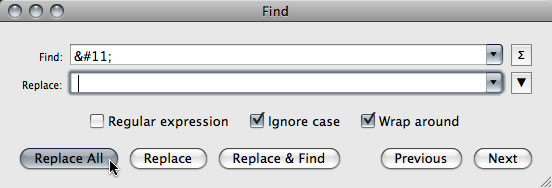
- Since we're going to replace the font, search for the font name. Most software will use Command+F to search. In my example it's 'Lucida Grande'. You've got to get this exactly right, so copy-and-paste from the XML into the search dialog.
- When the search finds 'Lucida Grande' use the replace function in your text editor to change the font to the one you want to use. I'll set Gill Sans.
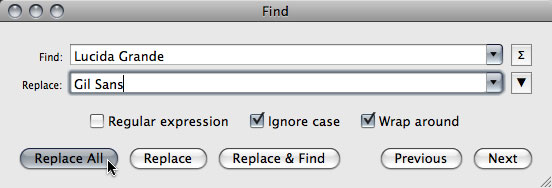
- Here's the magic part: as long as you're sure the new font is correct, click on 'Replace All' and "bam!" all 87 tiles are updated to the new font. (See Figure 4.)
- Save the XML file in the text editor.
- Import it back to Final Cut Pro or drag and drop it to a Final Cut Pro Bin or the Dock icon to add it back to the project. You can see the result in Figure 5.
IMPORTANT:
There are limitations to this trick. It only works with the Final Cut Pro Title Generators. It does NOT work with any of the Boris Calligraphy Generators (Title 3D etc) because their information is not available in the XML in a viewable or editable form.
Change Alignment or Font size
The same trick will work for changing alignment of titles. In the example the title is 'Center' aligned. To change to either 'Left' or 'Right' aligned:
- Search for "Center" in your text processor and replace with either "Left" or "Right". Similarly you can change the font size by searching for the current size and replacing with the desired size.
IMPORTANT: There's a problem: any two or three digit number could be part of a larger number, don't search for just the number. Instead, include the full tags, so instead of searching for "30". Instead, include the opening and closing tags, so the search if for "<value>45</value>" That is very unlikely to be part of anything else so you can use the Change All function with reasonable confidence.
Changing Motion Master Template for all titles
While it would be wonderful to have Automotion to make it easy to revise dozens, or hundreds, of Motion Templates (a.k.a. Master Templates) in a Sequence, we can use an XML export and change the Master Motion Template for all the titles.
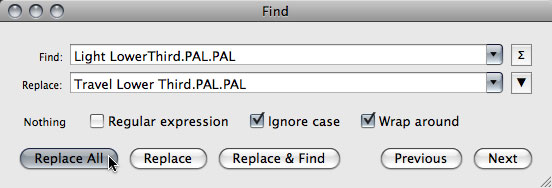
Tip: If you want to make a relatively minor change - a font, color or other element, create a new Master Motion Template with a different name and replace with that. Be sure to save it as a Master Template. Before you start, you'll need the name of the Master Template you're using, and the name of the Master Template you want to change it to. Fortunately this is the name, without extension, of the Template in Final Cut Pro, with all but the final suffix (.motn). Figure 6 shows the Master Template already applied to our clips.

- Export the XML of your Sequence and open it in a text editor.
- Search for the name of the Master Motion Template used in the project and replace it with the name of the Master Motion Template you created (or want to use) to replace it. (See Figure 6.)
- Save the XML and re-open it into the Final Cut Pro project by dragging it to a Bin or onto the Final Cut Pro icon in the Dock. You can also import the XML using File > Import > XML.

which should have been removed from the Master Motion Template before the search and replace.
One of the main reasons for modifying a Master Motion Template to make it better fit your needs, is to make sure that any unfilled fields are removed. In this example the "Travel Lower Third" Template has a Subtitle field that my modified "Light Lower Third" does not.
Globally change the media location
If you allow Final Cut Pro to manage your media locations - setting just a top level folder - then reconnecting to the same media on a different drive is fairly easy with a simple "Reconnect Media" command, then navigate to the first file in the folder and select it. Done!
Now, in the real world, people like to take some control of locations of stills, audio media, animation render files, etc - all the "other" stuff. This complicates re-linking, to state the obvious. Enter XML and your favorite text editor.
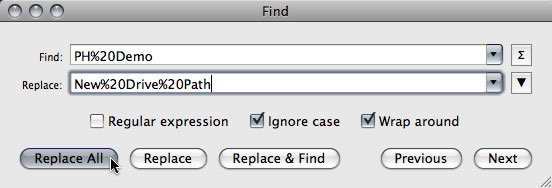
Now, you'd expect that we can just search for the drive name and replace it, pretty much the way we have been, but there's a trap. If the drive name includes a space, or other special character, then Final Cut Pro "escapes" the characters, html style. So, when I search for my drive "PH Demo" I get no results. But when I search for just "Demo" my drive is found. The space has been 'escaped' to %20 (like it would be if this was a web URL) as you can see in Figure 9.
![]()
This makes relinking just a little more complicated because you need to know the 'escaped' name for the new drive. Use this guide:
Instead of a space, use "%20" (without the quotes); Instead of a hyphen (dash), use "%7E";
- Export the XML file for the whole project.
- Open the XML file in a Text Editor.
- Search for one word from the drive name (or identifiable folder from the file path).
- Locate the full drive name, including any escaped characters, and copy that
- Enter the replacement text, also escaped, as in Figure 10.
- Search and Replace All instances of the drive name in the file path.
- Save the XML file and open it into Final Cut Pro. The project will relink to the new file path.
Fix a "broken" XML
In rare circumstances, Final Cut Pro can create an XML file that it cannot open! This is because there are "illegal" characters. No-one'll get arrested but these characters can trip up Final Cut Pro. Final Cut Pro 7 has gone a long way to removing this problem, by better escaping of these characters, but even in Final Cut Pro 7, it can happen.
Another problem is that most text editors also won't show you the illegal characters, which is another reason why I like TextMate: it's one of the few text editors that will show that there's an illegal character in the XML.
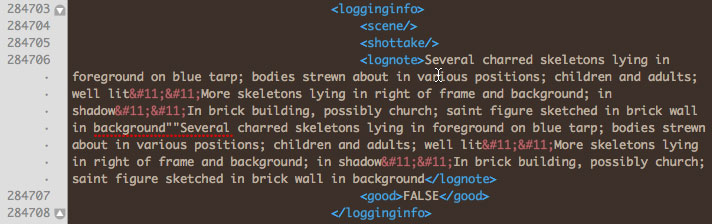
You'll know you have a problem if the XML doesn't import to Final Cut Pro, but that really doesn't help find a problem character (or two) in among 742,751 lines of XML? (Yep, that's how many lines of XML this project translates into.)
Fortunately we've got a handy dandy XML checker right at hand, although you probably don't know it, yet! Safari 4 or recent versions of FireFox and Camino include an XML checker. Just drag the "broken" XML file into one of these browsers (or open the file from the Open menu item). If it's a big file it's going to churn away for a few minutes but eventually will give a message like in Figure 11.

When we scroll through the lines until we get to line 284,706 to discover that there's a log note at that location, and inside the log note are some suspicious looking characters: ""!
Note: This is the output from Final Cut Pro 7; in Final Cut Pro 6 (and presumably earlier) the characters displayed as a diamond symbol.
Now that we know what the problem character is (or at least one problem character) we can remove it with a search and replace. From here:
- Select the whole character -  (one will be enough).
- Search for the character and replace all of them with a space.
- Save the updated XML file and open it in Final Cut Pro.
Read QuickTime (Camera) Metadata
Since version 5.1.2 Final Cut Pro can read QuickTime metadata from non-tape formats like AVCCAM, DVCPRO HD/AVC-I, XDCAM and RED. This metadata is stored in the Final Cut Pro project file but is not visible within Final Cut Pro itself. It is exported in the XML export. For more on QuickTime Metadata check out my blog post "What about the hidden metadata in Final Cut Pro?".
- Export Final Cut Pro XML for the Clip(s), Bin(s) or Sequence(s) that have the Clips you want to examine.
- Open the XML into a text editor and search for "<metadata>".
- Keep moving forward until you find the clip and the specific metadata you're looking for.
If you know the type of metadata you're looking for then you can search specifically for it. In the example in Figure 13, if you were specifically looking for this metadata, then you could search for "modelname" and find the metadata

its format, and the value - in this case the camera is an HMC-150.
This really isn't the most efficient way to examine QuickTime Metadata from Final Cut Pro. If you're really interested in exploring this hidden metadata then download Intelligent Assistance's MiniME (Metadata Explorer) application. In demo mode you can export the metadata to an Excel spreadsheet, where it can all be viewed and manipulated. (The application in paid mode allows you to remap that metadata back into visible fields in Final Cut Pro.)
Change an Effect
While the general principle for changing an effect filter across a Sequence is the same copy/paste routine we've done for the rest, it's a little more complex because we can't just change the name of the filter: we have to replace the whole of the Filter XML node (block of text, don't sweat the technical term). This means we'll have to prepare a replacement Filter before we export the XML.
There are many reasons why you would want to replace an effect. One example would be to have one Color Corrector 3-way filter replace a different set of settings, should someone decide that the balance is wrong. You could Delete filters and apply the Paste Attributes with a new filter to all clips, but that only works if there are no other effect filters applied to any of the clips.Tip: If you want to change a transition across a lot of clips, Final Cut Pro 7 offers a direct way of achieving this. Simply set the new (replacement) as the Default Transition. Then select all the transitions to be changed and press Command+T on the keyboard. The new transition will replace the old.
This technique will allow you to change one filter, without affecting any other filter in the group. In the next segment, I'll detail how to remove just one filter from within a group of filters.
- Make the changes to the Filter according to the production's need.
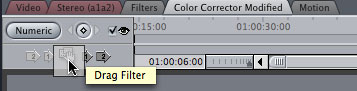
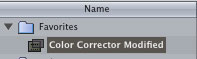
- Drag that copy of the Filter from the Viewer (see Figure 15) to a Bin and rename it as in Figure 14. (It doesn't have to be in the Favorites folder, that's just where I put it.)
- Rename the copied clip so you will be able to search for, and find it in the XML file.
- Apply the changed filter to one clip.
- Select the Sequence only (to keep the XML simpler).
- Export the XML and open it in a Text Editor.
- Search for the changed name. In this case I simply searched for "Modified" in my text editor to locate the Effect Filter. (See Figure 16)
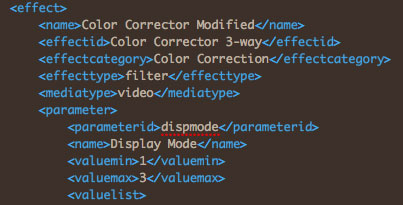
- Select the block of text from <effect> to </effect> and everything in between. For the Color Correction 3-way filter there are a lot of parameters so be sure to scroll down and select them all.
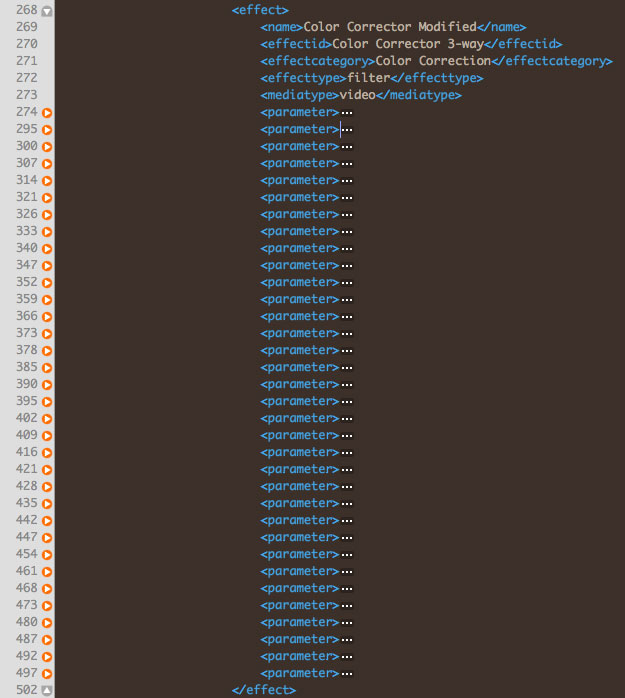
Each parameter has its own settings within it.
- Copy the selected text. These are the new filter parameters.
- Search on the original filter name, in this example "Color Corrector".
- Select the block of XML text for the filter you've just located from <filter> to </filter>.
- Paste the new Filter details over the existing filter to replace the existing filter. The name of the filter should change to your modified name.
- Repeat the search-select node-replace routine until no more instances of the original filter are found.
- Save the XML and import it back to Final Cut Pro.
All filters will be updated to the new settings.
Delete a Filter without changing other filters
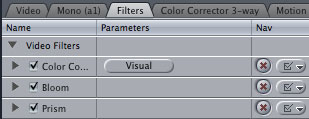
Removing a single filter from multiple clips can be rather tiresome, as Final Cut Pro does not have an easy way to do this. Sure you can remove all Filters, and we can paste multiple filters back, but if the filter pack applied to each clip aren't the same then you're back to square one.
Using XML we can simply delete any filter from the pack without changing the others. For example in Figure 18 we'll delete the Prism filter.
but all other filters needed to be left the same.
- Select only the Sequence to make searching easier and the file size manageable.
- Export the XML and open it in a Text Editor.
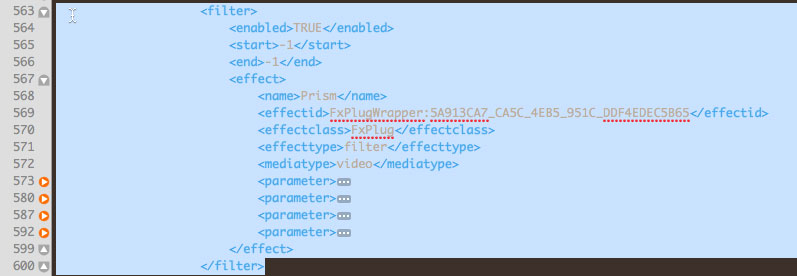
- Search for the Filter name that you want deleted. In this example "Prism".
- As before, select from the <filter> tag to the </filter> tag to select the whole filter node as in Figure 19.
- Delete the selected text.
- Repeat the search-select-delete process until there are no more instances of the filter you want to delete.
- Save the XML and open it into Final Cut Pro. The filter will be gone but all other filters will remain in place.
Spell Check
When I was researching this article, I felt sure I could create a technique for using XML export as a Spell checker. It sort-of works because any misspelled words will highlight in most text editors, but finding the blocks of text to check is tedious. For those who want to try:
- Export the XML and open it in a text editor.
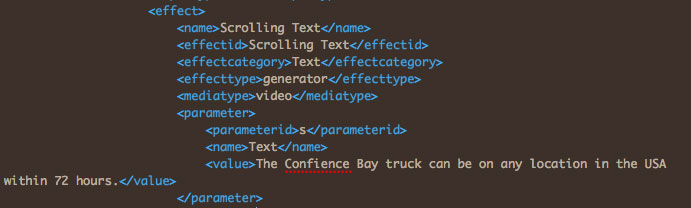
- Search for the field you want to spell check. This is likely to be a Log Note or Title:
- To spell check log notes search for "<lognote>" to find each field in turn. Check for errors within the lognote tag.
- To spell check Titles (except Boris Calligraphy titles) search for "<text>" or, for more precision, the name of the text generator. Searching for "text" will match in many more places than Text Generators.
While this does work, it's not very efficient. While not free, exceLogger would allow you to spell-check in Microsoft Excel and merge the corrections back into the project.
Go to Premiere Pro and After Effects
Although we are all grateful to Automatic Duck for making cross-application workflows possible, we can get from Final Cut Pro to After Effects without needing Automatic Duck by exporting Final Cut Pro XML.
- Export project or Sequence XML as version 4 of the Final Cut Pro XML. As of Premiere Pro Cs4.1 Version 5 of the Final Cut Pro XML specification is not supported. It is likely to be supported in CS5 or an interim release for Premiere Pro CS4.
- In Premiere Pro CS4.1 import the Final Cut Pro XML to recreate the project in Premiere Pro. IMPORTANT: Direct XML support from Final Cut Pro to Premiere Pro is not as robust as Automatic Duck to After Effects direct. More transitions and filters are supported by Automatic Duck when going from Final Cut Pro to After Effects.
Use Dynamic Link from Premiere Pro to After Effects - this will give you one clip in After Effects for the entire Sequence; orThere is currently no way to go from After Effects or Premiere Pro back to Final Cut Pro other than as a rendered movie file.Open the Premiere Pro Sequence directly into After Effects - this will give you all clips in the Sequence on individual layers.
Tools that manipulate the XML for you
Twenty years after the first NLE to reach mass markets - Avid Media Composer v1 - we are moving to an era when software tools are starting to take out some of the repetitive chores in postproduction and let smart producers and editors work more efficiently than their competitors.
There are several companies actively working to provide workflow automation tools that manipulate Final Cut Pro XML data to create new clips, bins or sequences: Intelligent Assistance, XMiL, Spherico, Digital Heaven and Edit Groove. Automatic Duck is certainly a workflow tool but intended to move between applications, rather than smooth out the workflow for Final Cut Pro.
copyright © www.kenstone.net 2009
are either registered trademarks or trademarks of Apple. Other company and product names may be trademarks of their respective owners.
All screen captures, images, and textual references are the property and trademark of their creators/owners/publishers.