
How To
March 26, 2001
How To
Final Cut Pro v. 2.0, an ambitious beginning...
PAGE ONE
So you think you're good, huh?
Got your Avid or Media 100 chops down cold and feel like you could be elected digital post-production dictator of this and other universes? Well then, its time to feel like a child again and learn a totally new interface and set of video standards...
The good news is that the new interface and standards are pretty easy to internalize if you keep on your toes (and read the suggested material). If you have previous NLE experience, you shouldn't really strain too much mentally to get this stuff down. If you're totally new to editing, you'll be able to approach Avid's and Media 100's much more confidence should the need arise. And the really great thing is that most of you could afford a turnkey system much like what we will be working with, if indeed, you don't already own the major components.
What follows is a suggested method of project setup for an NTSC Firewire FCP editing station. It was developed in a busy multi-user college editing lab. It is a system for ensuring that individual projects are properly configured and that each student's work is safe and secure in a lab where many hands pass over one FCP station everyday. Many of the exhortations included are specifically there to ensure that while you work, you are not demolishing another editor's work. As such, if you are the only one utilizing your station, some of the material may seem a little, well, paranoid or irrelevant. Rest assured that such techniques will not HARM the single user, although some concerns may be overstated for the single user. You may find that even in the single user setting, the processes below are useful and serve to keep you organized and healthy.
The set-up included here is specifically for those using NTSC Firewire capture and output. While it does not attempt to give info on PAL systems, the setup for PAL Firewire DV is essentially the same. Simply choose PAL numbers where there is a choice for PAL or NTSC. This document is not the correct setup information for Analog capture cards or even basic editing information The purpose is only to get a project started with preferences set for DV Firewire capture and to minimize the chances of running into dropped frames or losing media/project files.
On to the fun...
Before you begin ripping away at Final Cut, there are a few preparatory things you should take care of:
1. Make sure DV Deck/Camera is powered on. If not used for a while, it may power down into a sleep mode. When you start up FCP, you may get this message. If you do, chances are that the deck is not powered on. To see what you are doing in FCP, you need this deck/camera and an NTSC monitor (connected to your deck/camera using the analog outputs (RCA or y/c cables) switched on. This is also how you will be outputting other tape formats (VHS, HI8, SVHS, even Beta), should you wish to do so. Simply connect the destination deck between the DV deck/camera and the NTSC monitor.
2. To monitor audio, simply patch audio out of your deck/camera to the NTSC monitor. At some times you may also get audio from the Mac speakers. If it bothers you, you can disable it in preferences (later). If not ignore it. If you are sending Video out to the Firewire connection to monitor, the audio goes out to Firewire as well.
3. Even if you are new to editing, I have one piece of advice for you above all other. Log your tapes. Make a VHS copy with a time code burned in (displayed in your DV deck/camera) and log that bad boy in the privacy of your home and in the comfort of your quilted bathrobe. Even a small drive like 10 gigs can hold 40 minutes of DV. which is more than enough for smaller projects. You just can't capture two hours of stuff that you won't be using. Watch your VHS tape, write down the time code numbers of only the footage you want to use, and then use Batch Capturing to simply type the numbers in and have FCP go get the footage while you eat a sandwich. For more info about this, either get Lisa Brenneis' incredibly informative "FCP Visual QuickPro Guide" from Peachpit Press or take a CE class in non-linear editing. This is more important than you think.
A note on configuring drives:
It's really much less complicated than folks tend to think. The video footage on your DV tape isn't like VHS video. It's a digital file. So when you capture it, you're just transferring the file from the tape to the drive. That's why we call it LOSSLESS, because it's an exact copy of the file on the tape. Why is this important? Because when you play a clip in the FCP timeline (more later), the video file has to be read from a hard drive quickly, unlike physical tape which crosses a tape head at real-time.
Now for common FCP usage, there are two kinds of DV files; files you captured using the Firewire from deck/camera and files you create every time you render anything, i.e. transitions, filters, etc. The former are called (and go into) "Capture" and the latter are called (and go into) "Render". Audio and Video captured from Firewire are considered one file. Anything rendered is also a file.
I recommend that your machine have at least 2 separate physical drives (ATA or SCSI makes no difference, FCP just sees drives, not flavors.). The first one, your start up drive, needn't be enormous (I happily use a 2 gig I ripped out of an old PC). It will contain only your system folder and various applications (including FCP).
The second drive, your capture and render, or MEDIA drive, should be as large as possible. The cheapest way to put a system together is to use this configuration. The native ATA bus on your Macintosh (the start up drive that came with your machine is on this bus) can hold at most 2 drives. Your start up counts as one, so you can add one more. You'll want to make this as large as possible (60+ gig ATA drives are available) because after that, you will have to add either an ATA or SCSI expansion card in the PCI slots of your Mac in order to add more drives. Remember that DV data rates are about 5 minutes to the gig, so a sixty gig+ hard drive yields QUITE a bit of storage, time-wise. You may never need another drive in the life of your system.
It should be noted that the Macintosh actually ships with not 1 but 2 ATA buses, each of which can hold 2 devices. The bus referred to above is Bus 1 and can hold one more drive in addition to the drive that ships with the Mac. The other bus, Bus 0, is the ATA bus that your CD/DVDROM drive and Zip Drive utilize (if you have one there) (take a look at Apple Menu>Apple System Profiler>Devices&Volumes you'll see what I mean). Now if you don't have one of these devices internal in your system (many don't buy the Zip, myself included), you can put another ATA drive in that slot, making 3 drives possible in your native system. Whether or not you choose to do this is a personal matter. I really don't recommend running a machine in the 21st century without a CD/DVDROM drive. Also, the slot dedicated to the Zip Drive is narrow in the extreme and it can be pretty tough getting that drive to fit. I don't recommend it unless you know what you are doing.
The sharp reader has noticed that I have not mentioned partitioning. That is because partitioning, while appearing to create more than one drive, is really just divvying up slices of the same pie, so to speak. You will still be using one drive to read the separate partitions. Partitioning your drives is fine, but it is highly recommended that you use a separate physical drive each for media and the system folder/FCP application itself. Partitioning your Start up drive is a great idea if you are using your Mac for other tasks such as Internet, word processing, gaming or anything else with weird extension sets but it is best not to partition for the use of capture and/or render. Information and details about doing so may be found elsewhere on 2 Pop. Use your own judgement. It's your machine. Just think logically. Just because it can work doesn't mean it always works, and those clutch moments are the ones you'll wish you chose to use the safe route.
Why is all this configuring necessary? As specified above, these files must be accessed quickly. As such, your media drive needs to be kept clean, fragmentation-free and available for FCP's nefarious uses instantly. Keeping your start up drive physically separate from your media drive will vastly improve performance in this regard. If you experience dropped frame warnings that you can ascertain are definitely not settings issues, it may be the result of such fragmentation. This is usually pretty easy to test and eliminate in any of a number of ways. If you should encounter serious dropped frame trouble and you ascertain that the settings are correct, do a little research and try the following:
1. If you have the drive space available, export a single file QuickTime movie version of your sequence and then re-import it into your project. If the QuickTime doesn't drop frames, then the problem is probably the result of the inability to access the original files because of fragmentation.
2. Another way is, 2) Using the Render Manager, delete the project's render files and then re-render. The resulting re-write of render files may eliminate the fragmentation. Obviously, this is more drastic and wouldn't be a good idea if you had three hours of rendered material, but if you determine you have unacceptable fragging, this might clear it up.
There are a couple of things you can do to optimize your drives and avoid fragmentation or corruption. The first and most simple is to always use a storage buffer of 10% of the drive's size or 1 gig if larger than 10 gig. Giving the drive at least a 1 gig buffer will eliminate crowding on the drive which can slow down performance enormously (there are directions for setting this later in the document).
Secondly, wipe your drives clean at the end of each project. Simply trashing the media files isn't as thorough. Do so by selecting the drive at the desktop level and choosing Special>Erase Disk. Careful, this is irreversible. Optimizing applications, such as Norton, are available, but will never be necessary if you take care of your drives, back up your project and use Timecode for re-capture. Other options are available if these don't do the trick, but can produce unpredictable results depending on your own particular configuration. Consult a professional 2 Pop-style.
That said:
Start up the whole system
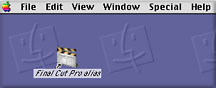
1. When the Mac is finished booting, you will be looking at the desktop. To start FCP, double click on the Final Cut Pro Icon.
by Charles Roberts AKA Chawla
Copyright Charles Roberts, 2001.

When you start FCP, it will always open the last project that was open on the machine, or an untitled project if this is your first time or you have thrown out the preferences. Chances are when FCP is finished loading, there will be a project open and it may not be the project you want to work on. If not, just go the File Menu and select Close Project. You can really screw up your life by not keeping your eye on the ball, because if you just begin working and save, you may change someone else's work. Also remember that more than one project can be open at a time. If you don't want to work with a project that opens at start up, close it or you may accidentally change and save it later.
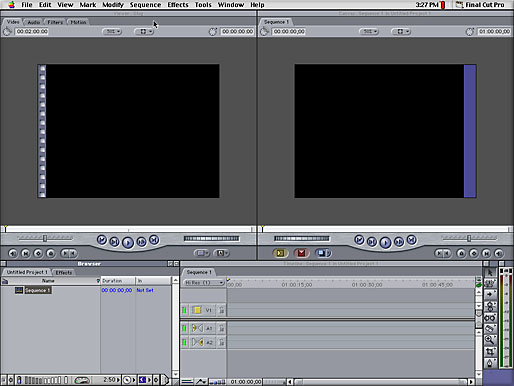
2. When FCP is completely loaded, several windows should open up. More than likely, a previous project will be open up as well, so immediately close any other project that may have opened, by going to the File menu and selecting Close Project. When there is no longer any project showing in the browser window (only the effects tab), you must set your Preferences. Unlike many applications, where you can happily work without ever altering the default preferences, FCP needs you to set the preferences correctly in order to work. FCP also has the annoying (or convenient, depending on your workstation needs) tendency to retain the preferences from the last project that was opened. This means that even if you have the right project open, FCP could do the wrong things to it. Although FCP 2.0 has included some enhancements that make preferences and A/V settings easier, you must still make the correct settings or FCP will not work right.
EVERYTIME you start to work, go to Preferences and check to make sure that they are set the way that you want them. To do this, first go to Preferences in the Edit menu.
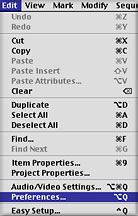
A window will come up that is divided into 5 tabs along the top. These are your Application Preferences. You must visit each of them, although it is conceivable that you may never have to change any of them. Just do it to make sure until you have it down cold, OK ? 99% of FCP problems are settings-related.
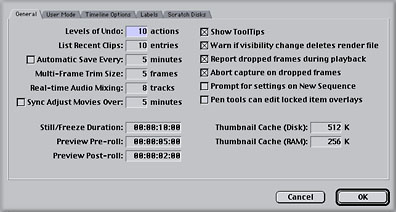
The first tab is for General Settings. You may want to disable AutoSave, as there have been rare reports of corrupted files. Be safe and manually save all the time. If you are using a Canon camera other than the GL-1, you may need to enable the Sync Adjust Movies to compensate for an audio sync issue related to those cameras. IMPORTANT: DO NOT ENABLE THE SYNC ADJUST MOVIES IF YOU BELIEVE THERE ARE TIMECODE BREAKS ON YOUR DV TAPES. The default setting for Sync Adjust Movies is on. It should be turned off if you are using anything other than Canon cameras, excepting of course the GL-1. Leave "Report Playback Drops" and "Abort Capture Drops" enabled. This will be the only way you know you are dropping frames. If your system is dropping frames, you need to know this so that you can fix the problem. DROPPED FRAMES ARE NOT ACCEPTABLE!!! Disabling them is like taking the batteries out of a smoke alarm. Be careful with the other settings on this tab and reference them in the Manual and FCP QuickStart Guide where they are explained in-depth.
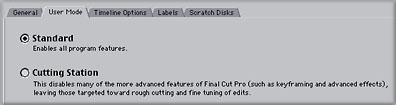
The second tab is for User Mode. The User Modes limit some of the features available to the project and leave a workstation that is easier to use for the simpler tasks of field logging and rough cutting. For the time being, select Standard.
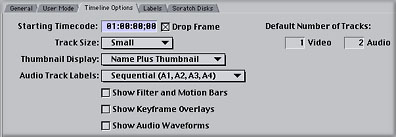
The third tab is for Timeline Settings. This preference allows you to customize certain features of the sequence timeline. You also have the option of having the timeline start with a time value other than 01:00:00:00, which can be a useful function in certain circumstances when using the Editing to Tape function.
The fourth tab is for assigning color values for status indicators in the timeline. This is less critical, but you can customize these when it becomes necessary.
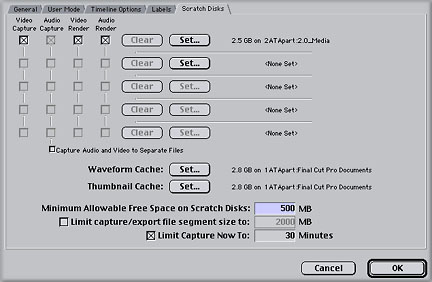
The fifth tab is absolutely critical. It is called the Scratch Disk settings and it is where you tell FCP where you want to save those enormous Capture and Render Files we were just discussing above. No matter how streamlined FCP makes the process of starting a project, this Scratch Disk Preference will always remain a critical responsibility of the user. You will not take it seriously until you lose a lot of files one day and have to completely redo a finished project.
To correctly set your Scratch Disk Preferences:
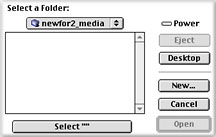
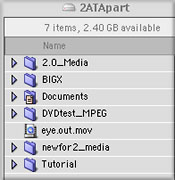
Click Set on the topmost of the five Clear/Set combination lines. You will receive a dialog box asking you to select the appropriate folder/drive. Navigate the dialog box until you are looking at the desktop, then double click your Capture/Render drive.
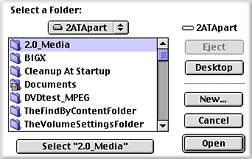
When you are inside your target capture/render drive, select "new folder". Enter whatever you wish to name your destination followed by "_media ".
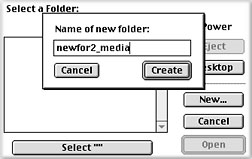
Hit OK, then hit "Select".
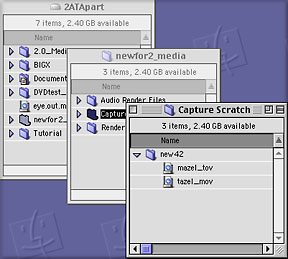
After you hit "Select", you'll return to the Preferences. Look at the information next to the Set button. Make sure that you named everything in this capture/render directory with distinctly different names, using the underscore if necessary(the directory is the exact path to the capture and render folders starting at the desktop level, the "2ATApart:newfor2_media" following "2.5 GB on..." in the below picture.)

FCP can confuse folder and drive names quite easily, so use a naming convention that makes sense to you but which is easy for FCP to keep organized. For instance, the drive or folder names "Video 1" and "video 2" are lousy choices; the difference between them can escape FCP. "#1Video" and "#2Video" might be better choices. "Fred" and "Sam" would be even better, if you can keep them organized in your own head.
Click in the check boxes for Video, Video Render, Audio and Audio Render. If you have other drives you wish to dedicate as Capture/Render drives, follow the same process for each, making sure to leave the start-up drive unallocated.
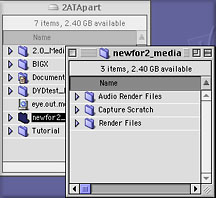
You may be asking yourself right now, "Why does Chawla want me to create a media folder for the project? FCP will create a "Capture folder" on the drive I select, so why bother with further delegating it into a specific folder?" The answer is Media Management, my friend. The secret to a happy Media Drive is keeping it organized and tidy. If you simply select the Media Drive as the assigned Scratch Disk, FCP will create three folders on that drive, the Capture, Render and Audio Render folders. Then, every time you create a project, it will create a project-specific folder in each of these folders.
Of course there is intrinsically nothing wrong with that. That's what FCP was designed to do, and it is a vastly improved system compared to the previous version's handling of media. However, there is a potential danger for people who tend to be sloppy with drives. Pretty soon, you may find yourself with generic Capture and Render folders on every drive on your system. And inside every one of these generic folders will be project media folders with different media from different sessions. Tidiness is important. Although the new Media Management tools will allow you to correct this situation easily enough, the best idea is to avoid such a situation in the first place.
So every time you begin work with FCP, go to the Scratch Disk preferences and make sure that the folder you created for your media on the Media drive is selected. Doing this will keep your Capture, Render and Audio Render folders grouped together in one location and also ensure that in each, the single correct media folder for your projects is in place.
Copyright Charles Roberts, 2000.
Charles Roberts AKA Chawla teaches Digital Video and Audio Production at Fitchburg State College in Fitchburg, MA. He uses his long tedious rendering times to generate content and tackle hard hitting issues on the discussion boards of 2-pop.