
How To March 26, 2001
How To March 26, 2001
Final Cut Pro v. 2.0, an ambitious beginning...
PAGE TWO
Version 2.0 of Final Cut Pro contains much stronger Media Management tools than previous versions, but the need to understand and control your media files is just as necessary as ever. Now FCP will let you eliminate media from your drives to make room should you need it. Your capabilities in MID-project are fantastic, but the ability to juggle multiple projects on the same drive and clean up the system after you are finished depends on how carefully you construct your projects at the beginning.
Take responsibility for your own Media Management. Never ask a desktop computer to do a job you can do better.
Make certain to disable capturing Audio and Video to Separate Files. Once again, if you are not using Firewire to capture, this may not be correct for you. A/V should be separated when using much higher data rates, for example Targa, Igniter and other Analog capture cards. If you are using such hardware, the info on these preferences probably not only doesn't apply to you but could screw you up. This info is for DV Firewire capture ONLY. For particulars as to why, ask me or wait for the stimulating lecture.
Another important setting for this preference menu is the "Minimum Allowable Free Space". This is the 10% buffer to which we referred earlier in the article. "Minimum" should be set to avoid getting poor drive performance and possibly dropped frames as a result of drive fragmentation. Drive performance degrades dramatically past a certain point of drive capacity. In the old days, 85% capacity of a drive was generally considered the limit. This meant that on a ten gig drive, you could expect massive drive slow down after writing 8.5 gigs to it. Some really neurotic people (like me!!!) used 75%.
This is not a written-in-stone policy and there are a jillion variables that affect whether or not a drive becomes massively fragmented after a certain capacity. I generally set mine at 1 gig (or 1000mb). A 1 gig buffer leaves plenty of space to avoid fragmentation and is realistically only burning about 5 minutes of capture time. Not too bad. I would recommend that you choose a number that is either 10% of the total drive size or 1 gig, whichever is less. That should keep it happy.
"Maximum Size for Capture/Export" should be left unchecked unless you are attempting something in particular that requires specific limitations on file sizes and/or you know what you are doing. This will not affect your system's performance under generic capture and playback situations. If you are going to use Capture Now (and not the preferable method of logging your clips), you can also enter a maximum limit to the length of the capture. Hit OK in the bottom right hand corner.
If that weren't enough:
Next you need to set the Audio/Video Settings. You can actually do what is called an Easy Setup to speed up your process in future projects. But you need to do an initial check to make sure your system is set up correctly. Then you can assign this as your Easy Setup, using it every time you work and easily adapting your system when your hardware or media situation changes. To get to the Audio/Video Settings, go to Edit>Audio/Video Settings(N).
This will bring up the A/V Settings
by Charles Roberts AKA Chawla
Copyright Charles Roberts, 2001.
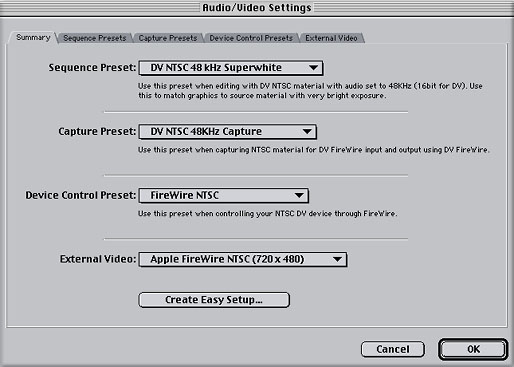
The first tab displays the settings currently active in the other four tabs and lets you set up Easy Setup settings. We'll come back to this tab after configuring the other four tabs. Click on the Sequence Presets Tab
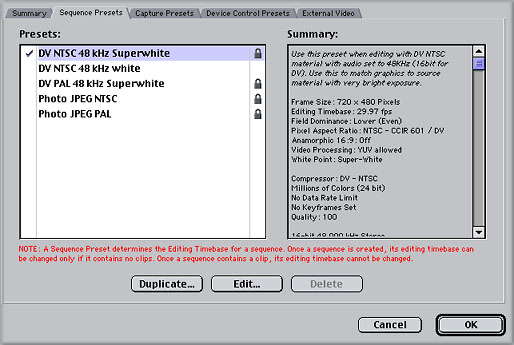
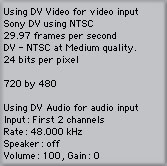
You will want to set up this preset depending on what your own needs are. FCP requires that your settings for Sequences and Capture match, and that both match the actual DV media you capture from tape. For Firewire, the DV NTSC 48K Superwhite preset should be fine here. But most DV cameras allow you to record Audio in your camera at either 32K or 48K. It is IMPERATIVE that you know which you have used, and that you set it correctly here.
A note on audio sample rates
As much as we'd like it to be intuitive and human, FCP really is kind of a stupid machine. It can only do exactly what we tell it. It does not evaluate the data we give it, it simply re-produces that data according to how we have told it the data should be evaluated. If you tell FCP that the audio on your DV tape was recorded at 48k, when it was really recorded at 32k, it will process the audio at the wrong rate. Incorrect audio settings are the main source of out-of-sync audio and video on the timeline.
If your audio goes slowly out of sync as the playhead moves down the timeline, your settings were probably wrong at some point. It is important that you inform FCP what rate the audio was recorded at and that you keep the rates consistent across the application. This means that 48k audio should be set at 48k in the capture settings and sequence settings. Not all cameras record at 48k; the Sony VX1000 only records at 32k, for instance. If using this camera, you must set up your project accordingly.
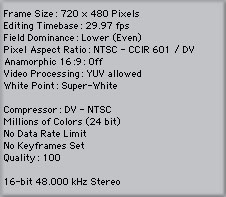
If you need a different preset from those provided, simply Duplicate the DV NTSC 48K Superwhite preset, select the copy, hit edit and change whatever you need to. Be sure to name it something other than Copy, since it no longer IS a copy. Consult the FCP User Manual for more details on what the rest of the settings imply. If you are using 48K audio, the Summary on the right hand side of the Tab should read like this.
Click the next tab to set the Capture Settings.
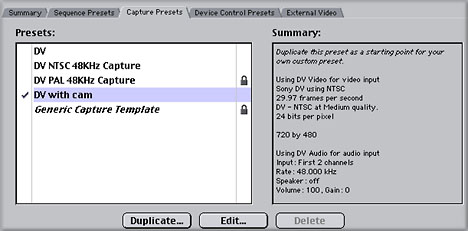
As stated above, this Tab needs to accurately reflect the media you will capture through Firewire. The DV preset should be mostly correct, but you may want to Duplicate it and then hit Edit on the copy correctly configure it for your system. Remember that you will need to correctly set the Audio Sample Rate here as well. If you are using 48K, then your settings should look like this in the Summary window.
With respect to Sequence and Capture settings, be advised that you will be miserable if you do not nail this down. If you capture media and then see the red render line when you place it in the timeline, chances are you didn't get these settings correct.
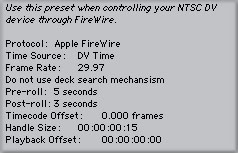
The next Tab you need to address is the Device Control Tab.
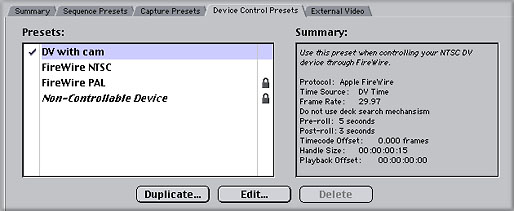
Device Control allows you to control, or not control, a Device like a camera or deck. Since you will be using Firewire, whether you are using a deck/camera or a DV converter, you need to check this tab. If you are using a DV converter, you need to select the Non-Controllable Device. If you do not, FCP will try and receive Timecode Data from the Firewire stream that is not there, resulting in failed captures. If you are using a deck or camera, you need to decide between Apple Firewire or Firewire Basic for Protocol (consult Apple's website to see which is appropriate). It is suggested that you set the deck Pre-Roll to 5 seconds and the handles to 15 frames. Consult the Manual for the reasoning behind these settings. The summary should look like this with variations based on your deck or camera situation.
ON TO PAGE THREE BACK TO PAGE ONE