
Audio in FCP 4 October 13, 2003
Final Cut Pro 4 Audio Essentials
Optimizing Sound For Beginners
By Dan Brockett
Audio in FCP 4 October 13, 2003
Final Cut Pro 4 Audio Essentials
Optimizing Sound For Beginners
By Dan Brockett
A New Way of Thinking?
For those of you reading this article who are not audio professionals or highly experienced video editors, I would like discuss with you a little bit about why audio should be one of the main concerns for you as you conceive, produce and edit your projects. Your project's soundtrack is incredibly important in communicating your message effectively to your audience.
Television and films have been described in the past as, "radio with pictures" and if you think about it, that's very true. Audiences have been conditioned by years of exposure to professionally produced television and film to viscerally respond to sound more than picture. Because of the way our brains are wired, we have to "see" a picture, and then process what we are seeing. With sound, we process and react more immediately than with picture. This all goes back to man's primitive "fight or flight" instincts that we still use for survival today. In practical terms, what this means to you is that your project had better have a smoothly mixed, high quality, clear soundtrack, regardless of your budget, other production values or project concept. The main purpose of this article is to teach you how to effectively use the audio tools included in Final Cut Pro 4.0 to optimize your sound, regardless of the type of project or budget. After reading this article, you will also discover that ending up with a high quality soundtrack is more dependent on your skills and abilities than whether or not you have the latest digital audio workstation and audio tools available. Throughout this article, you may notice certain words or phrases in Blue. All of these words and terms are listed at the end of the article in the Final Cut Pro Audio Glossary.
Before You Log and Capture Your Footage...
For the purposes of this article, we will assume that you are at least somewhat experienced with the basics of editing and the tools in Final Cut Pro. We do not have the space to go into exactly how Final Cut Pro 4.0 works as an editing application, there are several excellent tutorials and articles elsewhere on this site that explain the basics of video editing with Final Cut Pro in depth. If you are reading this article, it is obvious that you are interested in increasing the quality of your project's soundtrack and that is what we will be focusing on.
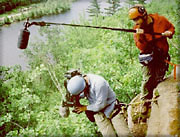 The Shoot
Making sure that your project ends up with high quality audio is an equal opportunity process, meaning that every step of the production is important in ensuring high quality audio. If the audio that is recorded during shooting is of poor quality, the audio for the project will be lousy, no matter what steps are taken during the editing process, it's that simple. Even though this article is primarily about working with audio during the postproduction phase of your project, there are several considerations that you need to be aware of if you are shooting the video for your project. Even if you are not shooting the video for your project, you should still be aware of these points and make sure that the producer and director who are shooting the footage understand these points as well.
Some Basic Digital Audio Terminology
In Final Cut Pro, you must remember that unless you are using an analog capture card, you are not digitizing the footage you are bringing in. Digitizing is what you do with analog footage when it is converted into digital media. The majority of Final Cut Pro editors work almost exclusively with digital video footage. When you capture digital video, remember, you are just doing a file transfer of digital information. From a practical standpoint, this means that you cannot adjust any audio or video parameters, including audio levels, as you capture the footage to your hard drives. This is one more reason to ensure that the audio recording levels that were recorded when the video footage was shot are within an acceptable level. This is a classic example of the saying, " garbage-in, garbage-out (GIGO)"
What's Are dB Levels?
Since we are talking about logging and capturing, this is the perfect time to discuss dB levels. dB stands for decibel , a standardized measurement of audio signal. Digital audio levels are measured using a scale called the dB scale. On Final Cut Pro's audio meter, you may notice a sequence of dB numbers that the meter is calibrated for. What do these numbers mean and how are they important in ending up with high quality audio? Depending on whether or not you have experience in working with analog audio , you may have some misconceptions about audio levels when working with digital audio. In order for you to understand how FCP's audio meter functions, you need to understand how digital audio works. Here are some examples of nominal or standard peak levels are setup for different types of mediums and equipment:
 Distortion/Clipping
Don't Crash Into That Wall!
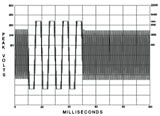 In the digital audio world, 0dB is a brick wall, if you exceed it, even by a little bit, you hear a nasty, screeching, popping sound that is quite unpleasant sounding. Unlike analog audio, when digital audio exceeds the 0dB level, it does not distort into pleasant to the ear, even-order overtones, called harmonics . Digital audio actually clips the waveform into a square wave that looks like this. Digital clipping occurs at odd intervals, which are not musical, and the result is very unpleasant sounding. For this reason, if you are using digital audio, you must make sure that your audio never exceeds 0dB. Ever. Period. End of story. Now that we have a rudimentary understanding of how digital audio functions and what analog and digital distortion and clipping sound like and why, let's learn about the logging and capturing process.
Logging and Capturing
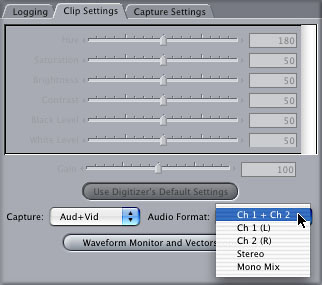
In Final Cut Pro terminology, logging and capturing is often referred to as L&C, so in order to further the rampant spread and abuse of acronyms in the FCP world, from here on out we'll refer to logging and capturing as L&C. There are not a lot of audio choices or parameters in Final Cut Pro when performing L&C with digital video, but there is one important audio choice you must make, how to capture your audio. In FCP 4.0, under the L&C window (keyboard shortcut command-8), under the "clip settings" tab, you have the following choices:
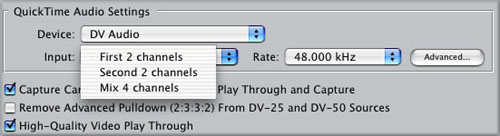
First off, let me say that I do not recommend shooting four-channel audio on DV. In order to shoot four channel audio in DV formats, you must shoot your audio at 32KHz, a lower than standard audio sample. Very few DV camcorders are not setup with dedicated channel 3 and 4 audio inputs. But, if for some reason you do end up with four-channel audio, here is how you capture it. Go to your menu, Final Cut Pro>Audio Video Settings>Capture Settings. Click on the edit button. Your capture-preset editor will come up and in the lower left-hand corner; you will see "Quicktime Audio Settings" then you will see an "input" pull down. Click on input and you will see choices for "First Two Channels" which is for normal DV and you'll see a choice for "Second 2 Channels" and you'll see a choice for "Mix 4 Channels". With your DV camcorder or deck in pause, select "Second 2 Channels" and you will be able to select channels 3 and 4 with a deck or camcorder in L&C mode. Quicktime is only capable of capturing two channels at a time so you will still need to do two passes to capture all four channels, but at least it's possible. If you select "Mix 4 Channels" in the capture preset editor, FCP will mix down the extra channels to the original two, which kind of negates the whole purpose of shooting 4 channels, but the option is available to do that if you want to. Apple does not specify how FCP combines the audio channels if this preset is selected.
Audio Sample Rates
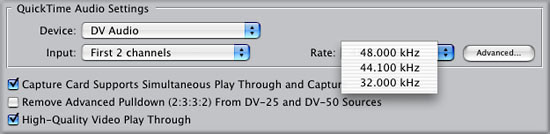
The most important set of audio-related parameters you need to set before you L&C is Final Cut Pro's Audio Capture settings. You must always capture at the correct audio sample rate. The correct audio sample rate is the audio sample rate that the tape was shot at. If you capture with a different sample rate then your source tape, there is a very good chance you will have sync issues and or audio distortion or artifacts. Mismatched audio sample rates are one of the biggest, single headaches in working with almost any digital audio application. If you capture at the wrong rate you will have to recapture. It's that important! In addition to capturing at the correct rate, it is essential that the Sequence Settings audio sample rate match your captured audio sample rate. The latest version of Final Cut Pro does tend to deal with mixed audio sample rates in a slightly better way than previous versions. If you are running Final Cut Pro 4.0, you are probably running a newer, faster G4 and have some processing power to spare. You do need to understand what audio sample rates are and why it is important for you to use matched sample rates.
Slices of Sound
The easiest to understand analogy for sample rates are to think of samples as individual "slices" of a sound. When you are dealing with a 48KHz sample rate piece of audio, each second of audio has been divided into 48,000 different "slices". Each "slice" (1/48,000 of a second) is referred to as a sample . Using this analogy, it's easy to understand why a piece of audio that has been sampled at a 48KHz sample rate has greater resolution, therefore, more potential for higher quality sound than a 32KHz sample rate piece of audio. The problem is that if you have setup Final Cut Pro to work with 48KHz audio, the standard sample rate for DV audio, when you also import a 44.1 KHz CD audio, for example, what does Final Cut Pro have to do to playback that piece of 44.1 KHz audio in real time? Final Cut, and therefore your Mac's CPU, must sample rate convert that 44.1 KHz audio up to 48KHz in order to make it playback seamlessly along with the 48KHz audio material in your project. What if within that same 48Khz project, you also add in some 32KHz audio from some different camcorder footage? What does Final Cut Pro, and therefore your Mac's CPU, then have to do? Correct, FCP and your Mac have to sample rate convert both the 32KHz and the 44.1 KHz audio to 48KHz, in order to playback the sound. Depending on the load you are placing on your CPU with other overhead , like RT transitions, color correction, filters, etc., your Mac may or may not be able to playback all three audio sample rate clips, together, in real time, without audio pops, clicks and other distortions. Get the picture? The bottom line here is to use QT Pro, iTunes, Peak DV or any other audio software that you have available to sample rate convert the audio to the same sample rate as your sequence preset used in Final Cut Pro before bringing the audio into Final Cut Pro. You don't have to do this, but you may pay the price with inconsistent audio quality. It all just depends on how much overhead you have loaded onto your CPU at any given time.
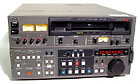
Checking The Audio Sample Rate of Your Footage
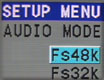 How can you tell what sample rate your footage was recorded at? It's essential that you know the sample rate that the tape was shot or recorded at. You can check the sample rate using a DV camcorder or deck. Most DV decks and camcorders will display the bit depth that the footage was recorded at. Some decks and camcorders will also display the sample rate, too. If your deck or camcorder only displays bit depth, remember that 12 bit = 32KHz audio sample rate and 16 bit = 48KHz audio sample rate. Usually the display is on a camcorder's viewfinder or flip out LCD screen or on a deck, the on-screen display is typically superimposed over the deck's analog video outputs (composite or Y/C ). You must sometimes flip a switch, press a button or enable a menu item to see the on-screen display, depending on the model.
Sample Rate Converting Using Quicktime Pro
Before you import CD audio into FCP you need to change the audio sample rate from 44.1 KHz to 48 KHz. You also need to convert the file format to "AIFF". This can be done with either iTunes or QuickTime. I use the QT process because I often trim my audio tracks before I import them. Using QT you can only import one track at a time.
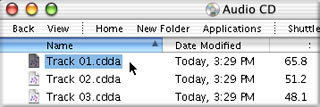
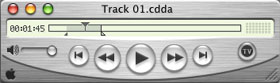
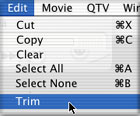
Open the audio CD window on the desktop, select your track and drag the track down to the Dock. Drop the track icon onto QT Player. This will open the audio track in the QT Player window. In this window you can set 'in and out' points for your audio, shown below left. When you have set your 'in and out' points, from the Edit menu > Trim.
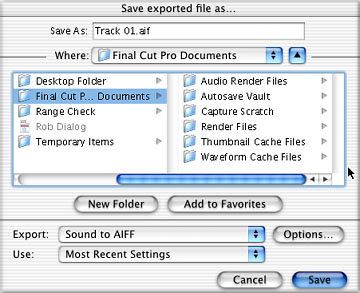
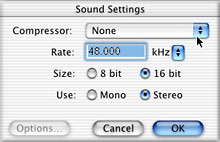
From the File menu select Export. This will open the 'Save exported file as...' dialog box. At the top, name your audio, you will notice that it has the .aif extension name as we are using QT to create our exported audio file. Just below in the 'Where'' box navigate to the location that you want the audio saved. You can save it right into your FCP media folder on your scratch drive. In the lower panel of this box set 'Export' to 'Sound to AIFF'. Next click the Options button. In the Options box, set compressor to none, Rate to 48.000 kHz, 16 bit Stereo. click the okay button. The 'Use' box will now show 'Most Recent Settings. Click Save.
![]()
The Export process is extremely fast. When done, simply import the audio into your Browser. Importing audio into FCP is now a simple and quick process. Drag the audio onto QT Player, trim, set Options and Save it to your media drive.
Sample Rate Conversion Using iTunes
Using iTunes, you are able to import an entire audio CD in one operation. However you will not be able to trim the audio tracks before import.
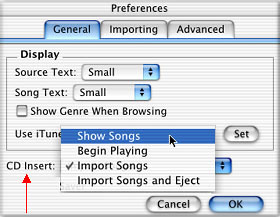
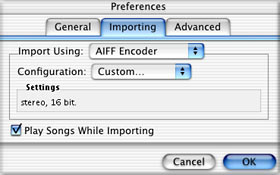
Launch iTunes. From the iTunes Application menu go to preferences. In the 'General' tab set the 'CD Insert' to 'Show Songs". Next click on the 'Importing' tab and set Import Using to 'AIFF Encoder'. Set Configuration To 'Custom',
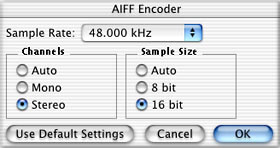
Double click on the Custom button to open the AIFF Encoder window. In the AIFF Encoder window set Sample Rate to 48,000 kHz, Stereo at 16 bits. Click Okay.
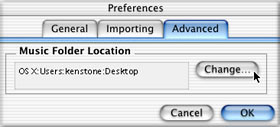
Select the Advanced tab. 'Music Location Folder', click on the Change button and navigate to the folder that you want to store your CD audio.
In the iTunes window, in the Source column on the left you will see your Audio CD, select it. In the main window you will see all your tracks. Uncheck any tracks that you do not wish to Import. Click on the Import button, top right.

Unfortunately, if you have loaded a library music CD with 200 tracks and you only want one track, yes, you will have to uncheck the other 199 tracks. The workaround for this is, if you only want to import a single track or just a few tracks, drag each track to the Library icon in the source list.
You can also use Peak DV as well as most other audio applications to also do sample rate conversion. Many applications will do complete batch conversions as well, which can be quite handy for saving time if you have a lot of tracks to convert.
If you want to trim your audio tracks before importing, use QuickTime. On the other hand, if you need to import several audio tracks at once, use iTunes. MP3 audio files that are to be used in FCP will need to convert to "AIFF" format and to 48,000 (32,000) kHz audio sample rate. You can use either QuickTime or iTunes to do this conversion.
Working With Audio on The Viewer
With the introduction of Final Cut Pro 4.0, FCP has finally come into relative maturity with its audio tools and with how audio is used in the application. In this section of the article, we'll take a look at how to manipulate audio in the viewer. Final Cut Pro is a very flexible application. There are often several ways of accomplishing a specific function so there will be some overlap and redundancy in how audio is manipulated in the viewer, timeline and with the mixer, respectively. Once you understand how to use each area most efficiently, you will even further appreciate the workflow flexibility that is built into FCP.
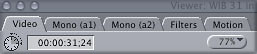
Go ahead and open a video clip that has audio content into the viewer by double clicking on the clip in the Browser window. Assuming this is a clip that was captured with the Ch1 and Ch2 option, you will see five tabs at the top of the Viewer, labeled Video, Mono (a1), Mono (a2), Filters and Motion. Click on one of the Mono tabs, in this case, Mono (a1).
Let's talk about several of the audio functions that can be performed in the Viewer window. Do you notice the Level slider at the top center of the window? This is the "volume" control, so to speak. The default dB level when you open a clip in the Viewer will always be 0dB. This does not mean that the clip is actually recorded at 0dB, this means that you have not added or lowered the audio level of the clip yet. Having a nominal level of 0dB when you begin editing is Final Cut Pro's way of helping you keep track of any level boosts or cuts that you make. If you know that you always began with each clip at 0dB, then you are hearing the level that the clip was actually recorded at, however loud or soft. Remember our discussion about L&C? All you did when you captured this clip was to do a file transfer from the DV device (assuming you are using DV), to your systems media drive. That said, older versions of FCP had some strange anomalies where clips would sometimes be captured with raised or lowered relative dB levels in comparison to where the levels were when the footage was shot or recorded. This seems to have been addressed in FCP 4.0 though and so far, in my experience, levels seem to be consistent in FCP in relation to the level that they were actually recorded at.
![]()
Notice the small diamond shaped button to the right of the Level slider? This is button lets you set keyframes so that you can increase or decrease the volume level for a clip over time. We'll discuss much more about keyframes later but just be aware that they let you smoothly ramp parameters over the course of time. If you have used keyframes anywhere else in FCP, for picture control, these audio keyframe controls in the viewer work in exactly the same way.
![]()
Directly below the Level slider control is a slider control labeled Pan. The Pan control selects how much of the audio signal comes from the left versus right side speaker output. In Final Cut Pro, panning hard left results in a numerical readout on this display of -1. Panning hard right results in a numerical value of +1. Or you can set the pan anywhere in between. If you set the pan to 0, it's default on single channels (linked stereo files default to hard panning, left and right); the audio output is centered between the two speakers on your system. The small, diamond-shaped button to the right of the pan slider provides the same keyframe function for panning as the keyframe button above it does for volume levels. If you are working with a stereo pair then a -1 Pan setting, the default setting for a stereo pair, means that the left channel will play out of the left speaker and the right channel will play out of the right speaker. Changing the Pan setting to + 1 will reverse the speaker output so that the left channel will play out of the right speaker and the right channel out the left. A Pan setting of 0 will play both channels out of both speakers.
![]()
 Next to the two keyframe buttons is a very handy reset button. Let's say you have experimented with raising the audio level for a clip and changed the pan, listened to the changes and weren't happy with them. Instead of having to move each of the two sliders back to there original zero settings. Just click on the reset button and each value is automatically returned to it's zero setting.
![]() To the right of the reset button is an audio clip icon, the small hand with a speaker. This audio clip icon can be used after marking the in and out points on an audio clip. You can then use this icon to drag the clip to the timeline.
To the right of the reset button is an audio clip icon, the small hand with a speaker. This audio clip icon can be used after marking the in and out points on an audio clip. You can then use this icon to drag the clip to the timeline.
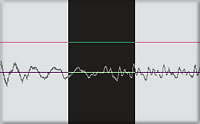
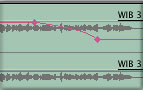
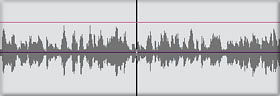 The waveform display is the main display in the audio tabs and is a visual representation of all of the levels in your audio signal. The higher the signal strength, the taller the waveform display, the lower the level the shorter or smaller the waveform display. The dark purple line that runs through the waveform display corresponds with your pan control. If you pan the signal hard right, you will see this line move toward the top of the viewer window. If you pan hard left, you'll see the line move down toward the bottom of the window. The pink line in the viewer window is representative of your volume level. The higher your adjusted volume, the higher the line moves in the window. The lower the volume level, the lower the line falls in the window. Once you get used to reading these indicator lines, you can then instantly tell whether a clip has had a panning or volume adjustment at a glance, even before you read the Pan and Level indicator windows themselves. You can click and drag on either of these two lines to change the settings.
Another important control for audio editing that works in conjunction with the jog wheel in the viewer window is the ability to be able to scrub audio (more about this below). You can activate this function with the keyboard shortcut shift-s.
Sub-frame Audio Editing
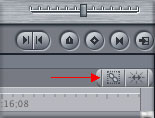
 You probably know and understand that NTSC video runs at 29.976 frames per second. If you don't, now you do. PAL and SECAM video run at 25 frames per second. What if you want to edit your audio at a smaller than 1/29.976th of a second in NTSC resolution or in a smaller than 1/25th of a second resolution if you are working in PAL? What if the audio edit you need to perform occurs in a fraction of a frame? Happily, Final Cut Pro gives you the ability to do sub-frame audio editing, that is, being able to effect an edit at a fraction of a second interval. In order to work at smaller than frame resolution, all you need to do is adjust the timeline magnification tool. By clicking and dragging to the left with the zoom tool, your playhead marker in the timeline in the Viewer will become a large black bar. This black bar covers the width of one frame and acts as a reminder that you are now editing in sub-frame mode or up to 1/100th of a video frame resolution. As you scrub the timeline magnifier tool left, notice how the playhead bar gets thicker and thicker? This is Final Cut's way of indicating that you are working at higher and higher resolution, allowing you to make very fine audio edits, cutting out small ticks, pops and breathes for dialogue editing or for smoothing rough audio edits.
Audio Scrubbing
What is audio scrubbing? Audio scrubbing is a way that Final Cut Pro lets you monitor audio as you view non-standard frame rate picture. So when you use the jog or shuttle controls in the viewer, if you have Final Cut Pro's audio scrubbing activated, you will here slower or faster than normal speed audio playback. In order to activate audio scrubbing, go to the View menu>Audio Scrubbing or you can toggle it on and off using Shift-S.
Split Audio Editing in the Viewer
A split audio edit is an edit where the audio either starts before the picture in a given clip or the video starts before the audio plays.

Applying Audio Filters in the Viewer
The viewer is where you apply and adjust Final Cut Pro's audio filters. I have already written a fairly detailed article on how Final Cut Pro's audio filters are used A Beginner's Guide to Final Cut Pro's Audio Filters so it would probably be redundant to cover the exact same content in this article. By reading the filter article and going through the tutorials, you will learn exactly how to best use the audio filters included with Final Cut Pro.
Creative Effects and Noise Reduction Filters
The audio filters in Final Cut Pro are mainly designed to enhance well-recorded dialogue and ambient sound . There are not a lot of truly wild sounding audio tricks in the audio filters in Final Cut Pro. If you need to perform noise reduction, or add effects that radically change, distort or synthesize sounds, for instance, you need to make a voice sound like a computer or like it's turning inside out, you will need to either export audio clips from Final Cut Pro into Soundtrack, Final Cut Pro 4.0's companion music composition program to use Soundtrack's included E-Magic Logic plug-ins or you will need to purchase third-party Audio Units audio filters that meet with Apple's requirements to work within the Final Cut Pro interface.
Working With Audio On The Timeline
Final Cut Pro's Timeline is where the majority of editors seem to perform most of their editing work. There are several operations that work very well from the timeline, yet there are some tasks that seem to have more control when performed in the viewer or canvas. The great thing about Final Cut Pro is that it features a true multi-modal interface, meaning that there are usually several ways to do the same operation, from several locations within the FCP interface.
Let's go over some basic audio operations and functions from the timeline and how and when to use them.
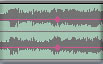
Audio Waveforms
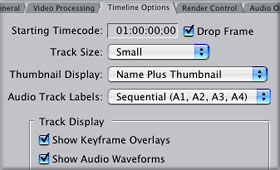 Okay, you've seen those neat little audio waveforms that sometimes show up on your audio clips in the timeline? By careful monitoring of the waveforms on your timeline, you will begin to be able to estimate relative volume levels before you even hear or playback a clip. Just as in the viewer, when viewing an audio clip, the taller the audio waveform, the louder the audio level. Sometimes the waveforms on the audio clips don't show up though. Why is that? It's because you have to make sure that they are turned on. Use the key combo Apple-0 or go to "Settings" under the "Sequence" pull down menu, and then go to the Timeline Options to turn on audio waveforms. Make sure that you have "Show Audio Waveforms" checked and you should be good to go. Also, while you are here, make sure that "Show Keyframe Overlays" is also checked. Hit "OK".
But I still Can't See The Waveforms!
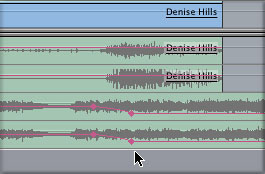
![]() Still not seeing the audio waveforms? You need to make sure that you are not viewing your timeline with the smallest size view. There are four sizes in the Timeline Track Height control. Selecting the one all of the way to the left means that the track height will be too small to display the waveforms. Switch to one of the three larger sizes and you should then see the audio waveform display all on all of your audio timeline clips. In order to better see the complete waveform, you may want to consider turning off thumbnails in your timeline. When using audio waveforms to do audio editing, you should also go to Sequence settings by hitting the keyboard shortcut Apple-0, then go to "Timeline Options" and go to the Thumbnail display pull down and choose "Name", then "OK" and your thumbnail displays will disappear.
Still not seeing the audio waveforms? You need to make sure that you are not viewing your timeline with the smallest size view. There are four sizes in the Timeline Track Height control. Selecting the one all of the way to the left means that the track height will be too small to display the waveforms. Switch to one of the three larger sizes and you should then see the audio waveform display all on all of your audio timeline clips. In order to better see the complete waveform, you may want to consider turning off thumbnails in your timeline. When using audio waveforms to do audio editing, you should also go to Sequence settings by hitting the keyboard shortcut Apple-0, then go to "Timeline Options" and go to the Thumbnail display pull down and choose "Name", then "OK" and your thumbnail displays will disappear.
Adjusting Audio Levels in the Timeline
The quickest, (not the most precise) way to adjust audio levels is in the timeline. Many newer users are not aware that using the "Selection Tool" (a.k.a. the pointer or arrow), you can actually adjust your audio levels in the timeline. Making sure that the "Toggle Clip Overlays" button is checked, when you hover your mouse over the audio waveform on your timeline, you will see the Selection Tool temporarily turn into a different tool that will look like an up down arrow. By clicking and dragging the audio Clip Overlay line up or down, a corresponding hovering display window will confirm the amount of level you are increasing by dragging upwards or are lowering by dragging the line downward.
Keyframing Audio Levels in the Timeline
Keyframing is used when you want to ramp the amount of volume in a given clip higher or lower. Keyframing is a simple way of letting the computer do a lot of the extra work for you and when it is used correctly, Keyframing will let you smooth out your audio mix with smooth audio cross fades , although you will soon see that Keyframes are not always the fastest way to make smooth audio cross fades. Let's say that you have a couple of dialogue audio clips setup on channels one and two on your timeline. You also have a pair of stereo music track setup on channels three and four on your time line. How do you reduce the volume on the music tracks (a.k.a.'ducking' ) when your dialogue tracks play so as to not have the music tracks competing in volume level with the voices? Keyframing is the answer.
Setting Your Audio Keyframes
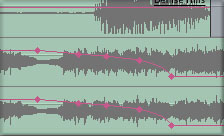
 Select the pen tool from your tool palette, usually located on the right-hand side of your screen. After you have selected the pen tool, go to the area in the timeline where you want to begin reducing the volume level of the music tracks. This is usually a fraction of a second before the dialogue begins, although some experimentation may be required. Hover the pen tool above the clip overlay line on the desired audio track, in this case, one of the stereo audio CD tracks that is serving as background music for this scene. As you hover the pen tool above the clip overlay line, you will see it turn from an arrow (selection tool) into a pen tool. Seeing the pen tool signifies that you can now make an audio Keyframe at the point on the timeline your mouse is hovering at. Once you have made a Keyframe, by clicking the mouse once at the point you want the change to occur at, you will see a diamond appear on the clip overlay line.
 If you are working with a stereo pair of audio, as CD tracks would typically be, you will notice that FCP has kindly inserted another Keyframe at the exact same point on the timeline, in the other channel of stereo audio, whether it is located above or below the audio track you put the Keyframe on. With the pen tool still selected, move the tool over the diamond-shaped audio Keyframe diamonds, and you will see the pen tool turn into a crosshair tool. When you see this crosshair tool, you can click and drag the Keyframe up or down vertically, changing volume. You can also re-locate the Keyframe by clicking and dragging on the Keyframe point horizontally on the timeline. Notice how if this is a stereo audio pair you are working with, the corresponding Keyframe on the other linked audio track moves in synch with the Keyframe point you are moving? If you are not working with linked stereo audio pairs, you will have to move the Keyframe points for each point separately.
Smoothing Out Audio Fades
Now that we have placed one Keyframe point, on the audio clip, we need to place, typically, at least three other Keyframe points in order to do a smooth volume ramp up and down. You begin with an anchor point, and then go a short distance like this to place the second point like this. You can place these pairs of Keyframe points anywhere you need to lower or raise the volume level of the music like this. In this example, I have looked at the length of the dialogue clip above the audio clips and determined roughly where I think I want the music to ramp down and then back up in volume. You really need to listen to the audio levels and adjust them accordingly, but visually, you can at least get a rough idea of how to best place the Keyframes. Notice how with only four Keyframes, we can ramp the volume of the music tracks down as the dialogue begins and then ramp the volume levels back up as the dialogue ends. Notice, however, that the volume decreases and increases reflect a linear fade ? Perhaps you would prefer a more gradual ramping effect to the volume? By adding more Keyframes, you can smooth or even curve the volume fade, either up or down. Now that you have mastered audio Keyframes, Keyframes elsewhere is Final Cut Pro, both visual and audio, will be a breeze; they all work the same way. Same with Soundtrack, only in Soundtrack, Apple decided to call the Keyframes envelope points. Don't ask why.

Split Audio Edits in The Timeline
 Disable clip linking by doing one of the following: Click the Linking control (or press shift-L) to turn it off. Click the edit point between the two audio items while holding down the Option key. Choose a tool from the Tool palette to perform the kind of edit you want. You can drag the length of the audio clips independent of the accompanying video picture. By editing two clips together, you can decide if you want the audio to precede the picture or the picture to precede the audio. If the audio from the first clip on the timeline ends before the picture does in the first clip, then the audio for the second clip should begin under the picture for the first clip, before the picture for the second clip begins. This is type of edit is referred to as a "split-audio edit" or as a "L" cut
Bringing Out Of Sync Clips Back Into Sync
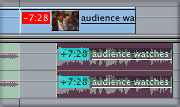 Some clarification is needed here to define audio sync in Final Cut Pro. Anytime you un-link audio tracks from video tracks and move the audio tracks, FCP will show you a red box in the video clip on the timeline and in the corresponding audio clips. The numerical readout in this small red box will let you know how many frames out of sync the sound and picture are. If you unlink the audio from the video clip (Shift-L) and move the audio out of sync with the picture, either intentionally or unintentionally, in order to move the audio back into sync, you could laboriously lock either the video or corresponding audio tracks and try to manually slide the appropriate clip back into sync.
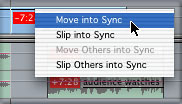 But there is a much better way. Control click on the red box in the video clip on the timeline and you will be presented with two options, "Move into Sync" or "Slip into Sync". Move into Sync just moves the audio and video clips back into sync wherever the lay. Slip into Sync does a slip edit back into sync. Depending on if the out of sync clips are at the end or in the middle of an already edited sequence, you can use either function.
A note of clarification; if you L&C footage and the footage was brought into FCP out of sync or with sync issues, the function we are discussing here will not help you to put your footage back into it's original sync.
Normalize Levels?
 Have you ever heard of the term, "normalize"? If not, a little explanation is in order. In most digital audio programs, there is a function called, "normalize" which is a fancy way of saying that the program is able to uniformly raise digital audio levels to a given value. For instance, if you are doing a shoot and for some reason, had your camcorder in manual audio input level mode and recorded inadequate audio levels, you could bring these levels up to a workable level using the normalize control. Of course, you raise up any noise levels that were recorded along with your desired audio. If you recorded your audio with a good S/N ratio you will be okay. If you recorded a lot of background noise, you will increase the background noise accordingly when you normalize. Now for the clincher, Final Cut Pro does not have a normalize feature, anyway. So what do you do if you record the audio levels too low? Fortunately, there is a hack for normalizing in Final Cut Pro. You can increase your relative audio levels by copying, pasting and stacking your audio tracks. In order to do this, Option-drag the desired track or track pair to the empty tracks below. Listen to the audio and watch Final Cut Pro's audio meters to make sure you now have adequate audio levels. They should peak at least at -16 dB to -12dB range. If they don't, repeat the above operation again until you get adequate audio levels.
Adjusting The Volume Level of Multiple Clips at Once
Yes, Apple has finally given us an option besides nesting when you want to adjust the volume levels on multiple clips at once. To adjust the volume of a group of clips simultaneously:
Audio Cross Fades
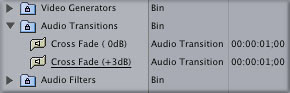 We will leave the timeline for just a moment to take a short detour to Final Cut Pro's browser. Click on the effects tab in the browser, and then go to audio transitions. Click the arrow to the left of the folder to reveal the two transitions contained in the folder, Cross Fade (0dB) and Cross Fade (+3dB). The Cross Fade (0dB) basically applies a linear fade down on the clip on the left side of the transition, while applying an equal volume linear fade up on the clip on the right side of the transition. This means that you will hear a slight dip in volume as the two clips transition to each other. By using the Cross Fade (+3dB), this volume dip is negated, resulting in no discernable volume dip during the transition. The best way to determine which transition to use to try both and see which effect works best for your particular situation. This is an aesthetic decision and there are no absolutes here.
Final Cut Pro 4.0's Audio Mixer
Final Cut Pro has been overdue for an audio mixer for a few years so now that we have one in Final Cut Pro 4, let's take a look at how using it effectively can save you time and let you control your audio with much more ease and precision than ever possible before.
To open the audio mixer at any time, use the keyboard shortcut option>6 or you can be a slow, mouse-driven editor and go to the "Tools" pull down menu, then go to the "Audio Mixer" option in the menu. Although FCP's mixer looks simple, and it is, it has a considerable amount of power if you understand how to use it correctly. Let's take a look at the main controls in the mixer:
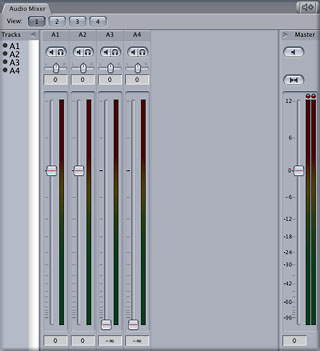
![]() The "View" buttons allow you to create different channel views. Let's say you have a project with 14 channels, each with a corresponding channel strip and meter. If you don't have enough room on your screen to view all 14 channels of audio controls, you can use the view buttons and create channel strip layouts that just show a certain amount of channel strips, in this case, let's say just the ones you are working on, perhaps six strips?
The "View" buttons allow you to create different channel views. Let's say you have a project with 14 channels, each with a corresponding channel strip and meter. If you don't have enough room on your screen to view all 14 channels of audio controls, you can use the view buttons and create channel strip layouts that just show a certain amount of channel strips, in this case, let's say just the ones you are working on, perhaps six strips?
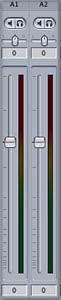
 To the left and below the "View" buttons is the track-listing column. This column lists how many channels you are actually using; See the little black buttons to the left of the channel descriptors (A1, A2, etc.)? Click on one of the black buttons and what happens. You will see the fader and channel strip that corresponds to the appropriate button disappear and appear as you toggle the button. So if you have a mixer view setup as we discussed above, with more tracks active than are visible, the indicators in this column serve as a reminder of how many channel strips you actually have active or available, if they have been de-activated.
 The Channel Strips
Moving to the right of the track control dialogue, you can see each channel strip. From the top down, you see the track heading, then a small speaker button. This is your mute button for each channel. When you press this small speaker button, the particular track that the button you pushed is assigned to is muted or made silent. If you have a complex mix with many tracks, you can use these mute controls to selectively listen to and audition specific tracks.
Directly to the right of the mute button on the channel strip is the solo button, the small button with the headphone symbol. By pushing the solo button, all other tracks in the mix are instantly muted, allowing you to hear this single track alone or solo.
![]() Below the mute and solo buttons are the track pan controls and display. These panning controls are pretty straightforward, -1 = full left panning, 0=centered, where there the spread of the sound between left and right channels is equal, then 1=full right panning.
Below the mute and solo buttons are the track pan controls and display. These panning controls are pretty straightforward, -1 = full left panning, 0=centered, where there the spread of the sound between left and right channels is equal, then 1=full right panning.
Below the panning control is each track's fader. As you slide each fader up, the volume level increases. If you slide it downward, the volume level for that individual track decreases. Next two the fader is a corresponding output level meter. Notice how each fader has a dark black bolded line about 3/4 of the way up? This mark signifies 0dB.
![]() To the far right in this window, you will see a Master output volume fader strip. The layout is similar to the individual channel strips, except you will see that the Master output does not have a solo button. You will see that it does have a master mute. By pushing this master mute button, you silence all output from the entire mixer.
To the far right in this window, you will see a Master output volume fader strip. The layout is similar to the individual channel strips, except you will see that the Master output does not have a solo button. You will see that it does have a master mute. By pushing this master mute button, you silence all output from the entire mixer.
Below the master mute button, you will see the down mix button. The down mix button actually combines all multiple channels into two stereo channels for final output to stereo media. It places the odd numbered channels on the left side of your stereo output and the even numbered channels onto the right hand side of your output.
You will also notice a small button in the upper right-hand side of the mixer window. This button is called the record audio keyframes button. In order to explain how this button functions and why it is so powerful, we need to explore the concept of mixer automation.
Mixer Automation
When you begin to work on the volume and panning of your audio mix, use the mixer automation controls in the Audio Mixer to record the changes to the levels and stereo panning of the clips in your sequence. Mixer automation is like having many hands and a multi-tasking brain available to precisely manipulate the channel strip controls as your project plays back. Automation is basically a quick and efficient way to set multiple keyframes in real time.
 To use Mixer Automation, you must make sure that the Record Keyframes checkbox in the Audio Mixer tab is selected. Once you have selected this control, Final Cut Pro records all changes you make with a fader or panning slider during playback as keyframes in the audio levels and panning overlays of the audio clip you are adjusting. The process of using the Audio Mixer to record keyframes is referred to as recording mixer automation .
Setting Up Preferences for Audio Keyframe Recording
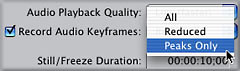 Before you start recording mixer automation, you must define how detailed you want the keyframes recorded when using the Audio Mixer. You set this using the Record Audio Keyframe preference in the General Preferences tab.
Choose Final Cut Pro>User Preferences. The Audio Keyframe Recording preference appears in the General tab of the User Preferences window as a pop-up menu with three options. Choose the appropriate setting for your needs:
Before you start recording mixer automation, you must define how detailed you want the keyframes recorded when using the Audio Mixer. You set this using the Record Audio Keyframe preference in the General Preferences tab.
Choose Final Cut Pro>User Preferences. The Audio Keyframe Recording preference appears in the General tab of the User Preferences window as a pop-up menu with three options. Choose the appropriate setting for your needs:
You can select or deselect the Record Keyframes checkbox during playback, if necessary. In the Viewer or Timeline, move the playhead to the area of your sequence where you want to record automation. You should start a few seconds before the section you'll actually be mixing, to give yourself time to get ready. This is sometimes referred to as pre-roll . Begin playback of your sequence. As your sequence plays, position the pointer over the fader or panning slider in the relevant track strip, then press and hold down the mouse button to begin automation recording for clips playing back in that track.
Hold down the mouse button to continue recording mixer automation, and move the control you've selected to adjust the clip's audio or panning levels in real time while playback continues. When you've finished, release the mouse button to stop automation recording. As the sequence continues to play, the panning and fader controls return to the previously set levels. If there are any other Audio Mixer controls you want to adjust at this time, repeat the previous process over for each control or set of controls you want to automate. When you're finished making adjustments, stop playback. After you've finished adjusting one control, you can move the playhead back to the beginning to record automation for additional tracks. The level changes you've already made play back with their respective changes you have already made to them, so that you can set the levels for additional tracks in relation to the levels you've already set. In this way, you can continue layering automation using different faders until you've set levels for all the clips in your sequence.
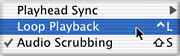
Looping Playback
You may find it helpful to set mixer automation while repeatedly listening to your material in a loop so that you can hear the same clip, over and over again and really dial in precise automation for the volume and panning. To record automation while your program is looping:
Four Common Audio Operations for the Beginning Editor
We are going to shift gears now and get into some hands-on, step-by-step tutorials working with audio in Final Cut Pro 4. If you are a beginning editor, you may not be sure of how to perform some of the most common audio-related tasks in Final Cut so let's go through a few them in easy to learn steps. Once you have mastered these procedures, you will begin to see how you can apply these same skills to many other common tasks in Final Cut editing. That's part of the beauty of Final Cut Pro, the application was written with common conventions and workflows that can be adapted to several different operations. For instance, keyframes. If you understand how to use keyframes when compositing images in Final Cut, you already have the basic understanding of how to keyframe audio.
1. How Do I Bring in a Background Music Track For This Dialogue Scene?
The setup: You have shot and edited an interview and you want to bring in some music underneath the interview subject's voice.
The first step is to audition some prospective music tracks so that you can select something that will support and enhance your interview. Depending on the source of your music, you may be able to just import a track from an existing file but for the sake of this tutorial, let's assume you will be bringing in a music track from CD. I am not going to lecture you about using copyrighted music in your non-home video productions, but you probably already know that it's not a good idea to use copyrighted music in anything but your home videos. Assuming you are in the midst of editing your interview, let's hide Final Cut Pro by hitting the Apple>H keys. This leaves FCP running but hides it, while you go and audition some music. Since we are going to bring in a CD track, use iTunes. There are other apps (Quicktime Pro, Peak, etc.) you can use to convert a 44.1 KHz CD audio track, but I prefer iTunes because of it's display and ability to easily manipulate large amounts of tracks.
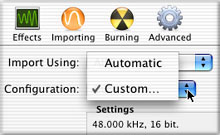 Click on the iTunes icon in your dock and iTunes will open. Before we even begin listening to music, let's set iTunes import preferences to convert your 44.1KHz audio tracks to 48 KHz .AIFF files so that once you have imported a cut into iTunes, the track will be ready to import into FCP at the correct sample rate and bit rate, in this case, a 48KHz 16 bit .AIFF file. Go to the iTunes menu pulldown and highlight preferences. This will bring up iTunes general preferences window. Click on the importing icon. Change the "import using" pulldown to AIFF Encoder. Then go to the Configuration pulldown and select "custom". You will then see a sub-window pop up. Make sure that the sample rate pulldown displays 48.000 kHz. Make sure that Channels is set to Auto and that Sample Size is set to 16 bit. Click "OK". Back in the main import preferences dialogue, you should see, "48.000 kHz, 16 bit in the "Settings" window. Click "OK" You are now ready to audition, import and convert 44.1 KHz CD audio tracks to 48 KHz .AIFF files, ready to import into a 48KHz DV project in Final Cut.
Open the CD/Superdrive in your Mac and put in a prospective CD. Once you have closed the drive, you will see iTunes poll CDDB, the Compact Disc Data Base from the Internet as it reads your CD. If the CD is in the CDDB, all of the song titles, album titles, etc. will probably come up in iTunes. Most library CDs are not in the CDDB, so depending on the type of CD you have inserted into your Mac, you may just get a list of track numbers or you may see full track descriptions.
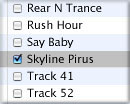 Audition prospective audio tracks in iTunes by double clicking on each desired track song name. Once you have located a couple of tracks that you think will work, make sure that the little black check marks in the song name title are checked ONLY for the tracks you want to import to your hard drive. This is a real drag when you load a CD with 300 tracks. Library music CDs often contain hundreds of variations and tracks. Unfortunately, all of the tracks will load with a check in the box next to the track as iTunes default. This means if you load a CD with 100 tracks and you only want to import one, bummer, you have to uncheck 99 boxes manually. Hopefully Apple will provide a workaround like an "uncheck all" box in the next version of iTunes. Once you have found the tracks you think might work with the interview, make sure that only the tracks you want to import have the boxes checked next to the track name, then hit the "Import" button.
You will hear the first track begin to play as iTunes imports the track and converts it for you. You may not be aware of exactly where iTunes locates the files for the tracks that it imports so let's cover that.

Once the tracks have imported, quit out of iTunes and go back into your FCP project. Using the keyboard shortcut Apple>I brings up the import files menu. To find the desired track that iTunes converted for you, go to your Mac HD>Users>your name (whatever you named your user partition in OSX)>Music>iTunes>iTunes Music> (various folders or tracks). Itunes will sometimes create a folder based upon information from the CDDB so it will depend on how many CDs you have imported tunes from and how iTunes was able to categorize them. My iTunes music folder has three sub-directories, "Compilations", "Gravity Music" and "Unknown Artist". Your iTunes music folder will probably look different. Locate the track you want to import and hit the "chose" button.
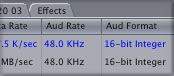
![]() You will then see the track in your browser, represented by a small speaker icon, signifying that the track is an audio only track. In the browser window, scroll to the right of the window and under the "Audio Rate" and "Audio Format" columns, you should see 48.0 KHz and 16-bit integer.
You will then see the track in your browser, represented by a small speaker icon, signifying that the track is an audio only track. In the browser window, scroll to the right of the window and under the "Audio Rate" and "Audio Format" columns, you should see 48.0 KHz and 16-bit integer.
 Double click on the imported audio icon and it will open in the viewer. You can now pretty much treat this audio clip like any other clip. Mark your desired in and out points. This is also a good time to check the audio levels on the clip. Some CD tracks come in pretty high level so you may need adjust the output level down in the viewer, using the level control. Remember, your peaks should be around -12dB so adjust the levels as necessary. Once you are happy with the relative levels, let's edit this audio clip onto the timeline.
Before you do the audio edit and insert these tracks onto your timeline, you probably need to target the correct pair of audio tracks or you may need to add additional audio tracks if you have already used your existing tracks.
Option 1 - You don't have an extra open pair of audio tracks
In case you have used all of your existing audio tracks for your dialogue for the interview, you will need to add a pair of audio tracks before you perform the edit. To add a pair of audio tracks, go to Sequence>Insert Tracks. Once the Insert Tracks dialogue opens, go to the controls in the bottom of the window and enter a "2" in the small gray box labeled "insert 0 Audio Tracks" is. Hit OK. You should now see an additional pair of audio tracks below your existing tracks. You can also add new tracks by control clicking in the audio area of the sequence, select 'add track'. Target the new audio tracks by moving the track target indicators (the buttons with the lower case a1 and a2) to your new tracks you want to place the music on. Locate the playhead at the point you want to bring in the music under the interview.Hit the F-10 key or drag the audio speaker icon with the little hand from the viewer to the timeline to perform the edit. You should now see the music track underneath your interview audio channels.
Option 2 - You have an extra open pair of audio tracks
Target the new audio tracks by moving the track target indicators (the buttons with the lower case a1 and a2) to your empty tracks you want to place the music on. Locate the play head at the point you want to bring in the music under the interview. Hit the F-10 key or drag the audio speaker icon with the little hand from the viewer to the timeline to perform the edit. You should now see the music track underneath your interview audio channels.
Congratulations! You now have music underneath your interview sync sound.
2. How Do I "Duck" The Music Levels Down When the Interview Subject Speaks?
The setup: You have performed the mini-tutorial above and successfully brought in a music track to play under your interview or dialogue scene. The problem is that although the music is now playing underneath the dialogue, the music is too loud when the interview subject speaks. If you adjust the music levels so that they are low enough for when the subject speaks, then when the subject isn't speaking, the music levels are too low.
In production terminology, you need to learn how to "duck" the music levels for dialogue. Final Cut Pro, being a very flexible application, gives you several ways you can achieve this.
The Basic Way To Do It (try it this way first)
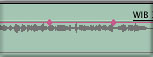
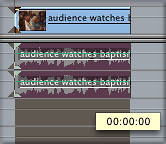
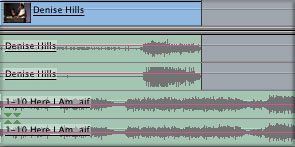
The first way you can do this is probably the most literal and a good place to begin. Using Keyframes, let's manually lower the audio levels in the music track. Make sure that you have the waveform display in the timeline turned on; it will be easier to see where the interview subject speaks. Locate the playhead at the beginning of the scene and let the scene play, monitoring the audio levels and listening for the relative levels between dialogue and music. Once you reach the first spot in the scene where the dialogue becomes overpowered from the music, hit stop, by hitting your spacebar on your keyboard. On the video clips audio tracks, you should see some waveforms that are the interview subject beginning to speak. The idea of "ducking" music for dialogue is to reduce the output levels on the music tracks smoothly and gradually. If you lower the music levels too soon before the dialogue begins, it will sound like a mistake. If you lower the levels too late after the dialogue begins, the listener may miss the first few words that the talent delivers. Ducking music for dialogue takes a little practice to learn exactly when and at what levels to duck the music down, but once you get an ear for it, it will become second nature to you.
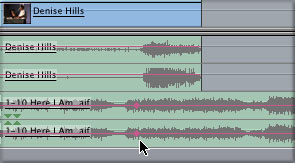
 Here is where the dialogue for this scene begins so let's try beginning the volume ramp down or "duck" here, a little before the dialogue begins. Select the pen tool from your tool bar. The pen tool is the last tool at the bottom of the tool bar and is actually drawn like a little fountain pen. Drag the pen tool over your music tracks. Notice how when you drag the pen tool around the screen, it stays the same looking as your regular pointer tool? Not so fast, carefully place the pen tool/cursor over the audio level line in your music track. You will notice that your pen tool will change from a pointer to an actual pen. By placing the pen tool where you want to set an audio Keyframe and single clicking it, you will place a small diamond-shaped audio Keyframe on your music track. In order to ramp the volume down or duck the volume, we must have a minimum of four audio keyframes for each instance of ducking down the music for the dialogue.
 Placing and Adjusting the Keyframes
Here I have set the first audio Keyframe where I roughly think I want the music to start ramping down in level. Here I have place a second audio keyframe where I want the volume drop to finish. Now, when I place the pen tool over each audio Keyframe, the pointer turns into a crosshair.
This is FCP's way of telling me that I can move the Keyframe vertically or horizontally on the timeline. By moving the Keyframe up, I increase the volume output level for this track. By moving the Keyframe down, I decrease the volume.
 If I move the keyframes up or down the time line, I am changing the physical location on the clip where the keyframes will affect. Notice how the volume fade here is so linear though? Locate the play head back to the beginning of this clip and hit the space bar to hear the volume ramp.
Notice how the decrease in volume is so linear ?
If I move the keyframes up or down the time line, I am changing the physical location on the clip where the keyframes will affect. Notice how the volume fade here is so linear though? Locate the play head back to the beginning of this clip and hit the space bar to hear the volume ramp.
Notice how the decrease in volume is so linear ?
 Let's try making this volume ramp down a little more curvilinear.
By inserting another audio Keyframe or two, we can change this straight (read: boring and mechanical) volume ramp down into something a little more natural and less mechanical sounding.
I have magnified the frame grab here so you really see all of the keyframes. Insert another Keyframe here and here. Then, try to move the keyframes into more of a shape like a curve. This will result in a smoother and more naturalistic sounding volume ramp down.
Let's try making this volume ramp down a little more curvilinear.
By inserting another audio Keyframe or two, we can change this straight (read: boring and mechanical) volume ramp down into something a little more natural and less mechanical sounding.
I have magnified the frame grab here so you really see all of the keyframes. Insert another Keyframe here and here. Then, try to move the keyframes into more of a shape like a curve. This will result in a smoother and more naturalistic sounding volume ramp down.
In order to raise the music volume at the other end of the clip, I just do the opposite of what we have done here to raise the output level at the other side of the clip. In a single sequence, you may need to repeat this procedure many times. The relative levels probably won't always be the same, they will vary depending on how well the interview subject projected when he/she was recorded and depending on how dynamic the music is at any given time. The entire object in performing these volume ramps or in "ducking" the music track is to make sure that all dialogue is clear, intelligible and doesn't get buried by the music levels.
The Easier, Quicker Way To Do It - The Audio Mixer
The reason you should try ducking music the way I have described above is so that you have an understanding of how Final Cut actually adjusts audio levels in the time line. Once you have tried the above method and mastered it, another alternative way of performing the same operation is to use Final Cut Pro's audio mixer.
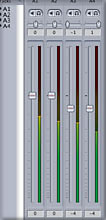 Let's pickup in the same place that you began the last tutorial at, you have added a music track to your interview/dialogue scene but the levels are too high when the talent speaks. Bring up Final Cut's audio mixer by hitting the Option-6 keys. Cue the play head to the beginning of this scene and hit the spacebar to begin playing the sequence. Notice how the levels read out on your dialogue channels (typically 1 and 2, if you began by editing the scene with the default channels assigned). If you added two more audio channels (typically 3 and 4) when you edited the music tracks onto the time line, you will notice two track channel strips for the music tracks. In order to adjust the volume level of the music tracks using the mixer, you are going to end up doing, in essence the exact same thing that you did in the above example. You are going to place audio keyframes on the time line as you did above. The difference here is that you placed the keyframes manually in the above example. In this instance, you are going to use the audio mixer to do the exact same thing. Place the play head at the beginning of the sequence, but before hitting the space bar to begin playing the track, hit the "Record Audio Keyframes" button. It's located in the upper right hand of the audio mixer window. In the interests of equal time for keyboard shortcuts, you can also activate this button by hitting the Shift-Apple-K keys to do the same thing.
Once you have activated the control, hit your spacebar to begin playing the sequence. As the sequence plays, grab the volume sliders for tracks 3 and 4 (in most cases) and adjust the volume so that the music levels duck down when and where you want them to. Hit the space bar to stop recording keyframes. You should now see at least several audio keyframes in the music tracks waveform readout. These keyframes correspond to how you moved the volume faders on FCP's audio mixer on that last pass. Cue the play head back to the beginning of the sequence and hit the space bar to play the sequence. Watch the channel 3 and 4 volume faders move on their own. The best part about using the mixer versus placing the audio keyframes is that the mixer is a much easier and quicker way of placing audio Keyframes than doing them manually, although using the mixer may not always give you as precise control as placing the Keyframes manually. Now you have two ways to do it tough. Use whichever method works best for you in a given situation.
3. The Basic Building Block Of Sound Design - Eliminating An Undesirable Sound With Room Tone
The most basic audio editing that you will probably do in Final Cut Pro as a video editor is to eliminate undesired sounds and to replace them with room tone. If you merely eliminate an undesirable sound by eliminating it, you will be left with a "hole" in your soundtrack where the room tone is missing. The whole goal in editing audio in any editing application is to make sure that all of the scenes transition to each other with smooth, even audio. Leaving these audio "holes" in your soundtrack will result in bad, uneven sound. Room tone is exactly what the name implies; everywhere video is shot has a distinct background sound. This may be a gentle breeze, a clattering, traffic noise in the distance or the whoosh of air conditioning on an interior office shot. All of this background noise is collectively referred to as "room tone" or sometimes as "ambient sound". When you eliminate an undesirable sound, like one of the crew in the scene coughing during a short break between lines, you must replace the audio where you removed the cough with clean "room tone". Shooting room tone is a basic technique of recording each location setup with no talent or crew making any noise, usually for about :30 to :60. If you or whomever shot your video without room tone, there are ways to manufacturer room tone, so relax, we can still make some room tone, it's just not as convenient as just recording it.
If You Don't Have Room Tone
Every location has its own room tone, so it's important to record some room tone for every location in your program. If, for some reason, room tone was not captured for a particular scene, but you have a gap you need to fill, you can try to copy a section from another clip in the same scene that has a pause in the dialogue, and paste it to fill the gap. If you have no pauses that are long enough to cover your gap, you can try to copy and paste a short pause multiple times. But there's a chance that it will end up sounding like a loop, which will be too noticeable. In this case, you can use the following method to obtain a long section of room tone from a short copied pause in the dialogue.
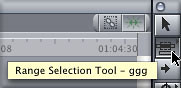 To create a section of room tone from a short pause:
Find the longest pause you can in a dialogue clip in the same scene, then copy the section that contains the pause. If you're in the Timeline, you can use the Range Selection tool. Create a new sequence, name it "Room Tone," and paste the audio pause into it twice.
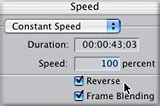 Select the second pause, highlight it, then click the Apple-J key combo or go the menus (you know, the slow way) and choose Modify>Speed.
In the Speed dialog, click the Reverse checkbox to select it. Play the resulting clips. The looping sound should be gone, but if you hear a clicking at the edit point between the two clips, you may have to add a cross fade between them. Cut and paste as many pairs of these clips as you need to fill the necessary duration, adding cross fades between each pair. Render the Room Tone sequence and then edit the sequence into the gap in your program.
Select the second pause, highlight it, then click the Apple-J key combo or go the menus (you know, the slow way) and choose Modify>Speed.
In the Speed dialog, click the Reverse checkbox to select it. Play the resulting clips. The looping sound should be gone, but if you hear a clicking at the edit point between the two clips, you may have to add a cross fade between them. Cut and paste as many pairs of these clips as you need to fill the necessary duration, adding cross fades between each pair. Render the Room Tone sequence and then edit the sequence into the gap in your program.
To replace an unwanted section of an audio clip with room tone:
Play your clip using the J, K, and L keys, and set In and Out points right before and after the section of audio you want to replace. Move the Canvas or Timeline play head to the In point.
Open your room tone clip in the Viewer, and move the Viewer playhead to the start of the section of room tone you want to use.
Edit the room tone into your sequence by doing one of the following:
Drag the room tone clip from the Viewer to the Replace section of the Edit Overlay in the Canvas.
Click the Replace button in the Canvas.
Press F11.
4. How To Make a Dialogue Track Sound Like It's Coming Over a Phone's Earpiece (and how to use Final Cut Pro's Audio Filters in the process)
At some point, you will probably need to make a voice sound like it's coming through either a telephone, radio or television speaker. Believe it or not, all three of these effects are basically variations on the same thing. There are ways that these effects can be embellished with "extras" such as adding a noise track or layering in static, but the basic effect is EQ.
Open a track in the viewer so that you can apply an EQ audio filter. In case you haven't applied an audio filter before, let's go through the procedure. Go to the Browser and click on the effects tab. The bottom folder is the Audio Filters folder. Click on the small triangle next to the folder and you will see two more folders open, "Apple" and "Final Cut Pro". The filter we will want to use is located in the Apple folder. Click on the small arrow next to the Apple folder and you will see all nine of the Apple audio filters. The filter you will want to use will be the AU Graphic EQ filter. You could use other combinations of filters but in using the Graphic EQ, you will actually be able to see exactly what you are adjusting, hence the name "Graphic" EQ. With other types of EQ like parametric EQ, you have to use your imagination and knowledge to be able to imagine what the changes will sound like. Setting a "Q" and a center frequency is much less intuitive than seeing a graphic representation of the audio bandwidth. With a graphic EQ, you can easily see the adjustments.
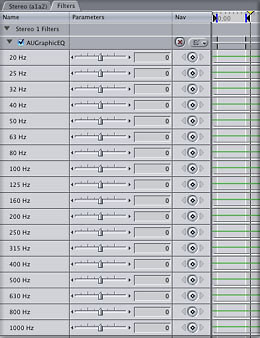 Getting Graphic
Let's take a look at this filter. Click and drag the EQ filter and drop it on your audio clip in the viewer. Click on the filter tab in the viewer to actually see the EQ. Here is what it looks like. Because we are working with two mono channels, you must individually adjust the EQ for each channel. With the advent of real time audio in Final Cut Pro, at least you can actually hear the changes as you adjust them. Previous versions of Final Cut Pro required all audio filters to rendered before you could hear any changes so the ability to effectively use filters is a big improvement. This filter is so large physically, you can only view a segment of all of the controls at a time.
Notice that the top of the controls has a slider that is labeled, "20Hz"? 20Hz is the lowest sound that human hearing can hear. Chances are unless you have some very high quality audio monitors on your system, your speakers will not even be able to reproduce any frequencies below about 80 to 100Hz. Most computer speakers are much worse and probably are not typically capable of reproducing sounds below about 160 Hz or even higher. The way a graphic EQ is laid out is that the sliders correspond with the frequency scale, in other words, the lowest bass sounds come first, then mid range, then the high frequencies. Our goal with creating a telephone-like sound is to basically cut the low frequencies, boost the mid range and cut the high frequencies. However, there is a lot of latitude for adjustment.
Degrees of "Phone-ness"
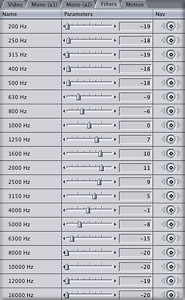 For instance, a period piece with a rotary dial phone from the 1940s would probably sound a lot tinnier than a modern phone from today. There is also a large amount of creative interpretation at work here, it depends on how you as the editor and or director "hear" the sound in your head. In this sample, I have basically cut all of the frequency content below 500 Hz. Then beginning at the 630Hz range, I began to bring in a little bit of content. Notice, however, that the content is still being "cut" because the slider is below the halfway point of its range, meaning that the frequency is still cut. At 1,000 Hz, the slider is actually at it's center detent, meaning that the sound has not been cut or boosted. At 1,250 Hz, I have actually begun boosting the frequency content.
Which Mid Range?
These are approaching mid-range frequencies, but you should understand that even though the scale of this EQ filter goes from 20 Hz to 20,000 Hz, the mid range we are speaking about is not at the mid range point of the EQ, which would be 10,000 Hz. The mid range we are discussing is the mid range voice frequency which is generally around 2,000 KHz to around 5,000 Hz. This where the human voice's frequency range is centered and this is where a typical telephone's frequency reproduction range is centered, for the human voice. When you speak on the phone, you generally cannot hear too many bass frequencies over the phone. Same with highs, you really don't get a very good sense of clarity over the phone if some plays music in the background while you speak on the phone, you cannot really get much detail, right? Telephones are designed to work with voices, not full frequency sound so the trick to setting EQ for an effective sound is to boost the mid range where the voice resides. The example I have provided here begins to taper off at around 4,000 Hz. If you adjust your EQ filter to match this sample, don't forget that below this EQ is a second EQ since we are affecting two channels. Once both of your channels are adjusted, your "telephone" audio should sound very close to this sample .
Sound Perception
You can adjust this telephone sound accordingly for trying to obtain a television speaker or car radio sound; both sounds would typically contain a slightly wider frequency range than a telephone would. Much of this type of sound design depends on the editor and director's perception of how they want the audience to react to the sounds. Another good example of this is television or movie gunshots. If you have ever shot a real gun before, you realize how different Hollywood's guns sound from what a real gun sounds like. In most environments, real guns just sort of emit a loud thump or crack. A real gunshot generally isn't as dramatic as a compressed, reverbed, gated, sound massaged gunshot. Most narrative films don't use the actual sound of a gun being fired on a set. Guns fired on a set are shooting blanks anyway, which actually don't sound like a gun firing a real cartridge. Typically, half or quarter power blanks are used in order to reduce the volume levels for the actors and crew.
Final Cut Pro Audio Glossary
Throughout this article, we have covered a lot of new terms and descriptions that you may not be aware of or may not have understood. This glossary will provide simple, real-world explanations for the terms that are in Blue throughout this article.
32Khz Audio Sample Rate
The "other" (non-desirable) sample rate for Final Cut Pro. Audio is typically recorded at 12 bit, 32KHz when the user is either shooting four channel audio or is lazy and didn't check the camera audio settings.
48KHz Audio Sample Rate
The "proper" sample rate for DV for Final Cut Pro. 48KHz audio sounds better than 32Khz, and is the standard, default sample rate to ensure audio harmony with DV and FCP.
Ambient Sound
All of the background or environmental sound in your footage. Can add a lot of warmth and character to your sequences when managed properly. Can become a huge headache when not managed properly during a shoot.
Analog Audio
Sound that it is recorded to a non-digital format like Beta SP, Cassette or Vinyl.
Audio Sync
When audio components play in exact time with visual elements, the audio is in-sync with the video. In FCP, when audio is out of sync with video, your video will look like a bad Kung-Fu film.
Component Analog Video
Also known as CAV or YUV. Generally, a video signal or routing input or output that contains three components of a video signal, luminance or brightness and two chroma or color components. Component analog video is most commonly from the Betacam SP format although other digital equipment can sometimes input or output the format.
Composite Video
A video signal or input or output that condenses the luminance and chrominance portion of a video signal into a single cable. Most commonly signified in consumer video equipment by a single, yellow RCA plug or jack. The lowest quality commonly used video standard. Most common with VHS format although most professional formats have a composite signal for monitoring.
Crossfades
When you combine, most typically, an audio fade down with a fade up, the resulting transition point is referred to as a crossfade.
Curvilinear
A linear fade that has been curved or smoothed by the addition of extra keyframes. Most listeners feel that curvilinear audio fades sound more organic and less mechanical then a linear fade.
Decibel
A standardized measurement of audio output level. Almost all audio meters on digital video equipment calibrate and measure digital audio signal in decibels with the maximum safe ceiling being 0 dB. Decibel is most commonly abbreviated to dB. The decibel scale is an exponential scale, so as you move up the decibel scale, the output levels increase disproportionately.
Digitizing
Digitizing is the process of converting and capturing analog material to a digital medium. This term is most commonly used mistakenly in place of "capturing" DV in Final Cut Pro. You are only digitizing if you are bringing in analog material to Final Cut Pro such as VHS or Betacam SP. If you are bringing in DV, you are capturing or doing a file transfer because the DV camcorder that the footage was shot on already digitized the camera's visual input.
Ducking
Commonly used industry terminology used to denote fading music or special effects audio level down so as to not compete with dialogue in a sound mix.
Envelope Points
Envelope points are the same as keyframes. Used only in Final Cut Pro 4.0's companion music loop composition program, Soundtrack.
Even Order Harmonics
Sonically pleasing music or sound overtones that occur at even intervals that vibrate in sympathy with other even intervals.
File transfer
When you capture DV in Final Cut Pro, you are doing a file transfer of binary digital information. The process of capturing video from a DV tape in Final Cut Pro is essentially the same as transferring a file from a CD or Zip disk.
Garbage In-Garbage Out (GIGO)
In computer and digital audio and video usage, the term means that if you do not have high quality material (footage, music or sound elements) to begin the editing process with, your end result will undoubtedly be sub-par.
Hard left
A term used to describe audio panning with the pan control set all of the way to the left.
Hard right
A term used to describe avid followers of Rush Limbaugh
Harmonics
Besides a root note or tone, all sound produces sympathetic overtones of the original note or tone, called harmonics.
Keyframe
A computer technique that uses anchor points identified by the user as reference for the computer to interpolate the time span or frames in between each anchor point. The term came from traditional cell animation where the "key" frames were drawn by a lead artist and the rest of the "in-between" frames were drawn by less skilled and lower paid animators.
Linear Fade
In Final Cut Pro, if you insert two keyframes into an audio sequence, then fade the volume or panning up or down, the resultant fade up or down will be linear because the there are only two reference points (the shortest distance between two points is a straight line?). In audio fades in FCP, linear fades tend to sound mechanical and un-natural.
Marshall Stack
A huge, loud guitar amplifier manufactured by the Jim Marshall Company in the U.K. Known as the signature loud, high output tube driven guitar amplifier that gave rock guitar it's distorted, warm sound.
Mismatched audio sample rates
Using a sample rate in your FCP sequence or capture preset that is different than the sample rate that your footage was shot at results in incompatibility between the your material and FCP. The results from mismatched sample rates can vary from distortions, pops and clicks to loss of audio sync.
Mixer Automation
Final Cut Pro's audio mixer lets you place audio keyframes on your audio clips in real time by manipulating the channel strip faders as the clip plays back. Then, when you play the sequence back, FCP's audio mixer automates and plays back the keyframes you placed using the faders and or pan controls. This process is referred to as mixer automation.
Multi-modal
A term used to describe Final Cut Pro's ability to perform the same operation in several different ways, from several different tools in the application.
Nominal
The original or stated value. Could be an output level, an impedance or any of several different measurements.
Normalize
To digitally raise a low output level up to a normal level. For instance, if you placed an audio clip on your timeline with several other clips and all of the other clips were much higher audio output level, you could normalize the clip with the lower output level to more closely match the other clips. FCP does not have a normalize setting, but it now has a similar feature called "absolute and relative gain".
Odd order intervals
Harmonics that occur and odd intervals are overtones that occur at distinctly un-musical, unpleasant interviews.
Overhead
The amount of total load you have placed on your Mac's CPU. The more operations you run, the more programs you have open, etc. the more overhead on your computer
Parametric EQ
Final Cut Pro has a parametric EQ in the Apple plug-ins folder. Parametric EQs work differently than graphic EQs in that with a graphic EQ, you adjust each of the bandwidths you want to effect separately. With a parametric EQ, you set a center frequency and all of the surrounding frequencies are also adjusted in various curves and patterns around the center frequency.
Pre-Roll
Another term that has a different meaning in the digital realm versus in the analog realm. Giving yourself pre-roll when you are laying down keyframes using mixer automation means that you cue the playhead to a place before the actual clip you want to effect to give you time to prepare to react.
Room Tone
The sound of the background in an interior location. You should always record room tone in every different setup so that when you edit the audio in a scene, you have some background material to work with for when you remove undesired noises.
Sample rate
The amount of times per second that an analog sound is captured by a digital recording. The preferred sample rate for DV and FCP is 48KHz.
Scrub
In FCP, when you scrub audio, you have made the audio output at non-standard speeds, in order to determine precise edit points. A term from the reel to reel analog days of cutting tape by hand. The editor would scrub the tape over a playback mechanism to find a precise edit point.
Society of Television and Motion Picture Engineers (SMPTE)
The worldwide standards committee for television and film technical standards. The committee that is most often known for standardizing time code used in video.
Square wave
A square wave is how a digital sound wave is distorted when driven to too high of levels. Very unpleasant sounding.
S/N Ratio
Signal to noise ratio. The more signal you can record and the less noise, the higher quality the recording will be.
Y/C Video
Y/C is the proper name for an "S-VHS connector" a small, multi-pin DIN type of connector that is common on consumer video product. The "Y" stands for luminance and the "C" stands for chrominance.
Just The Beginning...
Although we have reached the end of the article, hopefully this is just the beginning of your education with audio in Final Cut Pro. With the additions and improvements in the audio capabilities in Final Cut Pro 4, Apple has finally brought the application into the realm of being able to perform high quality audio work. With the additional processing power in the new G5s and what will be a 64 bit optimized version of Final Cut Pro coming soon, I have many reasons to believe that Final Cut Pro will continue to grow in it's audio capabilities. However, at this point in time, it is most important that you invest in strengthening your editing skills and expanding your audio skills. Without great audio, your projects will never realize their full creative potential nor usually their full audience potential, no matter what level you work in video and film. The software and hardware are continually improving by adding new tools and functionality. I hope that by reading and doing the tutorials in articles like this one that you are continually improving your skill set to keep up.
Dan Brockett is an independent television producer/writer/director and has been complaining about the audio in Final Cut Pro since he bought version 1.0. Now that Apple has finally addressed audio in Final Cut Pro 4.0, he will have to find something else to complain about. What about Soundtrack? Yeah, that's it. We need MIDI implementation in Soundtrack! And what about a real mixing console with sends and returns?
Big Little Films, Inc. ™
5235 Mission Oaks Blvd - Suite 373, Camarillo, Ca. 93012 USA
(805) 388 4689 E-Mail: dan@biglittlefilms.com
copyright © kenstone.net 2003