
The Basics - Stylize November 5, 2001
The Browser: The Organizing Brain of FCP
The Basics - Stylize November 5, 2001
The Browser: The Organizing Brain of FCP
When Ken asked me to write an article about the Browser, I thought, "Sure, that won't be too tough." Then I thought about it for a minute...Doing an article about The Browser touches upon every aspect of doing a Project in Final Cut Pro! This might take a bit more time than I originally anticipated.
After taking some initial notes, and doing a bit of research, I realized that there is a whole lot more to The Browser than meets the eye. It's a pretty powerful interface, as I've discovered, and there are quite a lot of strategies you can use within The Browser to assist you in streamlining the production of your Project. Hopefully, this article will give you some ideas on how to best organize your own Projects.
The Project
I'm assuming you all know what a Project is. In general, when creating a new Project, you receive a Project Tab and Effects Tab in the Browser window. In the Name Column of the Project Tab, a new Sequence will appear for you to begin working with. The Project contains all the Clips, Sequences, and Files for a particular program. The information pertinent to a Project is held in the Project File.
The Project File
The Project File is a reference file that relates to all your media that makes up your show. Source Tape Names, Clip Information and Time Codes that correspond to Quicktime Media Files are examples of information kept in the Project File. A Project file contains only alpha numeric data, so that is why it is so small. The corresponding Media Files to the Project are the items taking up most of the space on your computer's Media Drive(s). The Project File is the File that should be backed up, daily, to removable storage, like a Zip Disk.
The Browser: Function
The Browser is the centralized storage area to assist you in organizing and managing media assets for a Project. The Browser is probably one of the most important features of Final Cut Pro.The Browser contains no media, just references or "pointer files" to the actual media.
Every piece of media you work with in Final Cut Pro comes in through the Browser at some point. It is, indeed, the "brain" of every Project. It's the location for all of your Sequences, Clips, Bins and related files you need to complete a Project.
To Select the Browser, Click on it or Choose Apple + 4
Making a New Project
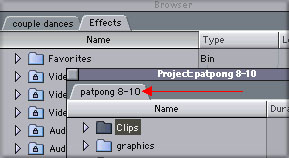
We can't begin talking about The Browser until we have a new Project. You can make a new Project from the File menu or by tapping Apple + E within Final Cut Pro. Upon launching a new Project File. See Fig. 1-1 , you get a Browser with two Tabs.
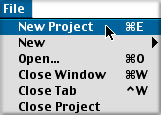
Launching a new Project Fig 1-1 |
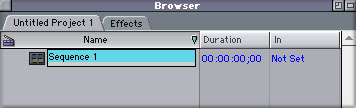
A new Project - Fig. 1-2 |
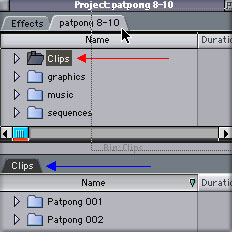
Architecture
The Browser is made up of the Project Tab and the Effects Tab. The information located in your Project Tab relates to your Project's media, while the Effects Tab offers drag and drop audio and video filters, audio and video transitions, video generators, and saved favorite effects. Before we can utilize some strategies towards Project and Media Management in the Browser, it's a good thing to get to know how we can arrange The Browser to best suit our work environment. In Fig. 1-2, we see a new Project with its Tabs intact.
Setting Up a Project in The Browser:
The way the Browser is set up prior to beginning a Project is one of function and individual taste. It really depends on the Project you are working on. When a Project is first opened you receive an Untitled Project Tab, an Effects Tab and an Untitled Sequence. Name the Project and Sequence as soon as possible.
Think about your Project ahead of time. If you have the need for multiple sequences utilizing the same media, you would need only one Project with multiple sequences set up in it. For example, you are working on 2 versions of a commercial. A :45 second version and a :30 second version. If you are working with two different kinds of source media, it might be a better idea to make up a separate Project with separate Sequences in each Project.
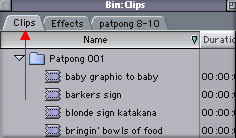
Setting Up Bins in your Project
One of the first things prior to capturing and/or importing media into Final Cut Pro is making up some Bins relating to your Project. The purpose of Bins is to subdivide your Clips into meaningful subdivisions. They are very similar to folders in the Mac. They are exceedingly useful for Project Management. You can use Bins to:
Separate different types of footage
Organize Video, Auido, Graphics Files Separately
Separate Sequences along with supporting Clips
You can make Bins relating to a variety of organization schemes.
How to make Bins
As you know, Bins are similar to Folders in FCP. Like folders, you can make as many as you like in assisting your Project organization. One of the first thing you'll do, even prior to Capturing Media, is to make Bins for your Project. To make a Bin, you can go to the File menu:

The Bin |
File > New > New Bin
Or
Apple + B
Either one of these methods will make you a new Bin. Use Bins in your strategy to find Clips easily and quickly and to assist you in organizing your Project into logical "chunks". Fig. 1-16 shows the Bin icon:
You can make Bins within Bins to further this strategy. Just make a new Bin and drag it into the existing Bin. Some other shortcuts you may not have known about Bins:
You may want to open a Bin at this point to make it your "default" Bin. I suggest this because you can duplicate this "dummy" Bin throughout your Project. Sort the columns the way you want after you make this Bin. Bring no media into the Bin, merely duplicate it if you desire to have your Columns set up the same way each time you make a Bin.
I find this useful as I don't need to look at certain Columns after capturing and once I am editing my Project. Certain data becomes more important to me once I am editing. Things like: Media Start and Media End, Tape Number, and maybe some cool Thumbnails sitting right next to the Name Column. Again, it's up to you to set up the Columns to your ideal order.
Opening Bins
You'll need to open Bins to see its contents quickly. The fastest way is to hit the Right Arrow key. The Left Arrow Key will close it. You can also twirl down the triangle next to the Bin to open it in List View. If you'd like to open a Bin that is already set to Icon View, you'll need to double click on it or select it and hit Enter.
Opening Bins in their Own Window
Often you'll want a Bin to be open in its own window. To do this, just double click the Bin in the Project Tab and the Bin will open on its own. You can also select the Bin and hit Enter. One advantage, you can now view the Bin without having to scroll up and down so much.
Closing Bins and other Tabbed Windows
Close Bins and Tabbed Windows by first dragging out the tab, if necessary, then click on the small square in the upper left hand corner of the Window. You can also Control + Click the Tab itself and select "Close Tab". Finally, you can close the Bin or Tabbed Window by choosing Control + W or Apple (Command) + W. One of these methods should work for you.
Making Bins according to Project Type
Ask yourself, "What kind of Project is this and how should I optimally organize it?" Different projects have different systems to help them stay organized. Some strategies are common, some things are Project specific.
In general, it's good to come up with a workable "naming convention" to help you find and manage items quickly. This prevents a lot of confusion, particularly with more than one person working on the Project. Also, it is wise to add information to imported sound files relating to sample rate, format and recording mode. Don't name Clips with duplicate or similar sounding names. Your Clip name must be less than 25 characters.
Working on a Film or other tightly shot and scripted Project? Maybe you should set up Bins that relate to Scene Number or Act I, Act II and Act III. Use the Description Column to name each Shot. Use the Auto increment Scene and Take numbers while logging to help you stay focused on the Clip at hand. Use the "Mark Good" checkbox to help you sort through all you're your "circle takes".
For Documentary style Projects, perhaps it makes more sense to make a different Bin for each Tape Number. Enter Clip names that reflect the content or what section of the Show you want to see the Shot. You can also use Logging Notes to enter a desired location for that Clip. Capture multiple takes as you'll never know when you may need a second sound bite, B-Shot or Alternate Take. Project organization is really up to you, so take stock of what you need to do and do your best to prepare intelligently.
Keeping organized and aware of future media management needs will serve you well at the beginning stages of a Project. You'll want to be able to easily sort and sift information about a Clip so you can easily find it, use it and, if necessary, delete it.
There are lots of tricks to help you in systematically staying organized in a Project.
Being able to "color code" Bins with labels would be a Feature Request as you can't do this in FCP 2.
In general, I usually make separate Bins for each tape I capture at the beginning of most Projects. After I Make the Bins, I will select Tape 1 as the "Logging Bin" so that all the Clips I log will drop into that Bin.
Making a "Logging Bin"
The first Bin you make will probably be a "Logging Bin" so you can Capture Media into it. A "Logging Bin" can be made from a normal bin by either selecting it, then going to:
File>Set Logging BinOr you can control + click directly on the Bin. The contextual menu will drop down and you can select "Set Logging Bin".
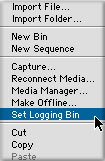
Control + Click on A regular Bin to get this contextual Menu for "Setting a Logging Bin
Making a Regular Bin into a Logging BinWhen a Logging Bin is made, everything that is brought into FCP via "Log and Capture" will go into that Bin.
In Log and Capture mode, you can click on the "Make Logging Bin" button as shown in Fig. 1-12
Make a Logging Bin from Log and Capture Mode Fig. 1-12 New Logging Bin Button - Red arrow |
Any of these methods will drop down the "Clapper Board" icon next to the Bin. This ensures that that Bin is indeed set as the "Logging Bin".
A logging bin has a "Clapper Board" icon next to it once it is set. If no Logging Bin is set, then the "Name" Column is the default "Bin" place are Clips captured. This is not recommended, because your Clips will not be captured into set Bins making them harder to manage their Media.

"Set" Logging Bin |
Tabs: Project / Bins / Effects
You can drag out the tabs of the Project, Effects and any Bin opened in its own window. This will help you organize your Project by being able to see all your assets at a glance. Unlike other popular NLEs, You can have more than one Project open at a time.
The Project Tab "Patpong 8-10" was dragged out as a separate Tab. Just Click and Drag it., Red arrow. |
You can have both your Project Tab and your Effects Tab open at the same time. This is a great way to work if you like to drag and drop effects.

If you have dual monitors, dragging out your Effects tab gives easy access to drag and drop effects to the Timeline. Dragging out Effects Tab |
Make a Bin into a Tab by dragging it up to the Project Tab area.
First double click the Bin to open it in its own window. Then click and drag the Tab of the Bin to the area to the right of the Project and Effects Tab: See Fig. 1-8 & 1-9
Turning a Bin into a Tab Fig 1-8 First, double click the Bin to open it in its own Window. You can also Select the Bin and just Hit "Enter". The Bin will Open with that Window's View Settings (Red arrow).
Then, drag the Bin's Tab next to the gray area along side the Project and Effects Tabs. |
Bin as a Tab Fig. 1-9 The Bin called "Clips" is now a Tab that can be dragged out on its own for viewing or left alone as a Tab for ease of switching back and forth between other Tabbed Bins, The Project or Effects Tab |
In the Browser there are 45 Columns (also called "Headings") which can be displayed. This information is vital to sorting through information about your Clips. Column information is based upon a Clips: Item Properties, Device Control and Capture Settings that were enabled when the Clips were captured or the Sequence Settings of an individual Sequence. Certain Properties can be can changed individually or en masse in certain Columns of the Browser by Control + Clicking and bringing up the Contextual Menu for modifications. Some Columns are shown here below.

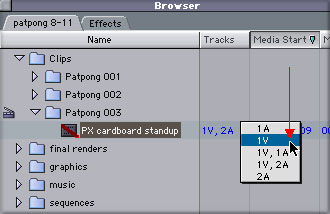
Columns also known as "Headings" "Media Start" is just one of 45 different Columns of information about a given Clip. "Media Start" is new to FCP 2.0 and indicates the starting source Timecode of a Clip. |
New Browser Columns in FCP 2
In FCP 2 there are a number of new Columns in the Browser. The Columns that were added are welcome additions to the interface. Some of them, such as "Media Start" and "Label" have already been explained.
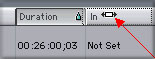
Media Start and Media End are the true Start and Stop Timecodes of a given Media File. This helps avoid the confusion of "Not Set" of the In and Out Columns.
Label offers two Columns for displaying a name in conjunction with the ability to color-code a Project's Clips.
Date Modifed relates to the last time the Media File was altered.
Standard and Logging Columns
There are also "Standard" and "Logging" Columns you can switch to. Just Control + Click on any Column.


Switching from Standard to Logging Columns Control + Click on any Column to get the contextual menu to enable switching from Standard to Logging Columns. Logging Columns contain only the information crucial to Logging and Capturing. |
Information held in Columns
The functions of the Columns will be briefly described below:
Name: Name given to the Clip Alpha: Clip's type of Alpha Channel Anamorphic: Shows if a Clip is flagged as 16 X 9 Aud Format: Clip's Audio Bit Size, Stereo or Mono Aud Rate: Sample Rate of a Clip Audio: Whether a Clip has audio or not Aux TC 1/2: Editable TC Tracks for other sources Capture: Clip's state of capture: OK, Not Yet, OK Comment 1-4: Custom Comments Composite: Clip's Composite Mode Compressor: Clip's Codec Data Rate: Clip's Captured data flow per second Description: Information about a Clip after captured Duration: Duration between In and Out Frame Size: Frame Size of the Clip Good: Indicates if Clip was marked "good" In: Timecode of the set in point Out: Timecode of the set out point Label: Color Coded Labels to organize Clips Last Modified: Date and item was last modified Length: Duration of a Clip on Disk Log Note: Text entered when logging Media Start: Timecode In of the Media on Disk Media End: Timecode Out of the Media on Disk Offline: Check indicates no Media is with Clip Pixel Aspect: Indicates square or non-square pixels Reel: Tape Number Reverse Alpha: Indicates if the Clip's Alpha is Reversed Scene: Scene Number indicated when logging Shot/Take: Clip's shot or take entered when logging Size: Size of Media File on Disk Source: Directory Path of Clip's Media TC: Timecode of existing Clip
Custom Columns
There are 4 Columns which are available for customizing your own category. The Comment Column 4 can be exported in an EDL. One can think of a broad range of ways that these Columns could be used in a database or the Find feature for more powerful searches and sorting.
To change the name of the Custom Comments, just Control + Click on the Custom Column and bring up "Edit Heading". You will then be able to change the Column's name. You can also change this in Edit > Project Properties.

Editing the Heading of a Custom Column |
Hiding Columns
Any Column can be "hidden" from View as well from the same menu. Hidden Columns stay hidden until you change them. Hiding Columns gets unnecessary Column information out of view.
Unfortunately, there is presently no way to customize Columns from Project to Project. Just set up the Columns the way you wish at the start of every Project.
Hidden Columns found in "Contextual Menus"
There are 45 columns of information available to you, however, many of them are "hidden" from you in "contextual menus". In Fig. 1-11's menu ( above), you can see some items that say "Show" other attributes, such as "Aux TC 1" and "Thumbnails". This indicates that these particular Columns are hidden until you bring them up. A popular hidden Column is "Thumbnails". Try to bring it up at this time by Control Clicking on any Column and select a hidden Column.

Click and Drag the Thumbnail to see the contents of your Clip. Note: you can't drag or double click a Thumbnail to load it into the Viewer. The Clip Icon is the one you double click. |
Setting a New "Poster Frame"
If you open your Clip in the Viewer you can set a new "Poster Frame" (aka a "Rep Frame") by opening it in the Viewer, scrubbing to a new frame and pressing control + P or by going to the Mark Menu and choosing "Set Poster Frame".
Another easy way it to scrub to the Poster Frame in the Bin and merely holding down the Control Key, then releasing the mouse. The Selection Tool temporarily becomes the "Scrubbing Hand" when the Control and Shift Keys are held down while in a Bin displaying Large Icons. Either way, the new Poster Frame will now be displayed in Large Icon Mode or Thumbnails.
Other items Available through Contextual Menus in the Name Column
As you may know by now, contextual menus are sprinkled throughout the FCP interface. The ones found in the Name Column of the Browser are exceedingly handy. You might take a minute to try them.
Import File or Folder Import of a File or Folder into Name Column or Bin New Bin or Sequence New Bin or Sequence into Name Column or Bin Capture Captures Clip into Name Column or Bin Reconnect Media Dialog Launches Reconnect Media Dialog relating to item(s) Media Manager Tool Launches Media Manager relating to item(s) Make Offline Dialog Launches Make Offline Dialog relating to item(s) Cut/Copy/Paste Cuts, Copies or Pastes item(s)
Adjusting Width of Columns
Sometimes it is necessary to adjust the width of the Columns to see, say, your logging notes. For this, just Click and Drag near the edge of the Column to widen it, look for the Left/Right Arrow like you'll see in Fig. 1-13
Click and Drag at the edge of a Column to widen it. (Red arrow) Adjusting the Width of a Column Fig. 1-13 |
Switching Positions of a Column
The info contained in Columns is invaluable for editing or troubleshooting. Some info is more useful than others, depending on the task. So, it is a great idea to be able to move your Columns to a more visible location. The Column Move Tool will engage once you Click and Drag the desired Column to a new place. The
Arrow (Selection) Tool turns into a Left/Right Column Move Tool when held over any Column.
By Clicking and Dragging on any Column with the Selection Tool (Red arrow), you can relocate any Column to a more desirable location Left/Right Column Move Tool |
One of the most powerful functions of The Browser is its ability to easily sort Columns of Information. To sort a Column, all you need to do is click on the Column Name or "Heading" in the Column you want to sort. A green arrow shows up to indicate the Primary Sort Column. The Clips would then sort according to the Column's information in descending alpha numeric order. Click the arrow again to sort in ascending order.
Commonly, you sort by the name of the Clip, but there are other helpful things to sort when you are making a Project. Let's say you wanted to find the longest and shortest Clip in a Bin. You would merely click on the "Duration" Column to sort the duration of those Clips.
Another common operation would be done by the sorting the "Media Start" Column which is the starting Timecode for each Clip on the original Source Tape. By sorting this Column, we would have all the shots in order as they were originally shot on the tape. This is valuable for a lot of reasons as you may realize. Media Start is a new column which was sorely missed in earlier versions of FCP. We now have an easy and obvious way to detect our Timecode In Point for recapture or media management. Before 2.0, many were falsely worried that their Timecode In Points were "Not Set" . This brought about fears of that the Media Start Timecode was either ignored or not entered into the Project properly. It wasn't true, but one can understand the confusion.
Sorting Multiple Columns in The Browser
Sometimes you need to sort more than one aspect of a Clip. To sort by more than one attribute of a Clip, you merely click on the Column for sorting out the first aspect of the Clip. Then you would Shift + Click on the additional Column to sort by both attributes. A light blue arrow shows up to indicate the Secondary Sort Column. Descending order is the default, but you can click on the blue arrow to put the Clips in ascending order.
You can continue to sort by multiple Columns by continuing to Shift + Click additional Columns. To clear too many Sorting Columns, merely choose a new Primary Sort Column.
List View vs. Icon View
People have asked me, "do you prefer List or Icon view?" "Both!" I say. It really depends on the task or tasks you have before you. It's important to be able to switch back and forth between these "views". List View is most valuable for sorting Clips and the information found within the Columns. Most of the time, I edit in List View. When troubleshooting, I also use List View to find out if anything is "wrong" with a captured Clip.
Advantages of List View: You can work quickly and see a lot of important info at a glance. Clips and Bins hierarchically arranged for easy access to sharing, storing and moving Items between Projects and Bins.Advantages of Icon View: With Large Icon View, you can scrub through Clips and can put them in "Storyboard" order for fast story arrangement. You can set a "poster frame" of the Clip to give you a visual idea of the contents of a Clip.
Getting into Icon Views of The Browser
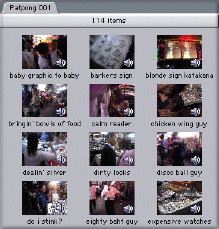
In my opinion, "Small Icon" view is SO small, you can barely see the Poster Frames and they are not "scrubbable". Therefore, this View is deemed useless, so I won't really talk about this View. You can switch back and forth from List View and Large Icon View quickly (see below). On the Project Tab level of the Project, I am always in List View. In my Bins, they often are opened in Large Icon View.
There are powerful reasons to use "Large Icon" view. As was mentioned, you can scrub through the Clip. The big one is a super fast way to achieve a "rough cut" show by assembling your Large Icons in storyboard order. You can also set a Poster Frame to see a thumbnail view of the Clip. Audio Clips are displayed as a "Speaker". Bins are displayed as large Folders.
You must first get into "Large Icon" view.
Common ways to switch to Large Icon View:View > Browser Items > Large Icons
Control + Click in the "Name" Column in List View or in any open area in Large Icon View to bring up the contextual menu and select "View as Large Icons"
Shift + H toggles through the Views (My personal favorite!) so you can get back into List View quickly.
Next, arrange the Icons in order: Left to Right and Top to Bottom.
Once you are in Large Icon mode, you can arrange the Icons in a Storyboard format. Then Select All the Clips you want to have in your Sequence Left to Right and Top to Bottom You can then drag the Selected Clips to a Sequence or an Edit Overlay for a super fast rough cut Large Icon View |
Arranging Large Icons in Columns and Rows
Bins in Icon format can get kind of messy. If this happens, do this:
View > Arrange
This should clean the Bin up neatly, however, it cleans things up by rearranging the icons in alphabetical order, which is something you may not want to do if you've already sorted them in some sort of "storyboard order". You can also Control + Click in the Browser to choose "Arrange".
Scrubbing Video in Large Icon View

Scrubbing Hand Tool |
Scrubbing in Icon View is something new to FCP 2.0. It is very valuable to quickly see the contents of your Clip by "scrubbing" through the video indicated by the Large Icon. For this, Apple has provided us with the "Scrubbing Hand Tool". Just Click and Drag across the desired Large Icon. It is located in the Tools window under the Zoom Tools. HH is the shortcut for this tool shown in Fig. 1-24. Hold shift down for the Arrow Tool to be temporarily enabled, this is handy for quickly reordering the icons. Similarly, with the Selection Tool, you can hold down the Control + Shift Keys down to enable the "Scrubbing Hand".
Unlike "Thumbnails", Large Icons CAN be dragged to the Timeline or Double Clicked for opening into the Viewer.
The Browser: Workflow and Methodology
Before any editing begins, one must acquire media by either capturing or importing it into the Browser. Capturing audio and video is usually done by way of either an analog capture card, like the Cinewave or Digital Voodoo cards for higher end uncompressed video or through a Firewire Cable should the editor be using DV, DVCAM or DVCPro 25.
Capturing Video for your Project
Now that you know how to make a "Logging Bin" you can capture digital video into it. After you have captured your Video, you can subdivide it into different other Bins and use the Clips to assemble your Sequence.
Importing Items
Importing media is simple enough, go to: File>Import and bring in your EDL, Batch List, Graphics File, CD Audio File or, even faster, a group of files as a Folder. That "folder" will become a Bin containing all the Footage Files originally contained in that original Folder. Nifty, eh?
Want an even faster way to import that folder? Try dragging and dropping a Desktop Folder filled with footage files from the Media Drive into the Browser. Again, as in the above example, a Bin with Clips that reference those footage files will be automatically be made.
Multilayered Photoshop graphics come into the Browser in the form of a "Nested Sequence", although it will come in as one layer if flattened prior to Importing. The beauty of these "Nested Sequences" is that elements of it can be changed easily and at any time (say, changing the title of "this week's guest star", while all other titles remain unchanged). After making the change, the update is immediately reflected in the main Sequence or "The Show".
Layers within the imported Photoshop can be adorned with effects and/or animated within Final Cut Pro. Treat this "Nested Sequence" as you would any other Clip in Final Cut Pro.
You can also drag the individual layers back into The Browser to turn them into individual footage files, if you like. A Bin can help you organize these layers.
If dragging and dropping a Still onto a FCP Icon opens in a Viewer, it will need to be saved before going forward with the Project, much like a "Capture Now" Clip.
If you are importing a Batch List , Importing Batch Lists, do this:
Set up and open a Bin. File > Import > Batch List
A dialog box will open. Navigate towards the Batch List, Select it and choose Open. A list of the offline Clips opens ready for Batch Capture. The Batch List should have the following at the minimum: Clip Name, Reel Number, TC In and TC Out. You can create a Batch List with any Tab delimited program. When importing a Batch List, make sure the Column info reflects native FCP structure, that is, make sure the Columns are in the same order.
Numbered Image Sequences like TIFF or TARGA can be easily imported:
First choose Edit > Preferences > set Still Duration to :01 > Import the Folder with the Image Sequence contained in it.
You may want to put this into a separate (Nested) Sequence before you edit it into your main Sequence for ease of handling. If you wish, you can export this Sequence to QT Pro to create a Clip as well, just choose the first image in the sequence and make sure the Image Sequence Settings reflect a 29.97 frame rate, then save to a media drive. Saving "normally" you will have a QT "ref movie" which is fast and easy. A "Self Contained" movie will take longer, but unlike the "ref movie" the original source files are not needed so the file can be handed off. There is no recompression if the original lossless codec, like Animation is used. If exporting to a PC Animation Workstation, make sure you follow the protocol for Windows machines. You'll need a ".mov" for sure at the end of every Quicktime movie for easy import into the Animator's PC.
You can also import music from sources like CD. The only gotcha is that audio from CDs typically have a sample rate of 44.1 Khz and the sample rate for DV is 48 Khz. So you may have to upsample your file. I recommend doing this because it's possible to introduce crackles and pops to your show if you don't.
You may wish to deal with CD Audio entirely in QT Pro:
File > Import File > Convert to AIFF > Options button set to 48 Khz > Save to a folder on your Media Drive.
With FCP you have to import as above:
File > import file as a 44.1 Khz file (your only sample rate choice)
You then export this file in Quicktime AIFF format as a 48 Khz file (check your options button on the export dialog box for the upsample rate). You then reimport the upsampled file from your Media Drive. You may want to trash the original CD file at this point to prevent confusion. In the end, it simply saves a step to do this all in QT Pro.
Importing an EDL from another workstation is an important thing to know how to do. Chiefly, this is ror recreating a Sequence created on a different editing system, like an Avid or Media 100.
Prior to importing the EDL, you should do a test with the Editor providing you the list. In the test you should suggest limitations on Filters, Motion effects, Composites above the second track, Audio below the fourth track, and any non-SMPTE transitions. More often than not, these are all ignored in the EDL.
To Import an EDL just:
File > Import > EDL then select the proper preset.
EDL Import Options:
Recapture : You can then specify if you want to "Recapture any media to your machine if you are coming from another system.
Reconnect : if the Quicktime Media files are already on Disk or came from another FCP system's portable (Firewire) Media Drive. Leave the "Make File Unique" box unchecked if you are using this method.
Custom : if handle size, Drop Frame Timecode is specified. Another reason would be if the Clips needed to have different "unique" names than the originals. FCP can read Clip Names from: other FCP systems, Avid (24 Track EDLs not supported) and Media100. In all other cases, FCP will use the Reel Number and Starting TC as the clip name.
Click OK. Then, navigate to the EDL and Click Open
The imported EDL becomes offline Sequence in your current Project Tab.
If you need to recapture, just select the Sequence in the Browser and Batch Capture (Apple + H) the offline Clips with the proper source tapes.
Dragging newly Linked Clips back into The Browser
It is often useful to take Clips that are linked with disparate Media, say a Video Only Clip linked with a CD audio Clip, and drag them back into The Browser. The linked item now acts as if it's a single piece of Media.
Keyboard Shortcuts for The Browser
Keyboard shortcuts are important here, most useful is that Apple + 4 selects the Browser. You'll want to know this to easily be able to select this interface for many common editing and media management operations. Here are some others:
F1 launches the "Help" Window.
Command + ? also opens "Help"
Apple + E makes a new Project
Apple + B makes a new Bin
Apple + N makes a new Sequence
Apple + Option + N makes a Sequence with Presets
Apple + O opens the file
Apple + I launches the Import Dialog Box
Apple + Q will quit FCP
Apple + S will save the current Project
Option + S will save all open Projects
Apple + Z will undo an action in The Browser
Apple + Y will redo any action in The Browser
Apple + 4 Selects The Browser
Apple + 5 Selects The Effects Tab
Apple + 6 Selects The Favorites Bin
Option + F Makes a Favorite Filter or Transition
Control + F Makes a Favorite Motion
Apple + A Selects all Items
Apple + D Deselects all Items
Option + D duplicates Items
Apple + C Copies Items
Apple + V Pastes Items
Apple + X Cuts Items and Pastes them to the Clipboard
Shift + H Toggles List View to Icon View
Apple + U makes a Subclip(s) from Marker(s) in List View
Control + D Modifies the duration of an Item
Apple + W closes The Browser and brings up the "Save" dialog box, where you'll then be prompted to save your Project file to Disk.
Control + W will also Close a Tab in the Browser
Control + Shift + Selection turns Selection Tool into Scrubbing Hand
Page Up and Page Down will scroll up and down The Browser vertically. Shift + Page Up and Shift + Page Down will scroll across The Browser horizontallyThe Up and Down Arrow keys will move you from Bin to Bin. You can use this method to scroll within your Bins to find Clips.
The Left and Right Arrow keys will open and close that Bin or move you up to the next level in the Project's hierarchy.
The Left and Right Arrow Keys applied to a Clip with Markers set will open the Clip to reveal the Markers.
The Left and Right Arrow keys will move Left to Right in a Bin in Icon view.
The Tab key will move you from Bin to Bin alpha-numerically. The Tab key will move from Clip to Clip in alphabetical order within the Bin.
Shift + Tab will move you in reverse alpha-numeric order.
After selecting a Bin, The Return key opens it as a separate window.
Shift + Return on a selected Clip will open it in a separate window.
Option + Return will open the Clip's item editor
If any Clip is selected, The Return key will load it into the Viewer
Type the first three letters of the Clip and it will be selected. Enter loads it into the Viewer.
Shift + B puts The Browser into "Standard Column View"
Option + B puts The Browser into "Logging Column View"
Use the Find Dialog to search for Clips quickly (Apple + F) and entering the Clip's name or Source Timecode.
Command + G offers up the "Find Next" function in "Find Results"
Shift + F3 Finds the previous Clip in "Find Results"
When you have time, try each one of these keyboard shortcuts and try to commit them to memory. You'll be a much faster and organized Editor when you have most of these shortcuts mastered.
Copying Sequence Clips back into the Browser
As you may know, Clips that are modified in the Timeline do not affect the original master Clip that it was originally derived from. You can save these Clips back into the Browser by dragging them from the Timeline back into an appropriate Bin in the Browser. This is useful if you've modified a Clip you want to use later.
Selecting Items in the Browser
Selecting items is easy in the Browser. Just Click on an item to select it. Navigating to it using the Tab key, Arrow keys or by typing in the first few letters of the name of the Clip will also select the Clip.
Selecting Multiple Items in the Browser
You can select more than one Clip. It depends if you want to select adjacent Clips or not.
To Select Adjacent Clips:
Select an Item, hold down the Shift key, then click the last Item. All the Items between will be selected as well.To Select Non-Adjacent Clips
Command Click the additional Clips.
Loading Items into the Viewer
After Selecting the Clip, Clips or Nested Sequence from the Browser, it can be loaded into the Viewer for evaluation. To load an item into the Viewer after it is Selected:
Tap Enter
Drag and Drop
Double Click (or Option + Double Click for Nested Sequences)
Loading Multiple Clips into the Viewer
You can load more than one Clip into the Viewer at a time. Select the Clips you want to view, then drag and drop them into the Viewer. The Clips will then be available to you in the "List of Recent Clips". You can drag a whole Bin of Clips to the Viewer in this fashion if desired.
Opening Sequences from the Browser
To open a Sequence to get a Timeline and Canvas you can merely double click on the Sequence. You can also select it and hit Enter.
Deleting Items from The Browser
Often, you'll want to delete items like Bins and Clips from The Browser. To do so, merely select the item and hit the delete key. This will not delete the actual media on your drive. If you made a mistake and deleted a Clip you wanted to keep, merely re-import it back into The Project. If you wish to take a Media File off of your Media Drive, use the Make Offline Tool to remove that actual piece of media Be exceedingly careful when deleting Sequences, once they are deleted, they can't be brought back into a Project without a backup.
Naming and Renaming Items
You can change the Name of many items in The Browser, including Video Clips, Subclips, Audio Clips, Favorite Effects, Favorite Transitions, etc. whenever you wish. Just make two distinct mouse clicks on the item and type in the new name. Note: if you change the name of the Clip, it's source Quicktime Media File will not. To find out the original name of the source file, you'll have to check out the Item Properties for that particular Clip.
Navigating in the Browser
Moving around the Browser quickly is what you'll definitely want to do. I have found that any kind of scrolling with the mouse is far slower and less accurate than using the Up and Down Arrow keys to move up and down the Browser in List or Icon mode. In Icon View, the Right and Left Arrow keys will move horizontally between items in Icon view. The Tab Key moves between Items alpha-numerically in a forward direction, while Shift + Tab will move backward in the Bin or Browser. You can also type the first few letters of the Clips name to navigate to it.
Clips: The Building Block of All Projects
All Sequences are made up of a group of "Clips" laid end to end from the beginning of the "show" to the end.
Although we "think" of Clips as our source material it is important to remember that Clips are merely "pointers" (much like aliases are to applications) to actual media that lies on our Media Drive. Clips can be either Offline or Online Clips.

Offline Clip Fig. 1-19 |
Offline Clips are Clips with either no media attached to them or the media is "unlinked" from it. You can either "Capture" these Offline Clips if there is no media on the Media Drive or you can "Relink" the media if it does exist on the Media Drive. Fig. 1-19 shows the Offline Clip. A Clip which has not been Captured can be altered prior to being brought online.

Online Clip Fig. 1-20 |

Audio Clip Fig. 1-21 |
Export Options
There are a variety of options in exporting items from The Browser. You can export a Quicktime, Still, AIFF audio file, AVI, Image Sequence and more.
Choose: File>Export>Quicktime>and then apply your choice of options.
You can also export a lossless Final Cut Pro "Reference Movie" for use in maintaining image quality on 3rd Party Applications like Cleaner and After Effects.
Choose: File>Export>Final Cut Pro Movie>Choose Your Settings>Make Movie Self Contained should be Unchecked.
Drag and Drop the "Reference Movie" onto the icon you wish to open the file into. The file opens in that application.
With the Batch Export function, you can export one Clip, a Sequence or many footage files to a variety of Codecs, Destinations, with a variety of Sequence Settings, differently named extensions, a variety of render qualities, different settings and more, including FCP Ref Movies. Cool!
All Batch Exports can be expertly managed in the Export Queue window, which is launched upon trying to execute any Batch Export task. Note: The Batch Export function is only available when the Bin or Browser is selected and Files are exported to the batch in the order they are displayed in the active Window. To do this go to:
File > Batch Export
This launches the Batch Export Window.
Batch Lists can also be exported. Keep in mind that you may need to change the order and/or hide Columns to match the expected tab delimited information.
File > Export > Batch List
You would then save the Batch List to an appropriate place.
You can export an EDL for use in other systems as well. It makes good sense to make the Columns reflect the order the other system will expect. Run a test first to really be sure that your list will work seamlessly. Keep it exceedingly simple with no speed changes, no filters, no more than 2 video and 4 audio tracks. If you must include FCP transitions in the EDL, use the "closest" SMPTE standard wipe pattern numbers used by standard video switchers, which are listed in the FCP manual in the appendix section.
Give the Operator at the projected Online Suite a call and ask him or her what kind of list they would like, such as, a CMX or GVG list.
Make a dummy EDL export and just go down the list making notes of what the Operator is specifically looking for. A dirty list makes you and your Operator look bad and your client mad because they are wasting money every moment the Online Suite has down time. Make doubly sure you give that person the best list possible with at least one test standing between your output and his or her online session. If you are exporting an EDL, make sure you understand the restrictions of each format you will use.
| System | Reel Name Length Max | Reel Name Characters |
| CMX 340 | 1-253 Characters | Numeric Only |
| CMX 3600 | 8 Characters | Uppercase Alphabetical Numeric 0-9 |
| GVG and GVG 4+ | 6 Characters | Uppercase Alphabetical Numeric 0-9 |
| Sony 5000 | 1-998 Characters | Numeric Only |
| Sony 9100 | 6 Characters | Uppercase Alphabetical Numeric 0-9; underscore (_) |
Starting with FCP 2, you can now export audio as an OMF Media File . This means that you can work on sweetening your audio in more advanced audio programs like ProTools, Bias Peak, and others. Be sure to export with the proper sample rate and the desired "handle". You can also choose to include crossfades or not.
Project Management in the Browser
Back up the Show by saving your Project File . Drag a copy of your Project File to a removable storage format daily, like a Zip Disk or by burning a CD, to give yourself a back up of your Project File. Should your drives crash, or your file become corrupt, you'll always have a back up plan.
File > Save to save the project.
Since the Project File contains the vital information to "recreate" your edit, all that is needed is a "recapturing" of the original source media, and you'll be back in business.
If Auto-Save is enabled, it will automatically save your Project at a desired increment of time. Experienced folks back up Project files to a removable storage media, like a Zip Disk. The Auto-Save feature should be enabled in case of a "crash".
One may even perform a "Save As" for a "snapshot in time" of your Project. This could be bit problematic with additional Capture Scratch Folders that are generated with each "version". If a multi-user environment is to be problem free, special attention must be paid to ensuring the proper person is capturing into their personal Capture Scratch folder.
Using the Find Dialog Box
Finding Clips in the Browser is something you'll certainly want to be good at. It all starts by typing in the name of unused clips, used clips, name of clip, TC, file type, etc and then clicking on Find.
By tapping on Find Next , the found item will be highlighted in Browser.
Option + G continues on with Find Next to continue the search in that Bin.
Multiple items are found by utilizing "Find All".
Choose Find > Enter Criteria in the Text Box > Select Search Options > Choose Find All
The "Find results" window will show the results of the search. This window behaves much like the Browser. You can then manipulate the found Items in the Find Results Window. This Window behaves much like the Browser in that you can delete, move, copy, display, sort any Clip(s), offering up some pretty powerful Project Management.
If you'd like to be aware the Clips in your Project that are not in your Sequence, you can search for them with the Find Dialog. This is called finding Unused Media. You can Find Unused Media in a Project by:
First selecting a SequenceFind
Check box: "In Selected Sequnces"
Select "Add to Find Results"
Click "Find All"
The Find Results Window will show you the results, so you can then track down the Clip in its Bin or Remove it from the Project altogether by clicking the Buttons at the bottom of the Find Results Window.
The Find Dialog Box is indeed a powerful feature, you can use it for a variety of Project Management operations.
You can make certain changes to an Offline Clip prior to capturing media in the Browser.
Ever log a shot and, after logging the out point, you see additional footage you want to have included in the logged Clip? To solve this problem, you will have to alter your "Media End" Out point. Fig. 1-23 shows the Timecode of the originally logged Clip.
Originally Logged Timecode (Red arrow) Originally Logged Clip Fig. 1-23 |
After the Clip is Logged, you can Option Drag the new Timecode Out point from the Log and Capture Window to the Media End's Column of that particular offline Clip. This will update the Out Point prior to Capturing. You can Option Drag any Timecode to anywhere you need it. When you are parked on a Timecode field, and depress the Option key, you will see a bold plus sign. This indicates that you have "grabbed" that particular Timecode. See Fig. 1-24
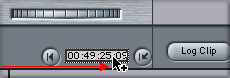
Holding down the Option Key over a Timecode Field will allow you to "grab" it for moving to another Timecode Field (Red arrow) Option Dragging Timecode Numbers Fig. 1-24 |
You then merely drag the Timecode to the "Media End" Column for an updated Out Point for the Offline Clip. Alternatively, you could've Copied and Pasted the Field Information.
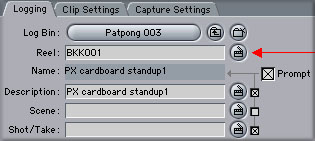
Changing Reel Numbers
You can do other important changes as well. Changing your Reel Number is something you'll want to do, because it's so easy to forget! Ensuring the proper Reel Number gets logged properly is vital for Media Management and Recapturing. Always make sure your Reel Number is accurate. To change this prior to Capture, just Control Click on the Reel Number indicated in the Reel Column in List View. You can then change the Reel Number. You can change this after Capturing, but a dialog box will first launch reminding you that this would alter the Project File's information.

Choose a New Reel Number from a list of existing Reels by Control Clicking in the Reel Column (Red arrow) Changing the Reel Number in The Browser |
Another common Logging error is to mistakenly log your Clips without audio, or video when your original intention was to do so. You also may have set the wrong type of Audio settings, like choosing stereo when you intended to choose mono. It's very easy to change this prior to capturing the media. Merely, control click on the "Tracks" Column.
As shown, The previously logged Shot will capture Audio and Video. By Control Clicking on the Tracks Column, you can choose to Capture Video Only. Being able to make these changes easily is crucial. (Red arrow) Altering Tracks prior to Capture in The Browser |
Post Capture and Import Considerations
Some things can be changed after Capturing or Importing as well. As was mentioned earlier, you can change the Reel Number. However, recall that it does change crucial information in your Project File, so you'll definitely want to consider that as you change any vital information attributed to a Clip after it is Captured.
Post Capture Changes that can be made in The Browser
Fortunately, a number of parameters of a Clip can be changed without having to Recapture it.
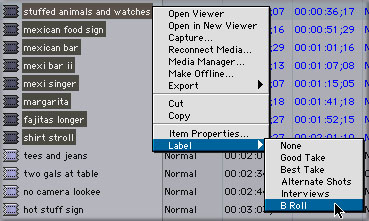
Labels
Labels, new to FCP 2.0 offers two Columns of color coding for further ease of organization. There are default Labels, but you can change the Label's name in Preferences>Labels. You might want to check this out. Fig. 1-28 shows you how to Label many Clips at once.
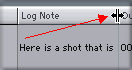
Log Notes
You can make any helpful notes you wish, even after Capturing, by simply clicking in the Log Notes Column of your desired Clip. You may want to widen the Column to see all of your notes.
Changing Parameters for more than one Clip |
Changing Logged Settings to More than one Clip
You can make changes to a whole group of Clips all at once. This is a very time saving method of making changes. Most useful is being able to change things like Reel Number or to Label many of your Clips at once. Let's approach this method to Labeling many Clips all at once:
To Label a Clip or Group of Clips: First select them. Once they are selected, Control + Click on one of them and select the label that suits you. After letting go of the mouse, all the formerly selected Clips will be labeled as "B Roll" with a Lime Green color attributed to each.
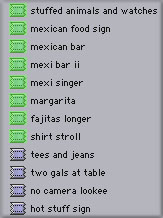
Result of Changing the Label Color for a group of Clips |
Another Example: Your Graphic Designer created a whole Folder of Graphics and let's say you want to change the alpha channel to change from Straight to Premultiplied all in one fell swoop. You already know how easy it is! Just Select the Files in the Browser and Control Click on one of the files and select the proper alpha channel. They all will change to the alpha channel you desire.
You can also change one or many Clips' Capture status, Mark Goods, Comments, Descriptions, Scenes, Shot/Take Numbers, Log Notes, Composite modes, or, as I mentioned, types of Alpha Channels or Reverse Alpha Channels and others by utilizing the same method as described above. Very useful! You might want to try this on your own to fully realize the power of this method of changing Clips' parameters.
Note: You can not modify the original Timecode of your Master Clip in the Browser or the Item Properties Dialog Box. This is for good reason as you usually don't want to do this. Usually you would modify AUX Timecode to be safe. The AUX Timecode column is a "hidden column" that you can bring up in the Browser.
If you do wish to modify your source Timecode, you can do so once a Clip is loaded. Then, you would go to:
Modify>Timecode
Then you would select how you would want your Timecode to be modified, either by modifying the first frame or the current frame that the Clip is parked on. Timecode will follow accordingly in numeric succession, as expected.
You can modify the duration of a Video Freeze Frame or "Still" once it is made by changing the numbers in the Duration Column of the Still.
Changing Ins and Out Points of a Clip in the Browser is easy to do. Just enter a new TC in the In and/or Out column.
Changing the duration works the same way. Change the duration of a Clip in the duration Column of The Browser. The In point will be honored and the new Out point will be determined by the new duration.
Changing certain Item Properties of a Clip can be changed by first selecting the Clip and choosing Item Properties from the contextual or File Menu. Once the dialog box shows up, you can change the following:
Video Items: Field Dominance, Alpha Type or Reverse Alpha, Composite Mode, Pixel Aspect (Square or Non-Square) and whether the Clip is flagged as 16 x 9 or "anamorphic".Timing Items: Timing of a Clip's In, Out or Duration
Logging Info: Reel Number, Description, Scene, Take, Labels 1 & 2, Capture Status, Log Notes, Mark Good, or Custom Comments.
After the change has been implemented, click OK. Keep in mind that changing any Properties will only change for the Clip in the Browser. If there is a copy of the Clip in the Timeline, you'd have to change it there as well.
Making Clips go "Offline" with the Make Offline Dialog Box
If you must alter something related to a Clip that simply can't be changed after Capture, you'll have to launch the "Make Offline" dialog box and knock the Clip "offline", which essentially breaks the " Link " between the Clip and the source's original Quicktime Media File. You can then make any changes to the offline the Clip to Capture with the proper parameters.
This would also be the methodology to " Unlink " a previous Sequence's Photo JPEG Lo Res Clips for a Recapturing to an Online NTSC DV or Uncompressed Resolution. It might be wise to run the Media Manager to fully trim the Sequence and Recapture only what is needed at that Higher Resolution prior to doing this.
To Unlink a Clip or group of Clips, first, select them. Then, Control Click on one of the Clips and launch the Make Offline dialog box, then choose the most appropriate action.
See "Deleting Unwanted Clips" a little later in the article for still more ways to use this dialog box. Likewise, see Fig. 1-32 to get a closer view of the Make Offline Dialog.
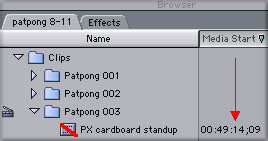
Organizing your Clips into more Relevant Bins
After Capturing Clips into basic Logging Bins, you should start organizing your footage into other Bins. I start by making Bins that are more relevant to my Project at this stage. It's really up to you and the scope of your Project to how you would do this.
You may want to have separate Bins for certain file types. An example is that you would have your Clips in one Bin, your Imported Graphics in another, your Imported Music in another Bin and so on. I often work in this way in small Projects without too many Clips because it is a very simplistic way to organize a short story.
Your Bins could also be set up in a more story driven fashion For instance, I might make 3 Bins, one for each Act of the Show. In each "Act" Bin, I might have "Scene" Bins. In each "Scene" Bin, I may have a Bin for each Master, Reverse, MCU and CU shots. I can move the Clips where I want by simply dragging the Clips into the proper Bins as shown in Fig. 1-30.
I also make up Bins for Titles that are to be reused, Nested Clips with preserved effect render files, Imported Graphics from Photoshop and Motion Graphics and Ref Movies brought in from Third Party Applications or stock Graphics/Motion Graphics Imported from CD or Tape.
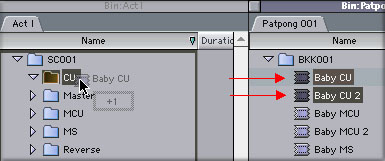
These Clips were Dragged from the Patpong 001 Bin into the Act I Bin. No Copies of the Clip were made in this operation (Red arrows). Dragging Clips to New Bins Fig. 1-30 |
If I Option Drag the Clips into a New Bin, I can bring "copies" of Clips into new Bins. This way I can "share" Clips between Bins. This is a very useful thing to do if you have more than one Sequence within the existing Project and you are using some of the same Clips, but wish to organize the footage in a different way. Fig. 1-31 shows the results of the same operation as in 1-30, only this time, the option key was held down. The same operation could be executed by Copy and Pasting or Duplicating (Option + D) the Clips from one Bin into another.
|
Option Dragging Clips to New Bins Fig. 1-31 |
Deleting Unusable Shots from your Project using the "Make Offline" Dialog
After I have broken out all the usable Clips into Proper Bins, I can then delete the bad shots out of the "Tape Bins" by using the Make Offline dialog, new to FCP 2. For Instance, if I wanted to delete the shot: "Baby WS 2" AND its related media, I would first select the Clip and Control Click on it to bring up the "Make Offline" Dialog as shown in Fig. 1-32. More info on the Make Offline Dialog Box and other Media Management Tips can be found at: Media Management or the Manual.
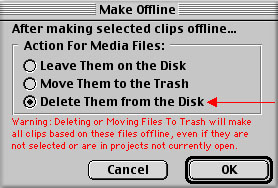
By choosing "Delete Them from the Disk", We are permanently taking the Clip AND the corresponding Quicktime Media File off of the Media Drive. This is a permanent action that can only be undone by recapturing the original media from tape (red arrow). The Make Offline Dialog Box |
If you are wondering why I would Capture bad shots that need deletion in the first place, it is because of brand new way to Capture media in FCP 2 that offers ease and convenience. That is by utilizing the DV Start/Stop Detection Tool, you merely Capture large chunks of Media. Then, after Capturing, you select the Clip and enable the Tool in the Tools Menu. This will separate the Clip into Markers for each time you started and stopped the DV Camcorder. These Markers actually have "duration", so they can be modified into Subclips (select the Markers and choose Modify>Make Subclip) so, after naming them, they can be more easily handled by the Media Manager and other Media Management Tools.
After all the Clips are organized into proper Bins AND all unnecessary Clips are removed, you should feel a lot more prepared to go ahead with the process of putting actual shots together into a Sequence.
About Sequences
Your Sequence is "The Show". It is essentially a "container" that has a series of Clips put together in order to tell a story. A Project can have one or many Sequences within it. A new Sequence is touched off by going to the File Menu>New>New Sequence or Apple + N. Fig. 1-22 shows the Sequence Icon. It's a gray square with blue and yellow "filmstrips" on it.
While Sequences are generally thought of as "The Show" or the main program that is laid down to tape, they can also be "sections" of "The Show", e.g. "The Show's Title Sequence or "Act 1". Sections of the show can be brought together at the assembly time of "The Show". Sections of "The Show" are referred to as "Nested Sequences" where the Sequence takes on the appearance of a "Clip" in the Timeline.
It is good protocol to put away any unnecessarily opened Sequences into a closed Bin or Bins. This aids and assists you in organizing your Sequences. You'll want to always be able to find your Sequences quickly, so keep them in a Bin that makes sense to you.
In addition to that, open Sequences require a certain amount of RAM to display, so if you have to many open, you may take a performance hit. Control Click on the Sequence if it is open as a Timeline to close it. Close the Bin it is in, if it is showing in the Name column, by turning up the twirly next to the Bin in List mode or Apple + W if you are in Large Icon Mode.
You cannot save Sequences outside of a Project, but you can export them as Movies or Clips.

Sequence Icon |
Rendering Sequences in a Batch Process
Often, you'll want to render a group of Sequences as you walk out the door of Studio at the end of the day. It's easy to do. All you need to do is select all the Sequences you want to render in a given Project or Projects and then tap Option + R or go to the Sequence Menu and choose "Render All". Your Sequences will render as expected.
Duplicating Sequences
Periodically, it is a good idea to duplicate your Sequences for a number of reasons. To make a revision, while preserving the original cut is the strongest reason. You can also make alternate versions of the same Sequence. For instance. You want to make two versions of a commercial: a :45 Second Commercial and a :30 Second Commercial using the same Clips. You'll also want to duplicate your Sequence for safety reasons as Sequences may become corrupt and unreadable, even though the rest of your Project is fine. The general rule of thumb is the longer you work on a Sequence, the more likely it will become corrupt.
Organizational Method: Making a "Virtual KEM Roll" for your Scene Bins
In every "Scene" Bin, what I find useful is to make a Sequence which famous Editor Walter Murch calls a "Virtual KEM Roll" . Using this method, all the shots are lined up end to end from the first shot to the last in the original order from the source tape with no In or Out Points set. This way, we can quickly scan all the shots in the order they were originally shot in that Bin at any time. Scrolling through your Clips in this manner will sometimes jar an idea or find that fleeting moment in a shot that you knew you saw.
In the old school of film editing, making a KEM Roll was a common request for the Assistant Editor to provide his or her lead Editor. In Digital Feature Film editing, the Assistant Digital Film Assistant will do this. No Assistant? Well�someone has to do it!
To do this, make a New Sequence in your Bin and open it. With the Clips sorted by Media Start time in list mode, select all of the Clips. Then overwrite these Clips into the Sequence. Handy isn't it?
If desired, at this point, you can remove the "Logging Bins" to streamline the Project. If I need to ever find the Reel Number of a Clip again, I can find that info again by sorting the Reel Column or going to the Clip's Item Properties under "Logging Info" as depicted in Fig. 1-33.
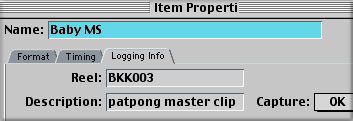
Checking or Changing Logging Info of a Clip using Item Properties Fig. 1-33 |
In the Logging Info Tab, you can change a Clip's Name, Reel Number, Description, Scene, Shot/Take Number, Capture Status, Label, Label 2, Log Notes, Mark Good Status, or Custom any Comments. As was earlier mentioned, you can also change this directly in the Browser's appropriate Column.
Sorting Items in The Browser
One of the most powerful functions of The Browser is its ability to easily sort Columns of Information. To sort a Column, all you need to do is click on the Column Name or "Heading" in the Column you want to sort. A green arrow shows up to indicate the Primary Sort Column. The Clips would then sort according to the Column's information in descending alpha numeric order. Click the arrow again to sort in ascending order.
Commonly, you sort by the name of the Clip, but there are other helpful things to sort when you are making a Project. Let's say you wanted to find the longest and shortest Clip in a Bin. You would merely click on the "Duration" Column to sort the duration of those Clips.
Sorting Multiple Columns in The Browser
Sometimes you need to sort more than one aspect of a Clip. To sort by more than one attribute of a Clip, you merely click on the Column for sorting out the first aspect of the Clip. Then you would Shift + Click on the additional Column to sort by both attributes. A light blue arrow shows up to indicate the Secondary Sort Column. Descending order is the default, but you can click on the blue arrow to put the Clips in ascending order.
You can continue to sort by multiple Columns by continuing to Shift + Click additional Columns. To clear too many Sorting Columns, merely choose a new Primary Sort Column.
Reconnecting Media
Sometimes our Clips lose the links to the media located on our Media Drive. This happens when things happen, such as, media is moved to another drive without the aid of the Media Manager. This can also happen if the Media File is renamed. This operation breaks the "link" between the Clip and the Media File. When this happens, we need to reconnect or "relink" our Clips with our existing Media Files on the new disk.
Sometimes the links are deliberately broken by us, because we want to relink offline Clips to newly recaptured Media.
Regardless of the reason, it's important to be able to reconnect Clips to their corresponding media in a Project. Links to media can either be reconnected upon opening a Project or while within an open Project.
Reconnecting Media in a newly Reopened Project
If any media files are missing upon opening the Project file and they are not detected by the Project File, then the Offline Files dialog will launch.
The top section has the name of the actual media files that are "missing".By clicking the Movie or Render button under "Forget Files", you will remove files from the list displaying the offline Clips. This action should be chosen if you had deliberately dumped the Clips.
Clicking the "Reconnect" button will search all of the drives on the system and will attempt to reconnect the listed files automatically.
Clicking OK will continue to open the Project without any attempt at reconnecting the files.
The Reconnect Options dialog will then launch and ask you if you'd like to reconnect Offline, Online or Render files. Click OK after you have made your choice.
FCP will search for the source media files after checking any options in the Options Dialog for Reconnect Media. The most noteworthy options are to reconnect using the "Show" parameter.
Choosing "All" will take longer, but will be more thorough.
Choosing "Video Files, Sound Files or Still Image Files" you'll induce a speedier search.
Choosing "Only Files that Match Name", you'll make the task of locating the exact Clip that is needed. This works well while reconnecting many files with similar names.
The buttons at the bottom of the dialog will narrow the search further:"Reconnect All Files in Relative Path" will reconnect other unlinked Clips that are following the same root path as the first Clip chosen for relinking.
"Skip" or "Skip All" will skip Clips that can't be found or to stop the search for Clips you know you have already eradicated.
FCP will search again, if any new criteria is introduced to the options dialog.
After the file is found, select it and FCP will continue on until all Clips are either reconnected or skipped.
After this is done, do the same thing for the Clips in the Timeline. Since they are "different" from the Clips in the Browser, they need to be reconnected separately.
Reconnecting Media in an Open Project
You can relink all media files that have been previously broken, even while working within a Project. This rule applies to Clips as well as any corresponding render files.
You'll want to first select the Sequence(s) and/or Clips that you want to reconnect to the Project. Then, Control + Click on one of the selected items and choose Reconnect Media from the contextual menu. The Reconnect Options dialog box will open. You can also call up the dialog from the file menu. Select your reconnect options then click OK. If you are reconnecting a Sequence, you can also reconnect render files at this point. FCP will then search for the corresponding media files on disk.
The Options Dialog will then launch and offer a variety of identical search options previously discussed above in "Reconnecting Media in a Newly Reopened Project". Those same choices are available to you.
As above, FCP will continue to search if any new criteria is introduced. Once the Clip you need to reconnect is found, then Click "Select". If you had chosen "link all files in this path" then all files will be reconnected in the same operation. The process of reconnecting will continue until all Clips are relinked or skipped.
As a side note, you should reconnect the Clips in the Timeline as well for reasons previously discussed above in "Reconnecting Media in a Newly Reopened Project".
Saving a Clip into the Browser using "Capture Now"
When using "Capture Now" to capture a Clip, you'll need to manually save it into the Browser. When dragging the Clip into a Bin in the Browser, the Save Dialog Box will show up. Make sure you save the Clip into the proper Folder on the Primary Scratch Disk. If you save it to a Secondary Hard Drive, it will take the time to "write" the Clip to the new drive, rather than just save it.
In the other Tab we see when opening a New Project is the Effects Tab. As was mentioned earlier, this is the location for audio and video filters, audio and video transitions, video generators and saved "favorites". See Fig. 1-34 to see the Tab. Note that nearly all Bins in the Effects Tab have a Lock on them meaning that Clips cannot be stored in them. The unlocked Bin called "Favorites" is a place to store all your favorite Filters, Motion Paths, Transitions, and Generators. You can also store Macros of many Effects as well.
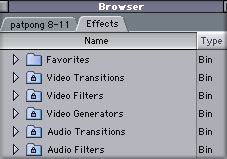
The Effects Tab of Final Cut Pro Fig. 1-34 |
In FCP 2 there are now some " Real Time" effects " available. Currently, these can only be used with the Matrox RT-Mac Card with Firewire Preview only. Some of these RT Effects include: Titles, Dissolves and many Wipes. These can be differentiated by noting the RT effects are emboldened in the Effects Tab if you own the Matrox RT-Mac. Check apple.com/finalcutpro for more information on the RT-Mac Card and its RT capabilities.
The cool thing about the Effects Tab is that it provides easy " Drag and Drop " functionality to the often complex world of effects. For Filter Effects , you first choose the Filter in the tab. Then drag it onto the chosen Clip. Fig. 1-35 Shows the Filter Icon for Gaussian Blur
|
Filter Icon Fig. 1-35 |
You could then keyframe the Filter or Filters in the Viewer to change the parameter of the Filter(s) over time. The Filters in the Effects Tab also offer 4 Columns for you to make any notes or comments for each Filter. See Fig. 1-36 shows the Gaussian Blur Filter being dragged out of its Bin to be dropped upon a Clip.
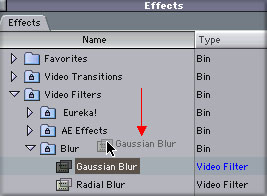
Drag and Drop method of applying Filters. Fig. 1-36 |
For Video Transitions, drag the transition between two Clips directly in the Timeline. Fig. 1-37 Shows the Video Transition Icon
|
The Video Transition Icon Fig. 1-37 |
After the Transition is laid in, you can open the Transition Edit window for adjustments to "cheesy" out of the box transitions. Your job? Make fromage! In the Effects Tab, you can adjust the duration of any or all of FCP's Transitions. Just open the Bin with the Transition in it you'd like to change, then you'd just change the number in the duration Column. There are 4 Columns available for any Comments you'd like to make for each transition.
You also have the ability to make one of these Transitions your "Default". A Default Transition can be applied with the Keyboard Shortcut, Apple + T. You can change the Default Transition by Control + Clicking on it in The Browser. You can then "Set" a new Default Transition. See Fig. 1-38 for a View of how to do that. You can also Select it in the Effects Tab and pull down the Effects Menu to "Set Default" Common Default Transitions are Dissolve and Dip to Color. Your Project should drive your choice for the proper Default.
Setting the Default Transition Fig. 1-38 |
In the Effects Tab, Audio Transitions come in the form of Audio Cross Dissolves. They are also available in the Effects Menu, as are all Filters and Transitions. One is a 0 Db Cross Dissolve and the other is a +3 Db Cross Dissolve. Fig. 1-39 Shows the Audio Transitions:
Audio Transitions Fig. 1-39 |
Either one of these can be chosen as the Default Audio Cross Dissolve. They can be set the exact same way as Video Transitions are. You can choose the duration for the Default and the other Cross Dissolve directly in the Column of the Effects Tab as well as make any pertinent notes in the Comments Column.
Audio Filters are also available in the Effects Tab. As with Video Filters, you can "Drag and Drop" the filter on to the Clip in the Timeline. Of course, you then would have to render the Filter to hear the result. Fig. 1-40 shows the Audio Filter Icon
|
Audio Filter Icon Fig. 1-40 |
You can also keyframe the Filter to achieve a varied result over time. For instance, the values in "Effect Mix" could increase in the Echo Audio Filter by keyframing it over time.
Last, but not least, you have a group of Video Generators . These are actual source Clips for you to use within your Project. The Video Generator Icon is shown in Fig. 1-41
|
Video Generator Icon Fig. 1-41 |
Generators include things like: Bars and Tone, Color Matte (or Color Layer), Slug (Black) Render (Gradients, Custom Gradients, Highlight, Noise and Particle Noise) and Text (Regular, Lower Third, Crawl, Outline, Scrolling, Typewriter and Credit Fade). Many of the Text Generators are new to FCP 2.
The great thing about Generators is that you can use them like any other Clip. Gradients also can be a great source of material for Travel Mattes or Backdrops. Color Matte can be used in a variety of ways: a Color Wash, A Lower Third backdrop you can cast a drop shadow on to, or for design elements. The other Generators are primarily utilitarian, like Bars and Tone or Slug . If you've tweaked a Generator to the point where you would want to use it again, you can drag it into your "Favorites" Bin.
With Video and Audio Filters, as well as, Video and Audio Transitions, you can save them as " Favorites ". The Favorites Bin can also be expressed as a Tab by pressing the shortcut Apple + 6 or by double clicking on the Favorites Bin. The Favorites Tab can be viewed in Fig. 1-42.
Favorites Tab Fig. 1-42 |
To Save a Favorite Audio or Video Fitler or Transition, First, Select the given effect in the Viewer's Filters Tab, then you can go to:
Modify > Make Favorite Effect
or Option + F
This will bring your saved Effect or Transition into the Favorites Bin of the Effects Tab. You can then rename the Item(s). If you have more than one Filter, you can Select them all or individually and they will come in as separate saved "Favorites".
If you made a Motion Path with your Clip, you could also " Make Favorite Motion " by going to the Modify Menu:
Modify > Make Favorite Motion
or Control + F
You can name your Favorite Effects, Transitions and Motions whatever you like. Be creative!
Back up Prefs File to retain "Favorites"
Keep in mind that if you ever have to throw away your FCP Prefs File, you will lose your "Favorites". This can be a real downer, so while everything is running properly and you have loads of "Favorites", it might be a good idea to keep around a duplicate Prefs file so you can recover your "Favorites".
Bins of "Grouped Effects"
Another trick you can do, if you have a group of "Favorite" Filters making up an Effect, is save them all into a Bin in your Effects Tab. This is useful as many Filters have complementary effects. For example, Tint (to Black and White) along with the Brightness and Contrast Filter go together very well. To group them together you first need to:
Deselect all the Effects in the Filters Tab you want to "Group"
Then go to: Option + F or "Make Favorite Effect" from the Modify Menu.
The Effects will now be intact in one Bin
Name the Bin the name you want to give the Effect
To recreate the effect, "Drag and Drop" the newly created "Grouped Favorite Effects Bin" onto the new Clip. Your Clip should now have the same group of Effects as the original.
Note: The order of your Filters as they are stacked in the Viewer can be very important. The most dominant Filter lies at the bottom of the stack. If you aren't getting the expected effect, this is probably the case. You can trick the Filters to regain their original order by renaming the Filters within the "Grouped Effects" Bin in the alpha numeric combination which will recreate the stacking order of the actual Effects.
After reading this article, my hope is that you have not only learned more about the Browser, but you have an idea of its power and flexibility, as well. Now that you have some strategies in place in getting more use out of the Browser, you will certainly be able to get your project completed more quickly and efficiently utilizing this amazing interface called the Browser. Good luck to you!
Kevin Monahan, aka "Telly", is a video editor, motion graphics artist and educator from San Francisco, CA. Kevin has a degree in Radio, Television and Film from San Jose State University and has been working professionally in radio and television for over ten years. He also teaches Final Cut Pro Classes both privately and at the Bay Area Video Coalition (BAVC) in San Francisco. Kevin co-founded the San Francisco Final Cutters, the world's first Final Cut Pro User's group and runs a small video post-production house called Shadowcraft Studios. For bookings and more information, contact Kevin by e-mail at: videoweb@pacbell.net
copyright © www.kenstone.net 2001