
The Basics - Chroma Key March 18, 2002
The New Chroma Key for FCP 3
The Basics - Chroma Key March 18, 2002
The New Chroma Key for FCP 3
If you've tried to do chroma keying with Final Cut Pro before FCP3, you may have found it a little difficult to work with. In my previous article, Chroma Key Basics for DV Guerrillas II, I showed how to use the old FCP Color Key toolset to do it. But with FCP 3, the new Chroma Keyer filter is much more robust and precise. You'll find that now its actually easier to pull a respectable key without leaving FCP than it used to be, and that you don't have to mess around with as many filter combinations.
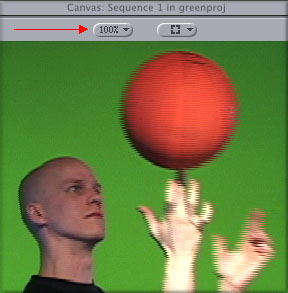
If you don't have any footage to work with, or you aren't sure how to light for green screen, try the Chroma Key Basics for DV Guerillas I article. Keying isn't any easier if you don't have good footage to work with, so make sure that your footage is the best it can be before you start. The tools are more flexible than they ever have been, but they can't fix completely unworkable footage. Remember the old line GIGO: Garbage In = Garbage Out! Let's get right into this. You should have captured some of your chroma footage onto your system. First, let's lay out the groundwork for your key. Now, most would assume that you'd immediately start layering your sequence in the stacking order of your key. But don't get ahead of yourself. Often, it's difficult to see how tight a key you've achieved this way because the busy-ness of the background distracts your attention. Shaggy edges that are not apparent in the still jump out and shimmy in the motion footage.
So, how to get things clean before stacking the layers? Easy. Do things one step at a time. First, drag your chroma key footage into the sequence (and create) a Video 2 layer. Why Video 2? Because this layer will need to be on top of your background footage. After keying out the green, whatever is on Video 1 will shine through where the green screen was. Now, double click your video 2 clip and bring it up in the Viewer. Pick up the Filters Tab from the Viewer window and drag it alongside the Video tab of the Viewer window so that you can monitor your changes to the clip as you make them.
Switch the window size from whatever you have it set to 100%, no more, no less. For this sort of precision work, it's imperative that you see the exact edge you are creating. Obviously, reducing the window size will not aid you, but going over 100% won't either. Since you need to see the edge exactly as it is, any interpolation on-screen by FCP will contain artifacts that may not accurately describe your matte. Stick with 100% for this work, switching back to your normally scheduled resolution when all is through. Those of you who normally use a lower res (50% or 25%) for fear of dropped frames may rest assured that we won't be playing back full frame full motion on the desktop (which would require rendering). We won't need to do this till the very last few steps, after we're totally satisfied with our key.
Finally, choose the appropriate temporary background from the View>Background>List of choices. What is appropriate? That depends on your footage. I find that it hinges on the quality and nature of your key footage. You could choose Black, White, Checkerboard patterns or any primary color. I find that either black or white is usually most suitable. Remember that we aren't looking for any sort of lighting effects here yet. We only want to get the tightest key possible, eliminating ALL green from the screen. After we have this successful key, we can go about futzing with the way the subject looks. Which to use for initial background; White or Black? As stated previously, this really depends on your key. I usually start my evaluation from the following grounds. If the edge of the subject contains semi-transparent and less easily definable edges EXTENDING OUT INTO THE KEY COLOR (such as hair, thin objects, motion blur leftovers), use a Black background so that you can monitor how much color spill remains in the green screen area.
On the other hand, if the major feature of your key footage is bounced key color bleeding over onto your subject's skin (for example if your subject was too close to the screen and not lit well), in other words, EXTENDING INTO THE SUBJECT SIDE OF THE KEYING EDGE, you'll want to try white, which may make it easier to identify subtler shades of the key color still living in your subject's skin, known as color spill.
Occam's Garbage Matte
The first step in pulling a good key is to isolate the area that will be keyed. Like the Occam's Razor philosophical rule states, you have to reduce the elements in a problem to get to the answer. What you want to eliminate from the frame are the green screen areas that are unevenly lit or just plain unnecessary. These areas make the range of green color values that you have to key out too diverse, and will make it difficult to pull the key based on one chosen color. These areas, many of which are never close to your subject, can be eliminated manually without using the color key. Once you get rid of these areas, it's much easier to focus the Chroma Key filter on the areas that you DO need to remove using the filter.
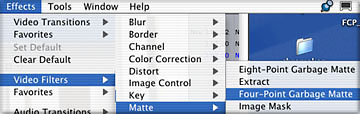
We do this using a Garbage Matte. A Garbage Matte is exactly what its name implies: a matte that removes garbage you don't want seen. Using the 4- or 8- Point Garbage Matte filter, you can say to FCP, "This area of the green screen will never be in view because the subject never moves into that area, so make it transparent..." without resorting to keying out based on its color. With the Garbage Matte filters, we can make a shape based on either 4 or 8 points and everything inside or outside the shape is automatically matted out. This will only leave our subject and the green areas directly around him or her. With your green screen clip loaded into the Viewer, go to the Effects drop down menu and choose Video Filters>Matte>4-Point Garbage Matte. In the Filters tab of your Viewer window, take a look at the parameters for the Garbage Matte tab. The first drop down has three options: Final, Preview and Wireframe. Preview mode lets you see the numbers for each of the points of the matte you are about to set below. Wireframe not only lets you see these numbers, but it draws a line between them so that you can see the actual shape of the matte you are creating with the points. Final gets rid of both numbers and lines and just shows the matte. Once you get the matte locked down, you will use Final, but until then, leave the drop down on Preview.
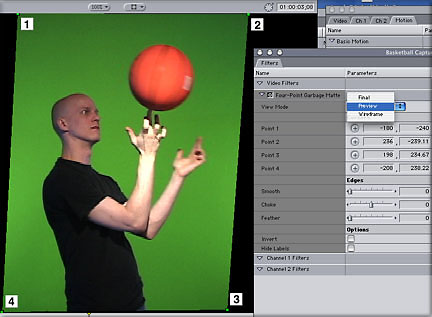
Take a look over at the Video tab of the Viewer window. If the View Mode drop down is set to Preview, you should see the boxes with numbers, which correspond to the point buttons in the Garbage Matte filter settings. In the Filter tab, click the crosshair button for Point 1, then go over to the Video tab and click somewhere to the top and left of the subject. Next click Point 2, and click somewhere to the top and right of the subject. Follow this method with Points 3 and 4 to complete a square or rectangle around the subject.
You should see the area outside this matte disappear. Next, scroll through the frames of the clip briefly just to verify that the subject never moves outside of the matte and gets cut off. When you get a sense of the movement of the subject, you can go back and tighten the matte up further until the matte is only showing the area of the screen your subject is in. Because the garbage matte is a filter, you could even keyframe the garbage matte to reshape based on the movement if your subject changes position a lot. This will make it much easier to pick one color to key out in the next step.
'The Chroma Keyer'

Now, select the green screen clip in the sequence and go back to the Effects drop down menu, where you will choose Video Filters>Key>Chroma Keyer. Unlike the old Color Key and Blue and Green Screen filters that still exist there, Chroma Keyer has two different interfaces for you to work with. We will use both of them to get optimum results. If you look at the Filters tab in the Viewer window, you will see the Chroma Keyer filter listed. But you will also see a separate tab labeled Chroma Keyer. These are the Chroma Keyer's two interfaces; the Visual, which uses luma and chroma samplers to control the key, and the Numerical, located on the Filters tab, which uses numerical entry and sliders to control the key. Neither is better than the other, and we will use both before the evening is over!
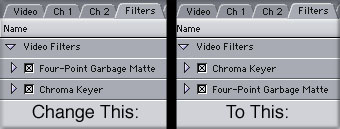
Before you go any further, click on the Chroma Keyer filter in the Filter tab and drag it above the 4-Point Garbage Matte. We have to avoid an issue here in which the Matte being created by the Chroma Keyer filter negates the matte being drawn by the Garbage Matte filter. Now that we know where the Garbage Matte's matte points should be, we can place it after the Chroma Keyer in the render order .
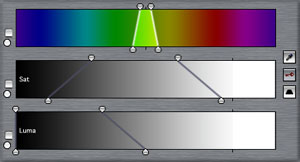
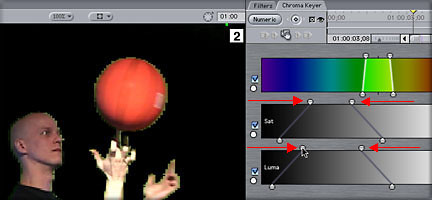
Now click on the Chroma Keyer Visual tab. Here we select the color we want to key and get the filter close to the right settings. It will not look perfect, nor even close to perfect. The visual tools here are just there to get the chroma key started. You should see three bars across the top, three buttons to the right and three sliders across the bottom. This interface is set up not to just allow us to choose the color we key out, but to extend the range of keyed colors beyond our choice of the specific green screen. We pick a color, and then decide what the tolerance will be, that is, how close a color must be to our green key color to be keyed out. As such, we have total control visually here for how the color choice range is defined. The remaining slider controls at the bottom of the window we will address after we hit the numerical window's controls.
First, click on the Eye Dropper button to the right of the window. Go over to the Video tab and find a middle green area and click. By middle green, we mean a green that isn't the brightest or the darkest green left inside the garbage matte. We want both the brightest and darkest green areas to be equally distant from the color we choose with the eyedropper. This is so that we can set the tolerance for the color we choose to its lowest value. This will become clear as we tweak further.
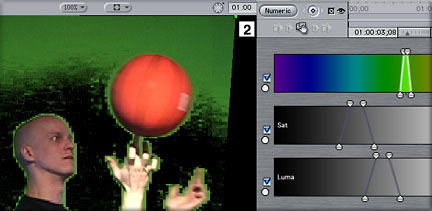
When you click on this middle green area, you will immediately see a result, although it will likely not be as clean as you expect. We are just choosing the best key color right now. If you look over at the filter settings on the Chroma Keyer tab, you will see that the top three bars have shifted pretty radically. The first bar is the color range, or the bar you use to tell the filter how different the hue or phase (range of red-green-blue), of the color can be. The second bar is for saturation, meaning how dense the color information is. The third bar is for luma, or how dark or bright the color is, based entirely on gray scale.
These three bars are tools for setting the tolerance of our color selection. The truncated pyramid on these lines can be reshaped to allow a change in what is included or excluded from the color choice. You are not just keying out the color you get with the eyedropper; Chroma Keyer will also key out any colors close to it based on the tolerance you set with the pyramids. By grabbing the bubbles on the top of either line, you can move the entire line over to the left or right, thus allowing more or less tolerance into the key color choice. By grabbing the bottom bubble of either line, you increase the slant of the pyramid. We will see shortly how this variation affects the key.
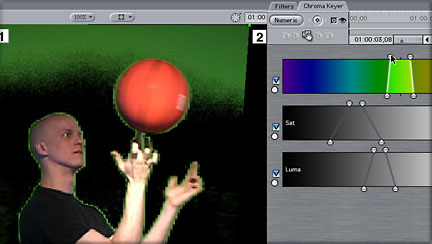
Start your adjustments by opening up the color range somewhat and increasing the number of possible hue variations that will be keyed out. As you widen the pyramid, you should see the big chunks of green disappear or break down into much finer detailed bits of green. If you need to make a radical change in the hue, like say from green to red, you can actually click and drag the color values themselves inside the top bar, although this brute force approach will be about as precise as dialing a number on a touch tone telephone with your entire fist!
After you've got the color range set as best you can, move to the Saturation and Luma bars . Once again, the pyramid lines allow you to define the cutoff tolerances for each. Start wide for each, and then, slowly, close them back up until you start seeing green dots pop back into the screen again, What you are doing is trying to start with a wide range and narrow it down till you get the lowest tolerance that will still knock out all the green without cutting out your subject, too. Don't worry that you will still have a very jagged edge on your subject, we will take care of that momentarily.
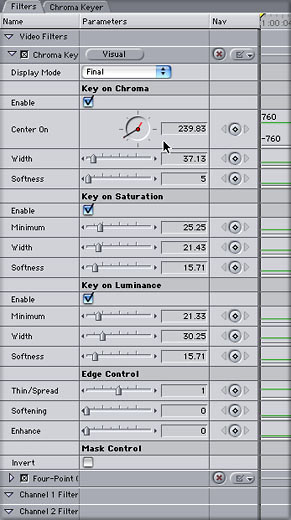 Switch your windows around so that now you are looking at the numerical controls for the Chroma Keyer on the Filters tab. Let's go through a few of these controls. The Display Mode switches between Final, which is the result of the chroma key, Matte, which is the matte displayed as a black and white image, and Source, which just shows the original pre-matte footage. You'll likely need to switch between Final and Matte pretty frequently, especially if you're footage has a lot of difficult matte edges, or if the color in your subject makes it very difficult to accurately visualize the matte you are working with.
The rest of the controls on the numerical tab are very precise, exact adjustments that do the same thing to your matte that the visual interface does. When you set a degree value in the Center on field, you are giving the filter a phase, or 360 degree value on the color wheel, which is how hue is measured in computer display systems. This phase is the same color you eyedropper-ed on the other interface. If you enter another number here and go back to the visual interface, you would find that it changes the color range bar.
Likewise for the rest of the controls. Each limits the composite matte depending on the values entered here, which correspond to the pyramids on the visual interface. The Matte is exceedingly well defined when you construct it out of all three variables, and you can get the matte even more precise by tweaking the numbers, as opposed to dragging a line in the visual window.
Switch your windows around so that now you are looking at the numerical controls for the Chroma Keyer on the Filters tab. Let's go through a few of these controls. The Display Mode switches between Final, which is the result of the chroma key, Matte, which is the matte displayed as a black and white image, and Source, which just shows the original pre-matte footage. You'll likely need to switch between Final and Matte pretty frequently, especially if you're footage has a lot of difficult matte edges, or if the color in your subject makes it very difficult to accurately visualize the matte you are working with.
The rest of the controls on the numerical tab are very precise, exact adjustments that do the same thing to your matte that the visual interface does. When you set a degree value in the Center on field, you are giving the filter a phase, or 360 degree value on the color wheel, which is how hue is measured in computer display systems. This phase is the same color you eyedropper-ed on the other interface. If you enter another number here and go back to the visual interface, you would find that it changes the color range bar.
Likewise for the rest of the controls. Each limits the composite matte depending on the values entered here, which correspond to the pyramids on the visual interface. The Matte is exceedingly well defined when you construct it out of all three variables, and you can get the matte even more precise by tweaking the numbers, as opposed to dragging a line in the visual window.
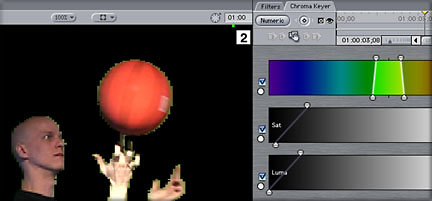
In the numerical interface, we have edge controls for each for each. Thus under each section of the numerical interface, Key on Chroma, Saturation and Luma, we find Width (the amount of space between the cut-offs from the pyramid on the visual interface), Softness (feathering), and with the exception of Chroma, we find a Minimum (the cut-off from the pyramid on the visual interface). These controls are where you really tighten up the edge, now that you have the chroma pretty well knocked out.
Choke that barge, lift that...(groan)
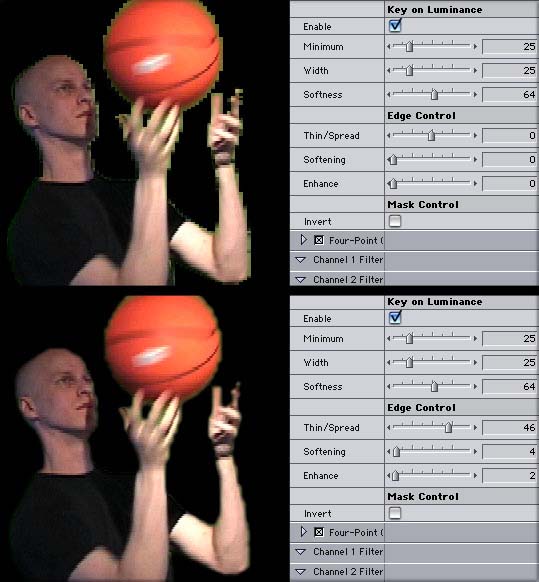 And the final tool in this filter is specifically for that purpose. Before FCP3, we had to apply a separate Matte Choke filter after the Color Key to clean up the edges of the final matte, but the new Chroma Keyer plugin includes a matte choke as a final step. This is called Edge Control. Thin/Spread basically just increases or decreases the total size of the matte evenly, in case you want to shave a little off of your subject to kill some color spill or jagged edges. Softening adds a hair of feather, although you want to be careful, since feather looks great on a still, but raunchy in motion. Enhance is a color spill tool for cleaning up that little bit of green that still hangs around the edges of our subject!
To make your adjustments to these, make sure the Video tab is right next to you so that you can monitor your changes . Your chroma should be pretty well set at this point, so start off by setting the Soften on the Edge Control to 2 or 3. If you set it much higher, you will end up with a force field-looking buzzing around the edge of your subject that destroys the illusion of the matte. 5 is usually about the absolute highest you want to go with any feather in a chroma keyer.
And the final tool in this filter is specifically for that purpose. Before FCP3, we had to apply a separate Matte Choke filter after the Color Key to clean up the edges of the final matte, but the new Chroma Keyer plugin includes a matte choke as a final step. This is called Edge Control. Thin/Spread basically just increases or decreases the total size of the matte evenly, in case you want to shave a little off of your subject to kill some color spill or jagged edges. Softening adds a hair of feather, although you want to be careful, since feather looks great on a still, but raunchy in motion. Enhance is a color spill tool for cleaning up that little bit of green that still hangs around the edges of our subject!
To make your adjustments to these, make sure the Video tab is right next to you so that you can monitor your changes . Your chroma should be pretty well set at this point, so start off by setting the Soften on the Edge Control to 2 or 3. If you set it much higher, you will end up with a force field-looking buzzing around the edge of your subject that destroys the illusion of the matte. 5 is usually about the absolute highest you want to go with any feather in a chroma keyer.
Next, hike up the Thin/Spread control of the Edge Controls. As you adjust it up, you should see the matte start to bite into the edge of your subject. At some point, you will see a nice sharp edge develop. The Soften is killing the jagged edges that are the left-overs of using DV compression, whose lower resolution color sampling isn't quite up to the task. Then the Thin/Spread is cutting off the overly soft buzzing that the Soften control introduced to kill the jagged edges. Between the two, you get a pretty decent edge that makes a nice matte.
'Where I see zee Green, I add zee Purple'
Finally, the Enhance is used to wipe out any color spill on your edges. Almost all green screen footage will have some color spill. The closer your subject is to the screen, the more ambient wrap-around color spill you will get on their skin. In addition to this, the low color sampling of the DV codec means that the edge between you your subject's skin tones and the green behind them aren't always differentiated very well, making it difficult to draw a sharp line between the green and the skin tone.
What the Enhance does is adjust the color phase of the area just on the edge of the matte. As it changes the color, you can neutralize the green tones in the skin. You are basically just color correcting right on the edge of the matte. If the skin is too green, Enhance will add some purple and balance it out. Usually, if you lit pretty well, meaning you had good solid edge differentiation from back-lighting the subject and keeping them far away from the screen, you should have very little spill. What little is left will generally have already been mopped up by the Thin/Spread and Soften you just used to tighten the edge. If there's a bit more, step the Enhance up a hair. Just keep a close watch as you do. Purple on your edges doesn't look any better than green!
Now look at what you've done!
Now that you've tightened the key up a bit, take a look back at the visual interface. You'll find that the sliders at the bottom match the Edge Control ones on the numerical interface. You could have adjusted them here, but the adjustments need to be so small and precise that you generally want to make them numerically. If you messed with the Soften controls for the Chroma, Saturation or Luma tools on the chroma portion of the numerical interface, you may find that the pyramid lines are even more slanted than before. Softness on the numerical interface translates as a partial cut-off of the gradient in the visual interface.
So how does it look? Probably pretty good, but the only way to judge is by rendering a section of it up. When you build a perfect matte for one frame, you usually find that it looks bad on every other frame when played back. This results in really ugly edges that ripple over time. Remember that a not-so-great looking matte that is CONSISTENT is better than a matte that looks fantastic most of the time, but rotten some of the time. Render up your footage and check. If you find that the edge is rippling way too much, you may need to ease back on the Thin/Spread and boost the Soften slightly. If you find that the subject seems to be surrounded by a glowing gas cloud, you'll definitely want to ease back on the Soften. If either case is really extreme, you may want to go all the way back to step one and pick a more suitable key color or even re-shoot. There is no substitute for practice. Do this over and over. If you use the same green screen shooting space and the same lighting, pretty soon you will be able to lock down the exact settings for every shot in a couple of seconds.
How can you make your key better? Well there are a few things you can do.
1) Start with the best possible footage. You cannot make good keys without good footage, which means very well-defined edges and strong saturation and contrast. That means even lighting on the green screen and lots of back-lighting for your subject. See my Chroma Key for DV Guerillas I for tips about that.
2) Start your shooting with your intended background in mind. Light your subjects from the front so that they match the intended background. Take a look at what happens when this footage is moved onto lower contrast area of the background and is resized a little to eliminate some of the shakier moments of the matte. Shrinking the subject by about 15% averages out the smaller crawling and rippling that happens when the edges just can't be cleaned perfectly. Get used to this. The DV codec is great, but it can present real problems in chroma keying, so you have to learn what you can and can't get away with.
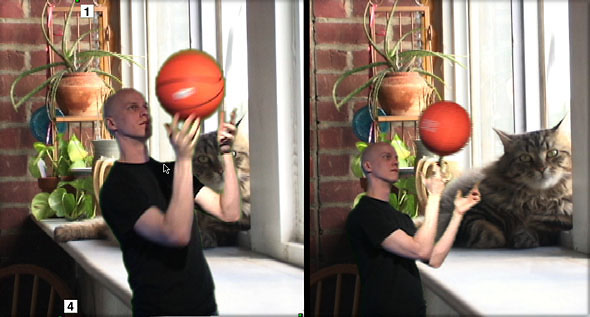
3) Always monitor your results out to a true NTSC or PAL video monitor. You cannot tell the quality of the matte unless you are doing this. The onscreen preview is ONLY for getting you in the right neighborhood as you start. It's the video monitor that reveals whether the matte is any good or not. Don't forget that you can't get better without practice. Have fun, and get those mattes tighter!
Charles Roberts teaches Video and Digital Media in the Communications
Media Department at Fitchburg State College in Fitchburg, MA, and is the
author of "Final Cut Pro 2 for Firewire DV Editing", published by Focal
Press. He spends what little free time he has coming up with ways to
eliminate the little free time he has left.
copyright © Charles Roberts 2002