
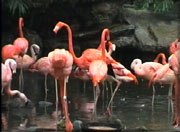
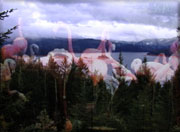
Can a Panther and a Mire Cat co exist in the
same video frame? Only when in Composit Mode.
The Basics - Composite Mode September 4, 2001
Using Composite Mode in FCP
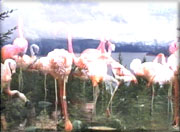
Can a Panther and a Mire Cat co exist in the
same video frame? Only when in Composit Mode.
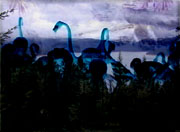
The Basics - Composite Mode September 4, 2001
Using Composite Mode in FCP
It has been said that compositing occurs any time that you have more than one video track. Compositing in FCP is the blending or merging of two video tracks to produce a new image which is a combination of the two video clips. There are many variations on the way that we can composite two clips in FCP.
 Before we get to Composite Modes let's look at the simplest type of compositing. Place one clip on V1 and a second clip directly above it on V2. Turn on 'clip overlays' from the graph icon lower left in the TL. This will produce a horizontal black line through the clips on the TL. The overlay lines will default to 100% opacity near the top of the clip. In my example, right, I have clicked on the overlay line in the clip on V2, waterfalls, and pulled it down to 41% opacity (Red arrow).

The ability to change the opacity of clips and to use Keyframes for changing opacity over time is an important compositing tool. More so when used in conjunction with other effects. However it is limited. FCP has some much more interesting techniques for Compositing.
COMPOSITE MODE
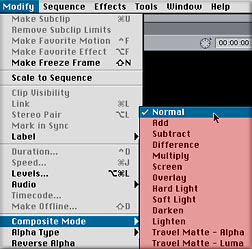
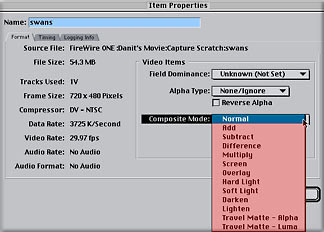
Composite Mode in FCP offers a wide variety of compositing methods. Composite Mode can be found by selecting the clip on V2 then from the Menu > Modify > Composite Mode. You can also control click on the V2 clip and select Properties. In the Properties box there will be a Composite Mode drop down menu.
|
|
|
|
We will work with Composite Mode using two clips, one on V1 and the other on V2, with the Composite applied to the selected top track. Composite Modes will work
between any two layers that are one on top of the other and FCP can have up to 99 video tracks.
With two clips in the TL, one on top of the other, each pixel has a corresponding pixel in the other track. Composite Mode works with each pixel from the two tracks by comparing the different color values of the pixels. Having found the differences between the pixels it then composites the two clips in a prescribed manner (add, subtract, difference, multiply, etc.) based on these differences.
Composite Modes have no controls. Changing the opacity of either or both of the clips on the TL will control the amount of 'effect' each composite mode will apply. Travel Mattes Alpha and Luma are a bit different and are most often used with three Video tracks. Travel Mattes are covered in the Travel Mattes Alpha and Luma Article.
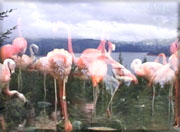
The best way to find out what each composite mode does is to try them all. Normal is the default setting for composite mode, with no effect applied.
Add Combines the color values of both clips producing a lighter composite image. Where areas of light colors are added together pure white can be the result. You can see that the entire finished composite is lighter than either of the two clips. Where there are light areas in both clips you can see that absolute white is produced. This can be a problem when trying to keep within the boundaries of broadcast limits.

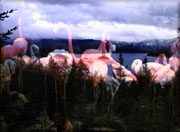
Subtract produces a darker image as color values are subtracted from each other. Darkest areas of the composited clips will go to pure black, again this can be a problem for broadcast limits. This Mode works well when both of the clips are light in color value.
Difference works by subtracting color values from the clip on V1 from the values of the clip on V2. This mode often produces the 'psychedelic' look of the 60's.
Multiply compares the color values of the pixels in both clips and multiplies them together. Dark areas of the clips will remain dark, lighter areas will be darkened as a result.
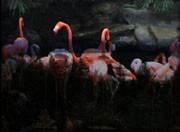
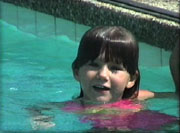
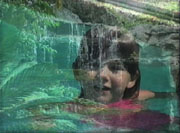
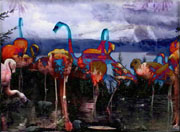
Screen compares the color values of the pixels in both clips and multiplies the inverse values of the pixels. Lighter parts of the image will remain the same. Darker parts of the image will be lightened by this process. The image, Panther and Mire Cat at the top of this article used the Screen Composite Mode which was then darkened a bit using the Brightness and Contrast filter.
Overlay mode applies two different techniques. If the pixel color value is lighter than middle gray, 128 value, then Screen mode is applied. Where the pixel color value is darker then middle gray, 128, Multiply mode is applied which makes the dark parts darker. This is like a split effect.
Hardlight compares the areas of the clips that are light and makes them lighter, areas of the clips that are dark get darker. This produces a hard edge between the light and dark areas not unlike a spotlight. What is in the spotlight is bright, what is outside the spotlight goes dark.
Softlight works in the same manner as Hardlight only the lighting effect is soft or diffused producing a softer transition between light and dark. Lighter areas of the video tend to stay light.
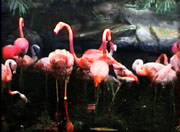
Darken compares the values of the pixels of both clips and selects the darker of the two.
Lighten compares the values of the pixels of both clips and selects the lighter of the two.
Conclusion While Composite Modes have no actual controls changing the opacity of either of the clips on the TL will alter the way that these Composites apply their effects. Both Add and Subtract Composite modes can produce whites and blacks with absolute values of 0 or 255. These color values exceed broadcast standards.
You will also find that a Composite Mode that works well on one set of clips will be terrible on a different set of clips. To preview the full effects of your Composite 'option scrub' (snapping turned off) the Playhead on the TL. As you view your Composited clips, the effects of the Composite mode will vary as the color values of the two clips constantly change. This presents the 'Composite Mode' with ever changing color values to work with. You can fine tune areas of the clips by Keyframing opacity where needed. For additional effects you can apply any of FCP filters to the clips on the TL before you use Composite Mode. Gaussian Blur works very well.
Three of my favorite Modes; Screen, Soft Light and Lighten often produce results that are close to what I want but are too light, washed out. Nesting the two clips with a Composite Mode applied provides the opportunity to use one of FCP Image Control filters to correct for the final look. Brightness/Contrast and Proc Amp filters work well and may also serve to pull absolute whites and blacks back to within broadcast standards.
The only way to get a feel for what each of the different Composite Modes do is to try them all.
Enjoy,
--ken
copyright © Ken Stone 2001