
The Basics - Pan and Scan August 6, 2001
How to do a Pan and Scan in FCP
The Basics - Pan and Scan August 6, 2001
How to do a Pan and Scan in FCP
We have seen it a thousand time on TV. A still photograph is displayed and often while a narrator does a voice over we see the picture slowly enlarge as it zooms in on some aspect of the photo. This technique is called a 'Pan and Scan'.
If we are using FCP to simply present a photograph and the photo is not going to be enlarged, then a file of 720 x 480 and a dpi (dots per inch) of 72 for the photo will be fine. If however we want to do a Pan and Scan which involves enlarging the photo as we zoom in and move around inside the photo then we will need a photo with more digital information to avoid pixelization. There are two different ways to do this. You can increase the overall dimensions of the file and leave the dpi at 72. For a 2X enlargement create your file at 1440 x 960 or for a 4X 2880 x 1920. Another way would be to increase the dpi of the file, leaving the file dimensions at 720 x 480, from 72 to 144 dpi for a 2X enlargement or 288 dpi for a 4X enlargement. The photographs that we use need to be prepared properly in Photoshop before import into FCP (Preparing Photoshop files for FCP).
Before we import our photo into FCP we will want to set the duration for the still. In Preferences, General tab there is the "still/freeze duration" box. This entry will become the default duration for all photos and freeze frames while working in FCP. In my example I have set six seconds as my default.
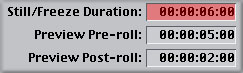
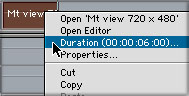
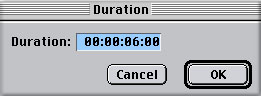
If your photo is already in FCP you can change the duration of your photo by 'control' clicking on the clip (photo) and selecting 'duration' from the contextual menu. This will produce the duration box where you can enter your new duration.
|
|
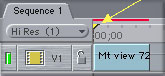
With the duration set we can place the photo on our Timeline. Move the playhead to the beginning of the clip (yellow arrow) by using the 'up' arrow on your keyboard .
Canvas Window
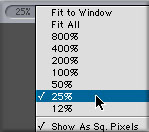
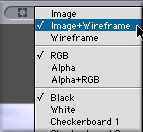
The first thing we need to do is set up our Canvas window. Using the two drop down menus at the top of the Canvas window set size to 25% and set 'image + wireframe.
|
|
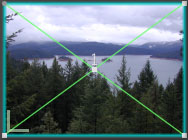
Click on the photo in the Canvas window to make the 'image + wireframe' active which will give you a wireframe 'X' (white in color) through the picture and a blue Bounding box around the edges of the image.
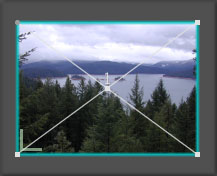
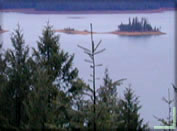
I am going to use a photograph of a distant mountain lake for my example. Near the back of the lake are several small islands that I want to zoom in on. I will start off with the full image and then over six seconds I will zoom in (enlarge) the image and pan one of the small islands to the center of the screen. The process of Pan and Scan involves both enlarging the image and moving it over time. To accomplish this we will be doing some Keyframing (Keyframing in FCP).
For this process I will be using the Viewer > Motions tab as well as the Canvas window. Double click on the clip in the TL to load it into the Viewer and then select the Motions tab from the top of the Viewer. The two controls that we will be working with in the Motion tab are Scale, to enlarge our photo and Center, to move or position our image.
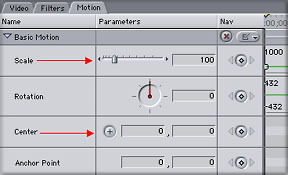
We have both the Motion tab and the Canvas ready to go. Here is an interesting thing about the way that FCP works. The Canvas and the View windows are tied together, they share information and changes made in one will be reflected in the other. Before we do our Pan and Scan lets look at this. With our playhead parked on the first frame, in the Motion tab enter 200 into the scale box and hit enter. You will see that the photo in the Canvas window has been enlarged by 200%. In the Canvas, click on one of the corners of the blue Bounding box and while holding down the mouse button, drag in towards the center of the picture. As you are reducing the size of the photo in the Canvas look over at the Scale box in the Motion tab, you can see the numbers changing as you drag your mouse. The fact that these windows are linked together means that we can do our work in one or the other or both. This has its advantages. For me setting Keyframes and Scale values is easier in the Motion tab. Positioning images and working a motion path better done in the Canvas. You will find a work flow that works best for you.
Pan and Scan
First I will do my enlarging of the photo. With my playhead on the first frame of my photo clip I check to insure that my Scale setting is 100% in the Montion tab. Just to the right of the Scale box is the keyframe button. Clicking on this button sets my first keyframe and the button turns green.
Looking over at my Canvas window I see that the white wireframe has now turned green. FCP uses this color green to denote keyframes.
I now move my playhead to the last frame of my clip making sure that I am on the last frame and not on the edit point.
Last frame marker |
Edit point marker |
I have decided that I want to enlarge my photo by 400% so I enter 400 into Scale box and hit 'enter'. Both the keyframe button in the Motion tab and the wireframe in the Canvas turn green. My first keyframe is set at the beginning of the clip with a scale value of 100%, my last keyframe at the end of the clip has a value of 400%. I can preview my work by holding down the 'option' key and scrubbing through the TL (turn snapping off). I can also hit 'option' 'p' from the keyboard and FCP will step through the clip one frame at a time, slowly - very slowly.
100% scale |
400 % scale |
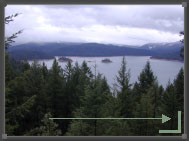
My size looks okay, now I want to move the image as it is enlarging so that one of the small island ends up in the middle of the screen. I return my playhead to the beginning of the clip. There are several ways to change the position of the image over time using the Motion tab. I can click on the Center button, blue arrow, and then click in my Canvas window to set my new center position. I can also enter numerical values into the X and Y position boxes, red arrows. Of course I don't have a clue as to what the numbers might be. (grin)
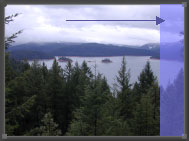
I use both the Motion tab and the Canvas window to set position. Before I re-position my island I'll set my first keyframe using the Motion tab. Playhead on the first frame, I check to make sure that the Center numerical values, X and Y are set to zero and click on the keyframe button (green arrow above). Moving my playhead to the last frame I place my cursor in the Canvas window and my cursor turns into the Move tool. I click and drag to move the position of the island until it is in the center of the screen. As I am dragging to the new location looking at my Motion tab I can see the numerical values for my position in the X and Y boxes changing as I drag. When I have my position and release my mouse button a keyframe is set. Now all that's left to be done is render.
|
Position of island before move |
Island moved to center |
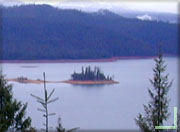
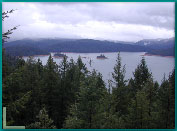
Final postion without wireframe |
My example of Pan and Scan is a simple use of the technique. We've all seen shots of maps where the camera pans along the route.
Sometimes there is a little airplane flying along the map and at the end
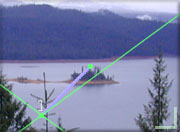
the camera zooms in on a city. Well, first you Pan and Scan your map and then you bring in a little airplane on a transparent background (a drop shadow from the plane would add to the effect), composite and animate the airplane on top of the map. If you look at the center photo above, the one with the keyframed (green) wireframe you will see the purple motion path that runs between the two keyframe points. This motion path can be manipulated to produce a motion path of any shape.
Pan and Scan is a simple technique but when used creatively can produce some fantastic effects.
Enjoy,
--ken
copyright © Ken Stone 2001