
How To January 28, 2001
How To January 28, 2001
Chroma Key Basics for DV Guerrillas - Part 2
or "Why is there a force field around my head?"
OK, so from Chroma Key Basics for DV Guerrillas Part 1, you have gotten up to shooting. As you enter this stage of the game, you should have some Chroma Key footage to work with. If not, go get some now. Keying is not an inborn gift. It is a skill that is improved upon with practice. One thing that must be understood with any compositing work is that there are always different ways of working. As you experiment, you will find the process and method that serves you best.You will also steal lots of great stuff from other compositors.
The only rule of thumb that pretty much applies to everyone is to stay organized. Write down everything. Save everything. If you finish a project, archive the project file when you trash your media. Sometimes after you finish a project, a better way of doing things comes to you out of the blue. If you save the project file, recapturing and rendering is a snap and you can quickly find out if you were right. If you use the same lighting set for your footage, chances are that your keying settings will be the same. Also, set up an archive of Favorites in your filters folder and pull and tweak them instead of always starting from scratch. Wasted time re-doing work you've already done is depressing after the fifth time around. Think ahead.
For those just joining us, let's review what keying is and how it does what it does. FCP can look at each frame of video, find every pixel containing the color you have chosen for a background key color and make that pixel transparent. Then whatever you have on the video layer underneath shows through. Keying means choosing a color for a background that FCP will get rid of, leaving your three year old googling around in whatever the video layer underneath it contains.
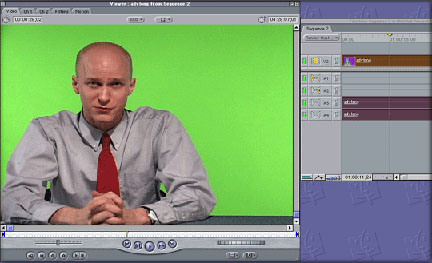
In our preceding article, we chose either green or blue for our key color. Now, having shot some footage using this background color, we will use the keying filters in FCP to remove the color and reveal the layer underneath. This sounds deceptively easy. Unfortunately, if your lighting isn't perfect (and it never will be), you will find that your initial key (simply selecting the key color in the filter window) removes not much of what you don't want and probably takes away some of what you want to keep. Whatta drag!!! Welcome to the world of compositing. You will have tweak and tweak to get good results, but when you finally do come up with good results, you'll spend less time tweaking the next time.
So how do you get FCP to narrow down what it mattes out to an even screen clean key? The answer is somewhat similar to the antiviral soup used to combat the AIDS virus. No one weapon will give you a good key in FCP (or Adobe After Effects either, for that matter). Rather a combination of filters is used in a particular order to begin the matte, produce a clean edge and kill stray pixels and finally eliminate any leftover color bleed. You'll find that the same battery will clean up almost any keys if you are consistent with 1) lighting, 2) framing and 3) organization.
 Let's get right into this. You should have captured some of your chroma footage onto your system. First, let's lay out the groundwork for your key. Now, most would assume that you'd immediately start layering your sequence in the stacking order of your key. But don't get ahead of yourself. Often, it's difficult to see how tight a key you've achieved this way because the busy-ness of the new background distracts your attention. We think we have a good key based on this until we render and see the thing in motion. Bleh. Shaggy edges that are not apparent in the still jump out and shimmy in the motion footage.
So, how to get things clean before stacking the layers? Easy. Do things one at a time. First, drag your chroma key footage into (and create) a Video 2 layer. Why Video 2? Because this layer will need to be on top of your background footage. After keying out the green, whatever is on Video 1 will shine through where the green screen was. Now, double click your clip and bring it up in the Viewer. Pick up the Filters Tab from the Viewer window and drag it alongside the Video tab of the Viewer window so that you can monitor your changes to the clip as you make them.
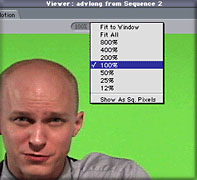 Switch the window size from whatever you have it set to 100%, no more, no less. For this sort of precision work, it's imperative that you see the exact edge you are creating. Obviously, reducing the window size will not aid you, but going over 100% won't either. Since you need to see the edge exactly as it is, any interpolation on-screen by FCP will contain artifacts that may not accurately describe your matte. Stick with 100% for this work, switching back to your normally scheduled resolution when all is through. Those of you who normally use a lower res (50% or 25%) for fear of dropped frames may rest assured that we won't be playing back full frame full motion on the desktop (which would require rendering). We won't need to do this till the very last, after we're totally satisfied with our key. Any rendering beforehand is gratuitous.
Finally, choose the appropriate temporary background from the View>Background>List of choices. What is appropriate? That all depends on your footage. I find that it hinges on the quality and nature of your key footage. You could choose Black, White, Checkerboard patterns or any primary color. I find that either black or white is usually most suitable. Remember that we aren't looking for any sort of lighting effects here yet. We only want to get the tightest key possible, eliminating ALL green from the screen. After we have this successful key, we can go about futzing with the way the subject looks.
Switch the window size from whatever you have it set to 100%, no more, no less. For this sort of precision work, it's imperative that you see the exact edge you are creating. Obviously, reducing the window size will not aid you, but going over 100% won't either. Since you need to see the edge exactly as it is, any interpolation on-screen by FCP will contain artifacts that may not accurately describe your matte. Stick with 100% for this work, switching back to your normally scheduled resolution when all is through. Those of you who normally use a lower res (50% or 25%) for fear of dropped frames may rest assured that we won't be playing back full frame full motion on the desktop (which would require rendering). We won't need to do this till the very last, after we're totally satisfied with our key. Any rendering beforehand is gratuitous.
Finally, choose the appropriate temporary background from the View>Background>List of choices. What is appropriate? That all depends on your footage. I find that it hinges on the quality and nature of your key footage. You could choose Black, White, Checkerboard patterns or any primary color. I find that either black or white is usually most suitable. Remember that we aren't looking for any sort of lighting effects here yet. We only want to get the tightest key possible, eliminating ALL green from the screen. After we have this successful key, we can go about futzing with the way the subject looks.
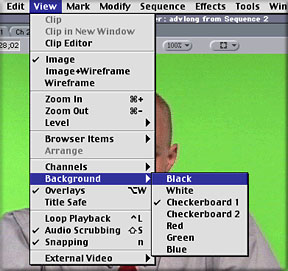 Which to use for initial background; White or Black? As stated previously, this really depends on your key. I usually start my evaluation from the following grounds. If the edge of the subject contains semi-transparent and less easily definable edges EXTENDING OUT INTO THE KEY COLOR (such as hair, thin objects, motion blur leftovers), use a Black background so that you can monitor how much color spill remains in this area.
On the other hand, if the major feature of your key footage is bounced key color bleeding over onto your subject's skin (for example if your subject was too close to the screen and not lit well), in other words, EXTENDING INTO THE SUBJECT SIDE OF THE KEYING EDGE, you'll want to try white, which may make it easier to identify subtler shades of the key color still living in your child's face.
What if you've got both problems in different parts of your footage? Easy enough, just switch back and forth to the background type you need as you need it. If you must have both at once, create a new Sequence just for fooling with this problematic clip and put down a white slug and a black slug, positioning each in its own Viewer window so that it lies under the area in the Canvas underneath the part of the problem clip that it best addresses. Then drop the problem clip on top of this and double click to bring up in the Viewer. Select the Filter Tab, and watch the Canvas update as you adjust the key settings. When they are suitable, toss the slugs on the lower layers and replace with your background video footage.
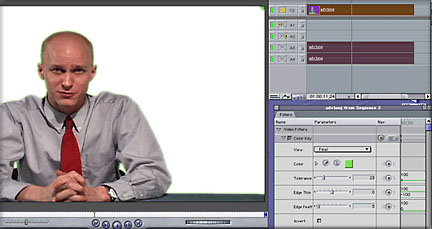 Next, you actually apply your key. As stated previously, your first selection of the key color probably won't net you decent results. But you aren't looking for the perfect key at this stage of the game. The best you can hope for is to eliminate a broad, if raggedy range around the immediate vicinity of the subject. Start off by selecting Filters>Keying>Chroma Key. Now for some reason, FCP's Chroma Key Filter default settings are set to a completely unusable setting. So immediately after you apply this filter to the clip, select the Filter tab and drag the Tolerance to 10, the Edge Thin to 0 and the Feather to 5. Now click the dropper button and move over to your Viewer window. Move the dropper around the parameter of the subject until you find an acceptable color value and click. The color should appear in the Filter's color picker box, and you should see some of the green background disappear, though not all.
This is where your diligence in lighting will pay off in big dividends. Now If you lit well, there should be little or no green in the subject, while the background should be very saturated with your color key. You can judge your success in lighting by how far up you can slide the Tolerance setting without losing parts of the subject, and therefore taking out more green without taking out any subject. Stop wherever you begin to lose your subject, and then pull back a little. Remember that the frame you are working on is only one of many and that the lighting and color values will change over time, so give yourself a tolerance buffer zone, especially if you know that your footage has some shaky moments.
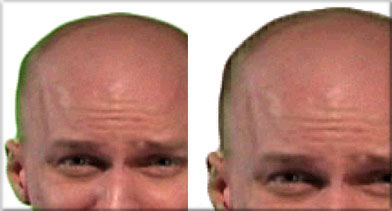
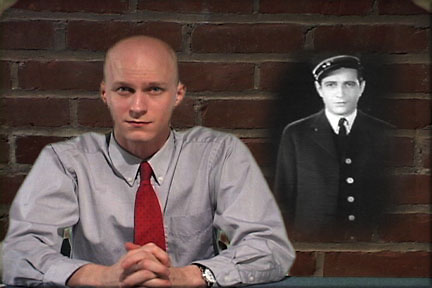
The more you get rid of here, the less you have to tweak later, so it's in your best interest to clear out what you can early. Don't worry if it looks spotty; you'll take care of that in a moment. Just choose a color and tolerance setting that eliminates a lot of green from the frame without compromising your subject. You may notice that increasing the feather appears to clean up the key, but don't be fooled. The initial happiness of the easy keying resulting from over-feathering results in buzzing, shimmering, force field-looking edges that mutate at high speeds. This is because the feathering value is being re-calculated at every frame and, while softening the edge of the key a great deal, it is actually including parts of a transition between chroma color and subject. That transition will never look correct, because it is based on a 2 dimensional mathematical model rather than a 3 dimensional range of values. Without depth, the shimmering will simply look like a crappy halo.
Then why use any feather at all? I start with a feather value of 5 because, while barely detectable in the video screen scale, it does lend a little edge definition to your key by eliminating rough edges that simply are in a no-man's-land of RGB chroma values. Since you will not have the Betacam resolution it takes to really get down to keying out individual hairs, a slight (very slight) feather will serve to assimilate all those irrational unkeyable little edge features. The minimal halo-ing introduced to the image will disappear with the next Filter to be applied.
Experiment a lot with your choice of color and your Tolerance setting. Sometimes the right combination is less obvious and you will have to stumble upon it. Later in this document, I'll suggest other options if the Chroma Key simply will not give you acceptable results.
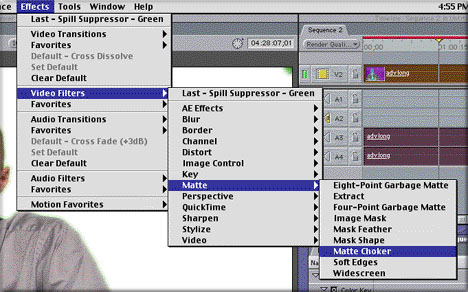 Next step is the Matte Choker. This tool is absolutely essential in arriving at an acceptable key. The idea with the color key is that although you see colors disappearing from the video layer, in reality FCP is just creating an invisible mask whose edge is defined by the presence of colors in the layer. So wherever there is green in the layer, FCP adds a little invisible mask. Now if the color key is sort of spotty and speckly (as are all honest color keys that have little or no feathering- no cheating, folks), there are little masks all over the layer, separated by areas that have none of our key color.
FCPs answer to this is the Matte Choker. It tightens up mattes with un-acceptably rough edges, giving you a clean edge for your trouble without having to soften them un-naturally. Think of it as having a lot of little puddles scattered everywhere, and then draining some and filling others to make one unified puddle with more regular edges. I know my analogies stink, but you get the idea...
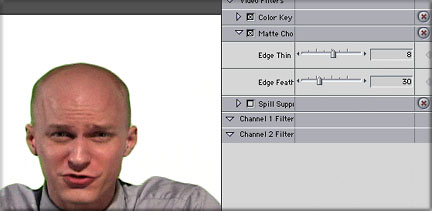 Once you've set your Chroma Key filter where you want it, go back to the Effect>Video Filters>Keying>Mattes>Matte Choker. There are only two controls, the Edge Thin and the Edge Feather, built in to the Matte Choker. It's impossible to predict the perfect setting for the Matte Choker because the Edge Thin setting entirely depends on how tight your initial color key was. And then the Feather setting depends on how where the Edge Thin was set. Your best bet though is to start screwing around at Unity or Zero. That's an Edge Thin of 0 and Feather of 0. Start adding to Edge Thin until you start biting into the subject area. Pull back 1, then start adding to the feather until the sharp contrasty edges the Edge Thin left are dulled just enough to avoid interlace crawl*. You will find that although these controls are a little clumsy and heavy-handed, its possible to tighten your key very close to the actual line of the screen/subject divide.
 Finally, after a mixture of Color Key and Matte Choker have given you an acceptable key, you will probably see little areas where variants of the key color have sneaked through your battery of keying and matting tools. There is a final convenient tool that you can use to eliminate those little areas without having to compromise the integrity of your carefully constructed key. This is the Spill Suppressor.
Go to Effects>Video Filters>Keying>Spill Suppressor-Green. All the Spill Suppressor does is color balance out whatever faint tones of the keying color remain in the frame. The Spill Suppressor only allows the suppression of color values related to Blue or Green, whichever one you choose. After you've narrowed things down to faint tones from the edges of your background, you can gently balance only this background tone and leave yourself with a natural looking key. Be careful with this tool, though, because the filter is actually adding magenta tones to the image to counteract the green ones it eliminates. Keep a sharp watch on your color values and only use sparingly, starting at 25% or so and going up a step at a time.
Finally, after a mixture of Color Key and Matte Choker have given you an acceptable key, you will probably see little areas where variants of the key color have sneaked through your battery of keying and matting tools. There is a final convenient tool that you can use to eliminate those little areas without having to compromise the integrity of your carefully constructed key. This is the Spill Suppressor.
Go to Effects>Video Filters>Keying>Spill Suppressor-Green. All the Spill Suppressor does is color balance out whatever faint tones of the keying color remain in the frame. The Spill Suppressor only allows the suppression of color values related to Blue or Green, whichever one you choose. After you've narrowed things down to faint tones from the edges of your background, you can gently balance only this background tone and leave yourself with a natural looking key. Be careful with this tool, though, because the filter is actually adding magenta tones to the image to counteract the green ones it eliminates. Keep a sharp watch on your color values and only use sparingly, starting at 25% or so and going up a step at a time.
Once you are happy with all this, grab your desired background footage, throw it in the layer underneath and take a look at your handiwork. Before rendering, skip around and see if there's any place where the key falls apart badly and consider re-working those sections piece-by-piece using the razorblade tool. Finally, render and enjoy the effects.
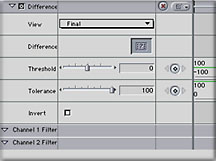 OK, earlier I mentioned that there were other options if your obtained un-acceptable results from the Chroma Key. In Part 1, I suggested making sure that you got a little head and tail footage of your green screen prior to adding subject and props. This was a safety measure for just such an eventuality. You can use a still from such footage as a "Difference Matte" that will only matte out similar colors that occur in the still and in the footage. In other words, if your still is exactly like the background of your key footage, the Difference Matte key will remove the similar pixels, leaving only your subject matter in the frame.
To do this, capture some of the head or tail of the shot without subject or prop. You only need one frame, so only capture a second or so. Just make sure that the lighting isn't radically different from your key footage, i.e. no new shadows, etc. Next, export the still as a pict file onto your desktop. Finally go back to your clip, add Effects>Video Filters>Difference Matte. Then grab your pict off the desktop and drop it on the little question mark in the filter controls. As you adjust the Threshold and Tolerance controls, the green should fall away like leaves from a tree. Now, go back to step two, add a Matte Choker to clean up and finally, a touch of Spill Suppressor, for those dirty rings (homage to "ring around the collar"). If your footage isn't too frenetic, sometimes you can produce even better results than with Chroma Key. Its all in the right tool for the job.

Now that you've generated this key, take a moment and drag copies of the Filters from your Filter Tab and drop them into the Favorites folder in the Effects>Favorites Tab of the Browser Window. Now these settings will be handy the next time you go to key similar footage.
Results? A spanky tight key...
OK, I'll admit it. I'm a huge fan of Adobe After Effects. And it's mainly due to the superb flexibility of the tools which are used in AE to accomplish the same keying process I've described here in FCP. Its no real epiphany to realize that the plugins and keyframing built-in to the FCP interface are a grandchild of AE's well-established approach to 2 D compositing and Motion Graphics. Whatever one thinks of them in the scheme of things, both Photoshop and After Effects have been watershed applications, excellent tools that allow an artist to develop their own style without retaining a generic "plug in" look. A good After Effects artist can use the application as a tool, instead of fighting the tendency to use canned effects.
In point of fact, many of the effects that ship with After Effects will look quite familiar to the FCP user, not only in name, but in control. The control palettes of After Effects standard plugins often have the same parameters and keyframe with nearly the exact same interpolation conventions. In fact, the FCP user may wonder why they should purchase After Effects, when so much of its compositing effects are available directly from within FCP.
The answer lies within the Production Bundle. The Standard version of After Effects, which costs around 500-600 dollars is really more of a taster of the possibilities opened up by the Production Bundle, which costs substantially more. The Production Bundle contains extra plugins and keyframe assistants that allow for more control over what is happens and where. It is precisely these extra plugins and features that turn After Effects from a decent 2 D compositor into a powerhouse of fine tune-able reality controls.
Some of the nicer features are a really robust Motion Tracker and motion path tweakers, a few effects plugins and other keyframe assistants. But where the Production Bundle really hits stride for Chroma Key folks is in the addition of advanced options in Keying. While not different in format from Standard version and FCP, the depth of the controls is the real winner. In choosing a method for that initial Chroma Key stage, one can choose from keying an expandable and collapseable range of colors, a linear color key, a difference matte and an extract matte. The Matte tools offer the familiar Matte Choker, but the Matte Choker is multilevel here, allowing you to choke the choked matte and control exactly how geometrically complex the subsequent Matte ends up. It goes much further tightening up the matte as well, cutting further into the subject if that's your game. And the Spill Suppressor color is USER defined here, allowing one to specify the color to be suppressed, by dropper OR color picker.
Of course no set of tools can replace skill, diligence and vision. If all your tools fail in the keying process and/or you are not able to control the footage source, you may have to resort to rotoscoping. Rotoscoping means step-by-stepping though the frames of video and correcting, hand-matting, adjusting each frame to be precisely the way you want it to be. Here, FCP is in DISTINCT weakness. After Effects, both Production bundle and Standard edition, allow close to infinite bezier curve control of Garbage Mattes and motion paths. That means that if you are willing to go over each frame individually, you can nuance every aspect of what is seen and where it goes.
FCP, on the other hand, doesn't allow for the really comprehensive Garbage Matte. The Garbage Matte filters only allow for 4 or 8 defining points to shape your matte. How many points do you need for a really tightly defined garbage matte? As many as you can possibly get, and eight is definitely not enough!!! If you are manually rotoscoping frames, its probably because the footage is too complex for accurate Chroma Key, so eight points is not going to get it.
Often, its a good idea to further mix tools. To end up with silky smooth motion and perfect keys, I usually get the key as tight as I can possibly get it for 99.999% of the footage. Then I go through and pull out the sections where the key really doesn't do the job. Its inevitable that you'll have these, especially with lo-res DV cameras. So rather than cry and cut stuff out unnecessarily, I pull out the second or so with offending key, export from FCP to AE or Commotion DV, rotoscope the 30 or so frames, then take it back to FCP.
Another bonus of using AE for your Chroma Keying is that you can use a SEED PROJECT for all your footage that uses the same lighting and subject matter. AE allows you to replace footage globally within a project. This is a quick way to use general settings for Keying, Matting and Suppression without needing to tweak much. FCP can do this in a very roundabout way that is sort of dangerous if you aren't really sure about it's relationship with media. Things like this can save you mucho time.
So, by the same theory of mixing filters to get the best key from multiple filters, you'll ultimately get the best total matte by using multiple masking techniques for different footage. Of course, many folks will say, "Chawla, no way, I told you I'm poor, I can't afford AE Production Bundle, that's why I'm reading your ridiculous article..." I can dig this. You don't NEED the Pro Bundle to make good work. But be aware that without things like it, you will have to accept certain limitations in what you can and can't key. That's not a value judgment, but beggars can't be choosers, you know?
Anyway, there you go. Between Part 1 and Part 2, you've now got the seps to setting up a Chroma Key set, shoot with correct light levels, capture and construct your Key in FCP and then, well, enjoy the results. Remember to experiment a lot and to share your process around. There's a million users and a million tricks in the naked city. Figure it out and spread it around and hope to hear from you soon.
copyright © Charles Roberts, 2000.
Charles Roberts AKA Chawla teaches Digital Video and Audio Production at Fitchburg State College in Fitchburg, MA. He uses his long tedious rendering times to generate content and tackle hard hitting issues on the discussion boards of 2-pop.