July 29, 2013
11 text plugin package for FCP X and Motion 5 - Price $55
CHV-Electronics
By Ken Stone
Back in 2005 I wrote about the dearth of good stock Text plugins for legacy versions of FCP. At that time, CHV Plugins came out with its Text Collection of plugins for FCP which filled the void. While the collection contained 10 different text plugins, the Credits (scrolling text) plugin quickly became very popular with FCP editors, not only because of the excellent quality of scrolling text, but because of its versatility.
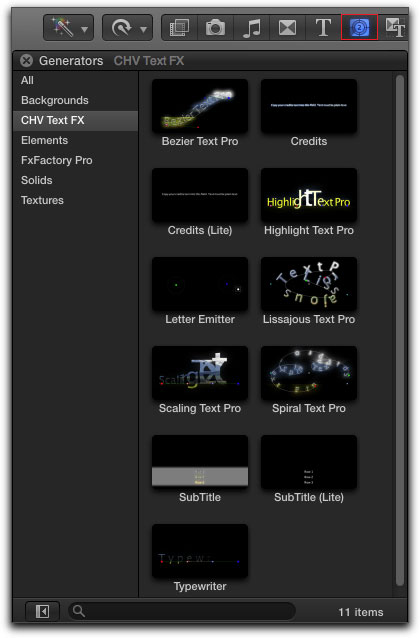
Now in 2013 we find ourselves in the same position with FCP X. True, FCP X now offers a basic scrolling Text generator, but it is very limited and so, once again, CHV comes to the rescue, offering an updated Text FX Collection for FCP X and Motion 5. This updated collection contains the same 11 plugins found in the collection created years ago for legacy FCP, which is good news for those of us who have been running the old set for years. CHV text plugins are generators and are found in the FCP X Generator Library shown on the right. The complete set contains the following plugins.
- Bezier Text Pro FX
- Credits FX
- Credits (Lite) FX
- Highlight Text Pro FX
- Letter Emitter FX
- Lissajous Text Pro FX
- Scaling Text Pro FX
- Spiral Text Pro FX
- Sub-Title FX
- Sub-Title (Lite) FX
- Typewriter Text Pro FX
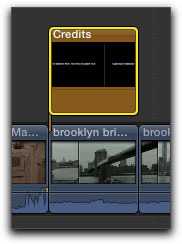
While this set includes both artistic and useful text plugins, I am going to show you the Credits FX (credit roll), as this is probably the most used and most important plugin within the collection. I am going to go through some of the Credit's controls before we start setting our text. There are some additional controls that we'll get to later on.
To apply the Credits plugin, click on the item in the Generator Library and drag it on top of the clip that you want to apply it to in the Storyline. Select the generator in the Storyline and it will open up in the Inspector window > Generator tab.
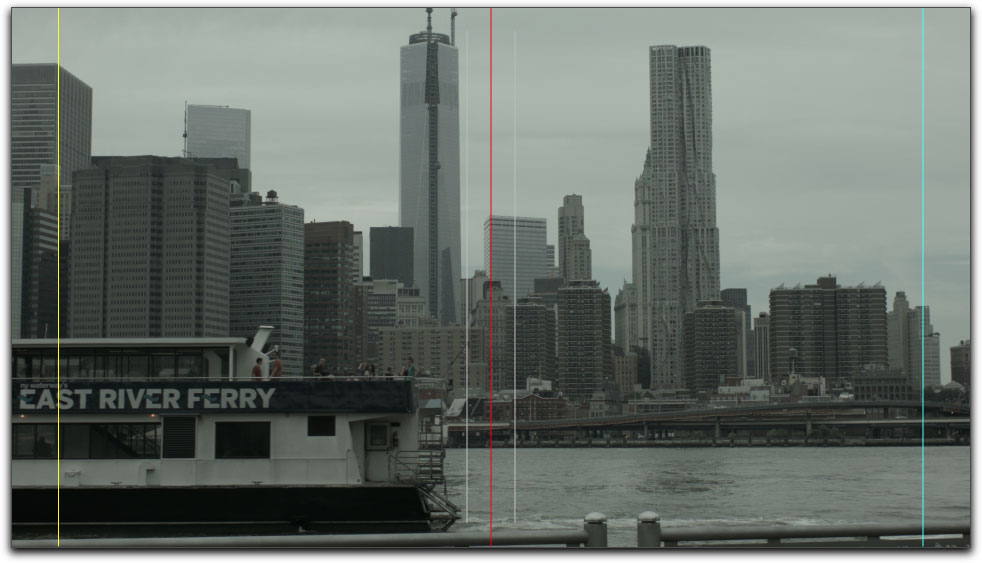
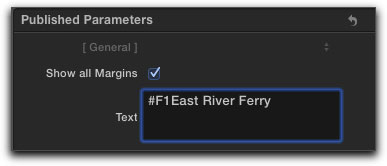
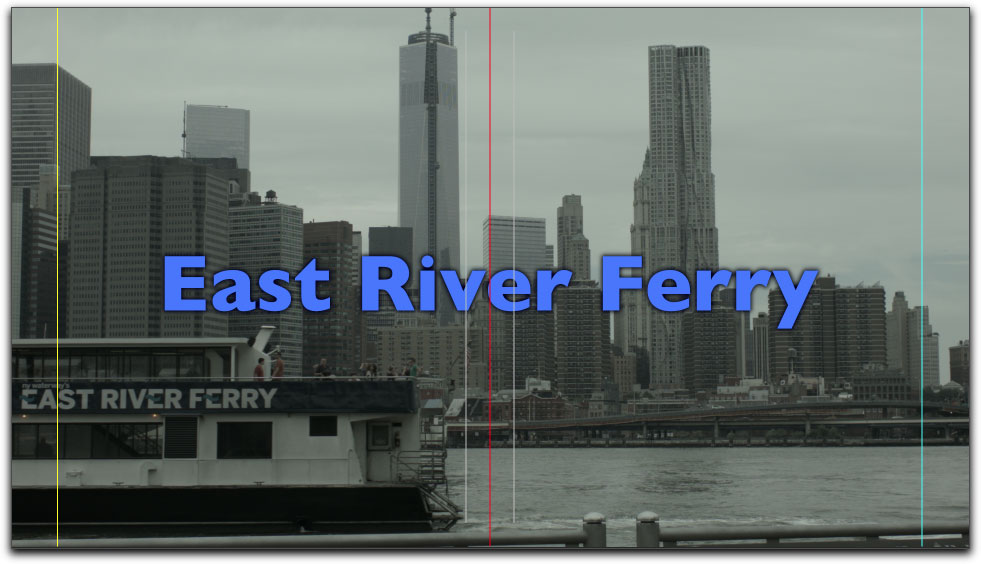
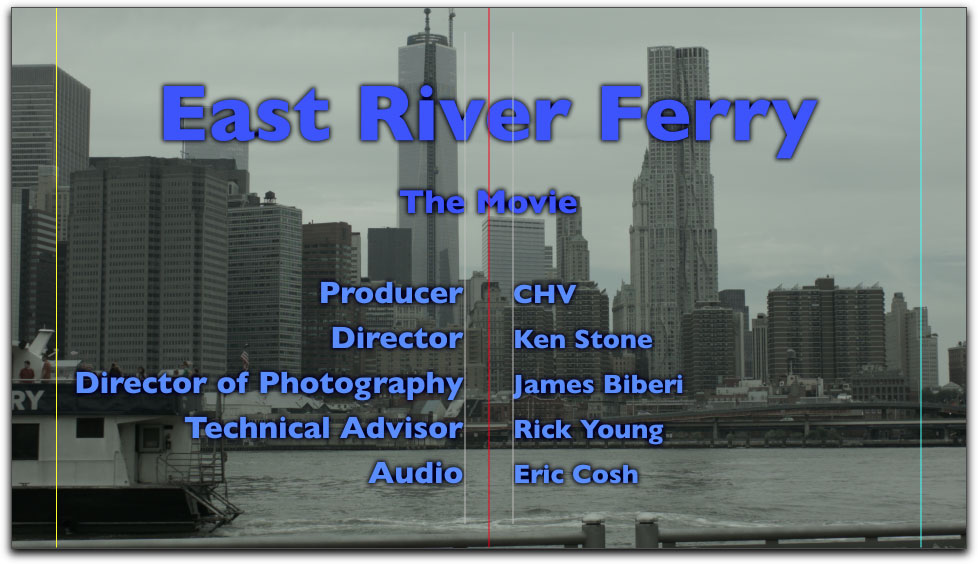
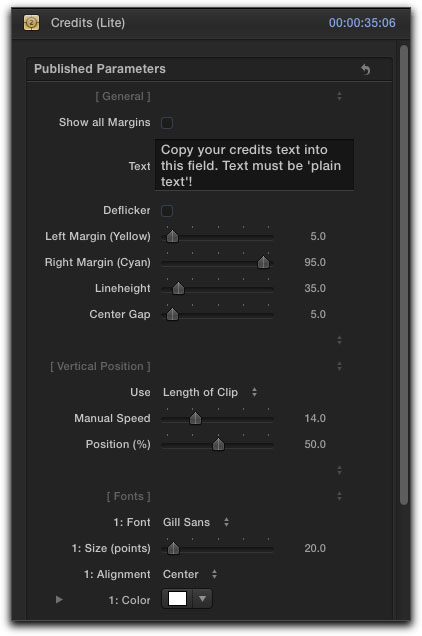
Turning to the Inspector, the first thing that we want to do is to turn on 'Show all Margins'.
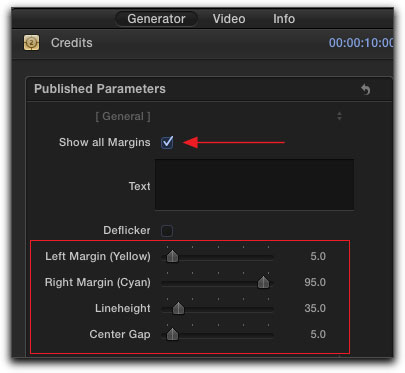
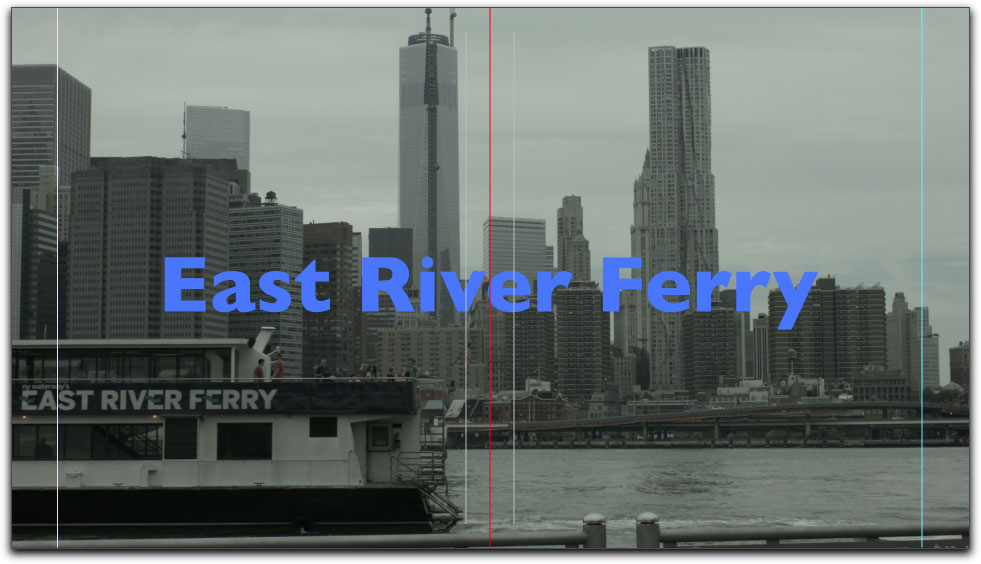
The margins for our Credits will now be displayed in the Viewer window. The left and right margins (yellow and cyan) set the outer boarders for text placement. The Center Gap (two white lines) can be adjusted to set the width of the gutter for creating columns of text. The vertical red line in the center of the Viewer is a motion path which I will demonstrate later. The Lineheight controls the vertical spacing between each line of type.
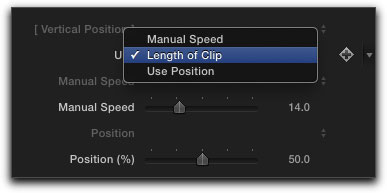
Next down in the Inspector is the setting used to control the speed of the scrolling text and the position.
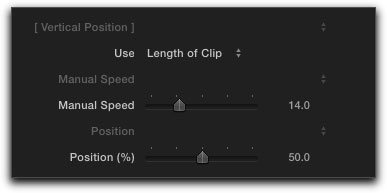
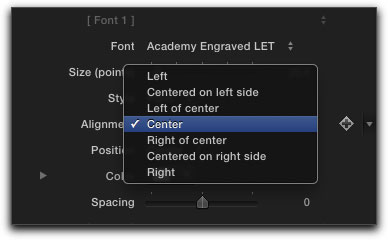
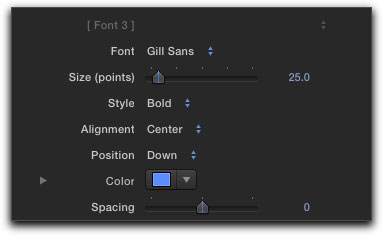
The power and flexibility of the CHV Credit generator comes from its ability to allow us to define up to 9 different 'text sets'. Each set has its own parameters, Font, Font Size, Style, Alignment (where the text will appear on screen, shown below right). Position with three settings, top, center, bottom can be used for small vertical adjustments. You can select the Font Color and Spacing (Tracking) controls the amount of space between each letter.

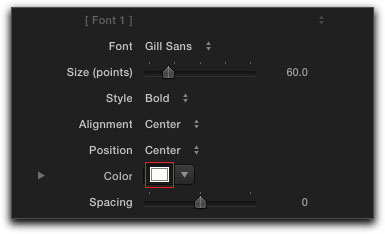
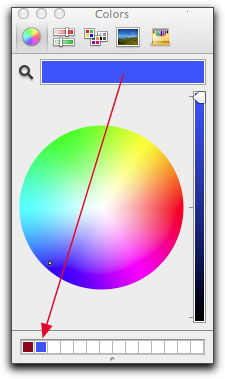
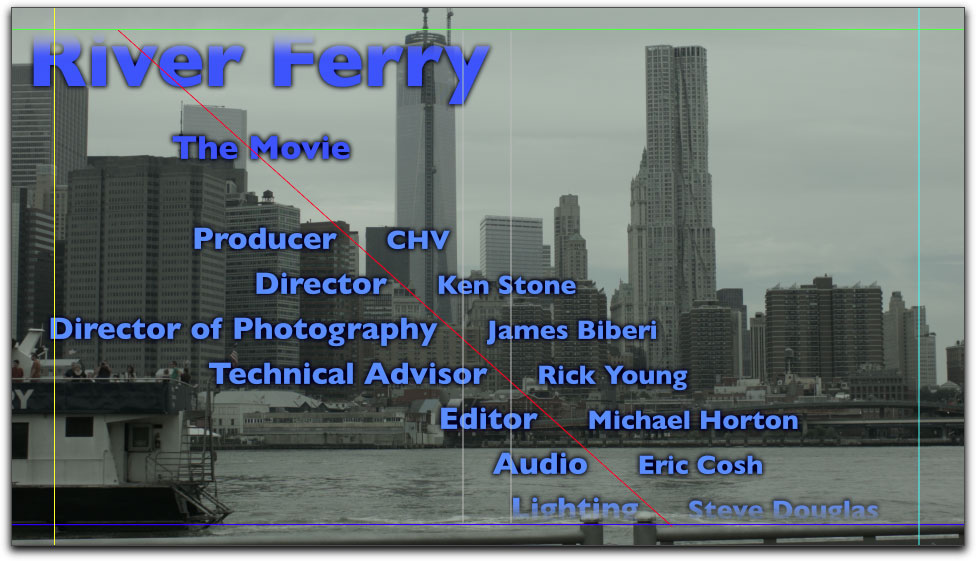
So let's start building our Credit Roll. Scroll down to [Font 1]. I want this first line of text to be my movie title. I have selected Gill Sans as my font, set the size to 60 points and made the font Bold. As I want the movie title to be centered on the screen I have set Alignment to Center leaving Position set at Center. To set the font color click on the Color box, shown below left. This will open the Color window where I have chosen a dark blue color. As I plan to use this same color for some of the text in my Credit Roll, I have clicked on the blue color bar at the top of the window and dragged it down and stored it in the color sample row at the bottom of the window. As the Apple color window is global and accessible to all applications, this custom color will always be available.
Scroll back up to the Text box to enter the text. You can prepare all of your text using a 'plain text' editor and copy and paste into the Text box or you can enter your text directly into the Text box. We want to call up the parameters for [Font 1] for our movie title so we enter
#F1
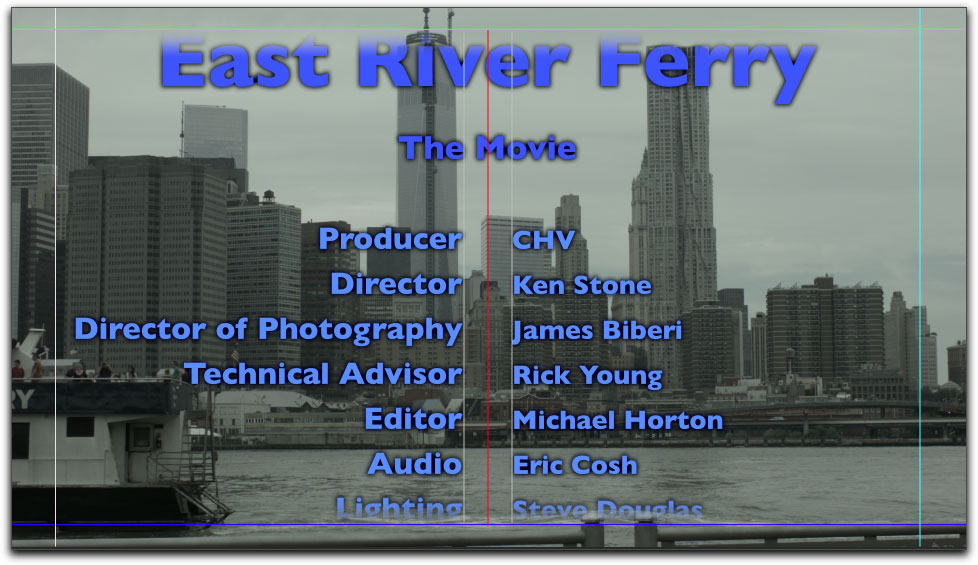
and then the movie title 'East River Ferry' as shown below.
Movie title centered.
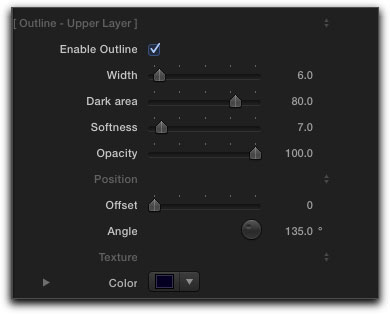
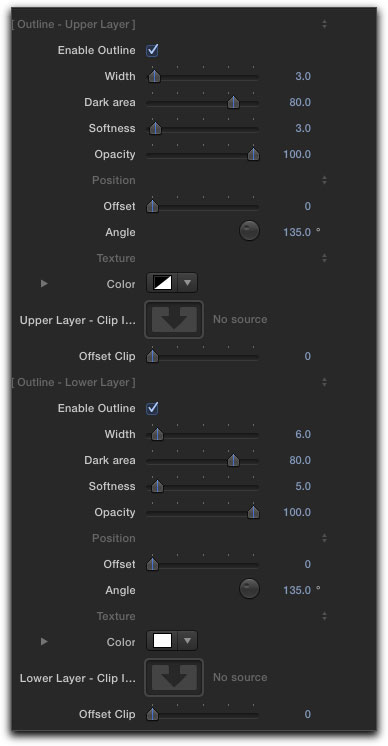
As I want all of my Credit Roll text to have an outline, I have scrolled down to [Outline - Upper Layer], enabled the Outline and adjusted the settings choosing black as my outline color. As the Outline setting is global, all text in the Credit Roll will have this same outline. More on [Outline] later on.
Movie title with black outline.
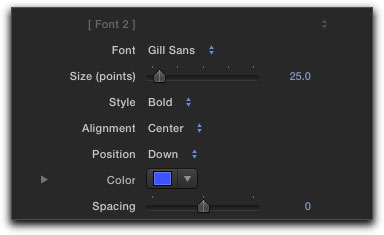
Now to set the sub-title for the credit roll. Scroll back down to [Font 2] and enter your parmeters. As this is a sub-title I have set the font size to 25 points. As I want the color of this title to be the same as the movie title I clicked on the color box to open the Color window and selected the blue color sample at the botom of the window.
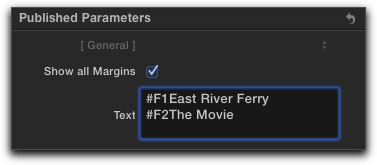
I want to enter the text for my sub-title using the parameters set for [Font 2], so I type into the box.
#F2
and then the text, 'The Movie'. *Note, if you use a 'plain text' editor to create your titles, carriage returns will automatically be applied. However, when you type the text manually into the text box, in order to drop down to the next line, (carriage return), hold down the Option key and hit the Return key.
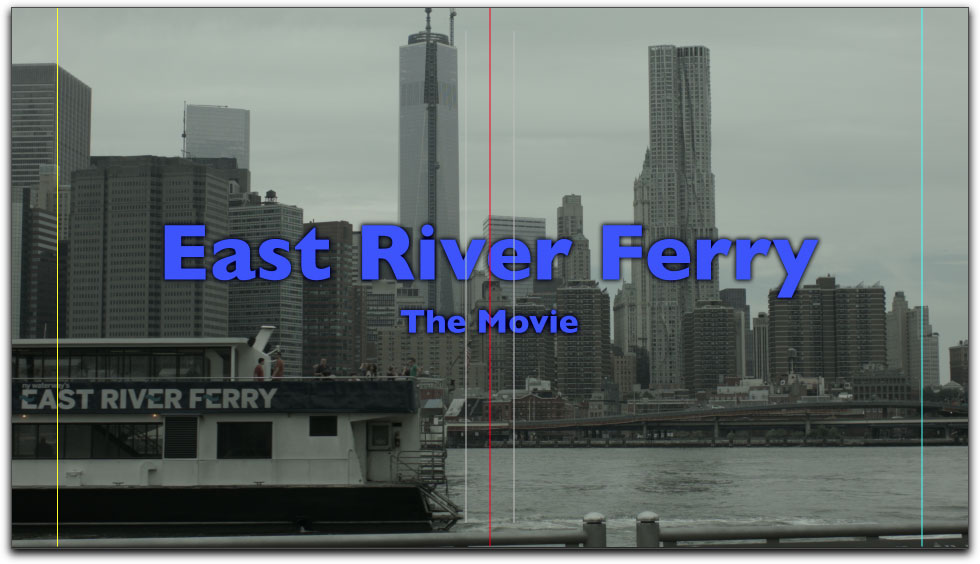
The Viewer now shows both lines of text.
Okay, now I'm ready to built the credits. The column for the job description will be [Font 3]. I have set the Font, Size and the Style to Bold. I have also selected a slightly lighter shade of blue for [Font 3 and 4].

As I want the job description [Font 3] to be left of center gap, I have selected 'Left of Center' in the Alignment drop-down menu.
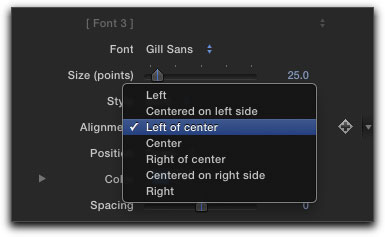
I want the person's name [Font 4] to be right of the center gap

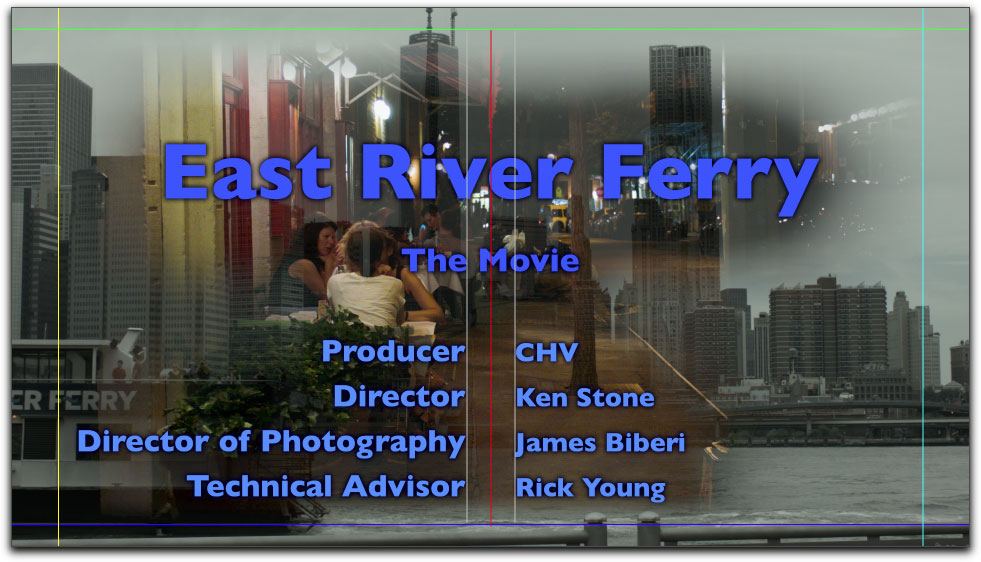
The Viewer now shows text in both the left and right columns.

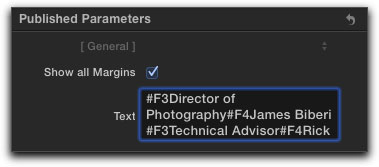
I have now added to [Font 3 and 4]. The text box is very small, use the up and down arrows on your keyboard to move up and down inside the text box.
The Viewer now shows the additions just made.
At default, when the text starts scrolling it appears at the very bottom of the window and scrolls up to the very top. This look can be a little harsh. We have a 'Mask' feature which will enable us to improve the look of our credit roll. Using the 'Top (Green)' and 'Bottom (Blue)' controls we can set where the credits first appear on screen and where they disappear. The Mask feature also has a 'Feather' setting which causes the text to fade in at the bottom and fade out at the top.
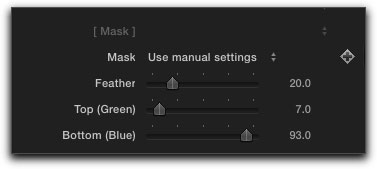
With the Mask margins set to 7 for the top, 93 for the bottom and a feather of 20, you can see below the title fading in at the bottom and fading out at the top.
Another feature of the CHV Text FX plugin is 'Text On Path'. The red vertical line in the center of the screen is the motion path for the scrolling text. Below left the Inspector shown at default, the red line is straight up and down so the text will scroll straight up the screen. Below right, The 'Straight Line' feature in the Inspector is enabled with the 'Top' and 'Bottom' settings adjusted.
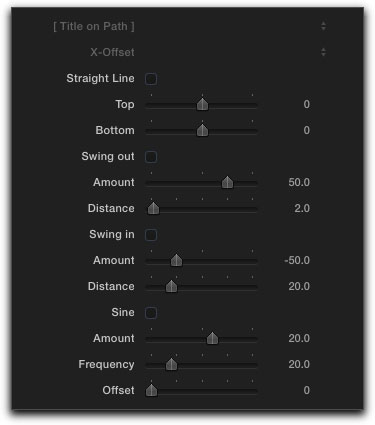
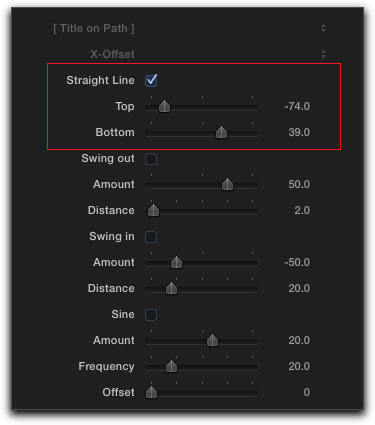
The credits will now scroll from bottom right to top left. There are a number of different ways to configure the motion path to vary the way that the credits will scroll on screen.
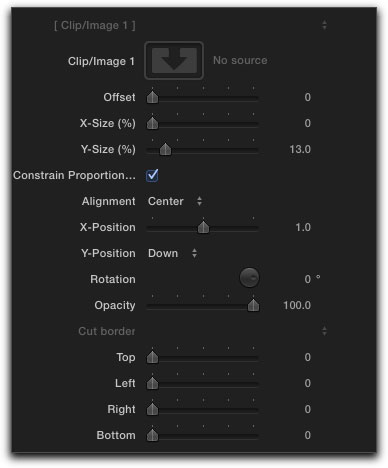
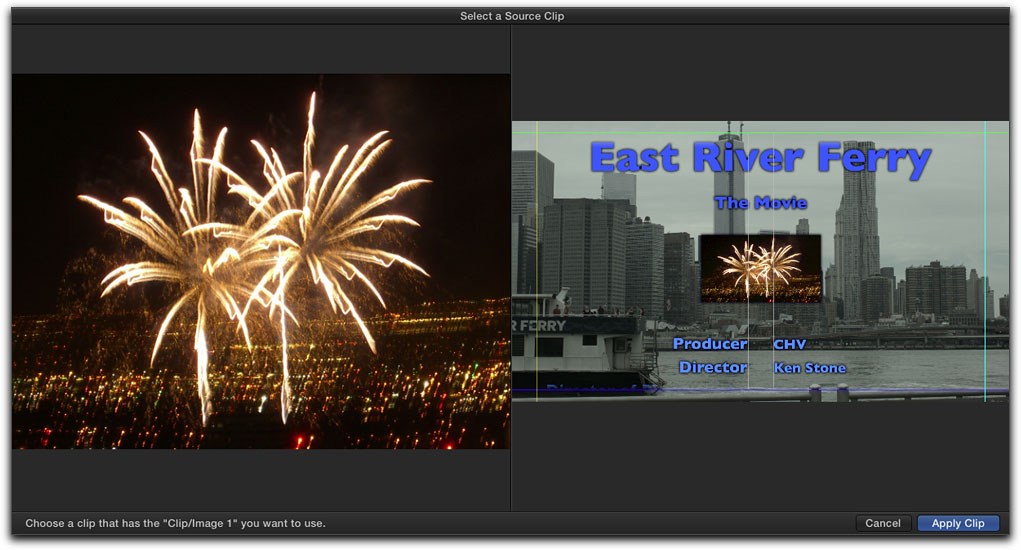
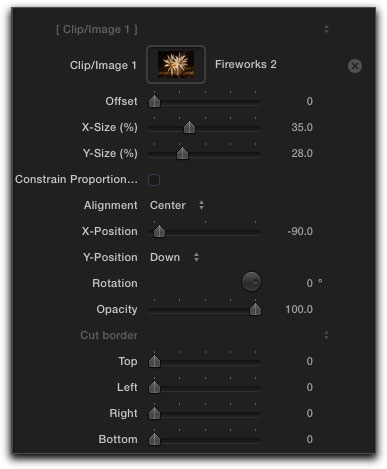
Just as we have the ability to create 9 different text styles we can also add up to 9 different clips or still images into the Credit Roll. Instead of typing #F1, #F2, #F3, etc for text we type #I1, #I2, #I3, etc. for clips or images into the text box. [Clip/Image 1] is shown below left at default. To add a clip or image to the parameter, click in the image well to activate, below right.
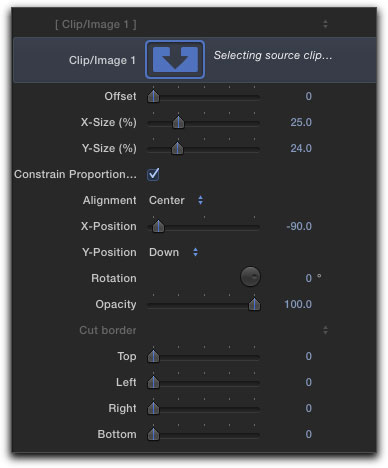
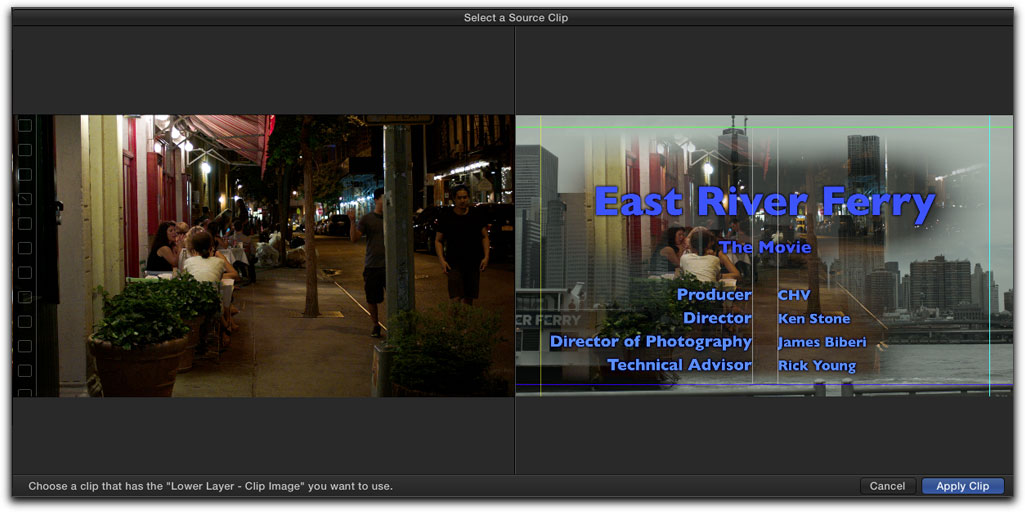
The clip or still image that you want to add to the Credit Roll must be in an Event. Select the clip or still image in the Event and you'll see a two up display. At this point you can choose a different clip or still image. When ready, click on the 'Apply Clip' button bottom right of the Viewer window.
Back in the Inspector, you can see the clip or still image that you have selected. There are a number of controls to adjust the size and position and there is the ability to crop as well (Cut border).
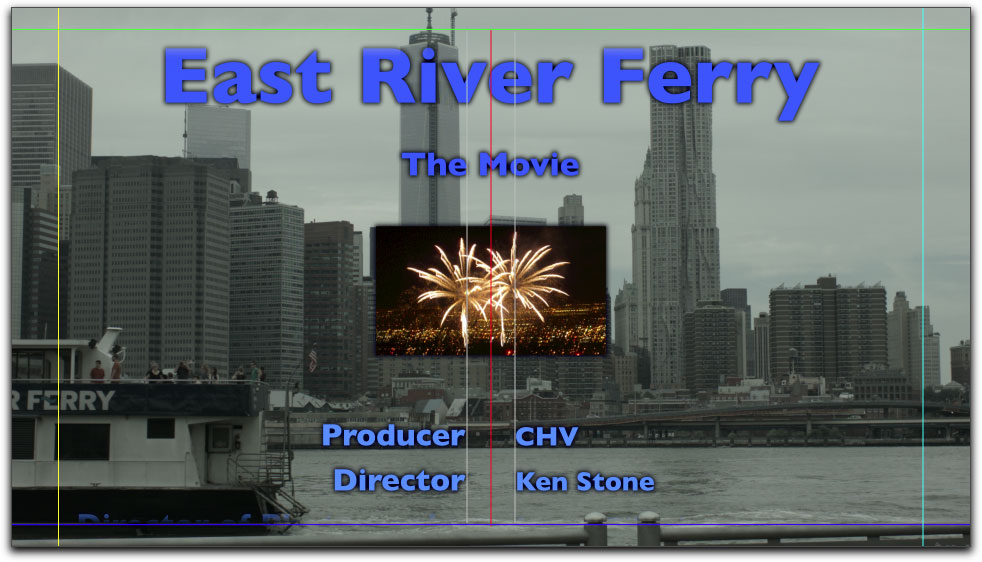
Clips or images will scroll along with the text.
There are two 'Outline' parameters, Upper Layer and Lower Layer which can be used to create outlines around the text, drop shadows and glows. Both the upper and Lower versions do the same thing giving you two opportunities to embellish your text. For example, you can use one to create an outline or drop shadow and then use the second one for a background glow.
Additionally there is a 'clip/image well'. When a clip or still image is placed into the well, the image can then be affected by all of the controls found in the Outline settings window. Let me demonstrate. First click in the image well, red box below.
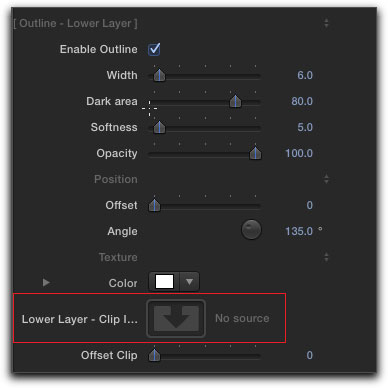
Now in the Event Browser, select the clip or image that you want to work with. This will open the 2 up display in the Viewer window. When you have selected the clip or image that you want, click on the 'Apply Clip' button.
Back in the Inspector your selection will now show in the clip/image well.
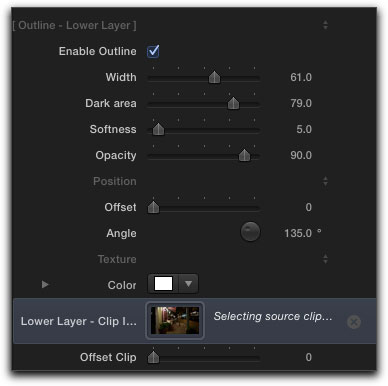
Your clip/image may not show in the Viewer at first. Use the Width slider to enlarge the clip/image. As you do so, the clip/image will start to fill the screen. Using the clip/image well in [Outline] can achieve some very interesting effects.
Final Thoughts
While this is supposed to be a review, because of the importance of the CHV Credit FX plugin, I decided to walk you through some of what it can do.
The Text window, where the text for our Credit Roll is entered, is way too small. Unfortunately, this is a limitation in the way that Apple has implemented the Text entry box in the Inspector. You'll need to use the up and down arrows on your keyboard to navigate through the text.
All of the parameters in the Credit FX plugin are keyframeable, so that effects can be changed over time.
The Credit FX plugin has a large number of effects and parameters, so one finds oneself scrolling up and down the long list. Two of the plugins found in the Text FX package, Credit (Lite) and Sub-Title (Lite), are abbreviated versions, offering just the basics of the Credit or Sub-Title FX plugins, shown below. The Lite version still has 9 [Font] style settings.
Credits and Sub-Title are pre-animated to ensure that the text scrolls properly for the duration of the plugin in the timeline. All other plugins do not have a pre-animated feature. To animate the text you just need to keyframe one or more parameters of the plugin you are using. This way you are not confined to the pre-programmed animations, and you can create any kind of animation to your liking.
There is a 'Sub-Title' FX plugin included in CHV Text FX package. While I have not demoed it here, it is equally as versatile and powerful as the Credit FX plugin, offering all of the same controls and effects.
The CHV TEXT FX Collection offers a number of other plugins that add to the value of the package and are worth checking out. The CHV Credit Roll text plugin for legacy version of FCP was arguably one of the best out there. With the CHV TEXT FX package and the Credit Roll for FCP X, I believe that this still holds true.
Enjoy,
-- ken
copyright © www.kenstone.net 2013
are either registered trademarks or trademarks of Apple. Other company and product names may be trademarks of their respective owners.
All screen captures, images, and textual references are the property and trademark of their creators/owners/publishers.