October 10, 2005
Final Cut Pro & Final Cut Express
By Ken Stone
While there are a multitude of uses for markers in editing, we are going to look at two special types of markers that can be applied to the FCP/FCE - DVD Studio Pro workflow, Chapter and Compression markers. Chapter and Compression markers placed on the timeline are special cues included in an export that will be used by other applications, like DVD Studio Pro, Compressor and even iDVD, for special processing.
Chapter Markers are a great navigational tool. Using the DVD remote control you have the ability to move quickly from one section of a movie to another, either forwards or backwards. Imagine how irritating it would be if you had to fast forward/backwards through the entire movie just to get to a specific location in the movie. Chapter Markers are added to the movie by the Editor at places in the timeline where he or she feels there is a natural break in the story.
Compression markers enable the MPEG2 encoder to do a better job encoding video for DVDs. Compression markers can be added to places in the movie that have fast motion, rapid scene change, transitions (especially dissolves) and other areas of video that would normally be difficult to encode cleanly, without pixelization or artifacting.
As adding Chapter and Compression markers in Final Cut Pro and Final Cut Express involves the same workflow we will cover both types of markers.
When you have finished your edit and are ready to add chapter markers to your timeline, move your playhead to the desired location for your first chapter marker, making sure that no clips are selected. When adding chapter markers to the timeline for either DVD Studio Pro or iDVD, never place a chapter marker at the start of the timeline as DVD SP and iDVD will automatically add a chapter marker at the very start for you. In addition, do not place a chapter marker at or within 30 seconds of the end.
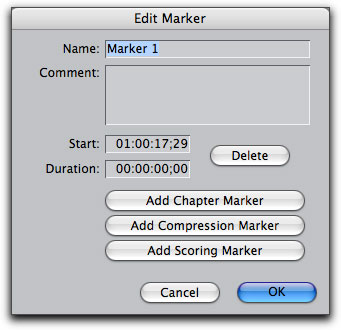
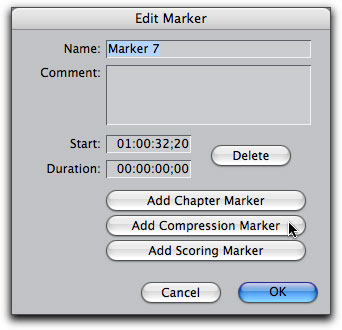
With the playhead set at the proper location for your first chapter marker, press the 'm' key on your keyboard twice. This will set a green marker icon in the ruler area of your timeline and open the Edit Marker dialog box.
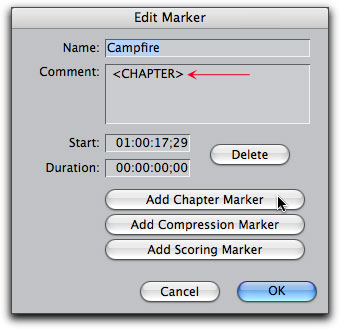
When the Edit Marker box opens it will have the default name of 'Marker 1'. Click on 'Marker 1' to select and give it an appropriate name remembering that this new name will be the name seen in the Chapter Index menu of your DVD. You can change the chapter name later inside DVD SP and iDVD if necessary. After you have named your chapter, click on the 'Add Chapter Marker' button. This will enter the word 'CHAPTER' into the Comment box. Do not change this text, leave as is, red arrow below right.
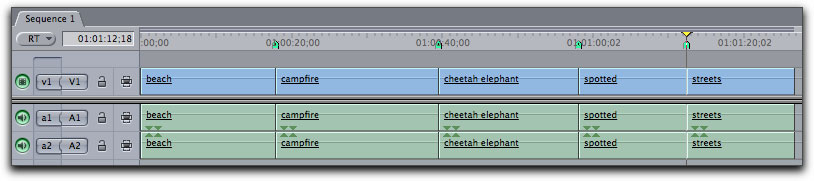
Move down the timeline adding and naming chapter markers to your movie. There must be at least 15 frames between each chapter marker.
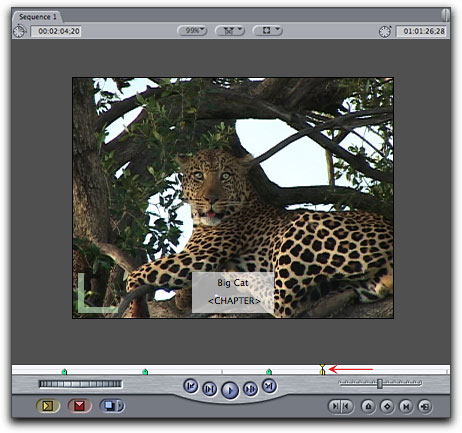
When the playhead is parked on a marker on the timeline a marker overlay will be displayed in the Canvas window. Note that in the Canvas ruler area, the active marker will change from green to yellow.
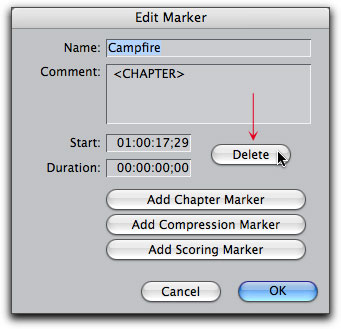
Even after you have set your chapter markers you can revisit any marker and change the name or even delete the chapter marker if necessary. Using the 'Shift m' keys will move you forward down the timeline from marker to marker. 'Option m' will move you back up the timeline from marker to marker. You can also use the shift Up and Down arrows to navigate markers. Once your playhead is parked on a marker, click the m key once to reopen the Edit Marker where you can change the chapter marker name or delete the chapter marker.
When you have set and named your chapter markers and are ready for export, select either the Sequence in the Browser or set In and Out points in the timeline. There are several different ways that you can export your project depending on your choice of DVD authoring software, DVD Studio Pro or iDVD. The first option is exporting as a QuickTime Movie which can then be placed into either DVD SP or iDVD for encoding to MPEG 2.
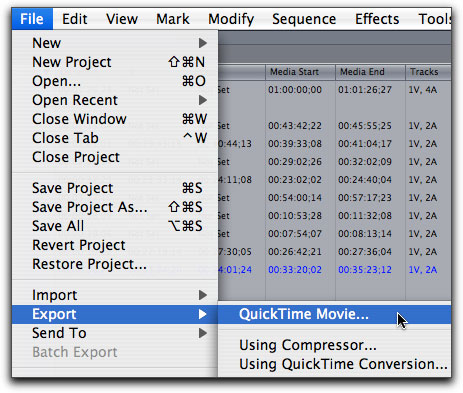
From the File menu > Export > QuickTime Movie, (not "Using QuickTime Conversion").
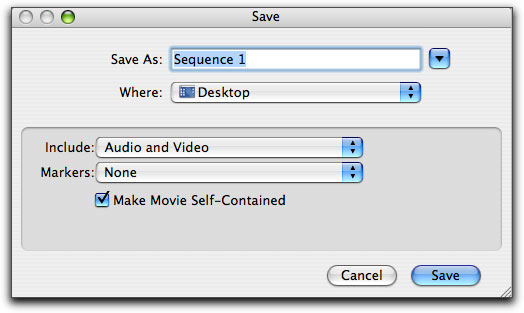
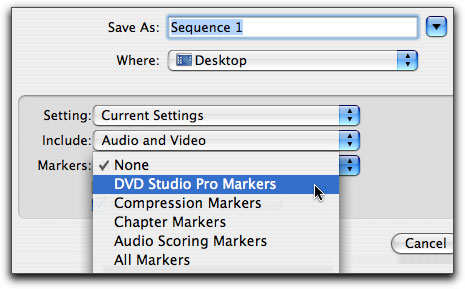
When exporting from Final Cut Express as a QuickTime Movie you will be presented with the Save dialog box shown below. There is a "Make Movie Self-Contained" check box. When this box is unchecked your exported QT movie will be what we call a 'Reference' movie. A reference movie will contain your audio but rather than containing all the video assets as well, it contains only pointers to your video files on your hard drive. A reference movie is small in size and will save on hard drive space but a reference movie can only be used on the same Mac that contains all of the video assets. If you need to move your QT movie to another Mac for any reason, a reference movie will not work as it does not contain any video. When the "Self-Contained" box is checked, the exported QT movie will contain all of the audio and video in your project. While a Self-Contained movie is much larger in file size, it can be moved to another Mac for further work. Generally speaking, if you have the space on your hard drive, I would recommend using a Self-Contained export for use in DVD SP or iDVD as it seems to be a bit more dependable than a reference movie.
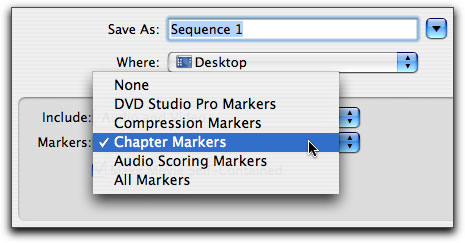
In the Markers drop-down choose "Chapter Markers" for iDVD or choose "DVD Studio Pro Markers" for DVDS SP.
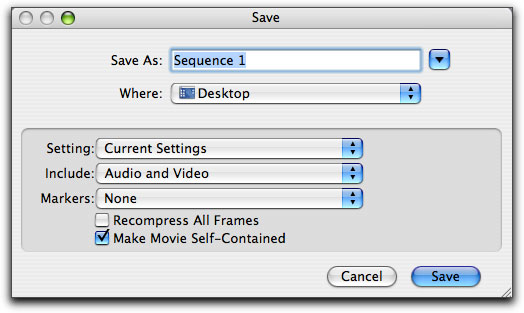
When exporting from Final Cut Pro as a QuickTime Movie you will notice several additional options. In the "Settings" drop-down menu will be a whole host of export options which includes 45 different Codecs for the� conversion to other video formats. As we are dealing with export for DVDs you will want to choose "Current Settings" which will export a perfect, full quality copy of your project. The other option is "Recompress All Frames", always leave this box unchecked.
In the Markers drop-down choose "Chapter Markers" for iDVD or choose "DVD Studio Pro Markers" for DVDS SP.
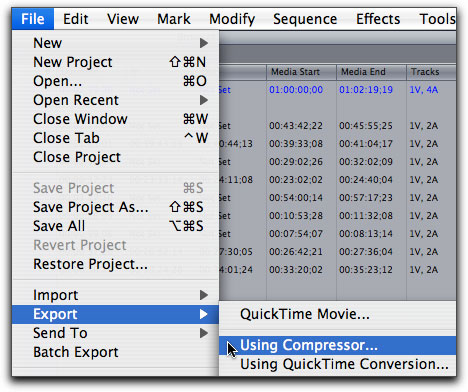
The second option for exporting from FCP and FCE is to export "Using Compressor". This option only works when you are exporting for use in DVD SP, it will not work for iDVD. When you choose to export "Using Compressor" you will not be presented with any type of dialog box (all Chapter and Compression markers will be included in the "Using Compressor" export, automatically). Compressor will launch and FCP and FCE will hand off your project to Compressor. There are numerous advantages to exporting "Using Compressor" rather than as a QuickTime Movie, more on this later.

The MPEG 2 codec, which is the standard format for DVDs at this time, is used to compress the extremely large video files in FCP to much smaller files that can fit on a DVD. The MPEG 2 encoder works by breaking the video into 'Groups of Pictures' or GOPs, normally 15 pictures (frames) per GOP for NTSC and 12 pictures or frames for PAL. The first frame in the GOP is the "I" frame (Intra frame) which, while compressed in a similar manner to still image JPEGs, is still a full representation of that video frame containing all the video information. The remaining 14 pictures or frames in the GOP, which contain only the changes in the video from frame to frame, are of two types, P-frames and B-frames. P frames contain only the differences between itself and the preceding reference frame. B-frames are comprised of the differences between the preceding and following reference frame. As P and B frames contain only the changes from frame to frame until the next "I" frame, they are very small in size and this is what gives the MPEG 2 codec the ability to greatly reduce file size while maintaining video quality.
This process only works well when there is very little changing from frame to frame. The point here is that the "I" frame is the only frame in the GOP that is a fully informational frame. What would happen if your cut (a change from one scene to another) were to fall in the middle of the GOP? As both P and B frames in that GOP are referencing video information from the previous cut, this will result in the encoded video (at the point of the cut) looking terrible, often with large blocky pixels and artifacting, (until it reaches the next I-frame).
This would be a critical issue except for the fact that FCP and FCE can set an "I" frame, also called a Compression marker, at every edit point and at the start and end of any transitions on a cut. This process ensures that each cut will start off with it's own "I" frame and that transitions will have their own "I" frames as well. This ability of FCP to set compression markers at locations where there is a change in video greatly improves the quality of the final MPEG 2 video, but don't look for any markers on your timeline. This process of inserting "I" frames or Compression markers into your sequence happens at the time of export and will act as flags for the MPEG 2 encoder.
When you export as a QuickTime Movie, the Save dialog box offers the option to include markers in the exported QT file. You can choose Chapter Marker or Compression Markers or to include both types of markers, choose DVD Studio Pro Markers from the drop-down menu.
When you Export to Compressor, (remembering that there are no Export dialog boxes), Compressor will include both types of markers for you automatically.
So when exporting from FCP or FCE, Compression markers ("I" frames) are inserted at each edit point and also at the start and end of each transition. This process greatly improves the ability of the MPEG 2 engine to better encode areas of video that have sudden changes. In addition, once in DVD Studio Pro or Compressor, dual pass VBR (variable bit rate) encoding can be used. When dual pass is used, the encoder moves through the video the first time, analyzing the footage and noting places where higher encoding is needed. The encoding process is done during the second pass using the information gathered during the first pass. In addition VBR (variable bit rate) encoding will adjust the bit rate settings depending on the video at that point. Video that has little changing from frame to frame will receive a lower bit rate, thus saving space (file size) for problem areas, which will be encoded at a higher bit rate to accommodate the more difficult video. With FCP and FCE adding Compression markers at each edit and transition and the ability to utilize dual pass VBR encoding, one would imagine that the final results would be free of problems areas of pixelization. Well ... not always.
Even though cuts and transitions are covered and VBR encoding tackles difficult video, there are still areas of video that can encode poorly, with heavy pixelization and artifacting. This would be video that falls between edit points, video that has rapid motion, abrupt changes or even a transition that changes dramatically between the start and end of the transition. Sometimes having an "I" frame at the start and end is just not enough as there could be severe changing during the transition, which is not uncommon and is why transitions can encode poorly.
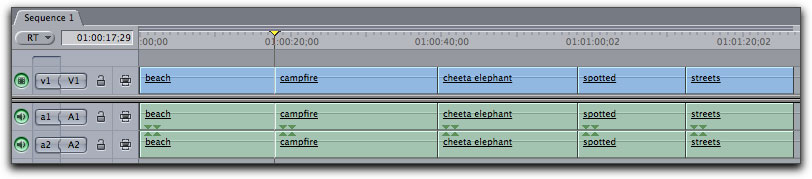
Enter the Compression Marker. It is possible to manually add Compression Markers, also called forcing an "I" frame, to video in the FCP and FCE timeline. Imagine a night time shot, the camera slowly pans across to a group of people sitting around a camp fire. The video frames in this shot are comprised mostly of slowly changing video and would not be a problem to encode except for the fire which has flames flickering rapidly.

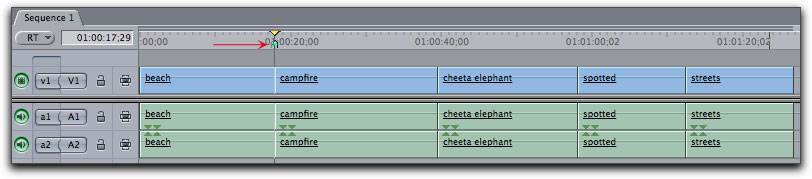
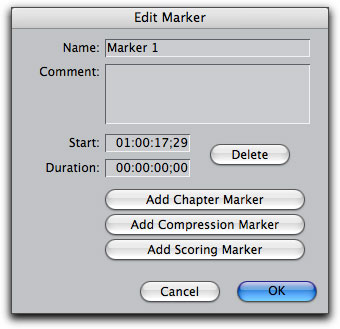
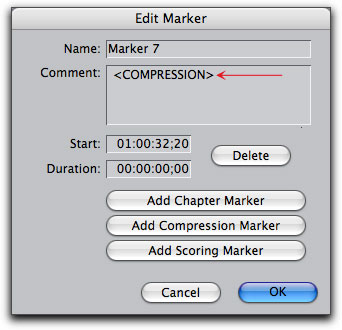
Place your playhead in the timeline at the start of the video with the rapid motion. Being sure that no clips are selected in the timeline, use the left arrow on the keyboard advancing frame by frame until you are at a frame where the image abruptly changes. While on the frame, hit the 'm' key twice to open the Edit Marker window, click on 'Add Compression Marker'. This will enter the word COMPRESSION into the Comment box. Do not change this text, leave as is, (red arrow below right). You can leave the Compression Marker Name as is, as it will not be displayed in the finished DVD or you can change it to a more appropriate name.
You will notice that the green Compression Marker, when added to the Timeline (red arrow below), looks exactly the same as a Chapter Marker, (Scoring Markers are the same as well).
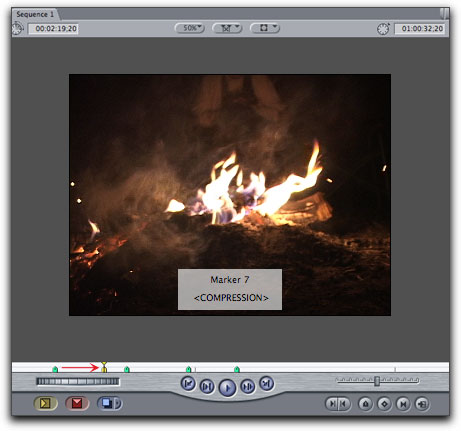
To identify what type of marker is on the timeline, use the 'Shift m' and 'Option m' to move from one marker to another, the Canvas window overlay will display the marker type and name in the Canvas window.
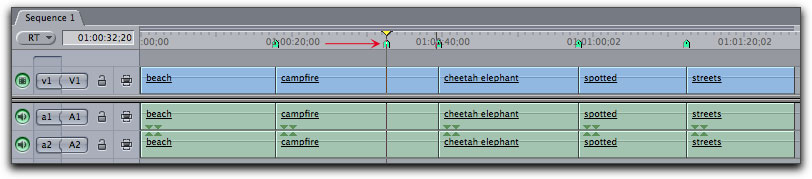
Shown below, I have added three Compression Markers to the campfire section of the clip that has rapid flame changes. This will force an "I" frame at each marker thus improving the encoders ability to compress this difficult section.

Foresight "The ability to predict or the action of predicting what will happen or be needed in the future".
Having the ability to add Compression Markers (forcing an "I" frame) in FCP-FCE is a powerful tool as it enables us to flag problem areas in our video that we feel will need special attention during the encoding process. There is one caveat, (isn't there always). When placing Compression Markers in the timeline we are really guessing at where we think the encoder will have problems because of difficult video. We really don't know for sure because we are looking at video that has yet to be encoded to MPEG 2.
Hindsight "Understanding of a situation or event only after it has happened or developed"
Wouldn't it be nice if we had the ability to employ hindsight to guide us in placing Compression Marks where they would be needed most? Well ... we do. You will remember that I mention that there were numerous advantages to exporting using Compressor, hindsight is one of them.
After exporting your project to Compressor and picking your MPEG 2 encoding Preset, you can review the encoded results in the Compressor Preview window. As you preview your encoded video (rendering on the fly) you will be able to see those areas of video that do not encode well. Based on this preview you will be able to add Compression Markers to the video right from inside the Preview window by hitting the "m" key, just like in FCP. By setting In and Out points in the Preview window, you can actually send out snippets of video for encoding, thus giving you the ability to do small encoding tests to determine not only your basic encoding settings but also placement of Compression Markers for best results.
You can start by adding Compression Markers to those spots in the FCP-FCE timeline where you know that they will be needed. After exporting using Compressor and opening the video in the Preview window, Chapter and Compression markers that were set in FCP-FCE will be displayed in the timeline ruler area of the Preview window. Now you can preview your video and add additional Compression Markers as needed.
Using Compression Markers gives us a powerful tool to improve MPEG 2 compression in problem areas of video as well as improving transitions that can often be difficult to encode properly. Adding Compression Markers should be done judiciously. For example, only place one on a quick pan or fast movement, or add one in the middle of a transition, as transitions will automatically have Compression Markers placed at the start and end. Adding too many Compression Markers defeats the purpose, increasing file size without the relative increase in quality.
Enjoy,
--ken
P.S. Throughout this article I have made references to using Compressor. If you need to learn how to use this application there is an excellent DVD tutorial, "The Art of Encoding Using Compressor".
copyright © www.kenstone.net 2005
are either registered trademarks or trademarks of Apple. Other company and product names may be trademarks of their respective owners.
All screen captures, images, and textual references are the property and trademark of their creators/owners/publishers.