
January 2, 2006
By Ken Stone
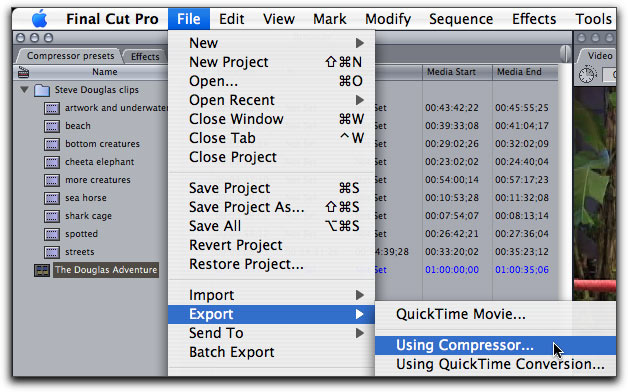
There used to be a number of different ways to encode a finished FCP movie for DVD delivery. One common method was to export directly from FCP through QT to MPEG 2, but with the release of QT 7, this option is no longer available. This leaves us with two options. 1) export from FCP as a QuickTime movie, not with Conversion (File Menu>Export>QuickTime Movie) then import into DVD SP for MPEG 2 encoding. 2) export from FCP to Compressor (File Export>Using Compressor). In either case you must select the sequence in the browser before exporting. Also keep in mind that if you have any In and Out points set in the sequence only the portion between the In and Out points will be exported.
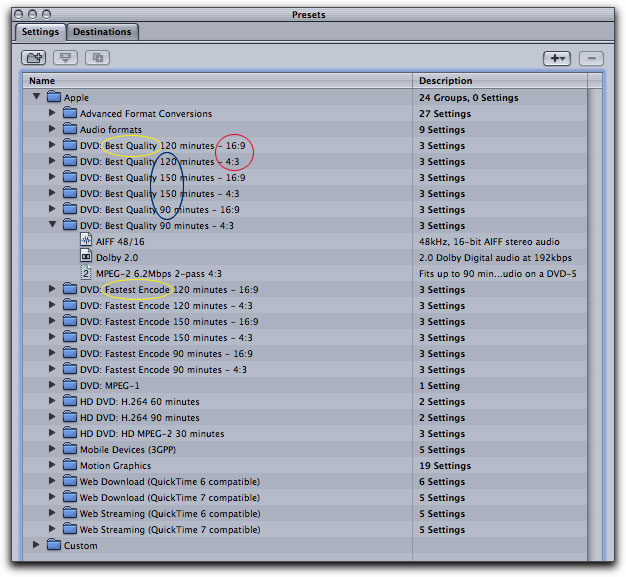
In Compressor, we use the Batch window to either select a preset or modify an existing preset, but before we go to work we should look at the Preset window which gives us an easy-to-read listing of all the presets available to us. Even though we will be working in the Batch window and not in the Preview window, lets take a look. If the Presets window is not open, Menu > Window > Presets, or Command 2 from the keyboard. With the settings tab active we see a number of DVD encoding presets which are divided into two main groups, 4:3 and 16:9 aspect ratios, (red circle). For both of these primary selections we are offered three settings for the duration of our movie, 150 minutes, 120 minutes, and 90 minutes (blue circle). The last option is for Best Quality or Fastest Encode (yellow circles).
Having these presets is a great time saver but there does seem to one preset missing, a preset for 60 minutes or less of video . As I often burn DVDs that are 60 minutes or less, I want to have a special preset for this duration. Because 60 minutes of video takes up less space on a DVD than 90 minute of video, I want to devote this extra space to my video encode (higher bit rate setting), to increase the quality a little bit more. It is possible to build a custom preset from scratch in the Preset window but it is easier to select a preset that is close to what you want, modify the preset for your specific needs and then Name and Save the preset for future use.
Building a MPEG 2 Preset
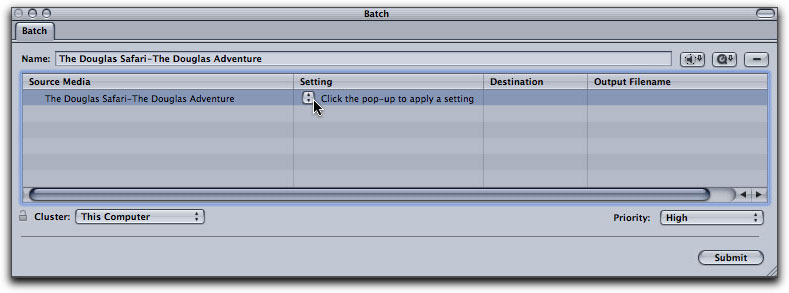
We will work in the Batch window to modify an existing preset and then Save it as our new 60 minute preset. After exporting to Compressor from FCP, Compressor will launch, opening the Batch window. The exported movie (Project and Sequence name) will appear in the left hand column 'Source Media' pane. The next pane to the right, 'Settings', is where we will select our MPEG 2 and audio encode presets.
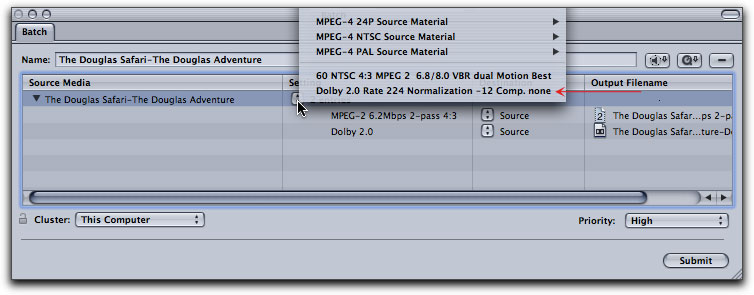
Click on the 'Settings' drop-down menu to display all the same presets found in the Presets window. From the drop-down I have chosen "DVD: Best Quality 90 minutes - 4:3 / MPEG-2 6.2 Mbps 2-pass 4:3", as this is the closest preset to the one I want to build (a 60 minute version). I will be modifying only one item in this preset, the MPEG 2 bit rate settings. It is important to point out that prepping a movie for DVD requires two encodes, one for video and the other for audio. We will start with the video encode by selecting the MPEG 2 video encode.
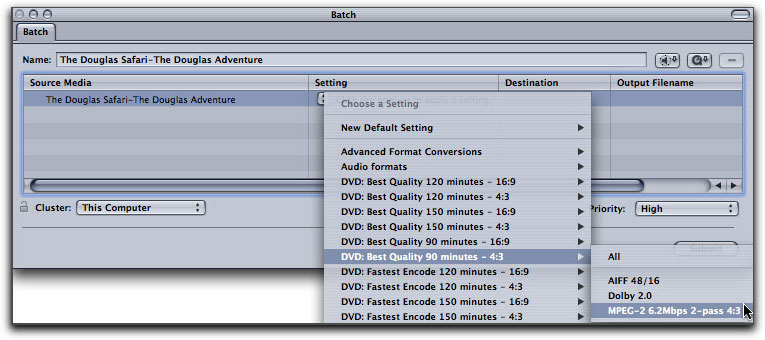
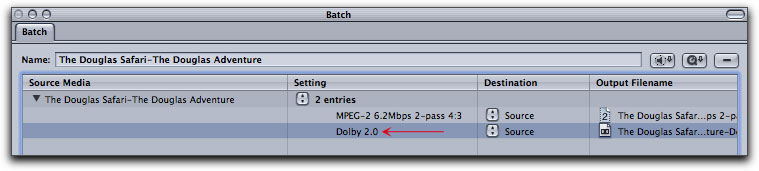
Our MPEG 2 preset is displayed in the Settings pane of the Batch window.

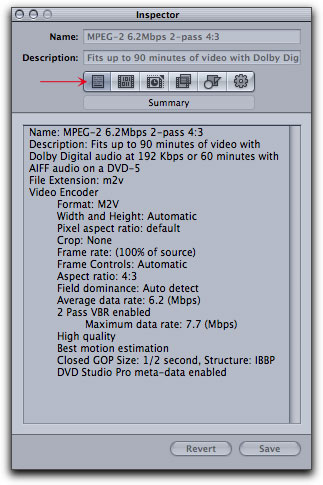
Select the "MPEG-2 6.2 Mbps 2 pass 4:3" setting in the Batch window (above), to open it in the Inspector window (Option-Command-I from the keyboard to open the Inspector window). With the Summary tab selected in the Inspector, we find all of the settings for this MPEG 2 preset. Look closely at the Summary information, you will see that there is a qualifying factor, the type of audio that will be used with the video encode, either AIFF or Dolby 2.0 (AC3). We will return to the audio issue after we have created our 60 minute MPEG 2 encode preset.
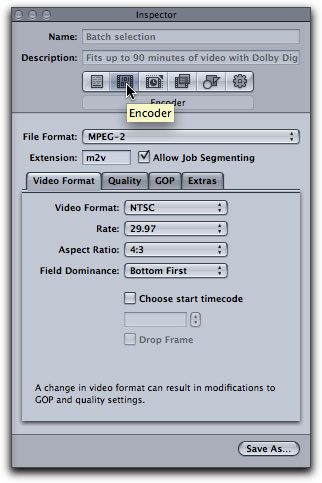
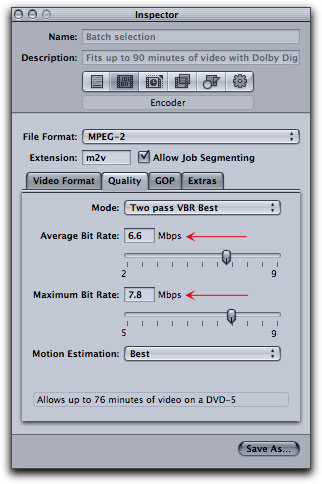
Chose the Encoder button in the Inspector. The encode section has four tabs and defaults to the Video Format tab. For my new preset these 'Video Format' settings are correct. Clicking on the Quality tab will provide access to the bit rate settings that I want to change. As shown below right, the Average bit rate is 6.2 and the Maximum bit rate is 7.7 (this is the setting for the 90 minute preset).
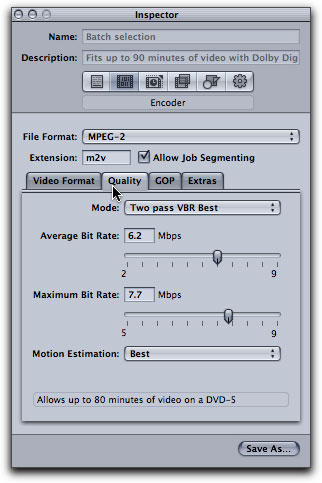
A 'Bit Budget' calculator tells me that for 60 minutes of video, 60 minutes of Dolby 2.0 audio and one minute of motion menus, my average bit rate should be 6.6 and my max bit rate 8.0. But there is a caveat. Even though a maximum bit rate setting of 8.0 is mathematically correct, experience has taught us that in order for our finished DVDs to be the most compatible with the DVD players out there, a maximum bit rate setting of 7.8 is as high as we should go, so I am using 7.8 as my max bit rate. I have entered these new figures into the Inspector, shown below. Click on the Save As button, Name and Save.

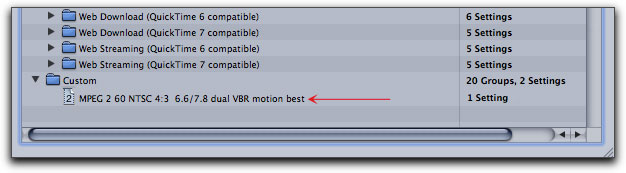
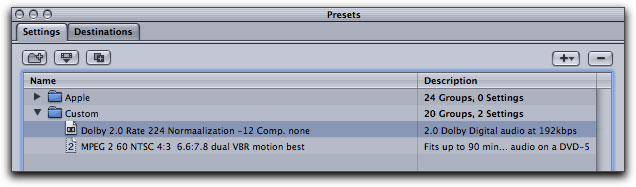
After you have Saved this new preset, it will be added to the Custom folder in the Presets window.
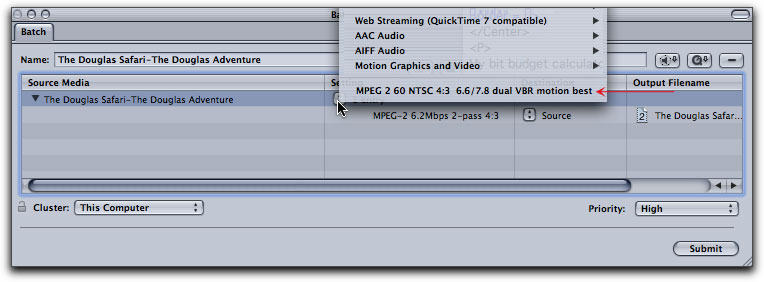
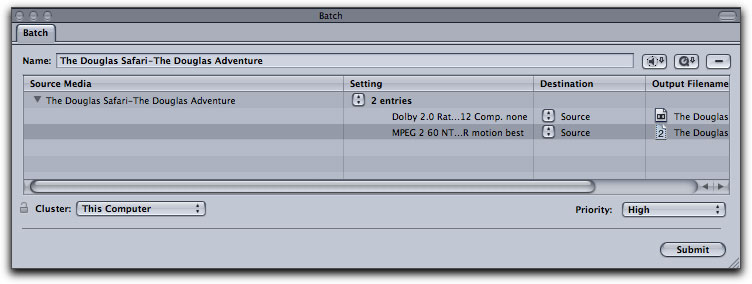
The new preset will now also show in the Settings drop-down menu in the Batch window (below). When we make a change to a preset in the Inspector, that change will be reflected in the encode if the 'Submit' button is clicked. So making a change in the Inspector works for a one shot encode. After encoding is done and Compressor is quit, that temporary change is lost. Because we have Saved our modified setting, the next time we will be able to simply select our new MPEG 2 preset.
Building an Audio Encode Preset
Each of the DVD encoding presets includes two audio formats, AIFF 48 kHz 16 bit, a common standard for FCP movies and Dolby 2.0 (AC3) which is an excellent audio compressor that reduces the audio file size to 1/8 the size of AIFF 48 kHz 16 bit. Reducing the audio file size provides additional room on the DVD that can be used for a higher MPEG 2 encode, thus yielding higher quality video playback.
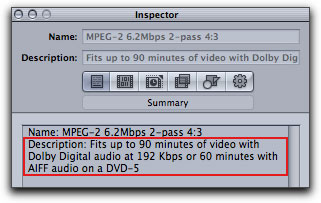
Going back to the standard MPEG-2 6.2 Mbps 2-pass 4:3 preset in the Summary window in the Inspector, we see that this preset is qualified, depending on which of the two audio options you chose. This preset can be used for 60 minutes of video if the audio file is AIFF or 90 minutes of video if the audio used will be Dolby 2.0 (AC3). This does demonstrate the space savings when Dolby 2.0 is used.
So why not simply choose the Dolby 2.0 preset and be done with it. There is a reason that we need to build a new Dolby 2.0 preset. One of the default settings in the existing preset is incorrect for DVD audio. In addition there are several other setting that we may want to modify.
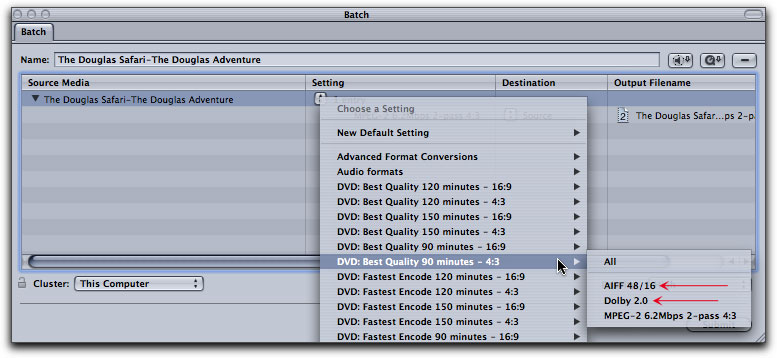
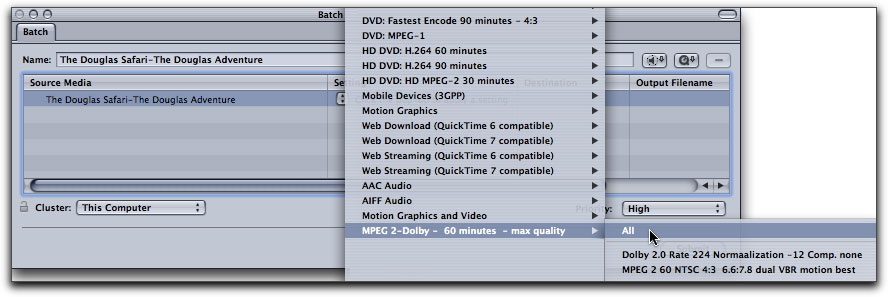
From the Settings drop-down menu in the Batch window, select Dolby 2.0 from the preset list.
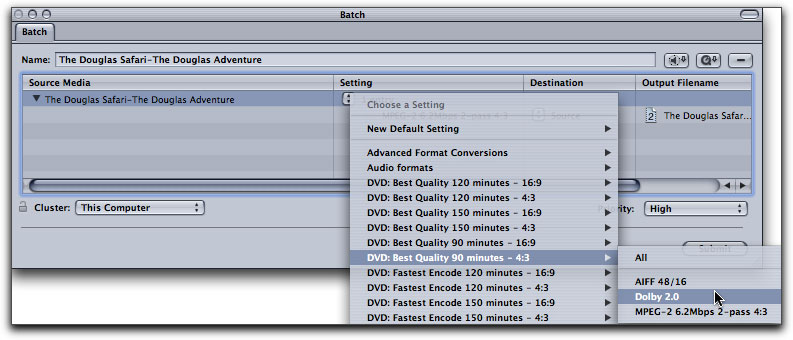
It will now be added to the 'Settings' column in the Batch window.
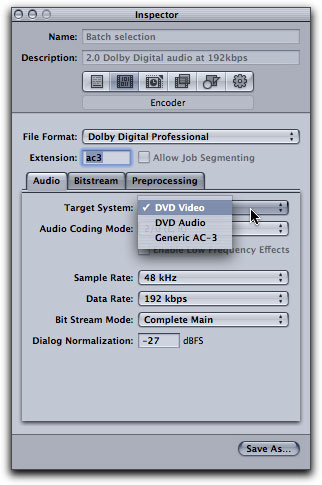
Selecting Dolby 2.0 setting in the Batch window will open it up in the Inspector window. Click on the 'Encoder' button and then select the Audio tab. As shown below left, these are the stock settings for this Dolby 2.0 preset. The first setting to look at is 'Target System'. If the audio we are encoding belongs to a video track then we want our Target to be 'DVD Video'. If the audio does not belong to a video track, but will be used, for example with a menu, then the Target should be 'DVD Audio'. In this case I am selecting DVD Video. The 'Audio Coding Mode' should remain 2/0 (L,R) which is for standard two channel stereo audio. Compressor can encode up to 5 discreet audio channels for a Surround Sound experience but you must create the surround files in another app before you can apply a surround preset.� We will want to leave our Dolby 2.0 audio sample rate set to the default 48kHz (16 bit) as this is the standard DVD audio sample rate.

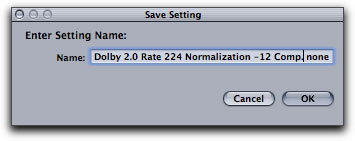
The next setting to look at is the 'Data Rate' which defaults to 192 kbps. While this is good quality audio, we can push it up for just a little better audio quality output by selecting 224 kbps. Moving this setting higher than 224 kbps will not produce a discernible increase in audio quality, but would take up additional space. The other setting that we need to change in this tab is 'Dialog Normalization' which defaults to -27. Admittedly the 'Dialog Normalization' is a bit confusing. If you set your FCP dialog audio peaks to -12 (using the audio meters), then you'll want to use -12 for the 'Dialog Normalization' setting. 'Dialog Normalization' does not normalize the audio volume within an audio track, but rather sets normalization for each different track of the DVD so that the dialog volume of each track is the same. A setting of -31 will turn off Normalization completely.

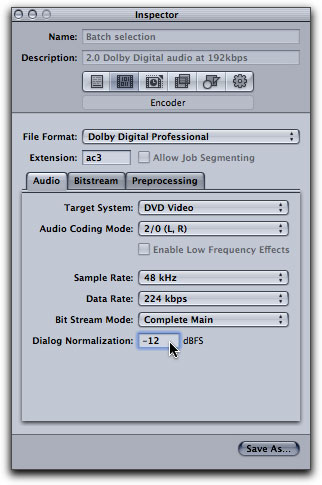
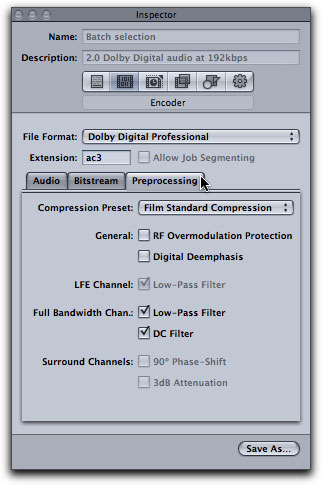
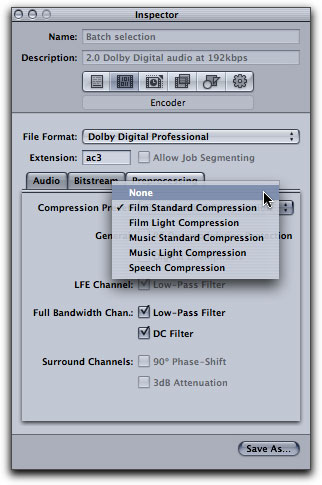
We can leave the Bitstream tab settings as they are. It's in the 'Preprocessing' tab that we must change the default setting if our audio is intended for DVD delivery. The Dolby (AC3) audio format was developed for the film industry and so the 'Compression Preset' defaults to 'Film Standard Compression'. A film shown in a theater has a greater audio dynamic range than the audio found on DVDs. Misuse of these audio Compression Preset can cause "gain pumping", which is the unwanted change of volume levels of dialog. For Dolby, 2 channel stereo DVD audio, click on this drop-down menu and select 'None' for your Compression Preset. (If you are building a Dolby 5 channel Surround Sound DVD then you will use the 'Film Standard Compression'.) Regardless of the Dolby 2.0 preset chosen in either the Preset or Batch window, this audio setting must always be modified if you are using 2 channel stereo audio for DVD delivery. Building a proper DVD audio Dolby preset will save time and insure that its settings are correct.
Save as
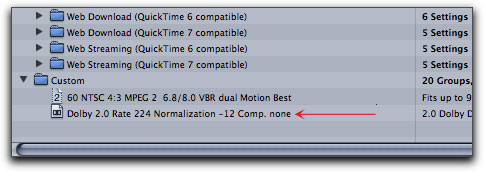
After you have Saved this new preset, it will now show up in the Custom folder in the Presets window.
It will also show up in the Settings drop-down menu in the Batch window.
New Settings Group
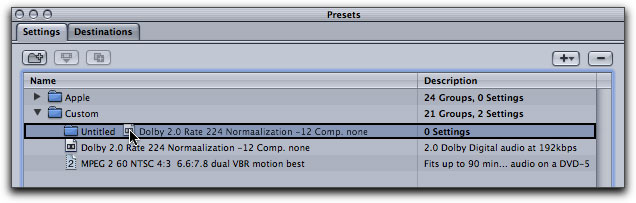
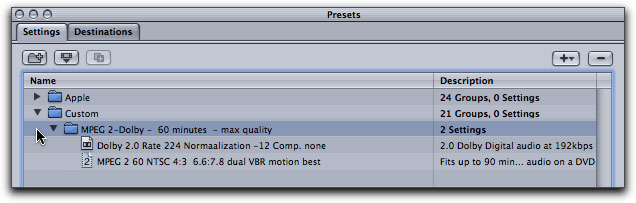
Now that we have built our MPEG 2 and Dolby 2.0 presets there is one more chore that will make using these new presets easier. In the Preset window we are going to 'Create a new settings group'. Opening the Presets window now displays our two new presets in the Custom folder.
Click on the 'Create a new settings group' button.

A new Untitled folder is created.

Drag the new presets into the folder.
Select the folder and in the Inspector, give this a descriptive name.
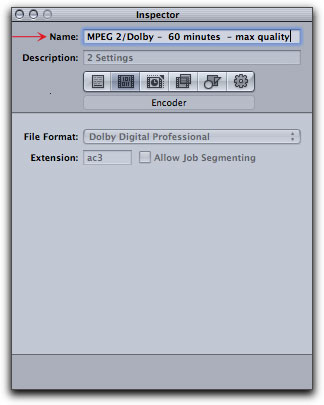
New preset named in the Preset window.
The next time you export from FCP to Compressor and the Batch window opens, you will be able to select the new presets and by selecting 'All', your new video and audio presets will be applied together.
Learning Compressor
The different applications in Final Cut Studio share similar interface layouts and are basically intuitive to use, but this is not the case with Compressor. Compressor is a utilitarian application, it's a bit like the inside of an internal combustion engine and as such, a manual is highly recommended. The Art of Encoding Using Compressor is an excellent tutorial and I refer to it more often than I care to admit. (grin)
Enjoy,
--ken