

Compressor January 19, 2004
Using Compressor to encode MPEG-2 Files
Compressor, which ships with both Final Cut Pro 4 and DVD Studio Pro, is an excellent professional utility designed to encode video into MPEG-2, the format required for DVDs. Compressor uses the same MPEG-2 encoder embedded in DVD Studio Pro, but gives you more control over the encoding parameters. In addition, you can export directly from Final Cut Pro into Compressor to avoid rendering into the DV codec. This allows you to create the highest-quality MPEG-2 footage for your DVD.Compressor is not the only way to encode FCP video footage to MPEG-2, since DVD Studio Pro also includes the QuickTime MPEG-2 Encoder. This encoder can be used to directly export MPEG-2 from FCP, or to encode in the background while you work in DVD Studio Pro. This process, which combines the simplicity of iMovie with professional control over the quality and bit rate of your encoded footage, is covered in Authoring with DVD Studio Pro 2 - Basic Mode
Although SP2 uses the same MPEG-2 encoder, Compressor gives you more control and quality. In addition, there are certain situations in which you must use Compressor. If you are working with widescreen or 24P footage, Compressor will encode them properly, while DVD Studio Pro's background encoder may not.
There are several other advantages to Compressor. For one, you can batch process several files at once. This is an excellent feature if you have multiple video files to encode, or if you want to encode a single video file using several different settings to compare.
Installing and Updating Compressor
Before working with Compressor, you should update so that you are using the latest version. At the time of this article, the latest version was Compressor 1.1, which changed several of the presets from earlier versions. The most reliable way to update Compressor is to run Software Update.If you installed DVD Studio Pro 2 after updating Compressor to version 1.1, then you may need to run this fix: http://docs.info.apple.com/article.html?artnum=93234
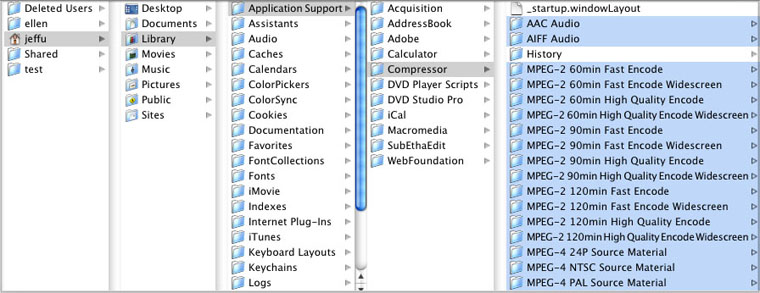
Finally, you will want to update your Compressor presets. If you launched any version of Compressor previous to 1.1, then your presets are outdated. To update the presets, first quit Compressor. Navigate to your Home > Library > Application Support > Compressor folder. Select all of the preset folders and any files with a ".setting" or ".group" suffix, and move them out of this folder. You can move them to Trash, or create a new folder on your Desktop to hold them temporarily.
Trashing the old Compressor presets
Exporting a QuickTime Movie
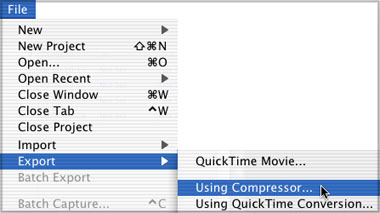
There are several options for getting your footage from Final Cut Pro into Compressor. You can simply export as a QuickTime Movie (formerly known as a Final Cut Pro movie). Compressor will accept files in any QuickTime format, either self-contained or reference movies.To export a QuickTime movie, first select a clip or sequence. In Final Cut Pro 4, choose File > Export > QuickTime Movie. In Final Cut Pro 3 or earlier, choose File > Export > Final Cut Pro Movie. Even though the names have changed, these are the same option; note that they are both the very first option in the Export submenu.
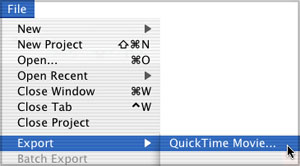
From Final Cut Pro 4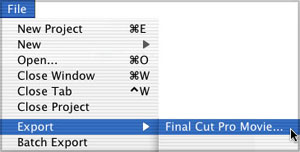
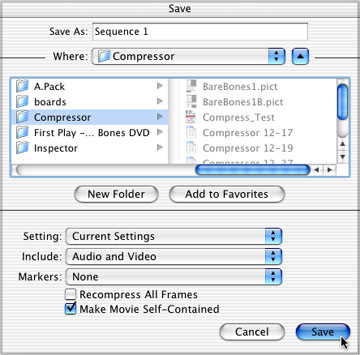
From Final Cut Pro 3Choosing one of these options will open the QuickTime Export Dialog Box. Name your file and choose a location. Leave Setting and Include to their default settings.
QuickTime Export Dialog Box
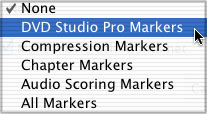
The Markers pop-up menu lets you choose which kinds of markers will be exported with your QuickTime. There are two kinds of markers that you can export: Chapter Markers and Compression Markers. Chapter markers are markers that you manually add to your clip or sequence in order to create separate chapters in DVD Studio Pro.
To add a chapter marker in FCP, place your playhead at the position on the Timeline that you want to mark as the start of a scene. Now tap the 'm' key on the keyboard twice to set a marker and open the Edit Marker window.
Adding Chapter Markers in Final Cut Pro
In the name section enter the name of the chapter, remembering that this is the name that will appear in SP2 when you import. Next, click on the 'Add Chapter Marker' button, this will set the chapter marker and will enter "(CHAPTER)" into the comment box. Leave this exactly as it is as this comment is needed for the process of embedding the chapter markers. Click OK and move your playhead to the next position and repeat the process. Do not add a chapter marker at the beginning of your sequence, since SP2 will automatically add one of its own.
The Edit Marker dialog box

Compression markers will not show up in DVD Studio Pro; instead they are used to force the creation of I-frames during encoding, which can greatly improve the MPEG-2 quality. Final Cut Pro will automatically create a compression marker at each edit point, and at the beginning and end of each transition. To select both Chapter and Compression markers, choose DVD Studio Pro Markers. You should export compression markers unless you are creating multiple-angle tracks.
Markers pop-up Menu
Exporting Directly to Compressor with Final Cut Pro 4
There is a second option: Final Cut Pro 4 allows you to directly export to Compressor. This is not an option in previous versions of Final Cut Pro or Final Cut Express. The advantage of using this method is that transitions, effects, titles, and other "renderable" footage will be send directly to Compressor without rendering into DV or other codec. This will greatly improve the quality of the footage.The disadvantage to using this method is that Final Cut Pro will be disabled for the duration of the encoding process, since FCP must process each individual frame and hand it to Compressor for encoding. In addition, encoding in this way does take more time than encoding from a QuickTime movie. If you want to maximize quality and are not concerned about encoding time, choose this method.
To directly export from Final Cut Pro 4, select a clip or sequence and choose File > Export > Using Compressor. Your selected clip or sequence will be automatically added to the batch window in Compressor where you can apply compression presets as described below. Any chapter markers or compression markers will be automatically included.
Export Using Compressor
Compressor
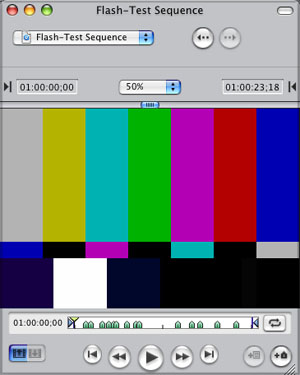
When Compressor first launches, you are presented with the Batch window, which is Compressor's main window. At the top of the window are a row of tools that open Compressor's other windows: Presets, Destinations, History, Preview, and Batch Monitor.Compressor's Batch Window
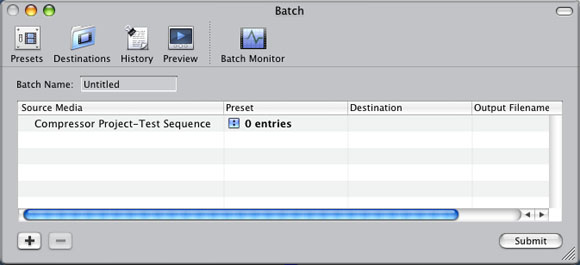
To import files, simply drag them from the Finder into the white area of the Batch window. If you exported directly from FCP 4, your clip or sequence will be automatically placed into the Batch window. My exported sequence was automatically given the name "Compressor Project-Test Sequence."
Don't let the name "batch" throw you off; Compressor can encode a single file as easily as a hundred! However, the nuances of working within a batch window can be a bit tricky, so bear with me. To begin with, all the items in the Batch window comprise one batch, which defaults to the name "Untitled," an ungraceful name if I've ever heard one. Click in the Batch Name field to rename your batch.
A Batch containing one Item with three entries to be encoded
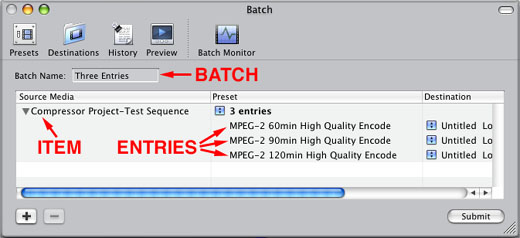
Each QuickTime file, clip, or sequence is called an Item; in this case, my untitled batch contains a single item called "Compressor Project-Test Sequence." Each item can contain one or more "entries," each of which will result in one compressed file. So, if I apply three separate presets to my Item, Compressor would encode the same item into three separate files. The entire batch will be submitted for processing as a unit, no matter how many items or entries the batch contains.
Choosing a Preset
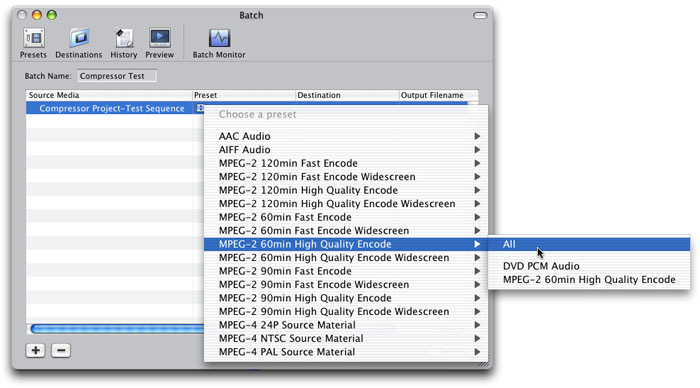
The first step in encoding is to choose a Preset for your item. To choose a preset, click the little blue arrow under the Preset column in the Batch window. This will open a nested menu containing all of Compressor's presets.Choosing a Preset
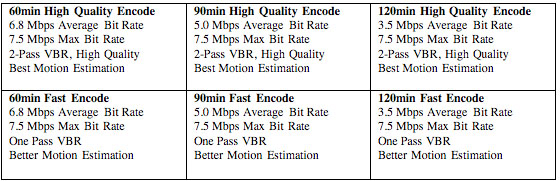
While the list might seem intimidating at first, the presets are divided into manageable groups. Most of Compressor's presets are MPEG-2 presets, and these are divided into 120min, 60min, and 90min categories. Use the 60min setting if you will have less than 1 hour of footage on your DVD. Use the 90min setting for 60-90 minutes, and the 120min setting for 90-120 minutes.
Each of these sets contains Fast Encode and High Quality Encode versions. As these names suggest, the Fast Encode settings will encode more quickly and the High Quality Encode settings will give you better MPEG-2 quality but will take longer to encode. I use the Fast Encode settings only when creating draft quality media and need to encode in a hurry.
The sets also include normal (4:3) and Widescreen (16:9) versions of each of these sets. Choose the version that corresponds to the aspect ratio of your footage. So, choosing from Compressor's MPEG-2 presets is a matter of knowing how much footage you have, how quickly you want it encoded, and the aspect ratio. For instance, if I have a 27 minute 4:3 sequence to encode, and I want the best possible quality, I will choose MPEG-2 60min High Quality Encode.
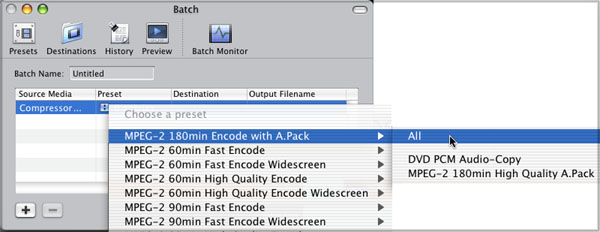
As you keep your mouse held down, you will notice that each of these Encode settings actually contains three choices: All, DVD PCM Audio, and the MPEG-2 Encode preset. The MPEG-2 Encode choice will encode your video into an MPEG-2 file. The DVD PCM Audio setting (identical for all presets) will extract the audio track from your video and save it as a stereo AIFF file; you will import this into DVD Studio Pro along with your MPEG-2 file, or encode it to AC-3 using A.Pack. The "All" setting will simultaneously encode video to MPEG-2, and extract and save the audio as an AIFF. Choosing All will create multiple Entries in the Batch Window for the Item.
The MPEG-2 and PCM Audio presets

Note that you must select an encoding preset; you cannot set encoding parameters "on the fly." However, you will learn how to modify existing presets and create your own from scratch.
Choosing a Destination and Output Filename
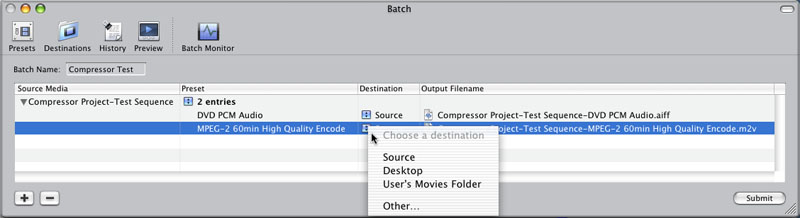
The second parameter to set is the Destination, or where the encoded files will be saved. Click the blue arrow in the Destination column to choose from the existing preset destinations: Source, Desktop, or User's Movies Folder. Choose Other to specify a new location on the fly. Later, you will learn how to customize this Destinations pop-up menu.Setting the Destination for a preset
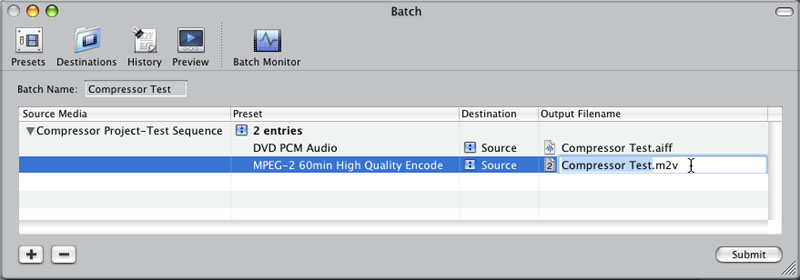
The third parameter is the Output Filename, or what the encoded files will be called. Setting a Destination will automatically generate an output filename. Each destination has a formula for figuring out the name; Compressor's presets use Source File Name + Preset Name. This gets very unwieldy since Compressor's presets are awfully long. Double-click on the existing name to change it. For best results, name the MPEG-2 and AIFF files using the same root name so that DVD Studio Pro will automatically relink them. For example, "Compressor Test.aiff" and "Compressor Test.m2v."
Setting the Output Filenames for the Batch items
Submitting and the Batch Monitor
When you are satisfied with your items and presets, click the Submit button at lower right. This will automatically launch the Batch Monitor, which is a separate application designed to manage submitted encoding jobs.The Batch Monitor with a submitted encode
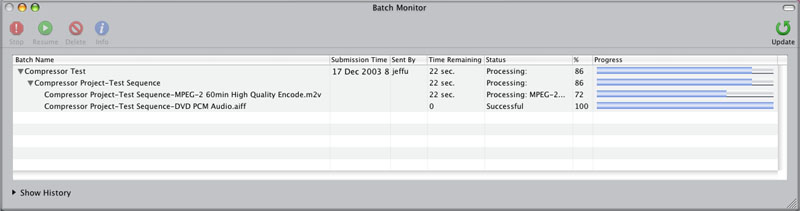
The Batch Monitor constantly updates information about your encoded batches. Note that you can have multiple batches in the Batch Monitor, each containing its own Items and Entries. At the top are four buttons: Stop, Resume, Delete, and Info. The Stop, Resume, and Delete buttons will pause or continue encoding selected batches, or remove them from the encoding process entirely.
Once a batch has been submitted, clicking on the Info button will display a redundant window that mirrors the same data that is in the Batch Monitor. It is the Batch Monitor that will encode your files and continually update the status of submitted batches.
Presets Window
Click the Presets button at the top of the Batch window to open the Presets window. Here you can view and modify details for each of the encoding presets in SP2, and you can create your own presets. The presets are arranged in folders called Preset Groups, each of which contains an MPEG-2 and PCM Audio (AIFF) preset. You can create new groups (folders) and new presets for all of your MPEG-2 encoding needs.Presets Window

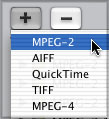
At the top of the Presets Window are buttons that will open the other four Compressor windows: Batch, Destinations, History, and Preview. Below these are two buttons, which will create a new preset (+) and delete selected presets (-). To create a new preset from scratch, click and hold the (+) button and choose the preset type: MPEG-2, AIFF, QuickTime, TIFF, or MPEG-4.
Creating a new preset from scratch
However, you will find that it is easier to duplicate an existing preset and modify it to suit your needs. For instance, let's say that you need to encode 180 minutes of video. Instead of creating a new preset from scratch, you might create a custom preset by duplicating the 120min High Quality Encode preset and modify its settings. At the far right of the Presets window are three buttons which will help you do so: Create Preset Group, Duplicate selected preset, and Create Droplet.
Before creating or modifying any settings, let's take a look at the settings of the existing presets. Click the twirl down arrow of the MPEG-2 60min High Quality Encode folder and select its MPEG-2 preset. At the bottom of the Presets window is the Summary tab, which gives details about the encoder settings.
60min High Quality Encode preset details
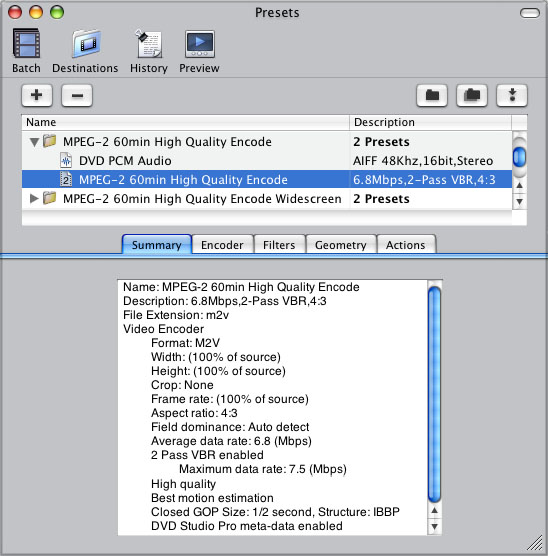
Many of the settings are shared by all of Compressor's MPEG-2 Presets. All of Compressor's presets encode to M2V format with Variable Bit Rate (VBR) encoding, and use 7.5 Mbps as the Maximum data rate. If your settings indicate 8.2 Mbps, then you have the outdated presets. You should update the presets as described earlier in this article.
All presets have Width and Height set to 100% of source, and Crop set to None, all of which can all be modified in the Geometry tab. All presets have Frame rate set to 100% of source, which means that NTSC source footage will be encoded at 29.97, PAL source will be encoded at 25fps, and 24p footage will be encoded at 24p.
The High Quality Encode presets have 2 Pass VBR enabled at High quality, and use Best motion estimation. The Fast Encode presets use One Pass VBR and Better motion estimation. Aspect ratio is 4:3 for normal presets and 16:9 for Widescreen presets.
The only difference between the 60min, 90min, and 120min presets is the Average data rate. 60min presets use 6.8 Mbps, 90min presets use 5.0 Mbps, and 120min presets use 3.5 Mbps. All use 7.5 Mbps Maximum data rate.
Modifying an Existing Preset
The main purpose for creating a custom preset is to change the average or maximum bit rate. There are two primary reasons for this: to fit more than 120 minutes on a DVD, and to increase the average bit rate for MPEG-2 when using AC-3 audio. The bit rates in Compressor's presets are conservative, and assume that your audio will be AIFF. However, if you use A.Pack to encode your audio into AC-3 format, then you can get away with using higher bit rates for video, and you can ultimately include more video on your DVD.

Comparison of video bit rates using AIFF vs. AC3 audio for a DVD-R / DVD-5:This chart indicates the average bit rates to be used for various amounts of video. As you can see, encoding your audio to AC-3 will allow you to dramatically increase the average bit rate for MPEG-2. In addition to modifying the average bit rate, if you use A.Pack to encode audio you can get away with using a maximum bit rate of 8.2 Mbps instead of the default of 7.5 Mbps. Using A.Pack is described in the article Encoding AC3 Audio with A.Pack
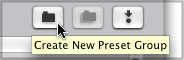
Let's say that you want to create a preset for fitting 180 minutes on a DVD and you plan to A.Pack your audio. You will duplicate the 120min High Quality Encode preset, and modify the average and maximum bit rates. For best results, you should first create and name a new folder, or "preset group" that will contain your customized presets. Click the Create New Preset Group button at upper right; this will create a new folder called Untitled, which you should immediately name to reflect your custom settings, i.e. "MPEG-2 180min Encode with A.Pack."
Create New Preset Group
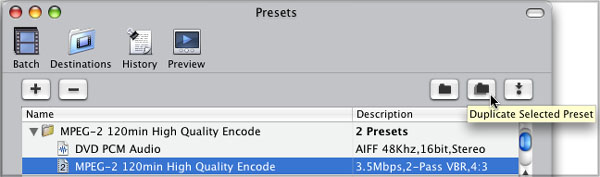
Now you want to duplicate a preset that is close to the desired new settings. Select the MPEG-2 120min High Quality Encode preset, and hit the Duplicate Selected Preset button at upper right. The new preset will appear in the preset list, outside of a folder. You may need to scroll down to see it. Select your duplicated preset and drag it into your new folder.
Duplicating an existing preset
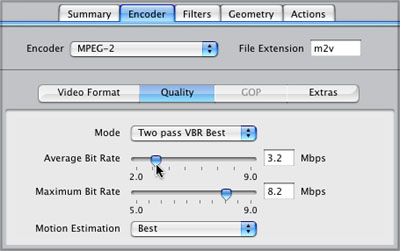
Now you will select the MPEG-2 preset itself and modify the bit rate settings. Select the duplicated MPEG-2 preset, and open the Encoder tab, Quality section. Set the Average Bit Rate to 3.2 Mbps and the Maximum Bit Rate to 8.2 Mbps. Keep all other settings at their default values.
Changing Encoder settings to customize your Preset
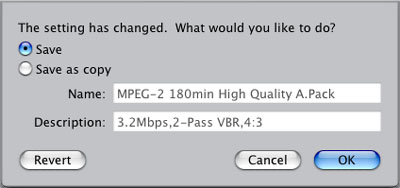
Now, double-click on the preset in the list and change the name. You might also change the description line. Once you have done this, you must lock in the changes to your new preset by clicking OFF your preset and onto another preset in the list. This will prompt you to save the settings. Click OK.
Saving the Preset
Voila! You have created a new Compressor preset. It might be convenient to also add a "DVD PCM Audio" (AIFF) preset to your new group, so that you can use the All setting to create video (encoded) and audio files simultaneously. To do this, simply select one of the PCM Audio presets from any other folder, since they are all the same, and duplicate it. Drag this new copy into your preset folder, where it will be saved for you.
New Preset Group with duplicated presets
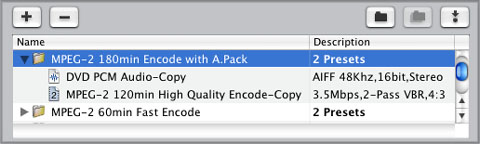
Your new preset group and its presets will now be available when you assign a preset to an item in the Batch Window.
Assigning your new preset in the Batch Window Assigning your new preset in the Batch Window
Destinations Window
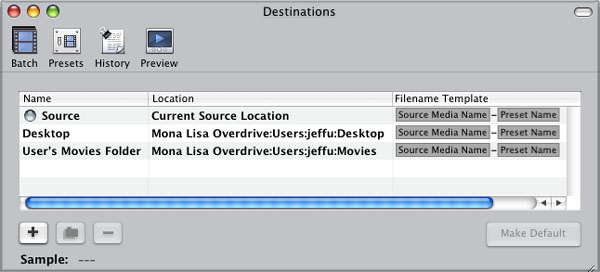
The Destinations Window is where you set default locations and filenames. This is most useful when encoding multiple files. The three default destinations: Source, Desktop, and User's Movies Folder, cannot be deleted or modified, but you can create new destinations and set one as the default.The Destinations Window The Destinations Window
To create a new destination from scratch, click the Create New Destination (+) button at bottom left and choose Local from the pop-up. Remote is used to create destinations on a server or networked drive. This will prompt you to choose a location on your hard drive. Navigate to the desired location and hit Open.
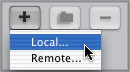
Creating a new destination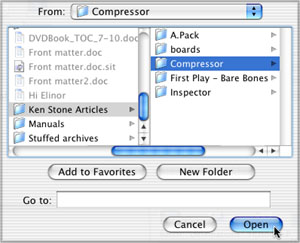
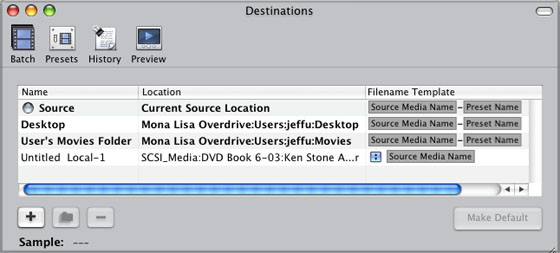
A new destination called Untitled Local-1 will be created. Each destination has three characteristics: Name, Location, and Filename Template. The Name will appear in the destinations drop-down when assigning the location for an item in the Batch Window. To choose a new name, simply double-click and edit the name field. The Location is the folder on your hard drive where the encoded file will be saved.
Your new Destination
Filename Template is the formula that Compressor uses for naming the encoded file. Although you can manually change the file name in the Batch Window or in the Finder, when encoding many files it is handy to have Compressor name them automatically. Compressor's default destinations use the formula "Source Media Name � Preset Name," which will generate such Faulknerian titles as "Compressor Project-Test Sequence-MPEG-2 60min High Quality Encode Widescreen." Play with the formula to come up with something you like, or simply change the name manually when you need to.
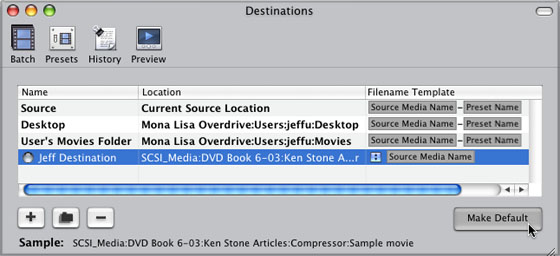
To make your new destination the default, select it and choose Make Default; a gray ball will appear to the left of the name. Now, whenever you apply a preset in the Batch window, your destination (and Filename Template) will be automatically applied to all entries.
Making a default Destination
History Window
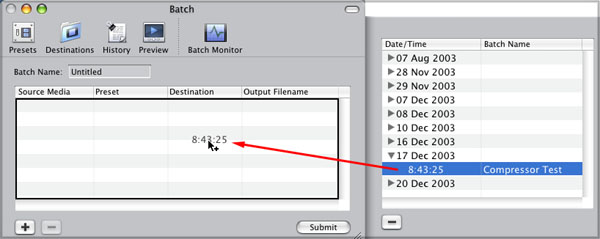
The History window is a drawer attached to the side of the Batch Window. The History window lists all submitted batches since you installed Compressor. Batches are listed by date, time, and name. To modify and/or re-submit a batch, drag the batch from the History window to the Batch window. This will re-open the batch with all its items and settings intact. It is wise to name your batches, so that you don't end up with a bunch of "Untitled" archives.Reopening a batch from the History Window
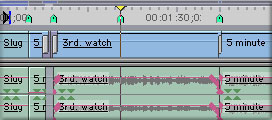
Preview Window Despite what the name would suggest, Compressor's Preview window is actually not useful for previewing the encoded MPEG-2 file. It is, however, useful for checking, setting, and changing markers. I mentioned earlier that Final Cut Pro adds a compression marker at every edit point in an exported sequence or QuickTime file. All markers, chapter and compression, are displayed in the little timeline at the bottom of the Preview window. Click the Add Marker or Delete Marker buttons at bottom right to modify these markers.
The Preview Window
I prefer to edit markers in Final Cut Pro, but this Preview window is handy for showing you that the compression markers are actually here! Remember that if you are creating multiple angle tracks, then you do not want to use compression markers.
Creating Droplets
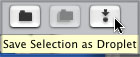
The final trick I will leave you with is working with droplets. A droplet is a self-contained application that works like a miniature version of the Batch window. To create a droplet, select a preset or preset group in the Presets Window and hit the Save Selection as Droplet button at upper right.Saving a selected preset or folder as a Droplet
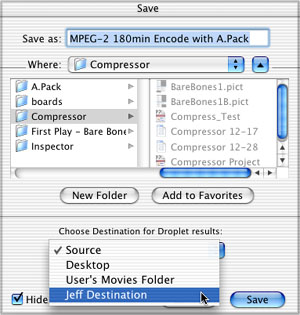
This will prompt you to name your new droplet and choose a location. You must also choose a Destination for Droplet results from the list of destinations.
Saving the droplet
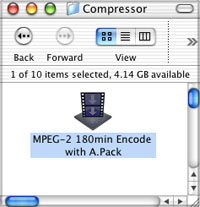
The droplet will appear wherever you saved it. You can drag files to be encoded onto the droplet's icon, or double-click the droplet to open it. You can even place a shortcut to your droplet in the Dock.
Double-click the Droplet to use it
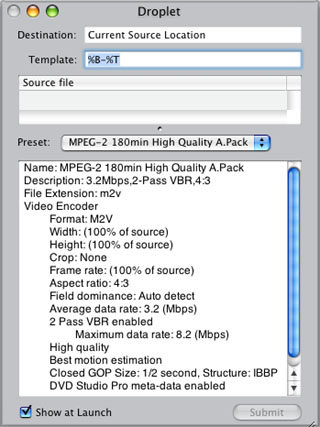
The droplet interface is like a cross between Compressor's Batch and Presets windows. To encode files, drag them into the Source file area and click the Submit button; this launches the Batch Monitor. The source files will be encoded using all presets included with the droplet, and saved in the chosen destination using that destination's "Filename Template." If you have a preset that you use frequently, a droplet can be a great time-saver.
Your Droplet
Once you have encoded your video files, import/drag them into SP2's Asset Window along with the associated audio files. If you intend for SP2 to relink the video and audio files, then you must ensure that the names are matching. For example, "My_Project.m2v" and "My_Project.ac3" (or "My_Project.aif.")
Parting Thoughts
Compressor is really an excellent application for encoding MPEG-2 files. Here are a couple of parting thoughts for getting the most out of Compressor.Some users have reported that Compressor's PCM Audio presets cause the audio to go out of sync or simply shift in time when the audio and video are imported into SP2. If this happens for you, there is a simple solution. Instead of using Compressor's AIFF file, export an AIFF directly from Final Cut Pro 4 by selecting your sequence or clip and choosing File > Export > Audio as AIFF. In earlier versions of FCP, choose File > Export > QuickTime, then choose AIFF. The settings should be 48.000 kHz, 16-bit, stereo.
Sometimes you may get the dreaded "Unable to Submit Batch: Cannot Connect to Background Process." If this is the case, there are several reported workarounds.
1) If you are exporting directly from Final Cut Pro 4, try launching Compressor first, and then exporting from FCP.Compressor can also be used to export any file format that QuickTime supports. I have focused on using Compressor to create MPEG-2 files, but you can experiment with setting presets for any QuickTime format.2) Trash Compressor's preference file. This can be found in Home > Library > Preferences > com.apple.compressor.Compressor.plist. Drag the plist file into the Trash and empty Trash.
3) Trash the Qmaster logs. These can be found in your hard drive > Library > Logs > Qmaster. Drag the entire Qmaster folder out of the Logs folder and into the Trash and empty Trash.
Happy Compressing!
Jeff "Jeffu" Warmouth teaches video and interactive multimedia at Fitchburg State College in Massachusetts. He is the author of the upcoming book "DVD Authoring with DVD Studio Pro," to be published by Focal Press in early 2004. Jeffu is a moderator of the DVD Forum at the LAFCPUG site and at Kenstone.net, and is an independent video/DVD producer and media artist. His work can be seen at www.jeffu.tv.
copyright © www.kenstone.net 2004
All screen captures, images, and textual references are the property and trademark of their creators/owners/publishers.