May 24, 2010
By Ng Chee Teng
This article is an update to my previous article on how to create Windows Media Video (WMV) files from Final Cut Pro FREE. Previously, we were using Windows Media Encoder 9 to create WMV. However, Microsoft has released the new Microsoft Expression Encoder 3 since 2009 and our efforts to export to WMV are now easier and results are even better than before.
I am sure many of you have encountered clients who want their videos in WMV format. After all, it is still a windoze world. I find myself delivering most of my videos in WMV to my clients using Flip4Mac (US$179 for HD version at the time of writing) from Telestream.
If you need regular exports to WMV from FCP, Flip4Mac is worth every cent. I highly recommend it for it is quite customizable, fast and delivers high quality WMV files. I have never received a single complaint from my clients about not being able to use the WMV files exported from Flip4Mac.
However, if you only require the occasional WMV exports or simply have no budget for Flip4Mac, then let's move on to my suggested solution.
Here's the Solution
1. Choose "Export Using Compressor" in Final Cut Pro, export your sequence to Quicktime H264. Depending on your projects, use at least 2 Mbps compression bit rate for Standard Definition (SD) resolution and at least 6 Mbps for High Definition (HD) with multi-pass "on". You should pick a higher compression rate for better results but just be mindful of higher file sizes. The key point is that your Quicktime H264 file should have a significantly higher compression rate and look as good as possible since there is going to be another round of compression later with Microsoft Expression Encoder 3. You should also pick a significantly high quality setting (select AAC format, a bit rate suggestion is 192 kbps) for your audio. When you are done, you would get the Quicktime file "xxx.mov".
2. Now, copy the Quicktime file to your windows machine.
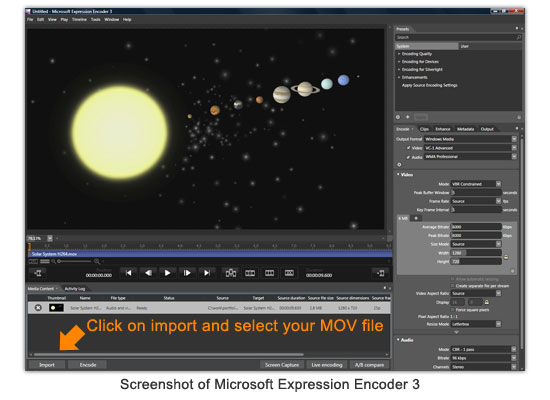
3. Open the free Microsoft Expression Encoder 3 (click here to download) software. At the bottom left corner, click the "Import" button and select your "xxx.mov" file. When loaded successfully, the video will be displayed on the upper left panel and some details at the bottom left panel.
4. Next, you have to choose your encoding settings at the right side of the window. The following are some quick guidances:
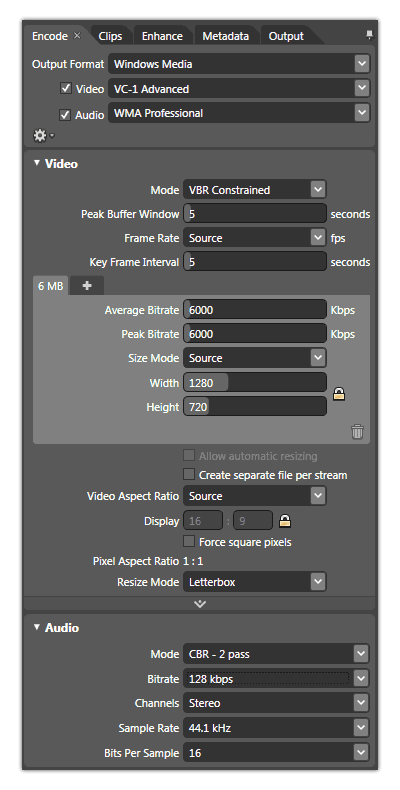
- Output Format: According to Expression Encoder's documentation, VC1-Advanced is optimized for high-bit-rate encoding (20 Mbps and up), though it is also effective with lower bit rates down to 2 Mbps second. VC1-Main is optimized for bit rates below 20 Mbps. VC1-Simple is optimized for bit rates below 400 kbps. Note that VC1-Main is more compatible with older Windows Media Players. VC1-Advanced requires Windows Media Player 11 or newer version.
For audio, Windows Media Audio (WMA) is more widely accepted by devices than WMA Professional. However, WMA Professional is more advanced and you can get a higher quality at the same bit rate.
- Key Frame Interval: This is something you have to experiment with. A value of 3-5 seconds is usually ok. Note that the shorter the interval, the higher quality your video should look but at the expense of a higher file size. A good estimation is to see if your video has a lot of fast-paced action or cuts. In other words, an action movie or a fast-paced video should ideally have a shorter interval while a slower drama could make do with a higher interval.
- Bitrate: I usually choose 6 Mbps for 1280x720 HD projects and 8 Mbps for 1920x1080 HD projects. Microsoft's very own WMV HD Content Showcase uses these bit rates, so we probably won't go wrong here. Higher bit rates are certainly better but be aware of playback lags in less powerful computers, especially older notebooks or netbooks. I find that 2.5 - 3 Mbps is the sweet spot for SD projects. I would suggest choosing the "VBR Constrained" mode. It is better to manually control your average and peak bitrate and never allow the peak bitrate to go too high since it might result in playback lags on less powerful computers.
For audio, I typically choose 128 kbps at Constant Bit Rate (CBR) 2 pass. Note that 70 kbps is already considered CD quality by Microsoft.
- Size Mode: Make sure your size mode is "Source" unless you have something else in mind. It is important to check because the default is typically a smaller size.
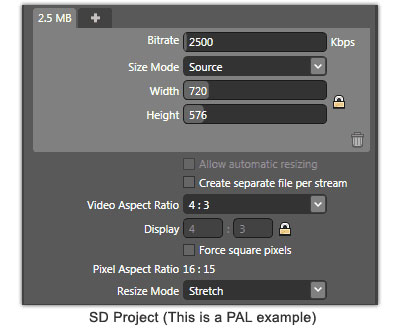
- Pixel Aspect Ratio: This is not an issue with HD projects since they are already 1:1 pixel aspect ratio (square pixels). For SD projects: you may want to resize it and choose "Stretch" (computer screen is square pixel vs TV's non-square pixel) so that your video will playback at the correct aspect ratio on computers. WMV is after all for computer playback.
5. You have to tweak the right settings depending on what you need. You may also want to deinterlace your file if necessary. Interlaced video does not look good on computer playback as computer LCD screens are non-interlaced. Deinterlacing option is under the "Enhance" Tab. For more help on other encoding configurations, please refer to the very helpful "User Guide" (Press F1).
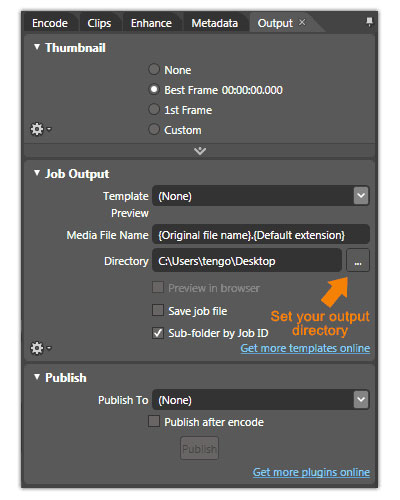
6. Next, set your output directory under the "Output" tab. You may also want to choose a thumbnail.
7. Lastly, click the "Encode" button and get yourself a nice cup of coffee. The encoding will take some time depending on your project size and encoding settings.

After thoughts
Another option would be to purchase Flip4Mac. I use Flip4Mac myself to avoid double compression which means more quality loss and I could save the time needed to do other things. However, if you do not need to export to WMV regularly or do not want to spend a single cent, the above method works rather well.
If only the vendors can work together and decide on a common video format, folks like us would not have so much trouble to go through. I really wish I do not have to be concerned about video formats. I simply want my videos to look good when I show them to my clients and I am sure most of you share the same opinion.
In the meantime, we can only cross our fingers for better times ahead.
Ng Chee Teng runs Tengo, a video production and web design studio in Singapore. He is also a multimedia instructor, having taught digital video, web design and computer animation in a polytechnic institute.