October 4, 2009
By Ken Stone
Final Cut Pro offers some very powerful tools in its video scopes, not only to ensure that our finished projects are 'Broadcast Safe', but they are also critical when 'Color Grading' our footage to give it a desired 'look'. To the uninitiated, the scopes can be very intimidating, even the terms 'Broadcast Safe' and 'Color Grading' can send some into hiding. But I promise you that this does need to be the case. Once you understand how the scopes work you will find that you will use them on a regular basis and to great advantage.
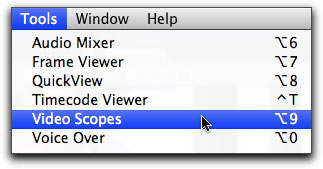
FCP offers four different scopes for us to work with; Waveform Monitor, Vectorscope, Histogram, and RGB Parade. For me, the two most important scopes and the ones that I use, are the Waveform monitor and the Vectorscope. The Waveform monitor displays the luminance or brightness of our video from black all the way to white and the Vectorscope, which uses a circular graph, not unlike a color wheel, shows the colors, hues and color saturation of the footage. This article is going to cover the Waveform monitor. There are some of you who create projects for the web and not for Broadcast or DVD, and think that because web video does not need to be Broadcast Safe, that you don't need to use the Waveform monitor. You are going to find that the Waveform monitor, in conjunction with the 3-way Color Corrector, can do a lot to enhance your video. Until cameras can shoot perfectly exposed footage and can even read the director's mind as to the mood and tone of the footage, the Waveform monitor is indispensable.
Reading the Waveform Monitor
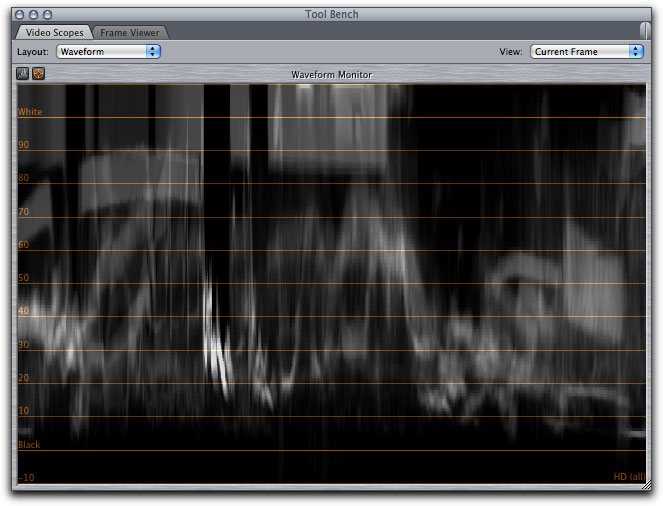
 The Waveform monitor displays a visual representation of the luminance levels of a video image. Instead of using multi-colored pixels to make up a recognizable image as the Canvas window does, the Waveform monitor displays the luminance values of the video image in white waveforms, which are comprised of very small white dots, sometimes called 'traces'. The left hand side of the Waveform monitor has a scale that runs from 0% (black) at the bottom to 100% (white) at the top. The higher the placement of the waveforms in the monitor window, the brighter that part of the image is. When the waveforms go above the 'White 100%" line, called 'Superwhite', then the image is not Safe for Broadcast. We need to limit the white levels to 100%, whether with the Broadcast Safe filter and or Color Correction. The benefit of the Waveform monitor in this case, is to use it to determine luminance levels and adjust the brightness to minimize any clipping that might occur because the video was overexposed. When the waveforms fall in the middle of the scope, from top to bottom, they are displaying the mid-tones of the image. The bottom of the waveform monitor represents the black or shadow areas. So, when looking at the Waveform monitor, the higher the waveforms, the brighter the image. The lower the Waveforms, the darker the image.
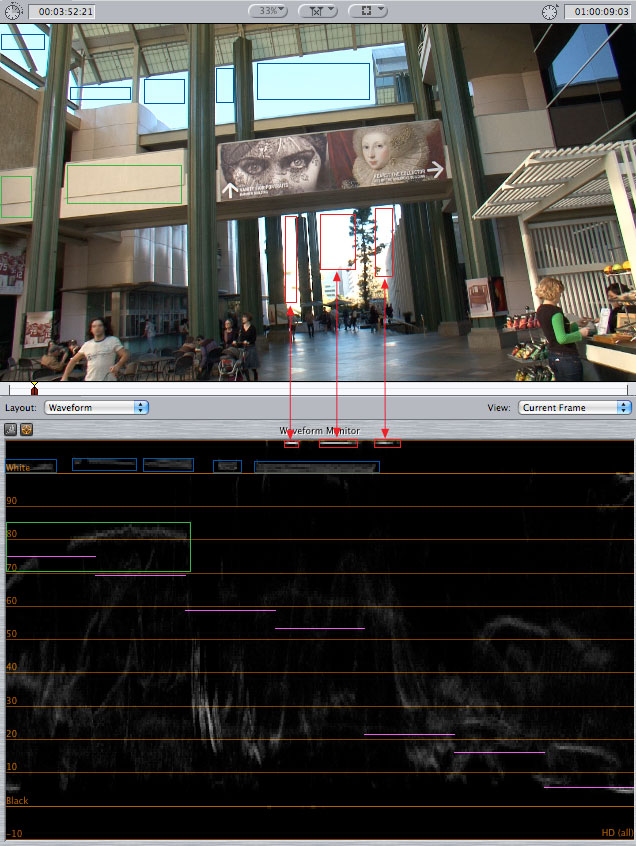
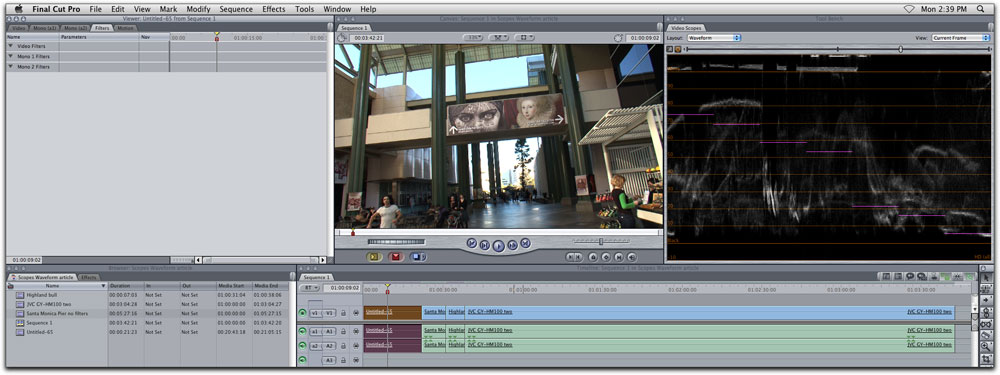
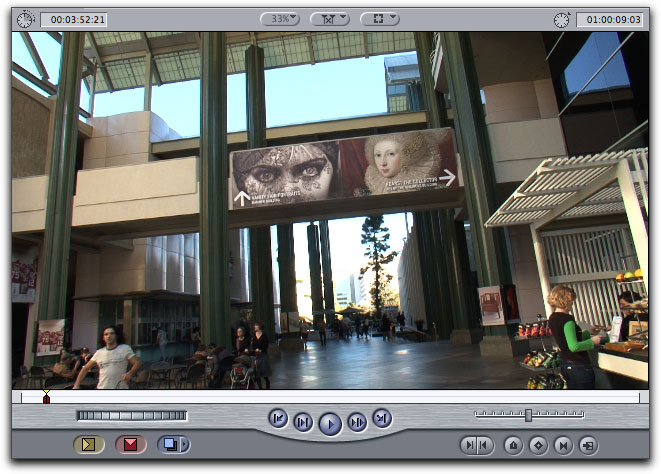
While we normally display the Canvas and Waveform monitor side by side on our computer screen, for this example I have stacked the Canvas window on top of the Waveform monitor to demonstrate how the two windows relate to each other.
To figure out what part of the image in the Canvas window the waveform represents in the Waveform monitor, we read from left to right. If in the Waveform monitor, there is a waveform that is at the 100% mark, and it is near the left border of the Waveform monitor, then, when you look in the Canvas window, near the left border, you will see exactly what part of the image is represented by the waveform.
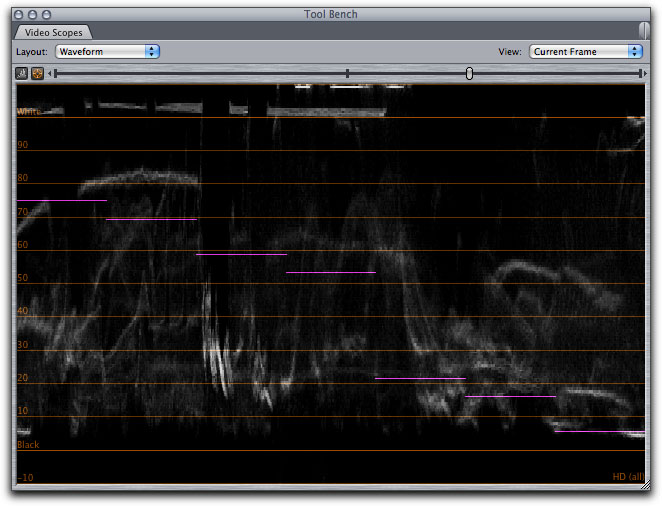
In the example shown to the right, the Waveform monitor tells me that there are three areas (red boxes), in the middle of the frame (left to right), that are way too hot, they are almost off the chart, at the very top of the waveform monitor. Looking in the Canvas window, in the middle (red boxes), it is easy to see what part of the image is too hot, in this example the sky is 'blown out', showing as pure white.
Again, in the example on the right, in the Waveform monitor, additional waveforms that are just above the White 100% line, show from the left side of the Waveform monitor to the middle of the monitor (blue boxes). Looking in the Canvas window, from the left border running to the center, we can see sections of the sky showing through the building structure (blue boxes). This sky, while still too hot, does show blue color.
On the left hand side in the Canvas window, is a tan colored cross-beam (green boxes). If you look carefully, you'll see that the tan color, at the far left, is just a little darker than the tan color that is more towards the center. Looking at the Waveform monitor, (green box) we can see that the tan beam on the far left shows at about 70% luminance while the lighter tan that is more towards the center registers at more than 80% luminance.
Using both the Waveform monitor and the image in the Canvas window, you'll find that it is easy to read the luminance values in your video image. I have used several areas that fall into the highlight area of the Waveform monitor, but the same process is used to check out mid-tone and shadow areas. Just remember that when looking for corresponding areas of the Canvas and Waveform monitor, read both windows from left to right. Very often, the shape of the waveform in the Waveform monitor is the same shape as the object it represents in the Canvas window making it easy to locate. Keep in mind that in the Waveform monitor, the position of the waveforms, top to bottom, show the luminance values of the video image and not the position of the item in the Canvas window. To summarize, if there is a part of an image showing in the Canvas window and you want to locate the waveforms that represent that image in the Waveform monitor, or visa versa, the placement of the image, in both windows, will be in the exact same location reading left to right. However it will not show placement from top to bottom because top to bottom in the Waveform monitor shows luminance values from 0% to 100%.
Setting up the Waveform Monitor
Before we start to work with the Waveform monitor, lets open it up and look at it's features. With some clips on the timeline, from the menu bar > Tools > Video Scopes. This will open up the scopes in a four-up display floating window.
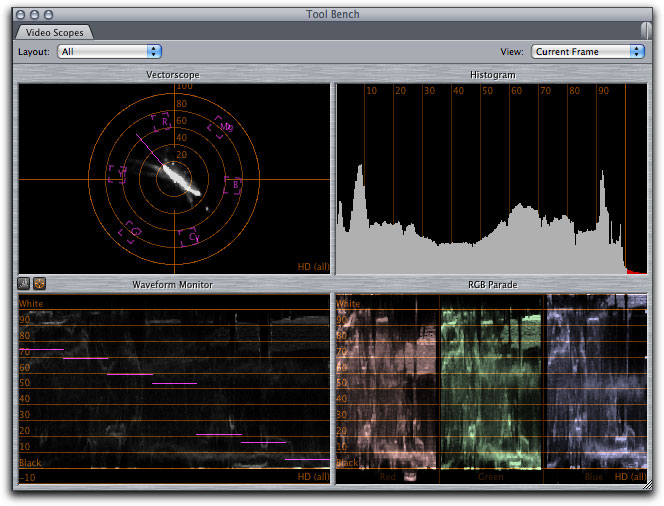
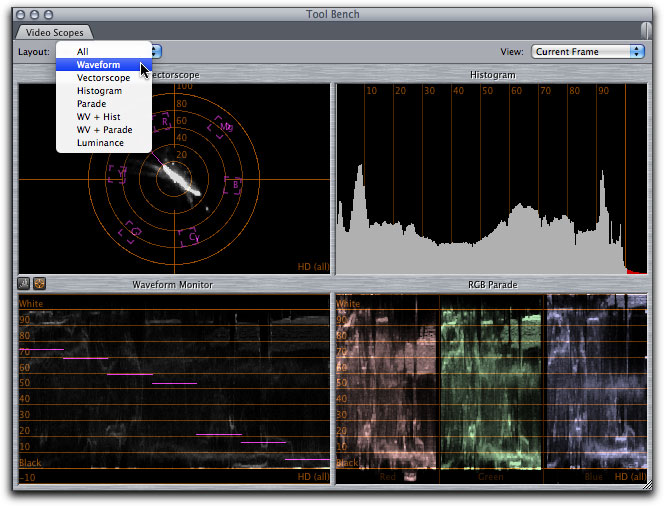
In the Video Scopes window, click on the 'Layout' drop-down menu and select Waveform.
The Waveform monitor now fills the entire window.
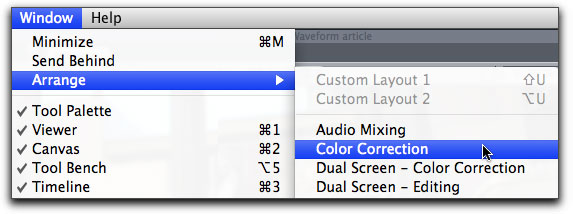
Sometimes, when I just need to work with a few clips, I'll drag the floating Waveform monitor window over on top of my Browser window. If I'm going to be doing a lot of work, from the Window menu > Arrange > Color Correction.
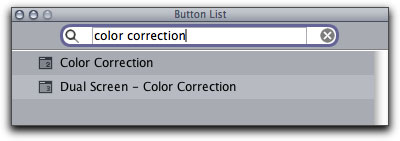
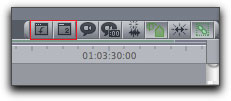
In 'Button List' there are buttons for Color Correction screen layouts for both one and two monitor setups. I have added two buttons to my timeline, the single monitor Color Correcting layout (it has the number 2 in the button) and the 'Load window Layout' button (curved arrow) which I use when I want to return to my own FCP window layout.
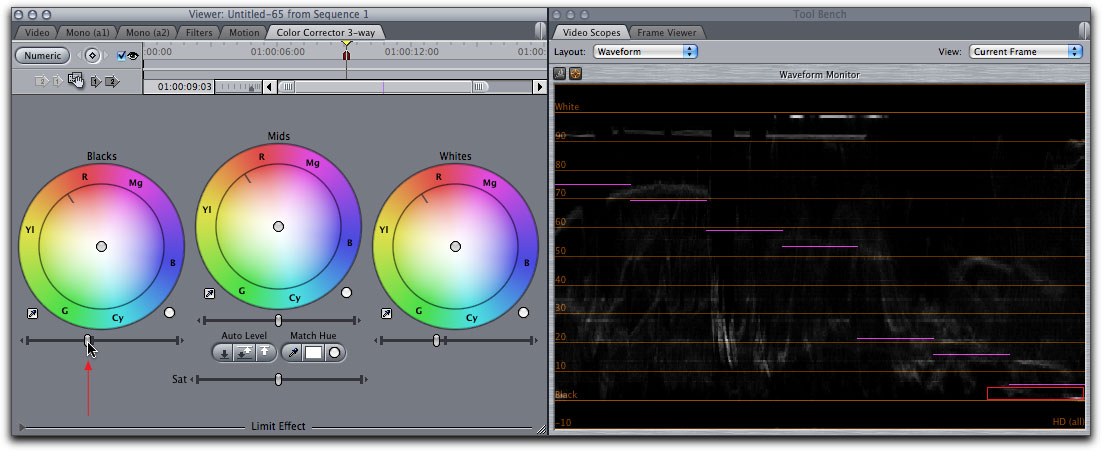
The FCP Color Correcting window setup is shown below. The Viewer window is on the far left, and as I have not yet applied the 3-way color corrector to my clips, the filter tab is empty. The Canvas window is in the middle and the Waveform monitor is on the right. Browser and Timeline are below.
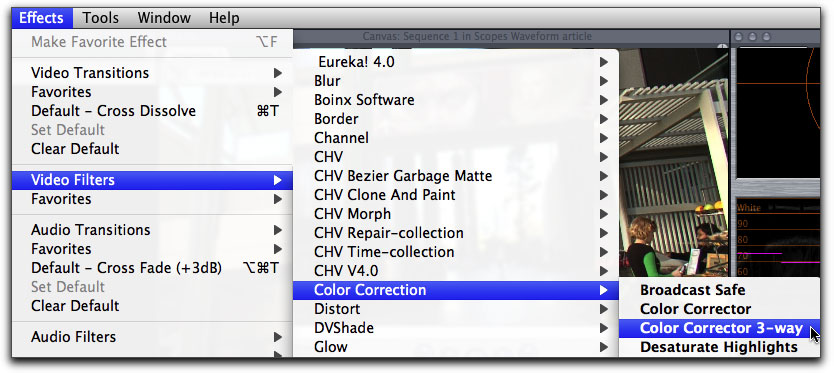
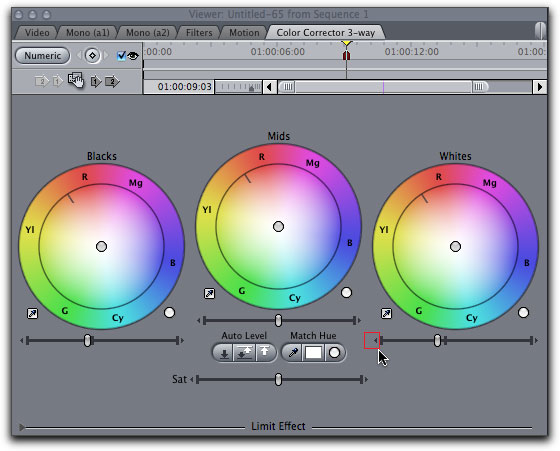
To add the 3-way Color Corrector filter, select the clip on the timeline and from the Effects menu > Video Filters > Color Correction > Color Corrector 3-way.
Below I have added the 3-way color corrector to my clip, after double clicking on the clip to load it back into the Viewer window, the 3-way filter now shows in the Viewer window.

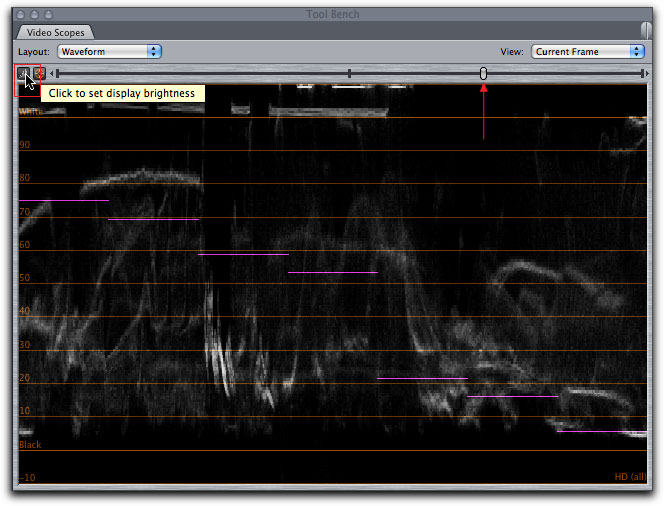
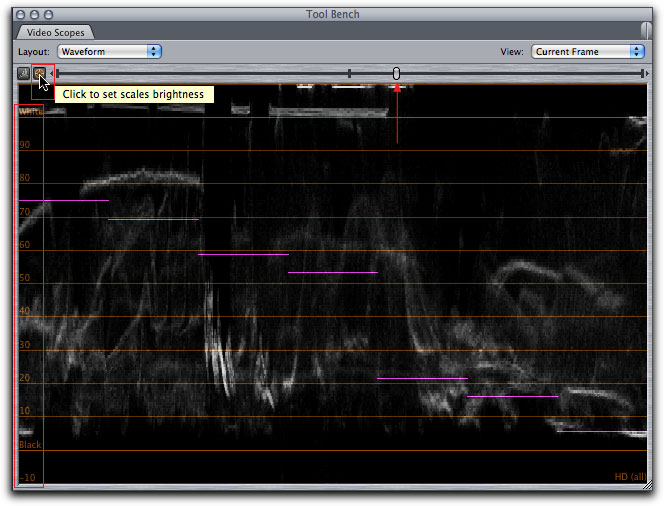
Just beneath the Layout drop-down menu are two small buttons. Clicking on the button on the left 'display brightness' turns on a slider that controls how bright the waveforms (the white graphics in the window) appear. I like to turn my brightness up, makes judging the waveforms easier for me.
To the right of the brightness button is the orange 'scale brightness' button, when clicked produces a slider that controls the brightness of the orange scale lines that read from While to Black (-10 through 100/White).
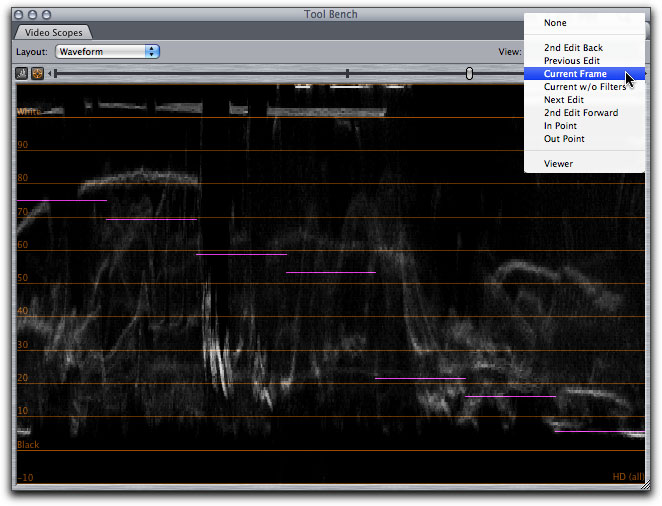
Upper right of the Waveform monitor is the View drop-down window with a number of different options. I have this set to 'Current Frame', which uses the playhead in the timeline for frame selection.
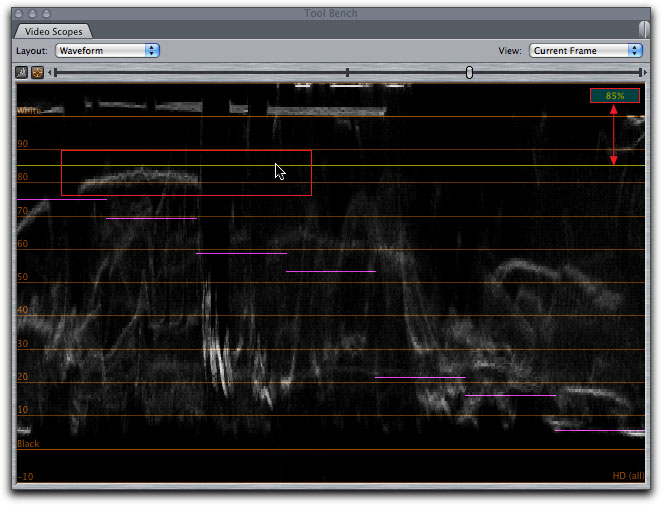
If you place your cursor into the Waveform monitor, it generates a yellow horizontal line that reads out the brightness values of the position that you have placed the cursor. You can use this to ascertain the brightness value of any particular waveform in the monitor.
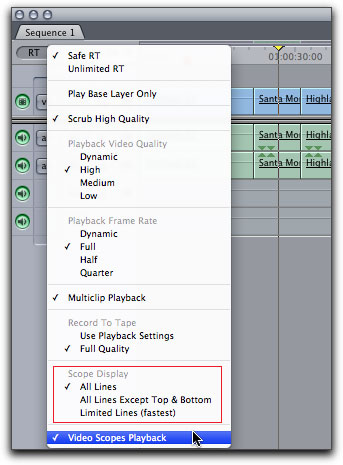
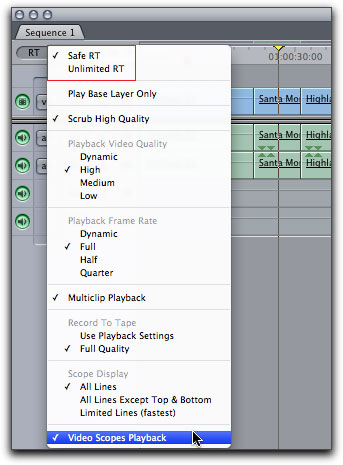
There is one last setting. In the timeline RT drop-down menu you must enable, 'Video Scopes Playback'. Additionally in the 'Scope Display' section, there are three options that control how the waveforms are displayed in the Waveform monitor when you are not playing back, when your playhead is stationary. 'All Lines' analyzes all of the pixels on all of the video scan lines. This is a very comprehensive analysis and affords the most visual information for us to base our decisions on. This is the setting that I use. 'All Lines Except Top & Bottom', this option excludes the top and bottom 9 scan lines which are reserved for special signals like 'Closed Captioning' that might confuse the waveform analysis if included. 'Limited Lines (fastest)', uses only 32 lines for evaluation, looking at the center portion of the video image. During RT playback there is only one display mode, which is the same as 'Limit Lines', because of the demands placed on the processor when running RT playback.
The Waveform monitor, shown below left, during RT playback in 'Limit Lines' display mode. The very lower-right corner of the Waveform monitor indicates the scope display option that is selected in the RT drop-down menu, in this case 'All Lines'. Your choice of RT 'Safe' or 'Unlimited', below right, will depend on your processor speed and the video you are working with.
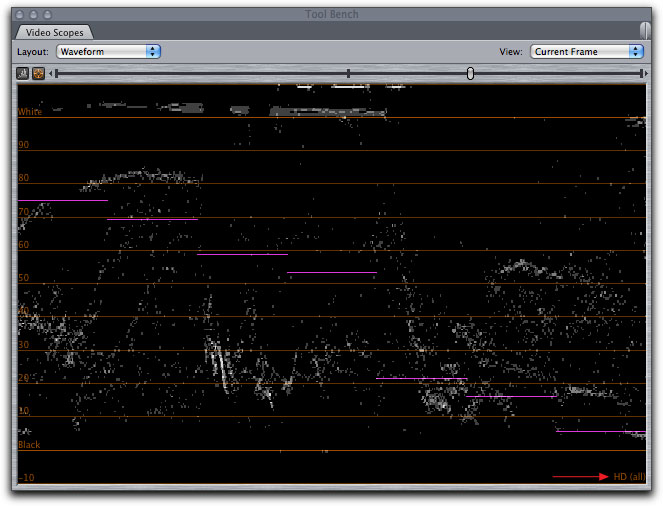
The Waveform monitor also displays purple 'target' lines. These targets are used to evaluate the brightness levels of color bars that are brought into FCP along with the video. Most cameras can add color bars to the video being shot. These purple targets, along with the color bars, are used to calibrate the luminosity of the video during the capture process, i.e. through a third party capture card.
If your control (right click) anywhere inside the Waveform monitor window you will see a pop-up menu. You can change the color of the Waveform from white to green, some find green easier to work with. You can switch the Waveform monitor from luminance to saturation. You can also turn off the purple Targets.
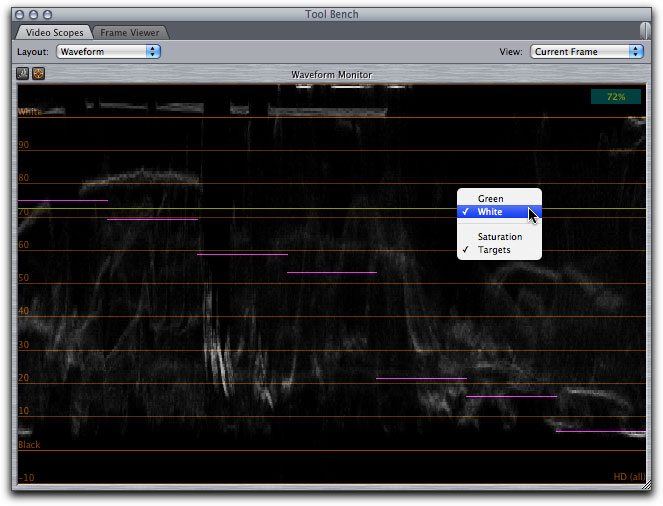
I have switched the Waveform monitor display colors from white to green and turned Targets off.
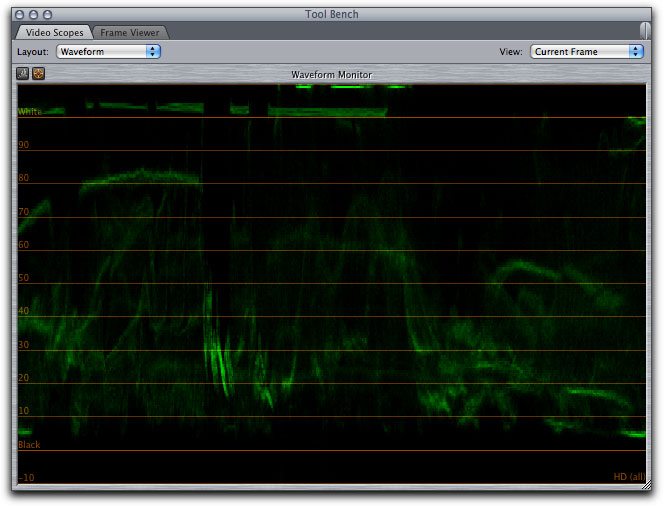
The Waveform monitor displaying Saturation which gives a reading of the color saturation in the image. The thicker the vertical lines or 'traces' the heavier the color saturation for that part of the image.
Adjusting the luminosity of your video
This is the clip that we will be adjusting, shown in the Canvas window.
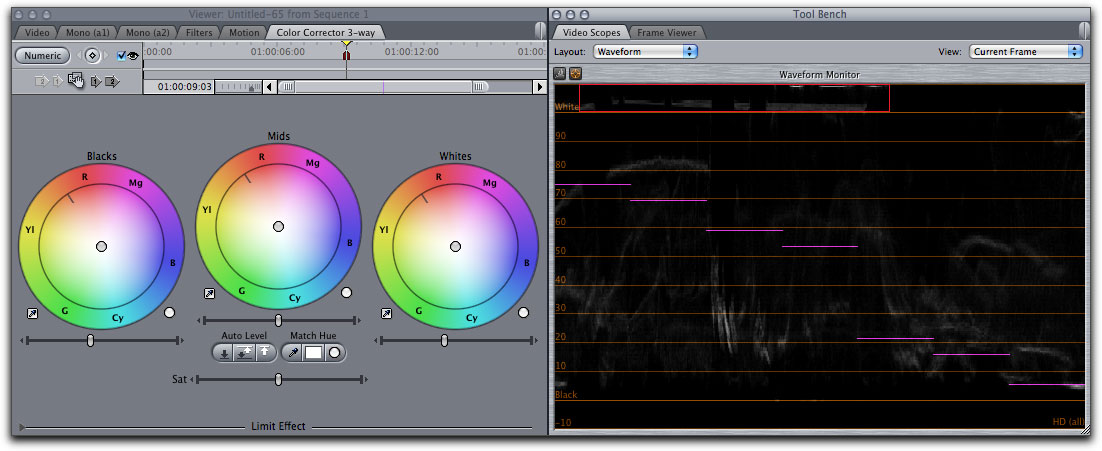
For this article I have moved the 3-way Color Corrector next to the Waveform monitor in my FCP layout. The 3-way Color Corrector filter has been applied to the clip but no adjustments have been made. Looking in the Waveform monitor, above the White 100% line, you'll see two sets of waveforms, at slightly different brightness levels, that represent the sky in the shot.
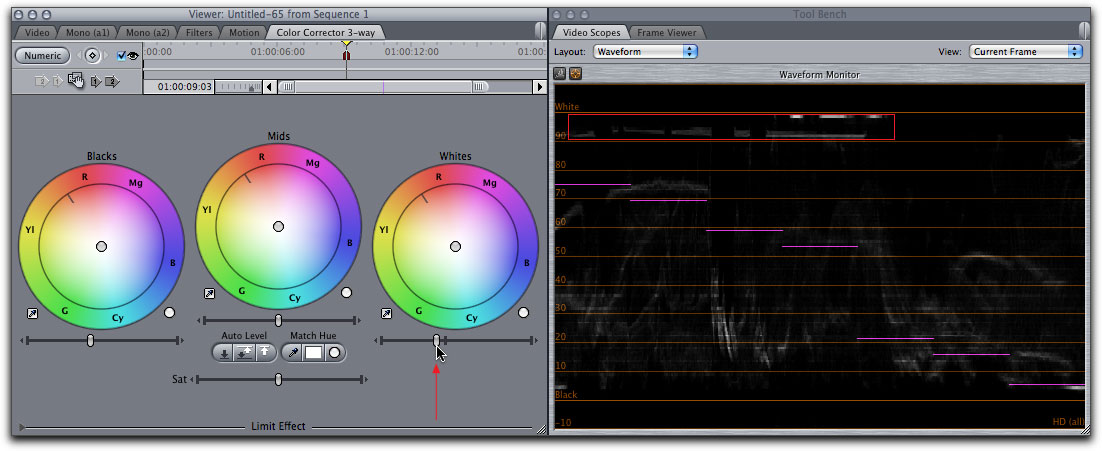
Click on the adjustment slider beneath the 'Whites' color wheel and drag to the left, lowering the brightness, Continue to drag until the waveforms are sitting below the 'White 100%' line. With the waveforms below the 'White 100%' line, this video is now 'Broadcast Safe'.
The next set of waveforms that I deal with are the 'Blacks'. In our modern day, most TVs use LCD screens, as do all of our computer monitors. Sad to say, LCD screen can not display true blacks. While getting better, LCD TV blacks are still more of a very dark gray than rich blacks. In order to get as close to black a possible we need to pull down or 'crush' the blacks in our video (those parts of the video image that are supposed to be pure black). Click on the adjustment slider beneath the 'Blacks' color wheel and drag to the left, lowering the luminosity of the waveforms that represent the black parts of the image, so that it sits just above Black or 0%. The bottom end of the waveform monitor can be used to see just how deep the blacks are, and how much of the shadows are getting crushed (intentionally or not).
When making our adjustments there is one issue that we need to understand. When we adjust the luminosity of one of the three zones; Whites, Mids or Blacks, the other two zones are effected as well. You can not adjust the Whites and not have an effect on the Mids and Blacks. You can not adjust the Blacks and not have an effect on the Mids and Whites. The three different contrast controls; Whites, Mids and Blacks overlap each other, move one up and the other two will move up as well, pull one down and the other two will move down. This process is of necessity, if the other zones do not shift, then there could be gaps in the luminance levels and this would produce banding or stair-stepping in the video image. It should be noted that when adjusting one zone, the other zones are effected but to a less degree. So if we are moving down our Whites, then the Mids will move down too, but not as much. The Blacks will also move down as well but to an even less extent.
The images below illustrate this point.
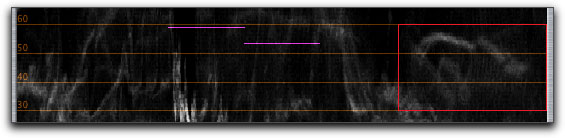
No adjustment. The example midtone waveforms, red box below, are almost at the 60% level.
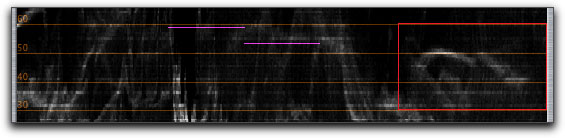
Whites adjustement. After the Whites have been pulled down to Broadcast Safe, the example midtone waveform is now just above the 50% level.
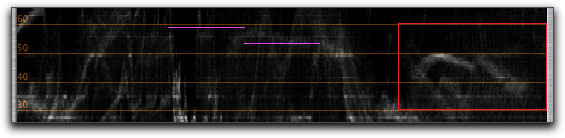
Whites and Blacks adjusted. Crushing the blacks has caused the example midtone to move down just a bit more and the waveform is now just touching the 50% level.
The two images below are of the Canvas window. The first image has had the Whites and Blacks adjusted, but the midtones have not been adjusted. Because I have pulled down both the Whites and Blacks, the mids have come down as well and are now a bit too dark.
While the mids might have been okay before any adjustments, it is now necessary to raise the mids by moving the Mids adjustment slider in the 3-way Color Corrector to the right to increase the brightness of the mids. (Please remember that these Canvas screen shots have been Jpegged for this article).
When using the adjustments sliders, you can achieve very small incremental increases or decreases by clicking on the small arrow, that is at the ends of all three of the adjustment sliders.
Notes
- I use two terms in the article that might need defining. "Crushed Blacks" means that the black levels of the video are too low to hold detail. Subtile details in the shadow areas are lost. This can happen when the video footage is underexpose during shooting. This can also happen when we use the Waveform monitor in conjunction with the 3-way Color Corrector to lower the black levels of the video. There is a trade off. We want the blacks to be true black, but lowering the black level, or 'crushing the blacks', can costs us detail in the shadow area. "Clipping" most often refers to over-exposed video. Not only do the highlights lose detail, they appear as being blown out (no color or other visual information), but because the white signal is so high, it can cause distortion. The term "Clipping" is also used for audio that has been recorded too loud.
- When looking at our video in the Canvas window, it is impossible to determine the brightness values of our footage by eye. There could be hot spots that we can not discern and Blacks may look black, but are not really full black. The only way to know and accurately correct these issues is with the help of the Waveform monitor.
- You need to experiment a bit to actually see what the Waveform monitor can do for your video. Drop the 3-way color corrector on to a clip and then open up the Waveform monitor. Play with the sliders, move the Whites, Mids and Blacks sliders watching in both the Waveform monitor as well as the the Canvas (or broadcast monitor) to see the different effects that you can achieve. You can dramatically change the look and feel of your video with just very small adjustments in the 3-way color corrector. Changing the luminance level of the Mids can have a very powerful and dramatic effect.
- I'm sure that you have been told that in order to properly color correct video you must have a professional broadcast monitor to evaluate your work. You have also been told that using the Canvas windows is not a good idea because it does not properly represent a broadcast signal. These statements are correct, however, if you are prepping work for the internet, then a broadcast monitor would not be of any help. You would want to judge the video on your computer monitor, because that's what the internet uses for delivery, a computer monitor. Even if you are prepping work for Broadcast or for DVD, the Waveform monitor and the Vector scope provide very accurate information, for both Luminance and Color. Not everyone has a professional broadcast monitor (though they should), but everyone has the scopes. It's the scopes that will keep you 'Broadcast Legal'.
- If all of your work is going to the web, then you really don't have to have a broadcast monitor. You can use the Canvas, maybe increasing the size of the Canvas window for easier viewing. You will also be able to use the QuickTime player to view and judge your video before you upload to the web. If you have an Apple Cinema Display, you can use 'Digital Cinema Desktop Preview, found in the FCP View menu > Video Playback. If you have a second ACD monitor, you can put the 'Digital Cinema Desktop Preview' on your second monitor.
- When doing Color Correcting work, it is important to remember that all video is different and adjustments must be made on a clip by clip basis. Some shots may not have any Blacks or Whites at all.
- If you have a number of clips all shot under the same circumstances spread throughout your edit, once you have the first clip adjusted, you can 'Copy' and then 'Paste' the Color filter 'Attributes' onto the other similar clips.
- You might have heard that in NTSC and PAL, blacks should be set to 7.5 IRE. 7.5 IRE, setup level or black level, are analog terms, however FCP reads and displays information as digital percentages. So 7.5 IRE is irrelevant when working in FCP.
- One of the primary goals of working with the 3-way Color Corrector and the Waveform monitor is to have all of the waveforms fall between 100% white and 0% black levels.
- A good practical use of the waveform monitor is to judge how much of the shadows are getting crushed to black during color correction. The waveform monitor can be used to judge how much highlight detail exists, then using color correction to control how much of that detail you'll eventually see. Also the waveform monitor can be used for shot consistency and to determine how much overall detail is in the shadow areas from shot to shot.
- The Waveform monitor is not just for FCP. High end cameras have had waveform monitors for years but now, cameras like the Panasonic HPX 170, have a waveform monitor for setting proper exposure. The waveform monitor is an important tool and understanding it will be helpful in production as well as post production work.
- While much of this article is about correcting the Whites and Blacks, making sure that Whites do not go above 100% and 'crushing' the black to get the richest blacks possible, the Waveform monitor is also used for 'Color Grading'. Adjusting the three luminance levels, Whites, Mids and Blacks can add enormously to the visual impact of your video. You would be surprised by the visual changes you can get by very slight adjustments of luminance.
- This article is not intended to teach Color Correcting, but rather how to use the FCP Scopes. If you want to learn Color Correcting, I might suggest that you look at Color Correcting in FCP by Andrew Balis which is excellent, for FCP 6, but still completely relevant.
- Minor point. Throughout this article I refer to the color correcting filter as the '3-way Color Corrector', Apple calls it the 'Color Corrector 3-way'.
Enjoy,
--ken
[Top]
copyright © www.kenstone.net 2009
are either registered trademarks or trademarks of Apple. Other company and product names may be trademarks of their respective owners.
All screen captures, images, and textual references are the property and trademark of their creators/owners/publishers.