
Film Look for Video Revisited January 19, 2004
Film Look for Video Revisited with Joes Filters
and Final Cut Pro 4
Film Look for Video Revisited January 19, 2004
Film Look for Video Revisited with Joes Filters
and Final Cut Pro 4
By Graeme Webb
I have always found the look of unprocessed video slightly unpleasant; this has probably something to do with being an avid cinema goer and a user of film for more years then I care to mention. Film has warmth to it, richly saturated colours, the shadows glow with fine detail and there is smoothness to the motion. Conversely untreated video can display some of the characteristics that I and many others find aesthetically disappointing, thin and low-density images that display under saturated colours with slight colour casts. Often when casts have been removed the footage can still display a starkness and have that 'live TV outside broadcast' feel to it - or worse.
I'm indebted to the work and articles written by Shawn Bockoven, Joel Peregrine, Steve Sullivan and Dan Coplan who put me on the right track in the first place in getting the sort of look I was striving for. This article in no way replaces the work these guys have done, it just adds to the information on this subject in the public domain and offers an alternative process/workflow. Please note due to JPEG compression some of the subtleties of the original video filter changes have been lost, but this shouldn't detract from understanding the workflow and process.
First principles
Before you even consider any 'film look' post production its imperative to consider the lighting and white balance of the scene you are shooting. I always light my internal scenes when I am working on corporate video and spend time balancing the whites, I find this pays off in post production and I don't have to mess around too much with colour correction. If I can, I will try to shoot external scenes when I have good weather and if there is too much contrast I will use low power fill in lighting or reflectors. If you can capture shadow detail and stop the highlights blowing then you are on you way to getting a good range to work on. I use a G3 iBook as a monitor plugged into the firewire socket of a Canon Xl1 this allows me to see a larger representation of the scene I am shooting and also enables me to see what is going on around me. If I am working with a difficult lighting situation (like a dark recording studio) I can capture a clip into FCP and then see if I can colour correct and alter the levels sufficiently with out going away to get more lighting.
Joes Filters
I have been experimenting with Joes Filters for a few months, trying to get a film look to music video footage, Joes Filters were created by Joe Maller and are available from his web site, you can download a trial version before buying.
Getting the colour right
During a recent music video production I experienced some very difficult weather conditions when shooting some external scenes by the edge of the River Thames in London, this is probably the worst example of footage to use for this process but it was a challenge. We had started early and the weather was cold but bright but as we came to the final shots a storm gathered and the lighting dropped dramatically. It was important to get these shots in the bag as we were running out of time for the project. I did some test shots but even as these were being completed the light got even worse.
Colour corrector 3-way
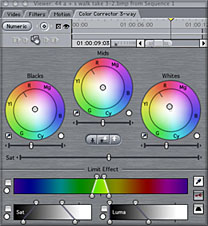
The first step in post production was to try to gets the blacks and whites right. I used the FCP 3-way visual colour corrector. Using the black dropper tool I sampled the black t-shirt on the actor furthest from the camera, I sampled the lightest part of the sky with the white dropper tool and the grey of the actors (closest to the camera) trousers with the mid dropper tool. This got rid of most of the dull green/cyan cast raised the contrast slightly and brought a hint of warmth into the shot.
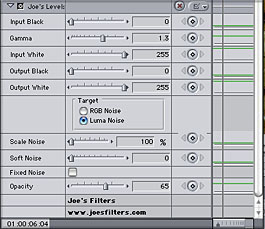
Joes Levels
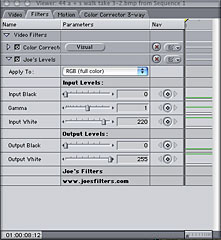
I used the Joes plug in 'Joes Levels' to brighten the image setting the input white setting to 220, I could have made changes to the gamma value but the 220 input white figure gave me the look that I was looking for at this point. I left the other settings as default. this adjustment brightened up the image and appeared to slightly increase the contrast. I tend to make adjustments intuitively and make sure that I have my undo level setting fairly high while I'm messing with filters and plug ins. I have always turned off auto save in FCP as that used to cause me crashing problems when rendering using version 3 of FCP, and once FCP auto saved something that I didn't want it to, while I was making a coffee.
The rest of this video had a over saturated retro/grungy look and blown highlights to it so I wanted to apply that look to this clip as well, the idea was to emulate a 1960's 16mm film look over the whole video. To save time the 'Joe's noise levels' plug in combines both the noise and levels in 1 plug in, you can simply use this 1 filter to change the gamma and create noise 'grain' to a clip, you just need to remember what filters you are using, sort out a workflow and stick to it.
'Joe's simple saturation' filter
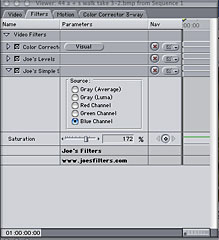
Next I used the 'Joe's simple saturation' filter With the settings of Source: Blue Channel - Saturation 172%. This raised the colour of the sandy path and gave some warmth to the brick work in the factory and the sold sign in the middle distance. Again if you wanted to add saturation and noise 'grain' at the same time you could use the combined 'Joes's saturation and noise'.
FCP Sepia window
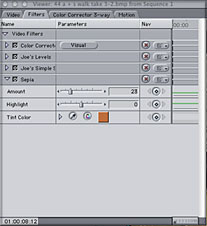
Next I used the FCP sepia filter leaving the tint colour as default and setting the tint amount to 23.
'Joe's' Colour Blur
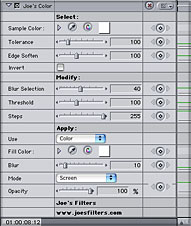
'Joe's Colour blur' was the applied with an edge soften value of 100 to blow the highlights out.
'Joe's' Levels Noise
I then applied 'Joes levels noise' with a setting of 100% to the scale noise setting and a setting of 65% opacity to add 'grain', all the other numbers were left at default.
Joes Field Blender
The penultimate action was to apply 'Joes Field Blender' with default settings. This is a deinterlace filter which uses an alternative method of deinterlacing video. Both fields are used to create a new frame which can give the appearance of a slight motion blur in the frame. This filter provides similar results to Joel Peregrines adaptation of Shawn Bockoven film look technique. Finally a 16x9 mask was added to the footage.
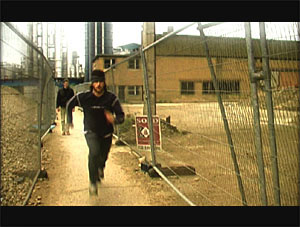
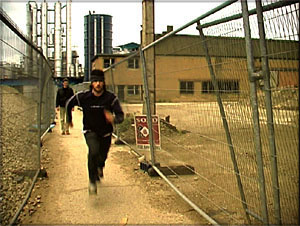
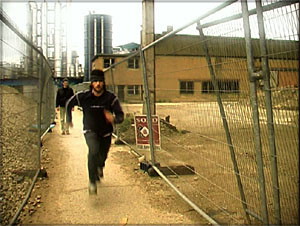
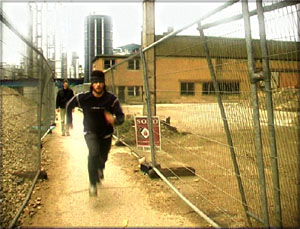
|
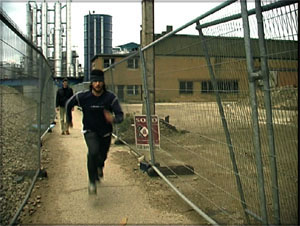
Original image |
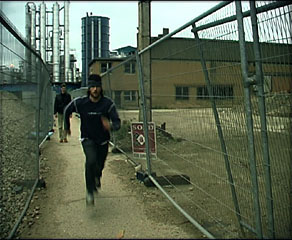
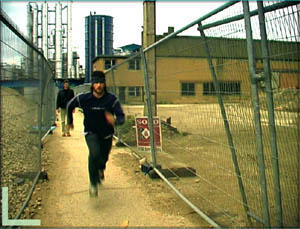
The finished processed footage |
Conclusions
Using this workflow on the footage has got rid of the cast and harsh video look to the scene, it has a subtle grain structure with a slight motion blur and the blown highlights give it a slightly surreal feel. It is just one interpretation off the scene there are many which could have been played with. Joes Filters give you another tool to use creatively when you are trying to achieve a film look to your productions. Visit Joes website for full explanations of each filter.
View the finished video here.
Graeme Webb
After getting bored working in the IT industry Graeme went to work for a media department in a European telecoms company, Producing Web, video, Macromedia flash and photographic presentations for corporate and training purposes.
The opportunity arose to take redundancy which he accepted with relish and now he pursues his passion for photography and Video through his company Amberwood Media, he is also a media/video consultant for a major European Cancer Charity. In his spare time he can be found drinking cider or tequila, listening to rock music and jazz on his Apple IPod or watching David Lynch and Cohen brothers films. Graeme lives in a leafy suburb of south London with his partner Gill and 3 Apple Macs.
copyright © Graeme Webb 2004