
February 2, 2009
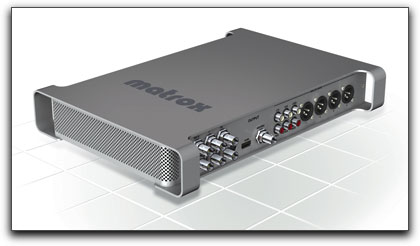
Matrox MXO2

www.matrox.com
$1,595
Review by Steve Douglas
For those of us using Apple's Final Cut Pro the Viewer is just fine for setting the in and out points of our clips. The Canvas serves its' purpose in allowing us to watch our sequences, and the ability to go to the Digital Cinema Desktop provides us with a good approximation of what our clients will view. However, wouldn't it be great to really view our sequences in broadcast quality, to be able to correctly see the color corrections we make, the filters and motion paths we apply, and fine tune them to broadcast standards? The Matrox MXO2 device allows us to do just that either at your home or office at your editing bay, or on location off your MacBook Pro and a good field monitor.
I was looking forward to reviewing Matrox' MXO2 hardware even before it was shipped. After reading positive reviews of Matrox's MXO, the prospective benefits of the MXO2 was both exciting and enticing. What I most looked forward to was being able to see on a good 1080p monitor how my editing projects were really shaping up. This became a great excuse to give to my wife regarding the necessity of purchasing a Sony KDL-32XBR monitor for the editing bay.
The Matrox MXO2 requires that you are using either a MacBook Pro or Intel-based Mac Pro using OS 10.5 or later. You will need to have one free PCIe slot on the Mac Pro in order to install the host adapter as well as the adapter slot for use with the MacBook Pro. It is recommended that, when using with Final Cut Studio, you have at least 2 gigs ram for use with compressed HD footage or uncompressed SD media. Four gigs ram is advised when working with HD uncompressed media. Strongly urged is the use of a HDMI monitor, which will support 1920x1080 for previewing all HD formats.
The MXO2 is powered by either a standard AC outlet or, in the field, by a universal battery adapter. Should you use an external battery be sure that it does not exceed 14. 4 volts as it may cause damage to the MXO2. The AC power cord is not supplied with the MXO2, and not wanting to use a power cord that may or may not be suitable, I had Matrox ship me one of theirs. I do think, however, that it would be a shame for someone to excitedly open their just delivered MXO2 parcel only to be disappointed that they then had to go out and get a power cord. For close to $1600.00, it should be standard that a power cord is supplied.
It is important that you install the MXO2 adapters before you download the software. This ensures that you will have the latest drivers downloaded. Currently the software from the Matrox website is version 1.2 with new updates on the horizon.
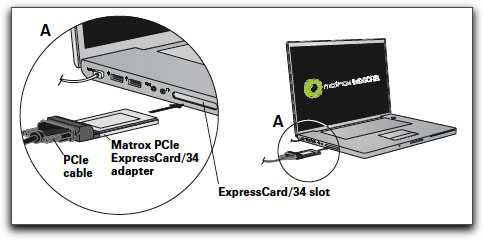
The MXO2 comes supplied with both a Matrox PCIe host adapter which will be installed in your Mac Pro and a PCIe host Express Card/34 for use with your Mac Book Pro. Installation was fairly easy, even for a guy like me who can be all thumbs when it comes installations. Before installing in the Mac Pro, be sure to shut down the computer, unplug your cables and remove the Mac Pro's side panel. Touching the bare metal of the Mac Pro will drain off any excess static electricity from your body. I gently laid the Mac Pro on its' side, and installed the host adapter in one of the available PCIe slots, clean and neat. No problems or issues whatsoever.
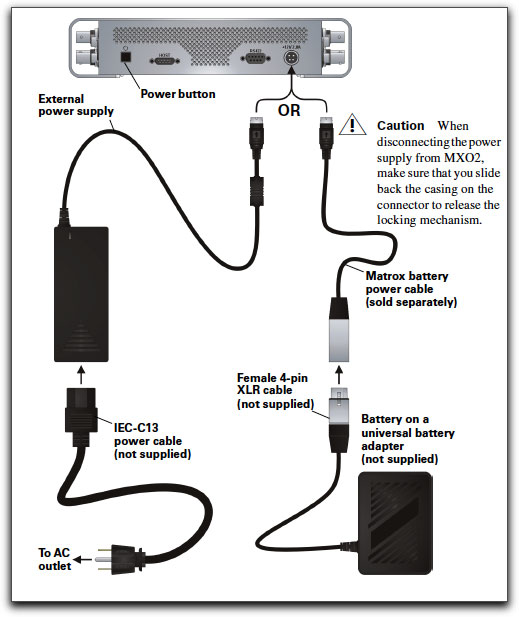
Powering up the Matrox MXO2 is as simple as the graphic appears.
Using the MXO2 with the Mac Book Pro and the PCIe host Express Card/34 is also a simple matter of connecting the supplied PCIe cable to the express card, and installing it into the peripheral component interconnect express slot.
The supplied PCIe cable is about 3 feet, quite short, and for me, I found I had to place the MXO2 on top of the Mac Pro, which is kept under my editing desk, in order for it to be accommodated. This makes it difficult getting under the desk to get to the many inputs/outputs the MXO2 features.
When using the MXO2 with my laptop, by necessity, the MacBook Pro was on the left and the MXO2 on the right. Again, the PCIe cable barely made it around to the MacBook Pro's left sided 34 slot. This is all easily remedied by purchasing a longer cable than that which was supplied. One thing that could not be remedied when using the MacBook Pro is the very tentative fit of the Matrox PCIe express card. It inserts easily to the Mac Pro's express slot, but its' ability to stay put is very poor. The slightest nudge on the cable repeatedly caused it to pop out. Matrox is aware of this and I am sure they will modify the design sometime in the future.
It is easy to use and set when editing on the the MacBook Pro. If only the adapter would stay in place!
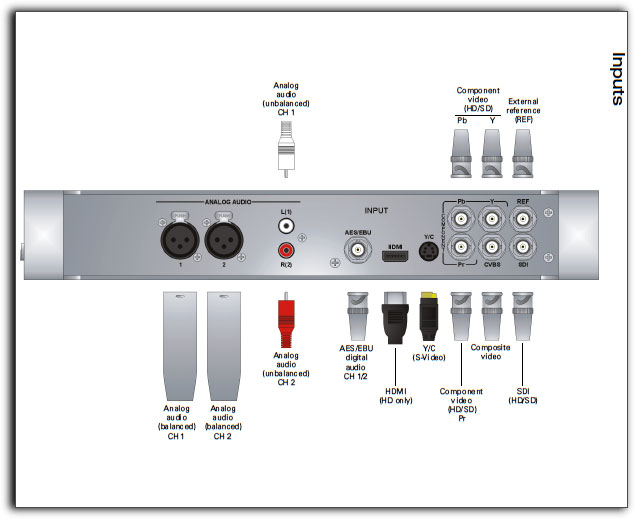
The MXO2 I/O device has a full array of both analog and digital, HD and SD, video and audio inputs. You are capable of attaching a diversity of devices to the MXO2 and use the control panel to select the active input via the Matrox software. Since I capture my footage into Pro Res 422, I was happy to see that the MXO2 fully supports the format as well as a large number of other codecs and video formats. Matrox MXO2 gives you complete freedom to customize your video and audio outputs to support the equipment in your facility and the optimal workflow for each project. You can select up to five simultaneous video outputs for print-to-tape and monitoring. The two SDI outputs are always the same, either HD or SD. The SDI, HDMI, and analog outputs are independent. You can choose whether each is HD or SD. Matrox MXO2 provides built-in 5.1 surround sound monitoring via RCA and HDMI so you don't need to invest in additional equipment as you do with some other I/O products. Matrox MXO2 also gives you the flexibility to map any audio track in Final Cut Pro to any audio output.

The Matrox MXO2 provides realtime frame rate conversion in hardware. It can output a 23.98 timeline to tape at 29.97 fps in real time, saving hours of rendering. This feature is also beneficial if you work in 23.98 but your monitoring equipment does not support that frame rate. Matrox MXO2 lets you view your 23.98 fps project at 29.97 fps to ensure correct title placement and accurate color temperature of your 23.98 fps project. Conversion from 23.98 fps to 25 fps is handled by Final Cut Pro and the host.
Unlike the MXO, the MXO2 has a power-on button. This illuminates a pleasant blue light somewhere within the MXO2's aluminum container. Once installed within the system, there is no reason to turn the MXO2 on or off. When you shut the computer off for the evening, the MXO2 will also be turned off. I made the mistake of closing Final Cut Pro and then manually shutting off the MXO2 intent on using a word document. This caused a full computer freeze. My error, and upon a restart, all was and is well. As I write, the MXO2 has been on for about 12 hours. Placing your hand upon the box produces minimum heat, though I am sure proper ventilation is still a consideration.
The most important thing, for me, was to be able to preview my source media on the HDMI monitor. The MXO2 does that beautifully enabling you to view your media outputting your RGB to a YUV broadcast signal from within Final Cut Pro. This allows you to view footage either straight from your browser to the viewer or directly from the timeline. The ability to see your captured clips from the viewer on a HDMI monitor provides you a better foundation for setting your in and out points, and in the decision making process, of deciding just which clip or take to use. Just as valuable, I now have the ability to see my final sequences via the Matrox' MXO2 HDMI cable output to the SonyXBR monitor's HDMI input and get a strong, clean broadcast quality signal. This permits me to judge exactly how much color correction is needed and how my manipulations will appear on a clients' own screen. The MXO2 provides the same advantage when adjusting filter parameters throughout the sequence. When viewing on the HDMI monitor, I would sometimes be startled by just how much is added to my viewing pleasure. Wow, I didn't know how much those colors would just pop for me. It was an epiphany of an experience.
For me, it was as if I were seeing my footage for the first time.
The MXO2 device is the first such device I have tested that doesn't cost 20k and is within most budgets.
Please keep in mind that I am testing this using a new monitor. All monitors, especially when used for color correction, or simply in a person's home theatre need to have a burn in period of between 100-200 hours. Proper calibration by an ISF certified calibrationist is costly, but definitely the way to go in order to get the best image possible. It is fairly common knowledge that televisions straight from the factory are poorly set. With many sets, the controls to properly calibrate are deep within the menus and not intended for the buyer to play around with. It is best to have a professional do that chore. In the system preferences you can access many of the setup settings for the MXO2. This includes MXO2s' own calibration controls with sliders for hue, chroma, contrast and brightness, as well as a blue only checkbox. Due to the lack of 'break-in time' on my HDMI monitor, I did not attempt to calibrate using these controls.
If you are still filming using long GOP, tape-based camcorders employing firewire, there will be a change in your workflow. It might trick you up a time or two, but once you get your memory trained there should be no problems. When log and capturing footage, you will log and capture your media the same way you always have. In your Easy Set Up you will set it to HDV, Pro Res 422 or whatever format you choose. If your device also has component, SDI or HDMI outputs you can bypass the whole long GOP editing process and capture directly to ProRes. However, once all your media has been captured and you are ready to start the editing process, you can simply go to View > Video Playback > and choose the MXO2 output that matches your sequence. Once you've picked the setting and are in 'Matrox Mode' you are good to go.
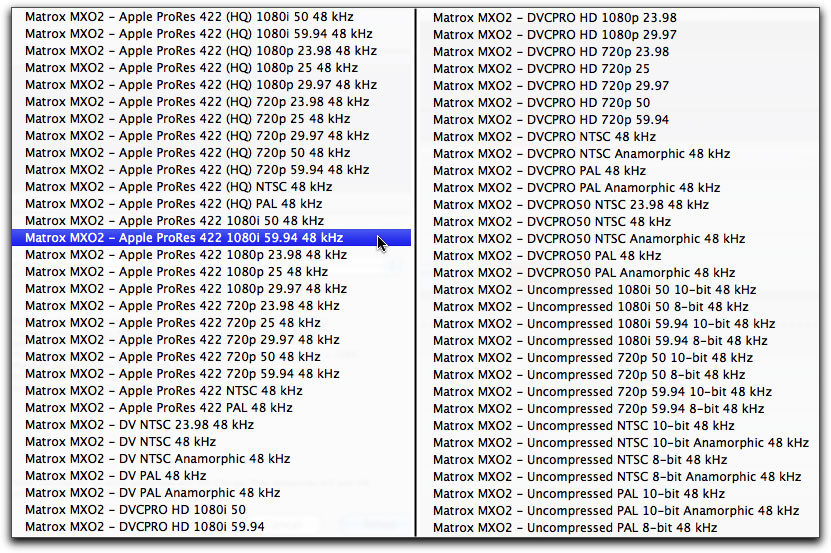
As you can plainly see, you are not limited to just a few settings or codecs. The MXO2 really delivers in this area.
Should you have to do another log and capture mid project there is nothing to worry about. You simply repeat the process by going back to your easy set up and original L & C setting, complete your capture, and then switch back to the Matrox setting you had been using. I did this a few times and had no loss of media and no crashes of the project.
While I did not have the opportunity to try a log and transfer with a card based camcorder, I was told by Matrox's support department that the log and transfer is a one step process and you will not have to go back and forth in easy set up as I did.
With certain 1440x1080i Pro Res 422 clips stopped at a single frame I did notice some interlacing artifacts on the HDMI monitor. This is probably due to the format of the clip itself. When testing with DVCPRO HD 720p 60, 920x720 clips shot using a Panasonic HVX 200 the still image looked expectedly improved.
Speaking of application support, there are probably many who think that any reviewer is going to get extra special attention to problems or questions that arise in the process of testing. This is not always the case. In the past, I have been left hanging for days waiting for someone to get back to me. This has certainly not been the case with the folk at Matrox. No sooner had I sent an email to Chris Ellis at Matrox then the phone would ring. Things can sometimes be simpler than we make them out to be, and anytime I had a concern Mr. Ellis cheerfully and clearly worked through my questions. If there was something he wasn't, himself, sure about, he opened his own editing bay and got back to me as quick as could be expected. Thus, I would be remiss if I did not send my kudos their way.
Yes, the Matrox MXO2 works fine in both Motion and Adobe After Effects. Initially, in Motion and After Effects, I used the Matrox 10 bit setting and could not get a proper signal to the monitor. It took me awhile before I could figure out the problem. However, once I changed the setting down to 8 bit the output worked just fine. As an experiment, I used the Final Cut Pro easy set up to create a 10 bit setting and imported both a Pro Res and HDV clip. When FC asked me whether I wanted to change the project to match the clips' format I clicked on 'no'. I then exported this 10bit clip as a self contained movie and imported that to Motion. Now the clip worked well in Motion with either the 8 or 10 bit Matrox setting. Obviously, and especially, if you work with a variety of formats, you need to be observant of the MXO2 settings you use. If you are, you should never have a problem.
The Matrox MXO2 I/O device is capable of far too many options and features to cover in one sitting or review. The lightness of the MXO2 and its' relative small size makes it completely mobile used in the field with a MacBook Pro. My bottom line had been how well I could visually monitor my footage in Final Cut Pro and be able to see any color corrections and changes I made to my sequences upon a good HDMI monitor. I am very pleased to say that the MXO2 does an outstanding job, allowing me to preview images and sequences with the broadcast quality I hoped for.


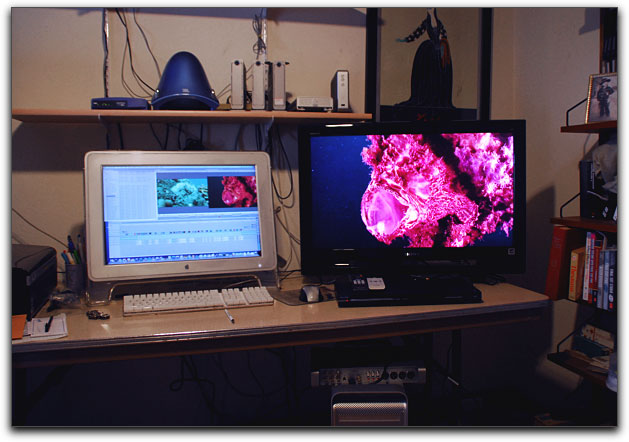
The image on the left is a screen grab taken from the viewer in Final Cut. No color correction or image changes were used. On the right, a photo of the same frame shot off the HDMI monitor. You can clearly see the startling difference. Now when I color correct and add final touches I will be able to be far more accurate during the editing process.
Aside from my only real complaint regarding the tenuous fit of the express card adapter to the MacBook Pro's 34 slot, I was simply amazed at how much difference the Matrox MXO2 made. I was viewing my footage without blinders. If it had failed, my wife would have killed me for buying a new monitor for something I could not use effectively. I am happy to say that I have a few more years of life within me.
In order to have the finest results, you have to be able to see them. The computer monitor only provides a close summation. The MXO2 coupled with the HDMI set is a godsend to anyone who demands the best results for their productions. While not exactly inexpensive, it is worth every penny. Hyperbole aside, and if you couldn't already tell, I love it.
I would like to thank Royce Hildreth of Hildreth Media for his expertise and assistance in this review.
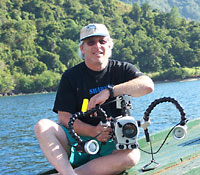 Steve Douglas is a certified Apple Pro for Final Cut Pro 6 and underwater videographer. A winner of the 1999 Pacific Coast Underwater Film Competition, 2003 IVIE competition, 2004 Los Angeles Underwater Photographic competition, and the prestigious 2005 International Beneath the Sea Film Competition, where he also won the Stan Waterman Award for Excellence in Underwater Videography and 'Diver of the Year', Steve was a safety diver on the feature film "The Deep Blue Sea", contributed footage to the Seaworld Park's Atlantis production, and productions for National Geographic and the History channels. Steve is also feature writer for Asian Diver Magazine and is one of the founding organizers of the San Diego UnderSea Film Exhibition. He is available for both private and group seminars for Final Cut Pro and leads both underwater filming expeditions and African safaris with upcoming excursions to Kenya in Aug.09, the Red Sea and Egypt for Nov.2009, Truk Lagoon and Yap in Micronesia for July, 2010. Feel free to contact him if you are interested in joining Steve on any of these exciting trips. www.worldfilmsandtravel.com
[Top]
copyright © Steve Douglas 2009
© 2000 -2009 Ken Stone. All rights reserved. Apple, the Apple logo, Final
Cut Pro, Macintosh and Power Mac
are either registered trademarks or trademarks of Apple. Other
company and product names may be trademarks of their respective
owners.
All screen captures, images, and textual references are the property and trademark of their creators/owners/publishers.


