
July 14, 2008
Monitoring, output, and scan conversion device for the Mac.
Matrox MXO $995.00
Matrox MXO system requirements.
DVD-ROM drive to install the MXO software.
Free USB port.
Display card with a secondary DVI-I connector. Must be able to display 1920x1200 @ 60 Hz.
DVI monitor that supports a native display resolution of 1920 x 1200 is recommended,
such as the 23-inch Apple Cinema Display.
Note: Matrox has issued a fix for the QuickTime 7.5.5 issue with the Proc amps
color calibration setup. This patch is for both Tiger and Leopard.
By Ken Stone
When Apple introduced High Definition abilities to Final Cut Pro, it also created a bit of a conundrum for users. 'How do you view your HD video output at full broadcast quality?' This is a critical issue because it is necessary to monitor your HD video at full broadcast quality in order to do frame accurate color correcting, keying and effects work. There seemed to be only one option, the use of a dedicated capture card, which output to a very expensive professional HD CRT monitor, but the price was very high and out of the reach of a good number of FCP users. A less expensive solution was needed.
The Matrox MXO box works in two modes. In Presentation mode, it is a scan converter. In Mastering Mode, the video signal is sent down DVI to the MXO, where it is sent out as a broadcast quality signal to a monitor. Mastering Mode offers various output options. The MXO provides frame-accurate, broadcast-quality HD/SD output, with Genlock, to a 23" Apple Cinema Display or other monitor. While the output from the Matrox MXO box may not achieve the 100% quality of a capture card and Pro HD CRT monitor, it can get very close, good enough for many and at a an affordable price. It will work with any Mac that has DVI and USB2, running either Tiger or Leopard. It is portable and 'hot swappable'. The MXO box can be used in lieu of a capture card, but it is an output device only and has no input (capture) abilities.
DV-NTSC or DV-PAL FireWire was always considered to be a 'prosumer' format, and the new video formats that FCP now works with have too much bandwidth to flow down FireWire. Additionally, these new formats have different frame rates, frame sizes, color spaces, codecs, aspect ratios, and compression schemes (codecs). Video formats can now be Interlaced or Progressive. All of this adds to the complexity and expense of viewing broadcast video output, which is critical not only for judging color timing, but keying and effects as well.
'Capture' cards, which are installed into PCI slots inside the Mac, like the Kona cards by AJA and Decklink cards by Blackmagic designs, are very powerful tools. They can capture from almost any type of input source, digital or analog, can transcode codecs on the fly during capture and have sophicisated audio inputs. They are equally powerful output devices and can output a true broadcast quality video signal to a professional CRT video monitor as well. But these new capture cards and pro level CRT monitors are extremely expensive.
A while back, Apple added a new feature to FCP called 'Digital Cinema Desktop Preview', which gives us the ability to turn an Apple Cinema Display (ACD) into a 'quasi' output monitor. In the FCP View menu > Video Playback, you could choose which ACD (if you had two) you wanted to use for output. You invoke this playback feature by using the 'Command F12' keys, which toggles 'External View' on and off. In newer versions of FCP, you can view HDV video down FireWire to a NTSC monitor, but FCP down converts HDV to SD DV NTSC on the fly and the resulting FireWire output is rather poor to say the least, not only that, but you can only send HDV 29.97 down FireWire.
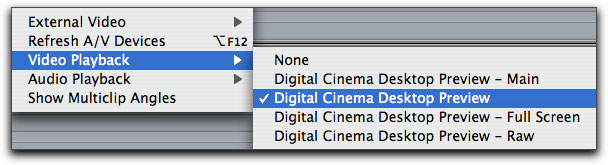 While better than nothing, using an ACD as your output monitor has real limitations. The 'Digital Cinema Desktop Preview' feature sends the video to the ACD, but it is being outputted as a computer signal and not as a broadcast signal. The FCP ACD Preview feature does not map pixel for pixel to the ACD, it displays both fields at the same time, which can produce an interlace tearing effect on screen and it can not be color calibrated.
Setting up the Hardware
You will want to setup the MXO hardware before you install the software, there is a reason for this. If you have the hardware installed when you download the MXO drivers from Matrox, the download and install process will give you the newest drivers but will also check the Firmware in the MXO (via USB2) and update it, if necessary, as was the case for me.
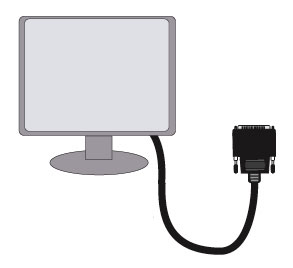
Shown below is the schematic for setting up the MXO in conjunction with the ACD. Matrox provides a 64 page PDF 'Installation and User Guide' that covers all aspects of the Matrox MXO box, including schematics for all the different methods of outputting from the MXO box.
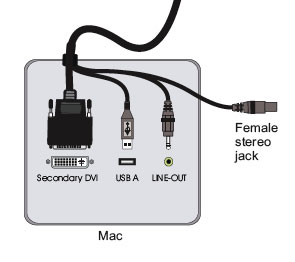
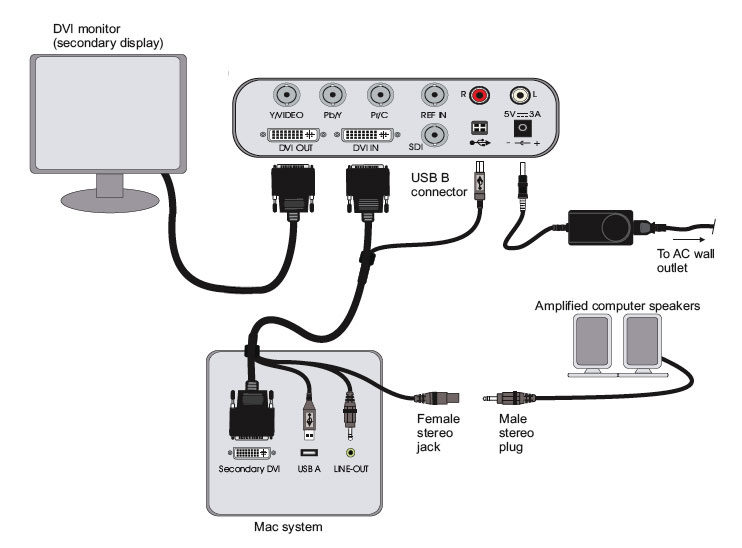 Installing the MXO box is a simple affair, you'll want to shut down your Mac before you begin. The main MXO cable has four plugs on one end; DVI, USB2 and an audio in and audio out. This is the end that runs to your Mac. The DVI carries the video, the USB2 controls the MXO box. There are two audio plugs, one goes to the 'line in' on the Mac, the other plug, a female stereo jack, can run directly to amplified speakers. There is a second method of outputting audio which we'll see in a moment. If you are running two ACDs you will want to disconnect the DVI of your second ACD from the Mac and attach the DVI plug from the MXO cable to this DVI port on the Mac. You can attach the USB2 to the back of the Mac or even to a USB hub but don't attach it to your keyboard. If you are running only one monitor from your Mac and want to add a second monitor via the MXO, attach the DVI plug from the MXO cable to the open DVI port on the back of your Mac.
 On the other end of the MXO four plug cable are two plugs, DVI and USB2. Attach the DVI to the DVI 'In' port on the back of the MXO, then attach the USB2 to the MXO box.
 Run the DVI connector from your second ACD to the 'Out' DVI port on the MXO box. Plug in the power cord and you're done, told you it was simple.
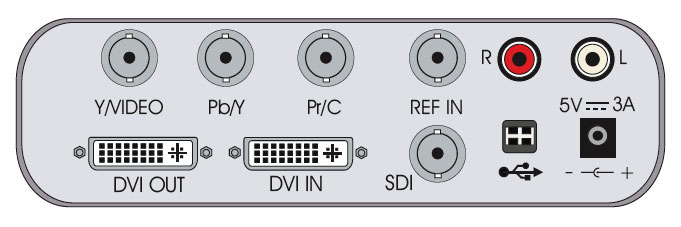
 I mentioned that there is another way to handle your audio. You may not have known this (I didn't) but DVI can carry audio, so your audio is carried to the MXO box via DVI. This DVI audio ability is a unique feature of the MXO box. If you are running out of the MXO box via SDI, then you can output up to eight channels of embedded audio output with stereo audio monitoring. The MXO box also has RCA out ports that you can connect to your audio system. In my case I'm using a Mackie mixing board, so I run from the MXO RCA audio outs to my Mackie. The MXO dual audio output system offer two choices for outputting your audio, excellent.
 You are not limited to using an ACD with the MXO, as it has Analog component, S-Video (a S-Video to BNC cable is supplied), SDI and Composite outputs.
Registering and Installing Software
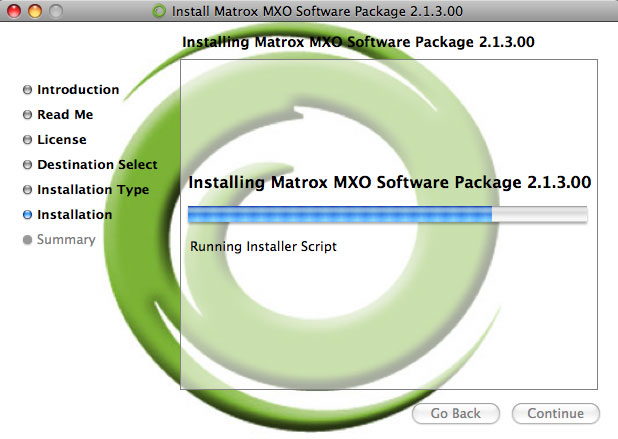
Registering your MXO box and getting to the MXO software for download can be a bit tricky, and there are a number of steps, so I have taken the time to outline, step by step, the process. Believe me, it takes longer to register and download the software then it does to setup the hardware. You can skip this section if you like. While the MXO ships with a DVD installer, there could be newer drivers as well as new 'Firmware' for the MXO. The hardware must be installed and in place before you download the software from Matrox, as the MXO box could get a Firmware update during this process, this would happen via the USB2 cable.
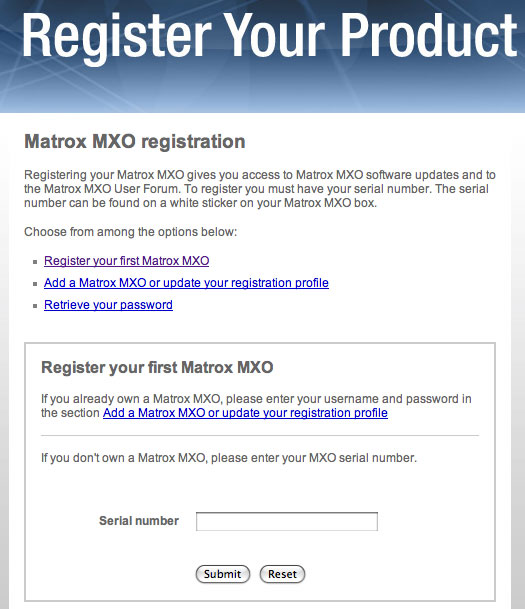
In order to download the necessary software you must first register your MXO. Enter the MXO serial number found on the outside of the MXO box, then click 'Submit'.
You will be taken to the 'Create a new Profile' page.
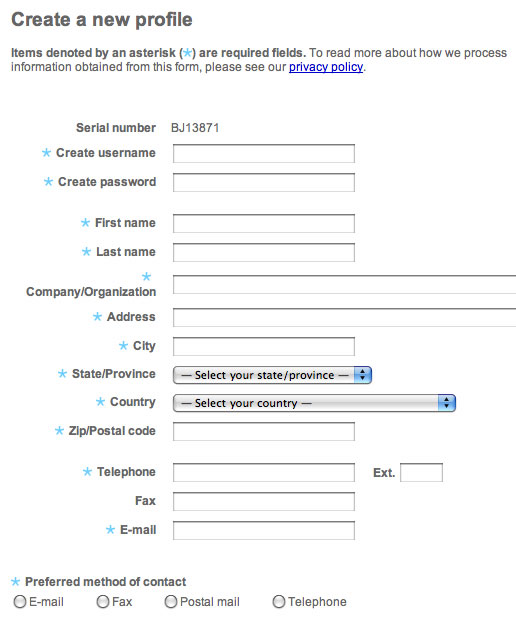
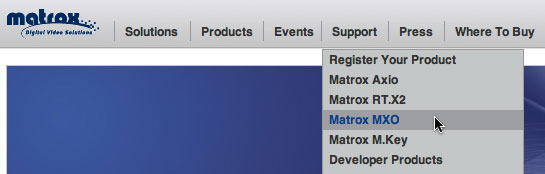
After you have created a profile, and assuming that you checked the E-mail 'Preferred method of contact', you will receive an e mail from Matrox with your registration information, MXO serial number and log-in password. This notification is just back up and as you created your own password, you do not need to wait for the email to complete the process. Now select Support from the menu bar and then
Matrox MXO.
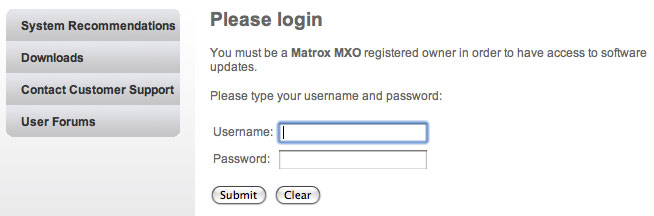
You will now be taken to the Login page. Enter the Username and Password that you created and hit Submit.
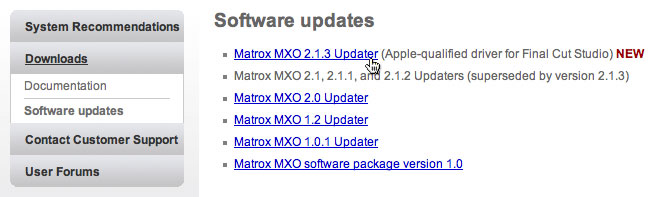
You will now arrive at the Support page, click on Software updates in the Downloads section.

And here we are, click on the latest Updater to start the download process. During this process,
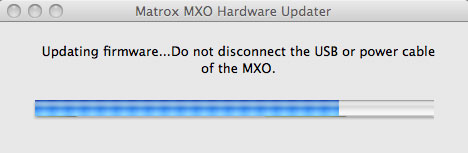
Matrox will check your MXO Firmware version. If your MXO needs a Firmware update, the process
will happen automatically.
The MXO drivers will be installed.
Firmware will be updated during this process, if needed.
Setting up the Mac for the MXO box
After you have installed the software and firmware updates, if necessary, you will be asked to restart your Mac. After the restart, the MXO is now in the loop. During the boot process, if you are running two ACDs, the second monitor, the one on the MXO, will stay dark until the Mac has completed the startup process, then the second ACD will light up and perform as normal.
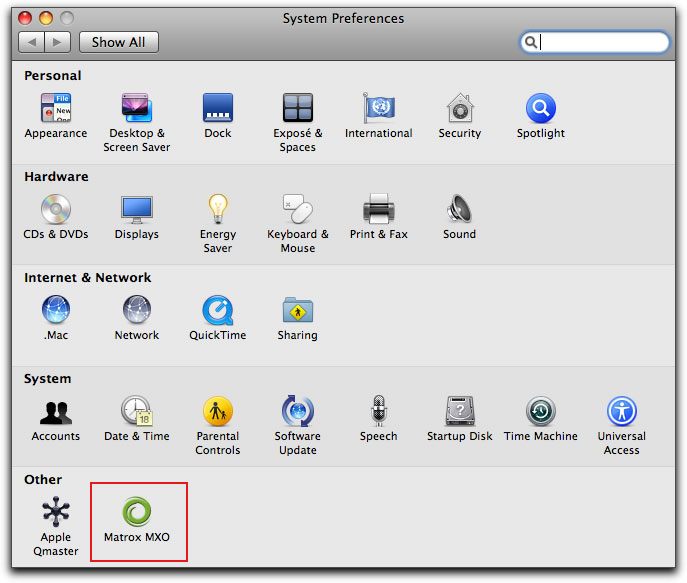
Open the Mac's System Prefs and you'll see a new item, 'Matrox MXO'.
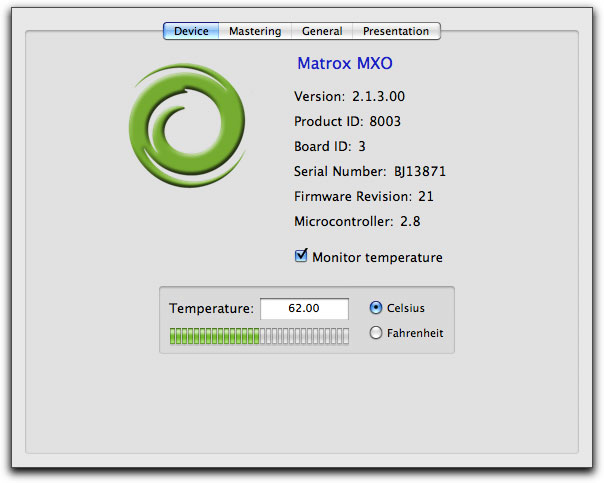
Click on the Matrox icon to open the MXO Prefs. The Device tab shows pertinent information about your MXO box. There is a 'Monitor temperature' check box that shows the operating temperature of the MXO. If, for any reason, the MXO overheats, you will get a 'on screen' warning and the MXO box will automatically shut down to avoid damage.
 The Mastering tab. In the Video Output section, there is 'Scrub and Pause'. This option can be set to 'Both fields', 'First field' or 'Second field'. Shown here, it set to 'Both fields'. When working with Interlaced footage, when you pause playback, there could well be flickering between both fields, which is normal and makes it difficult to view the footage properly, hard to color correct. In this case you would want to chose 'First field' or 'Second filed' (your choice), to view just one field when paused and eliminate the flickering. Field choice is a feature of the MXO box. Of course, if you are working with Progressive footage, this is not an issue. The settings of 'Scrub and pause' have no effect on normal playback.
There is also the ability to Down-convert HD to SD. When the 'Downconvert' box is checked, in the 'Output 16:9 material as' menu, you will have the option to select; Letterbox, Center Cut or Anamorphic, depending on how you want to display your video. When the 'Downconvert HD video to SD' is unchecked, then the three options in the 'Output 16:9 material as' have no effect. Audio Output offers which channels you want to monitor from. I'm set to 1/2, but 3/4, 5/6 and 7/8 are also options.
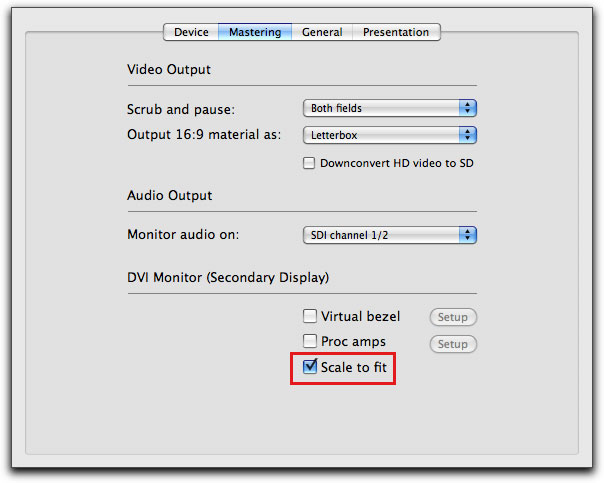
The DVI Monitor (Second Display) has three settings. The 'Virtual bezel' is used to place a bezel onto the video on the MXO monitor, to show which areas of your video image would be cropped by the bezel on standard TV sets. When you check this box, the Setup button becomes active, which enables you to pick the size of the bezel you want to overlay onto your video. The second setting is 'Proc amps' which is used to color calibrate your MXO monitor, more on this later. The last setting is 'Scale to Fit'. When checked, it will scale up the video to fill the monitor. I am working with an ACD 23" monitor, which is 1920 pixels wide, so 1080 footage already fills the screen. When working with 720 video, the video will be enlarged to fill the screen, but even with the MXO, enlarging video will take a small quality hit. If you are doing critical work, you would want to have this box unchecked. While it's true that the 720 image will show both letterbox and pillarbox (on my 23" ACD), the video image will be pristine. I now leave this setting unchecked at all times.
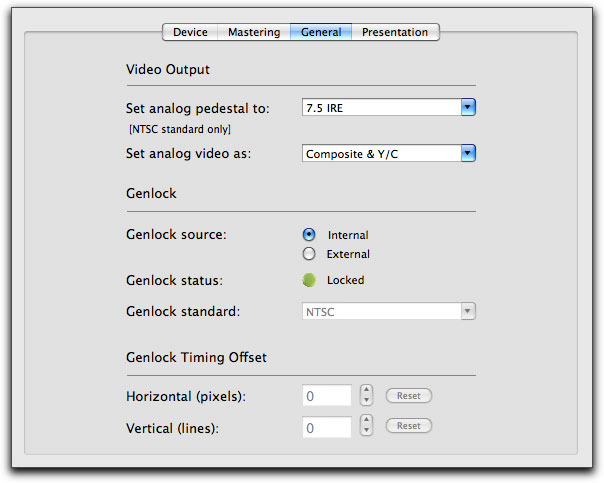
The General tab. 'Set analog pedestal to' offers two choices. 7.5 IRE is for standard NTSC and 0 IRE is for Japanese NTSC. When working with HD video, this setting has no effect.
'Set analog video as', again two options. If you are outputting to a monitor that has composite inputs you'll want to set this to 'Composite & Y/C'. If you are going out to Component to your monitor, then use 'Component' as your selection.
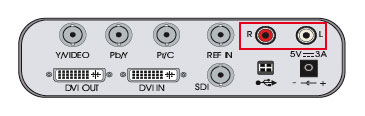
Genlock offers 'External' if you are using an external sync generator and the MXO box has a 'REF IN' port to connect to your external generator. If you are not running an external sync generator, then select 'Internal'.
'Genlock standard' is used to match the MXO's Genlock standard to the video standard of the external sync generator.
'Genlock Timing Offset' is used to adjust the timing of the video output to the external sync generator. This is used to compensate for signal delay between your system and the external sync generator.
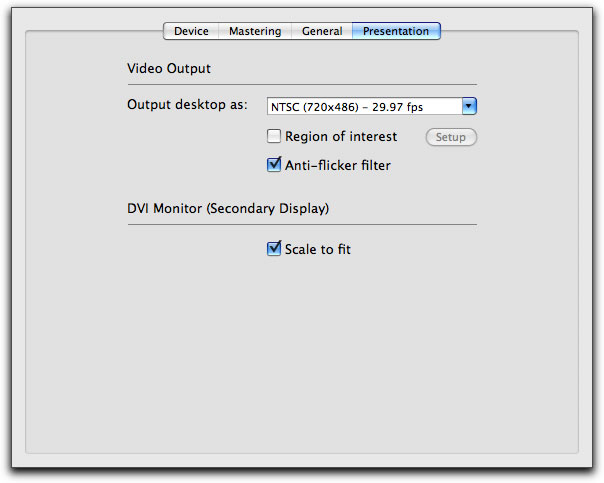
The Presentation tab. "This mode mirrors the contents of your MXO desktop (secondary display) and outputs it as high-quality video, such as for display on a video monitor or recording to a VTR. In Presentation mode, MXO can be used as an SD and HD scan converter to display and record Keynote and PowerPoint presentations or web browser sessions. It can also be used to
create software application training. When working in Presentation mode, your system's audio playback is routed to all the MXO audio outputs."
Color Calibrating your MXO ACD.
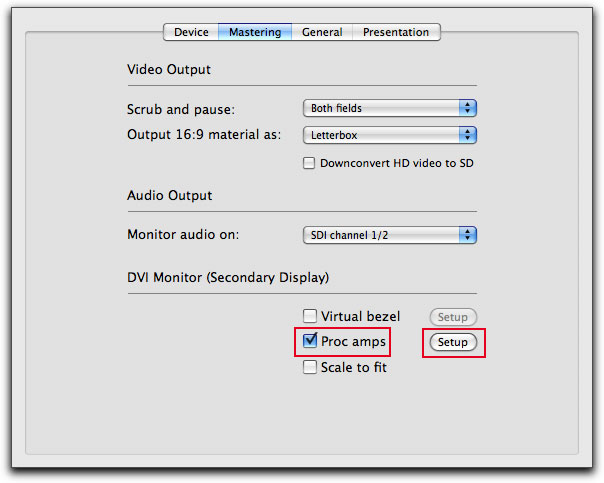
Matrox provides a way of color calibrating the output monitor, in my case a ACD 23". Two tools are used in this process, selectable color bars, and a 'Proc amps' control surface, to calibrate the monitor. The Pro Amps allows the adjustment of brightness, contrast, hue and saturation, the same type of controls that you would find on a Professional broadcast monitor. With your MXO ACD up and running, go to System Preferences and select the Matrox MXO icon and then the 'Mastering tab'. Check the 'Pro amps' box which will make the 'Setup' button active. Click on Setup.
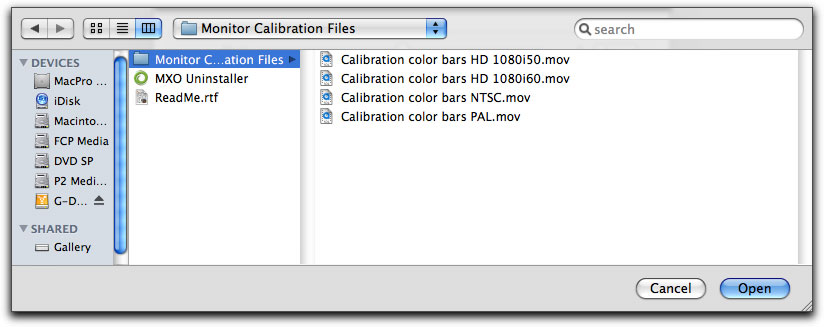
The Proc amps control window will open on screen. The first thing we need to do is to load color bars onto the MXO ACD. Click on the 'Load Clip' button.
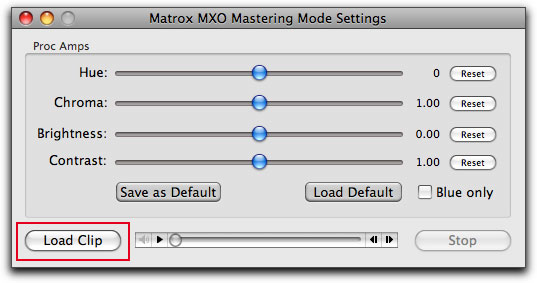
This will open the Finder, select the Monitor Calibration Files and then the appropriate color bars for the video you intend to work with. In my case, I have loaded the HD 1080i.mov color bars. These color bars are used with 720p video as well. When you click on the Open button, the selected color bars will appear on the MXO ACD. You can use the 'Stop' button at any time to remove the color bars and return to the desktop.
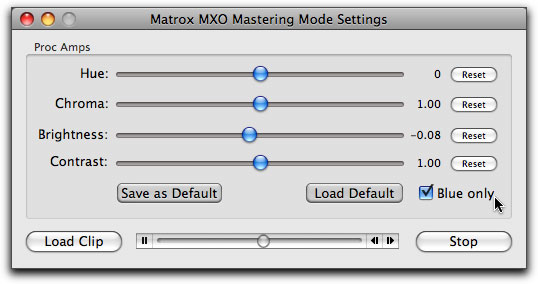
The inclusion of the Pro Amps along with "Blue only' bar allows us to color calibrate our MXO ACD and is used to setup hue and chroma . The 'Blue only' feature is essential for accurate color calibration of a professional monitor. There are step by step instructions in the 'Installation and User Guide', page 28.
FCP and the MXO
Now that everything is set up, we are ready to go ahead and use the MXO with FCP. Remember that when you boot your Mac, the MXO ACD will remain black until the Mac has fully booted and the main monitor displays the desktop, then the second monitor will light up.
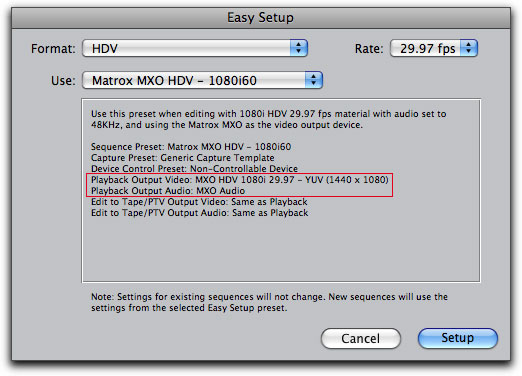
Launch FCP and go to Easy Setup and pick the setup that matches your project format. For this example, I'll be working with HDV 1080i 60 footage. Because I am working with interlaced footage, I will open the Matrox Prefs (in System Prefs) > Mastering tab and set 'Scrub and pause' to First field'. When you open Easy Setups > All, you will see that when you installed the MXO software, a large number of MXO Easy setups were added to the list. If you look at the list, you'll see that the new MXO Easy setups look the same as the 'stock' Easy setups that are supplied by FCP. The advantage of choosing the MXO versions is that it will set proper playback video/audio output for the MXO.
I selected the Matrox Easy setup that matches my video footage. Note that the MXO Easy setup 'Playback Output Video/Audio is set properly for the MXO box for correct output.
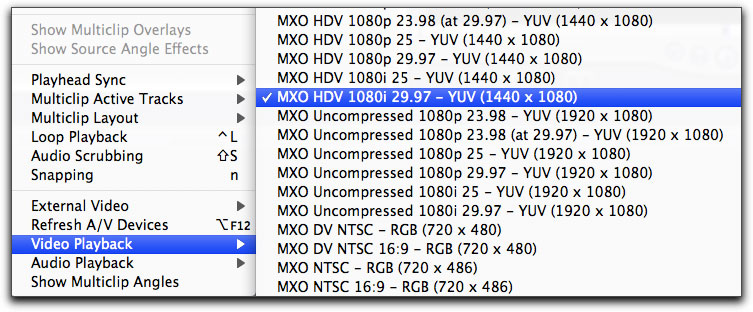
If, for whatever reason, you use a FCP 'stock' Easy setup, you will need to set the Video/Audio MXO outputs manually From the FCP View menu > Video Playback, select the proper setting.
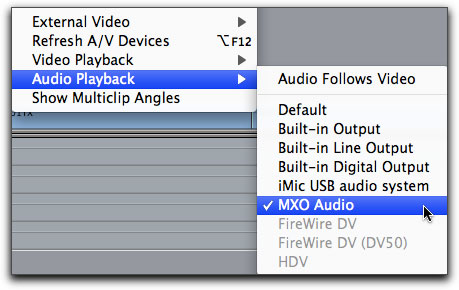
From the FCP View menu > Audio Playback > MXO Audio.
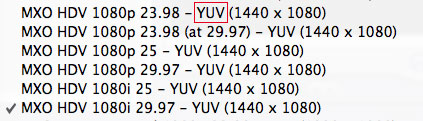
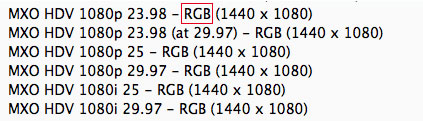
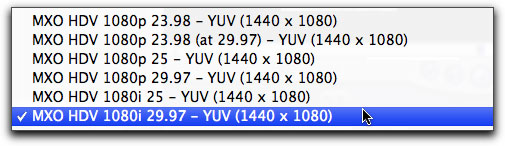
In the View menu > Video Playback you'll see that there are two complete sets for each format, YUV and RGB. MXO supports both RGB and YUV applications. However, its better to use YUV with FCP since it's a YUV application. After Effects would be set to RGB.
While the above might seem a bit like information overload, using the MXO with FCP is very simple. Use a Matrox Easy setup, open a new project, load your footage onto the timeline and then, from the keyboard, 'Command F12'. It's that simple.
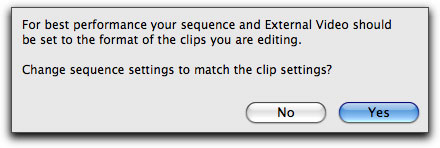
A bit of a shortcut. Now, in Final Cut Studio 2, we have an 'open timeline', which means that when you place video into the timeline and it does not match your sequence settings, you will be asked if you want to change the sequence setting to match the video clip, click 'Yes". This is a very powerful feature and it means that with the MXO, you do not have to choose an Easy setup. You can drop your clip into the timeline, tell FCP to have the sequence settings match the clip settings, but then be sure to go to the View menu and set Video Playback to match the sequence and also in the View menu, Audio Playback, set to MXO Audio.
ProRes 422
ProRes 422/ProRes 422 HQ is a new codec from Apple. If you look at all of the options for Video playback in the FCP View menu, you'll note that there are no ProRes 422 settings. You will still be able to use the MXO to properly output ProRes to the MXO ACD, most often you would use a 'MXO Uncompressed' setting.
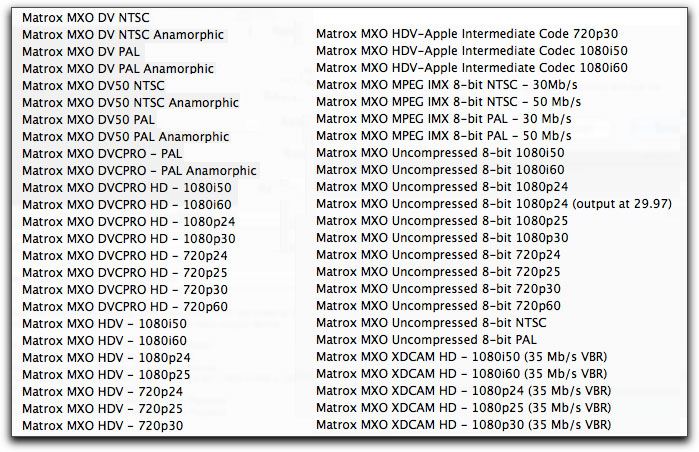
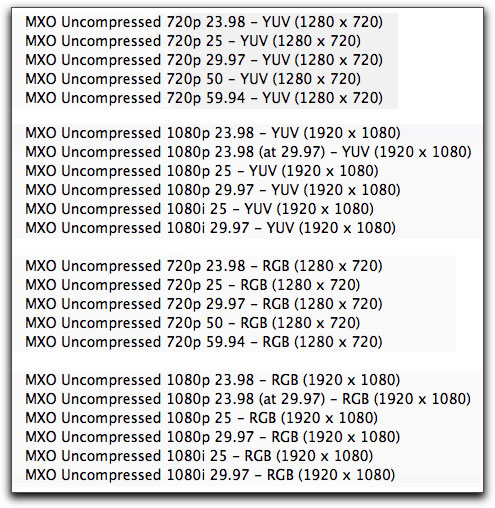
I have extracted the MXO Uncompressed settings from the Video Playback list, shown below. What is important here, is that the frame size of the video playback setting must match the frame size of the video on the timeline.
The HDV video codec has become quite popular, but because of the issues associated with the MPEG 2, long GOP format, several workflow's have been developed to move the video format from HDV to ProRes 422; for editing, color correcting, keying, effects and outputting to SD DVDs. If you capture HDV via a Capture card as ProRes 422, the frame size of the captured video will be 1920 x 1080. In the list shown above, you will see that there is a MXO Uncompressed setting that you can use.
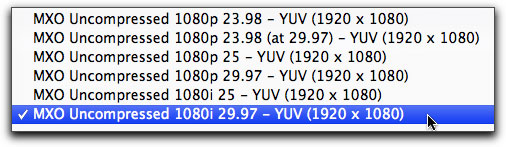
To playback ProRes to the MXO ACD, we need to choose a 'Matrox uncompressed' 1920 x 1080 option in the View Menu > Video Playback. The frame size in Video Playback must match the frame size of the clip.
For those people who want to capture HDV via FireWire and transcode to ProRes during capture, there is Capturing HDV Into ProRes Via FireWire by Andrew Balis, which also includes Easy Setups for many of the HDV cameras. When capturing HDV via FireWire and transcoding to ProRes on the fly, the captured video will have a frame size of 1440 x 1080, not 1920 x 1080. You will note that there are no MXO Uncompressed settings that have a frame size of 1440 x 1080, remembering that it's the frame size that counts, MXO Uncompressed can not be used.
So for proper MXO ACD playback of ProRes 1440 x 1080 we can use the Matrox supplied, appropriate MXO HDV 1440 x 1080 setting. This works perfectly.
Notes
I mentioned earlier that the proper workflow would be to select a MXO Easy Setup, because the MXO Easy Setup also includes proper video and audio playback. With the correct Easy Setup in place, all that is required to engage the MXO box is the 'Command F12'. Easy.
In order for the MXO box to work properly, three settings must be in place.
- The sequence settings must match the clip settings.
- In the FCP View menu > Video Playback must match the sequence settings.
- In the FCP View menu > Audio Playback > MXO Audio.
I have been banging away at the MXO box for several weeks now, throwing every type of video format at it that I could find, and I admit to becoming lazy when testing all of the different formats. As FCP now has an 'Open Timeline', I throw a different format onto the timeline, get the 'Change sequence settings to match Clip' dialog box, click 'Yes'. I then simply go to the View menu > Video Playback and set appropriately. It seems that Audio Playback > MXO Audio does not need resetting.

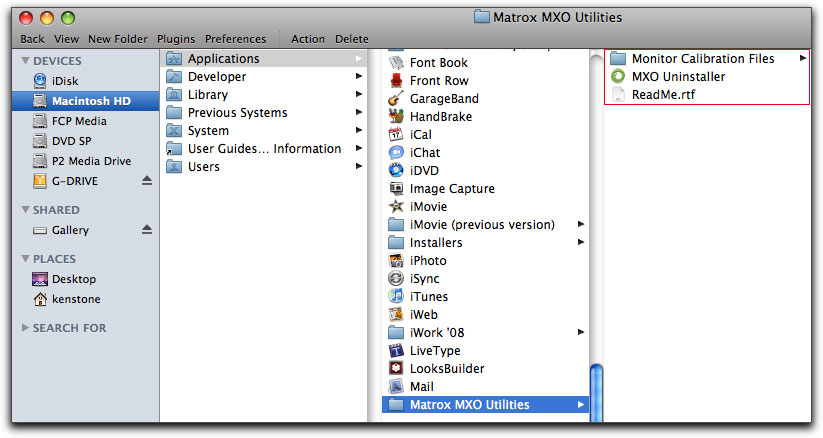
When you install the Matrox software, files are placed in the Applications folder > Matrox MXO Utilities. Nice that there is a 'uninstaller'.
One thing I noticed when banging away on the MXO box, switching formats like crazy. At some point the MXO box can stop responding. Quitting FCP and relaunching it does not fix the problem because the Matrox MXO drivers live at the system level, which is why the control panel is in System Prefs. To restore the MXO box, I restart the Mac and the MXO box comes back on line (this only happened twice). You can also try unplugging the USB from the MXO and then plugging it back in. At one point I got a strange twitching of the video in the Canvas and the MXO stopped outputting correctly. To fix this toggle 'Command F12' off and then back on again.
When switching between 'Command F12' and the standard Desktop, there is always a slight pause where the MXO ACD goes dark for a moment before the change appears. This is normal behavior. One thing that I found was, that if I was in 'Command F12', and then went into System Prefs to change something on the MXO or even if I made a change in FCP settings, the MXO ACD could throw some very strange looking video on the screen. This causes no problems, but it can be a bit disconcerting. The solution is to come off 'Command F12' before making changes, make your changes and then re engage 'Command F12".
Conclusion
The Matrox MXO box is amazing and it truly works as advertised. It's easy to set up, handles all formats and pushes a Broadcast signal out to your ACD or other types of monitors. When the monitor is properly calibrated, you will see true Broadcast output, accurate enough for color timing, keying work and viewing of effects.
In a way, having the MXO box installed was a bit of a revelation. I do work with a number of formats, but HDV has become very popular of late. When working with HDV, I had to judge the quality of the video via the Canvas window, pretty lame I know. At least I never tried to color correct using just the Canvas window. In fact, the first time I could see HDV video as Broadcast was after I had burnt it to SD DVD and played it on my Sony HD LCD TV, but viewing a SD DVD is not really Broadcast quality, is it?
There are a number of other features of the Matrox MXO box that I have not explored, for example, the MXO can deliver frame-accurate audio/video output for insert editing and printing to tape with audio/video synchronization.
I am very impressed with the abilities of the Matrox MXO box, other than DV-NTSC, I have never been able to monitor video at the Broadcast level. It is quite a joy to be able to view color corrections in RT on the MXO ACD as I work. This is also critical for checking special effects, text and keys. Now I can view, as a Broadcast signal, all of the formats and codecs that FCP can work with.
Enjoy,
--ken
copyright © www.kenstone.net 2008
are either registered trademarks or trademarks of Apple. Other company and product names may be trademarks of their respective owners.
All screen captures, images, and textual references are the property and trademark of their creators/owners/publishers.