May 14, 2012
Encoding and Broadcast Monitoring
Matrox Digital Video Solutions
By Ken Stone
For the past number of years I have been working on a Mac Pro, with two 23" Apple Cinema Displays, running Legacy versions of FCP. I had added a Matrox MXO box, which went between my monitor card and my second ACD to provide Broadcast Monitoring so that I could view my video output. Hitting the Command F-12 keys would toggle the second monitor between a standard Mac Desktop and a Broadcast Monitor. This was extremely helpful in viewing and judging video output, as the Canvas window does not provide an accurate representation of the video being played back. This is an important issue because it is necessary to monitor your HD video at broadcast quality in order to do accurate color correcting, keying and effects work.
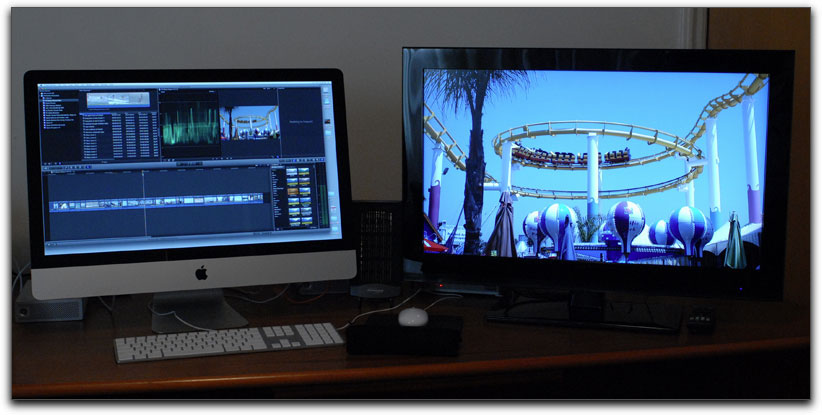
After almost 6 years, the Mac Pro was getting a little long in the tooth, and it was time for me to replace it. Rather than purchase a new MacPro, I decided to go for a tricked out i7, 27" iMac, with 16 Gigs of ram and a 2 Gig monitor card, to run FCP X. One exciting thing about the new iMacs is that they come with the new Thunderbolt connectivity.
Thunderbolt is a new ultra high speed interface for connecting peripherals to the Mac, with a bandwidth of 10Gbps of bi-directional throughput. Using a new type of cable, about the thickness of a pencil, it carries, USB 2, FireWire, Ethernet, supports high-resolution displays for up to 2 Apple Thunderbolt displays and connectivity to Thunderbolt drives and Thunderbolt RAIDs. You can daisy chain from one Thunderbolt device to up to 6 other Thunderbolt devices, and Thunderbolt cables are 'hot swappable'. My first foray into Thunderbolt was with the Promise Pegasus Thunderbolt RAID 5 which I wrote about.
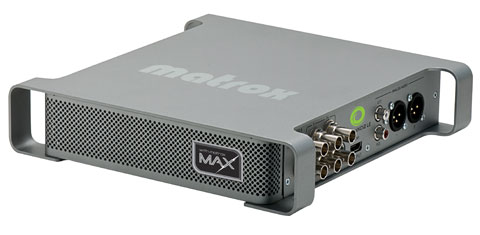
When FCP X first shipped there was no 'Broadcast Monitoring' feature. With the release of FCP 10.0.3 there was a Beta version of 'Broadcast Monitoring' and now with the FCP 10.0.4 update, this feature is now ready for prime time. It was time for me to add 'Broadcast Monitoring' to my new iMac NLE. As I had a good experience with my early Matrox MXO, plus the fact that Matrox has a Thunderbolt adaptor to be used with their existing hardware, I decided to add the Matrox MXO2 LE MAX with Thunderbolt adaptor to my rig. I would like to point out that all of the currently shipping Macs, iMac, MacBook Air, MBP, and even the Mac Mini, all have Thunderbolt. The only Mac not yet equipped with Thunderbolt is the Mac Pro.
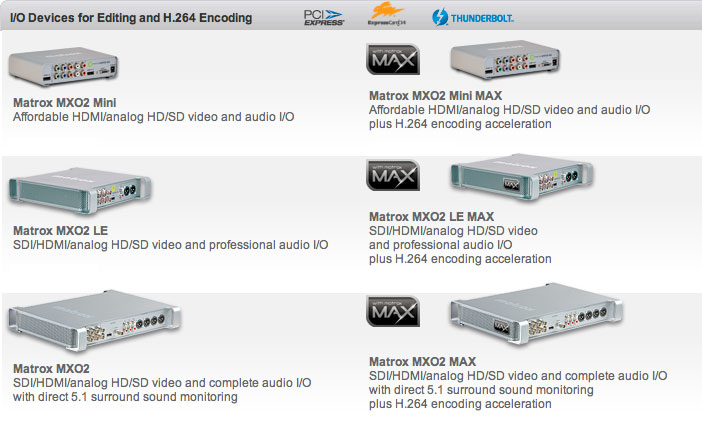
Matrox offers a number of different I/O devices with different capabilities and at different price points. I'll cover these a bit later in the article.
Matrox Set Up
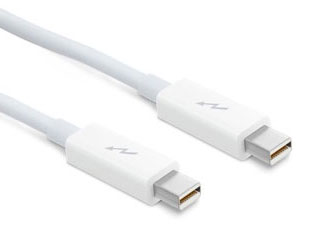
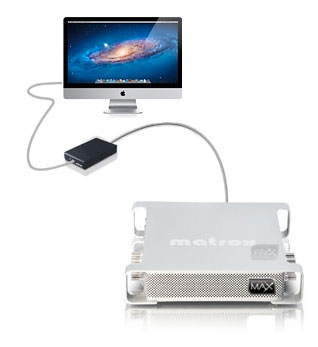
You will want to set up the MXO2 hardware before installing the Matrox software. It's actually pretty straight forward. Attach the Thunderbolt cable, which is manufactured for Apple, and sold separately for $49.00, to the Thunderbolt port on the iMac, plug the other end of the cable into the Matrox Thunderbolt adaptor, which is smaller than a pack of playing cards. On one side of the adaptor is a Thunderbolt port, shown below.
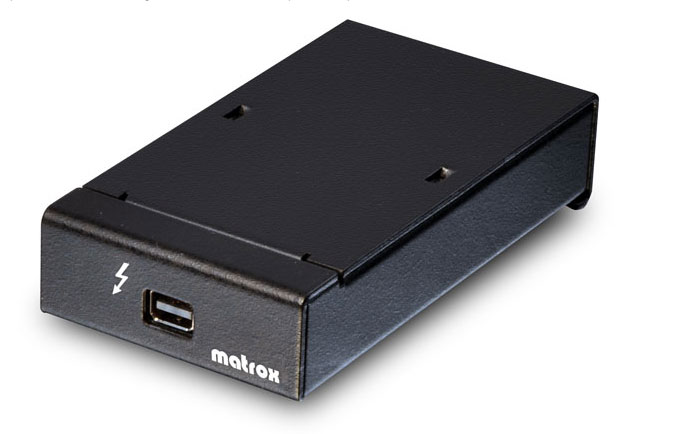
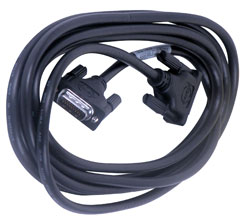
On the other side of the Thunderbolt adaptor is a multi-pin 'Host' port. Attach the multi-pin 'Host' cable, which is supplied with your MXO2 box, to the adaptor.
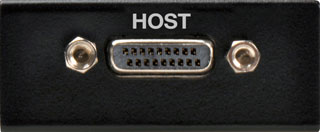
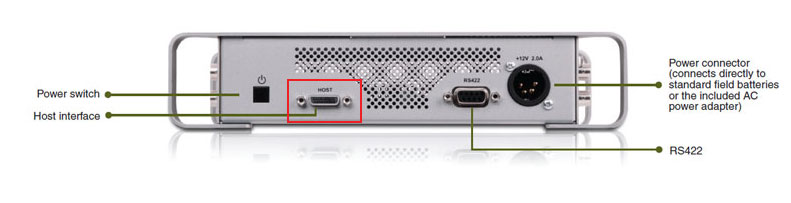
The other end of the 'Host' cable is attached to the 'Host' port on the MXO2 box, shown below, red box.
As shown below, Thunderbolt cable from the iMac to the Thunderbolt adaptor. Host cable from the Thunderbolt adaptor to Host input port on the MXO2 box. This setup will be the same for any Thunderbolt equipped Mac. If you have an existing MXO2 unit, you can purchase the Thunderbolt adaptor for $199.00. If you order Thunderbolt at the time that you purchase your MXO2 unit, the Thunderbolt adaptor will add $100 to the purchase price. Thunderbolt is $100 more than ordering the MXO2 with a ExpressCard/34 or PCIe card.
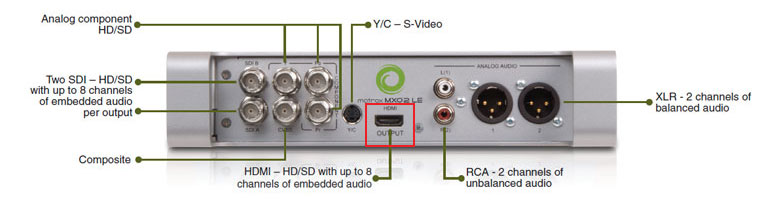
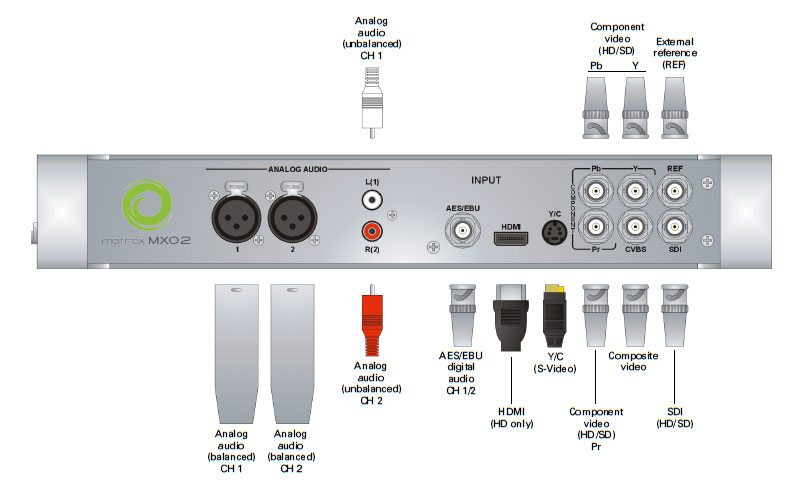
Another side of the MXO2 box has all of the available Output ports, which include Analog component, two SDI, Composite, S-Video and HDMI. There are also RCA unbalanced audio and 2 channels of XLR balanced audio. As I'm using a 32", 1080P TV as my broadcast device, I'll be running HDMI from the Matrox box to the TV.
Matrox software installation
All of the Matrox drivers are available at the Matrox Download Area. Select your Matrox product, then click on 'Software' in the Download column. A number of releases are presented. There is an important caveat. You can not run both legacy FCP (7.0.3) and FCP X (10.0.4) from the same driver (software). You need a different driver for each version of FCP, legacy and X. It is also important to note that you can not have both versions of the Matrox drivers (FCP 7 and X) installed on the same drive (partition). You'll want to read the Downloads Description column carefully to insure you get the correct driver. As shown below, driver 3.0.1.0013 is for FCP 10.0.4.
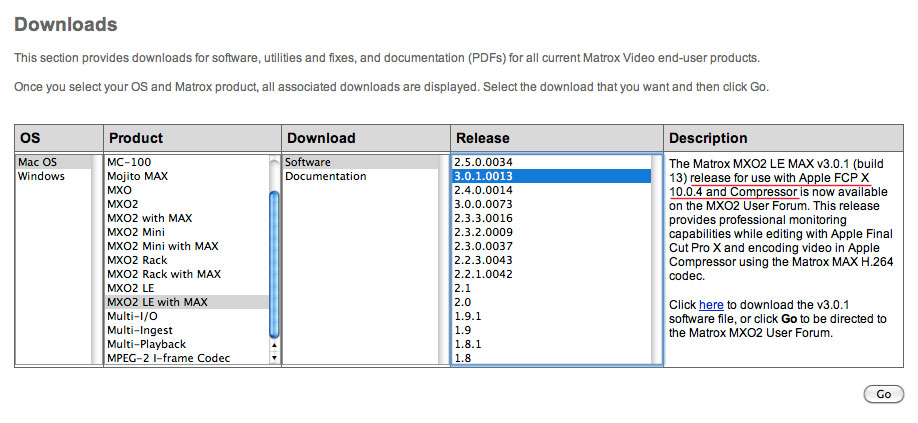
If you are running FCP 7.0.3, then you'll want driver 2.5.0.0034.
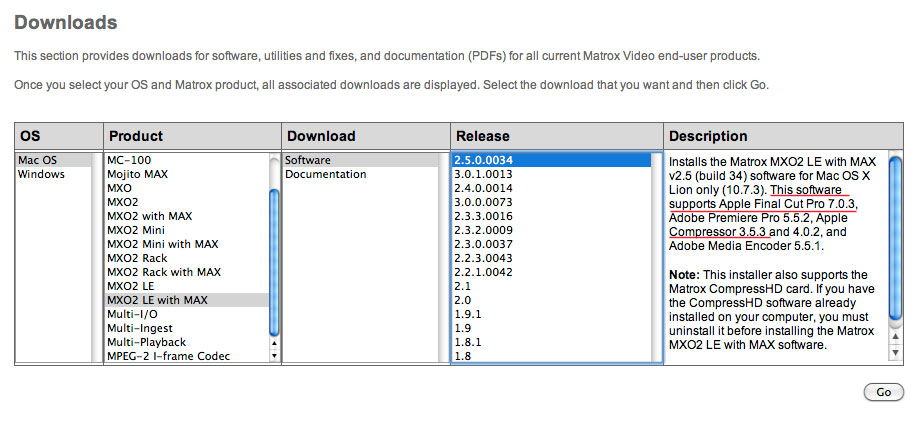
Select the driver for your device, click on the "Go" button. You may or may not be taken to a 'Register' page before proceeding on the driver download page. The Matrox download section is overly complicated and really needs to be simplified.
Before you install your Matrox driver, be sure that your Matrox device is attached properly and powered up. The power button is on the same side of the device as the Host connector port. When the device is powered up there will be a light glowing from inside the unit. If your Matrox device is 'MAX' enabled, the light will be red. If it is a non-MAX version, then the light will be blue.
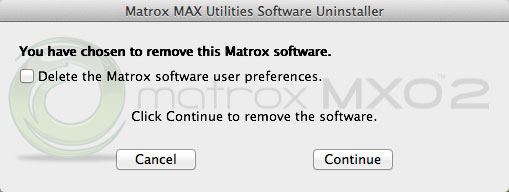
Note. If you have any Matrox software installed, you'll need to uninstall it before you can install the new driver. To uninstall existing Matrox software, open your hard drive > Applications > Matrox Utilities > Uninstaller. If you check (enable) the 'Delete the Matrox software user preferences' box, any Custom Presets that you have created will be deleted as well. You may want to leave the 'Delete the Matrox software user preferences' box unchecked.
If you plan on using your Matrox device with both Legacy FCP and FCP 10.0.4, you'll have to partition your hard drive with a different driver on each partition. You can only have one driver installed on your boot drive at any given time and setting up different User accounts won't do it either because the Matrox drivers are installed at the system level.
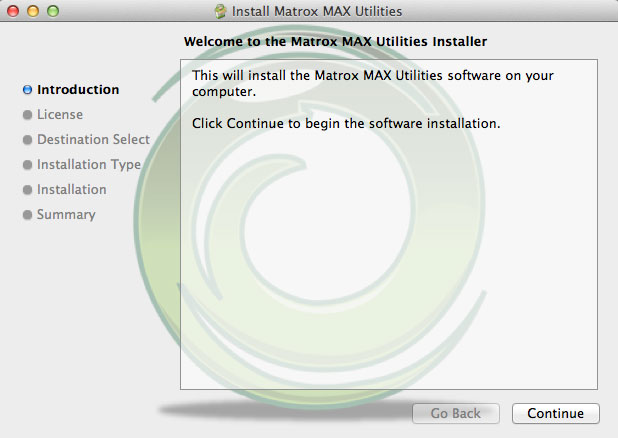
After you have downloaded the Matrox driver, double click on it to launch the installer.
You will be guided through the installation process.
The Matrox software will be installed in two different locations. Matrox will place two pieces of software in the Applications folder of your boot drive, the Matrox Utilities Firmware Updater and the Matrox Utilities Uninstaller.

The Matrox Utilities Uninstaller.
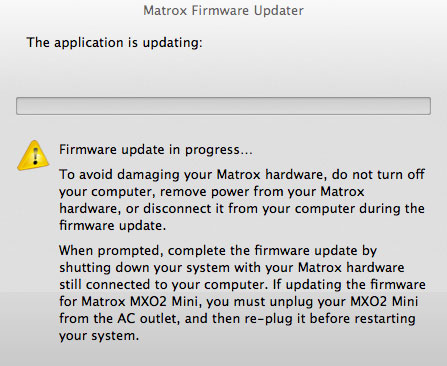
The Matrox Utilities Firmware Updater. You can run this app to check to see if your Firmware is up to date.
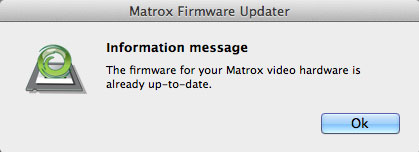
If your Firmware needs updating you will receive the following dialog box.
Matrox Broadcast Monitoring
Broadcast monitoring is new to FCP X and while it now works properly (10.0.4), the process has not yet been completely implemented by Apple. The following workflow for the Matrox seems a bit cumbersome, but I need to point out that this workflow will be the same for any of the other third party suppliers of Broadcast monitoring like BlackMagic and AJA. Hopefully Apple will continue to polish Broadcast monitoring.
In order for Matrox Broadcast monitoring to playback our video properly we need to set up the Matrox Utilities with the Project settings for the project that we are working with. Frame size, Interlaced or Progressive, frame rate, and bit depth (8 bit or 10 bit). As strange as this might sound, we enter our FCP Project settings into the Matrox Utilities that are found in the Mac System Preferences. But here is the caveat. Every time that you want to change the Matrox Output settings in the Mac System Preferences, say if you are changing FCP X projects and the new project has a different format, you must quit FCP X. That's right, you have to quit FCP X and then go into the System Prefs > Matrox Utilities and change your 'Output format' settings, and then relaunch FCP X.
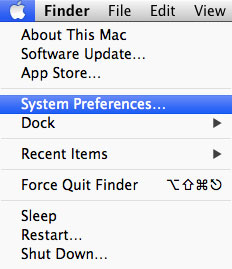
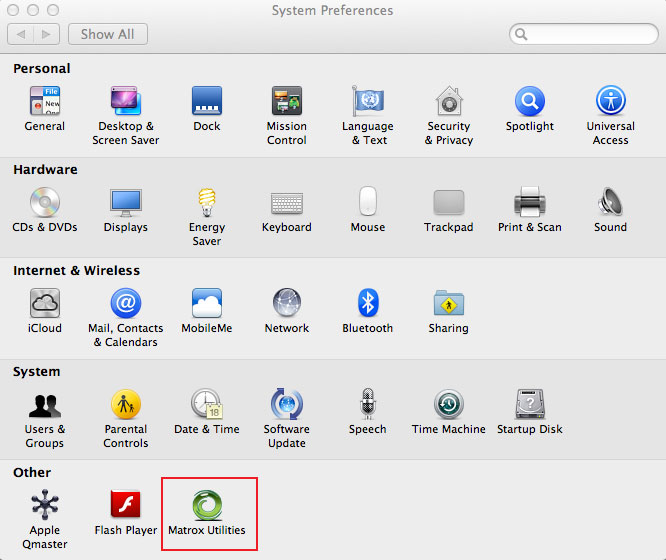
At the bottom of the System Preferences window, in the 'Other' section is the Matrox Utility, double click on it to open.
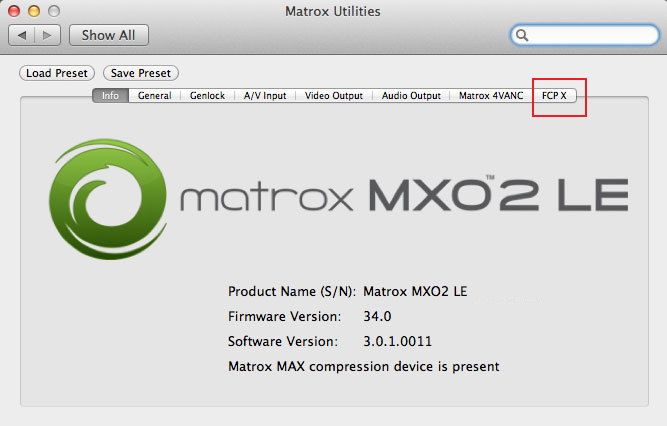
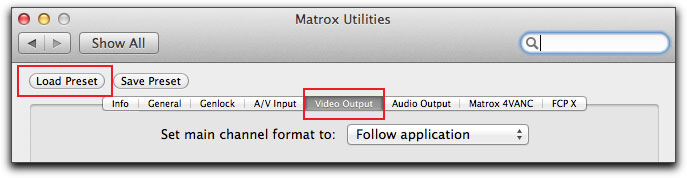
This will open up the Matrox Utility, click on the 'FCP X' tab at the far right.
Click on the 'Output format' drop-down menu to reveal the Output format options available.
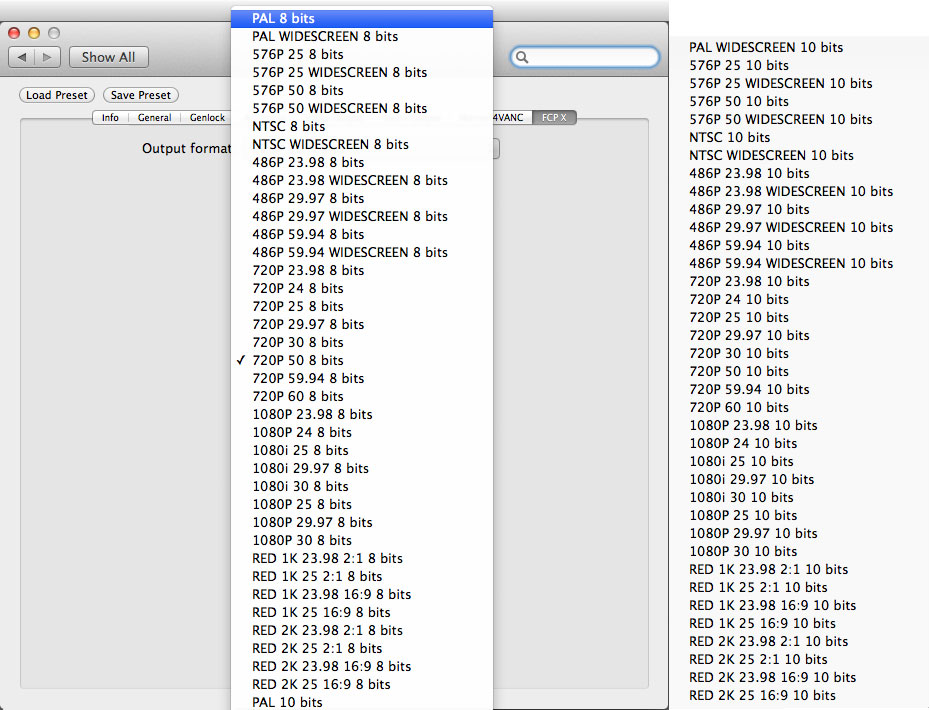
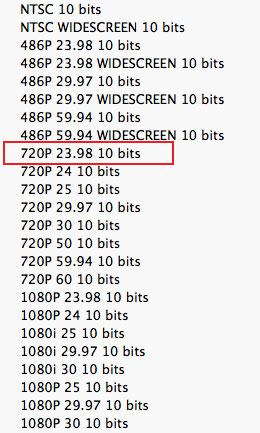
You will note that while there are several specific format and codec settings, like DV-NTSC, DV-PAL and Red, the balance of the formats are generic in nature, no specific codecs are mentioned. This makes the selection of the correct Output format a simple matter. First, chose your frame size and either interlaced or progressive for that frame size, like 720P or 1080i. Next comes the frame rate, 23.98, 24, 25, 29.97, 30, etc. The last item is bit depth, either 8 or 10 bit.
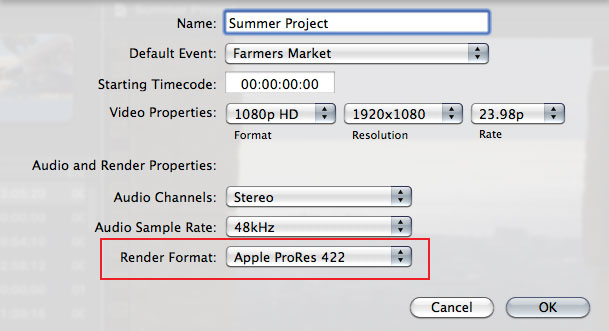
For example, I'm working with ProRes 422, 720P, 23.98 and 10 bit (all ProRes is 10 bit). So, from the list I'll select 720P, 23.98, 10 bits.
While ProRes is 10 bit, the following formats are all 8 bit.
- HDV
- H.264
- H.264/AVC
- AVCHD
- XDCAM EX
- MPEG-2 XDCAM 422
- DVCPRO HD
- HDCAM

As shown below, I have selected the 'Matrox MXO2 LE Audio Output'. With this setting the audio will follow the flow of video from your Mac to the MXO2, out of the MXO2 to a TV via HDMI (or other connection) and will play out through the TV built in speakers. Note that in the Sound panel there is the instruction 'The selected device has no output controls'. What this means is that you will not be able to control the volume level through the Mac keyboard. You will have to adjust the level of the audio volume from the TV set.
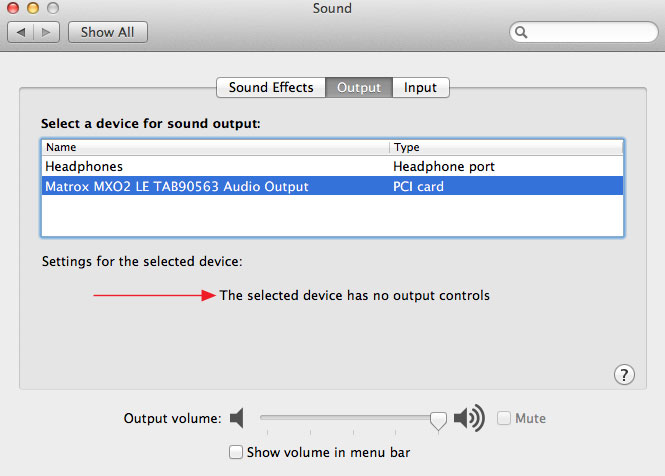
Actually I have a good set of desktop speakers attached to my Mac (which are better than the TV speakers), so, in my case, I have selected 'Headphones' in the Sound panel, which is the audio input port that I use for my desktop speakers. This way, the video plays out to the TV but the audio plays out through my desktop speakers and I can control the audio volume from my keyboard. Your call.
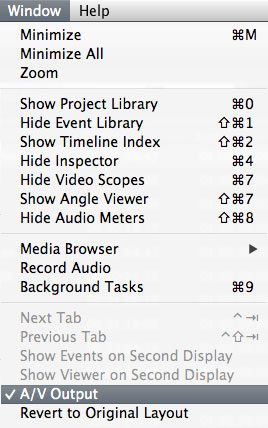
Now, close System Preferences and launch FCP X. With FCP X open, go to the Window menu and slide down and select 'A/V Output'
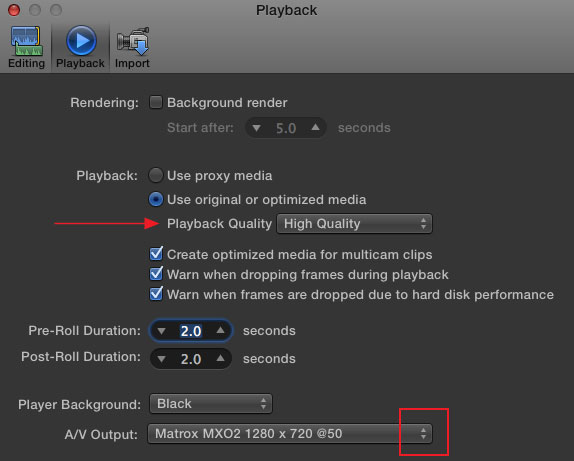
There is one last item to look at. In the FCP X Prefs, click on the Playback tab. There is a 'Playback Quality' option, either High Quality or Better Performance, red arrow below. You would want to set this to High Quality for viewing Broadcast out. If you encounter performance issues, like dropped frames, then you'll need to switch this setting to Better Performance.
At the bottom of the window is 'A/V Output'. It shows 'Matrox MXO2 1280 x 720 @50'. While it does not show the bit depth, this is the setting that I chose in the System Prefs > Matrox Utilities. Notice that the A/V Output options looks like it is a drop-down menu, red box below. One would expect that you would be able to click on the drop-down and select your Matrox Output right from inside FCP X. But alas, this is not the case. There is nothing in the drop-down except the setting that we chose in the System, Prefs > Matrox Utilities. Hopefully Apple will continue to work on Broadcast Monitoring and this feature will work as it should. For now, if you don't remember what selection you chose in the Matrox Utilities, you can open the FCP X Prefs and quickly check your settings.
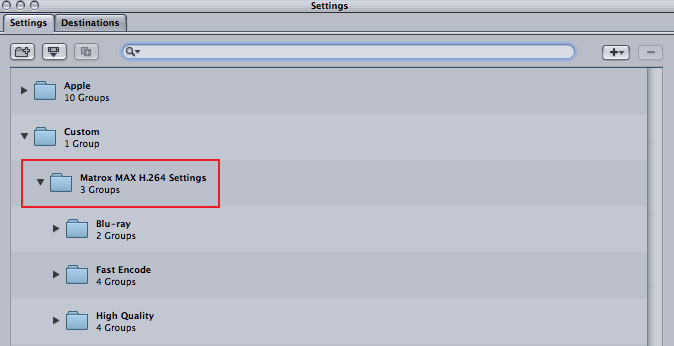
Matrox MAX - hardware accelerated H.264 encoding
Each of the three Matrox products, MXO2 Mini, MXO2 LE and the MXO2, are also available with the Matrox 'MAX' feature, which costs an additional $400, and must be included at time of MXO2 purchase. There is a fourth Matrox product, a Rack mount version, that only comes with MAX. MAX is the Matrox designation for its H.264 hardware acceleration encoding process for deliveries to the web, mobile devices, and Blu-ray. The Max H.264 hardware acceleration is accessed through Apple's Compressor, version 4.0.3, in the form of a number of Matrox Compressor Presets found in the Custom folder. As you can see in the image below, there are 'Fast' encode groups and 'High Quality' encode groups. The MAX High Quality encode Presets in Compressor are still in Beta. The Matrox manual states, "The Predefined High Quality Matrox MAX H.264 settings are not supported at this time." It is not that the High Quality Presets won't work, they do, but the High Quality Presets are identical to the Fast Presets, so there is no quality improvement in High Quality encodes over Fast encodes.
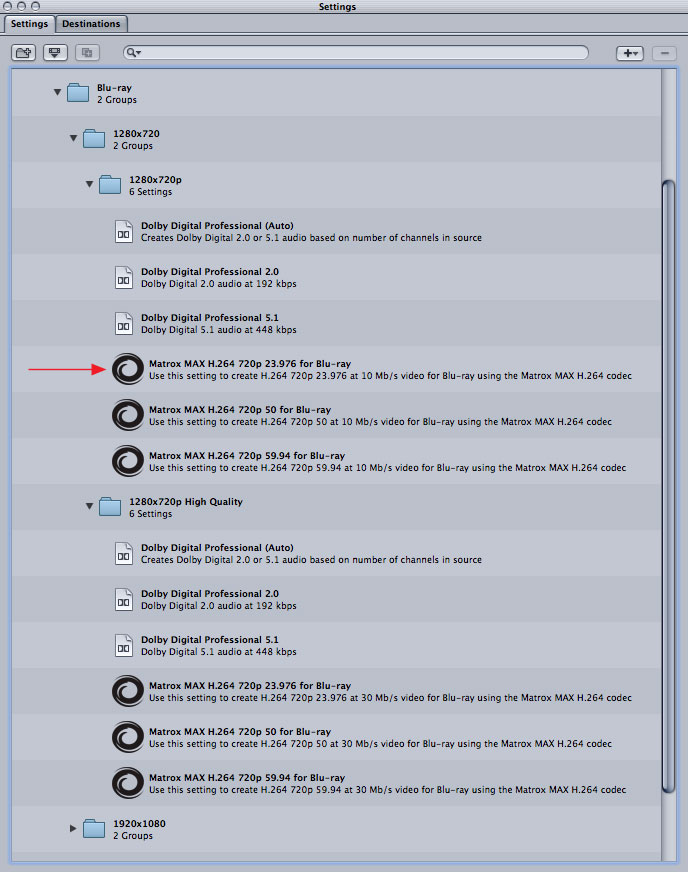
The Matrox MAX Compressor Blu-ray Presets are shown below and are divided into two main groups, 1280 x 720 and 1920 x 1080. Each group has additional groups, one for regular encodes and the other for High Quality encodes. The difference between the two groups is the bit rate. The Matrox MAX Presets are denoted by a black swirling circle icon, red arrow below.
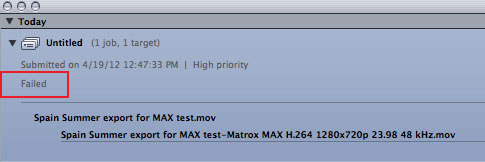
The first caveat that you need to be aware of is that in order to run the Matrox MAX acceleration in Compressor, you must first quit FCP X. If FCP X is up and running, when you submit your batch for processing in Compressor, you will receive a 'Failed' message in the Compressor History window. Having FCP X up and running when using the stock Apple Presets in Compressor is not an issue, however, I would like to point out that the stock Apple Compressor Presets can not take advantage of the Matrox MAX encoding acceleration.
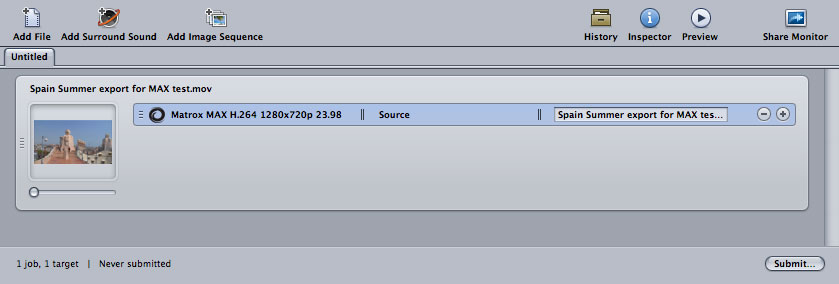
This behavior does beg the question, what about 'Send to Compressor' from FCP X? As this process leaves FCP X open, the Matrox MAX encoding will fail. For me this is not a big deal as I have never been a fan of 'Send to Compressor'. I always export from FCP as a QT, self contained movie. In some cases I'll export with 'Use Current Settings', other times I'll export as ProRes. After exporting your QT movie, quit FCP X and then launch Compressor and drop the QT export into the Compressor Batch window.
Okay, there is a second caveat when using Matrox MAX 'High Quality' encoding. After you have dropped your QT export into the Batch window and applied a Matrox MAX Preset (above), you'll need to look to the Inspector. First, select the Matrox MAX Preset in the Batch window and then, in the Inspector window, click on the Encode tab, red box below. Then click on the Options button.
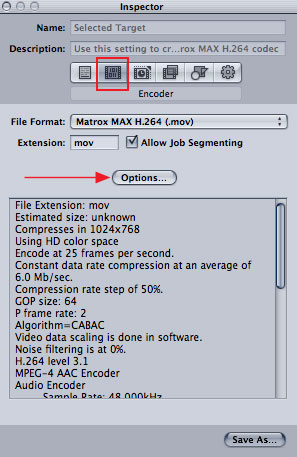
The Options window is shown below. In the Matrox PDF manual it states that 'Hardware Scaling is not yet implemented. Here is the caveat. In the Options window for each of the Matrox MAX Presets, the 'Hardware scaling' box (red arrow below) is checked by default. You must uncheck this box and then click on the Save button, lower right in the Options window. You will now be able to submit your Batch for processing.
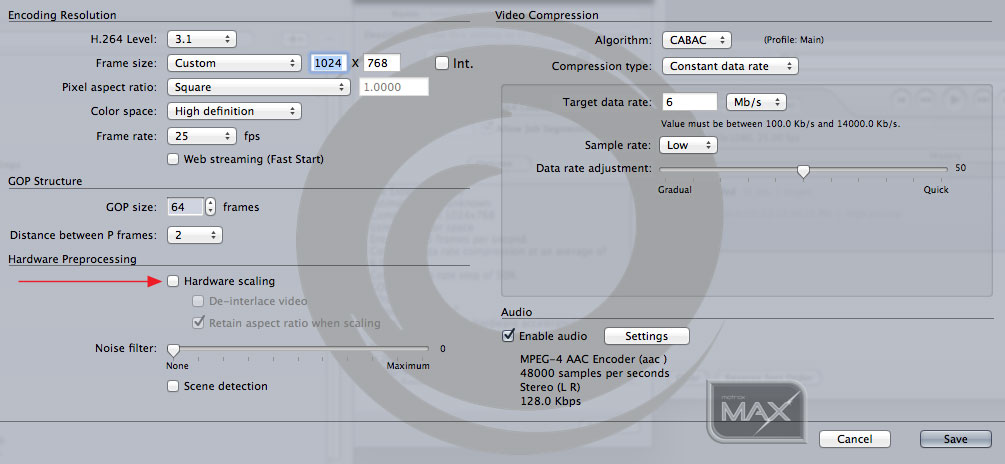
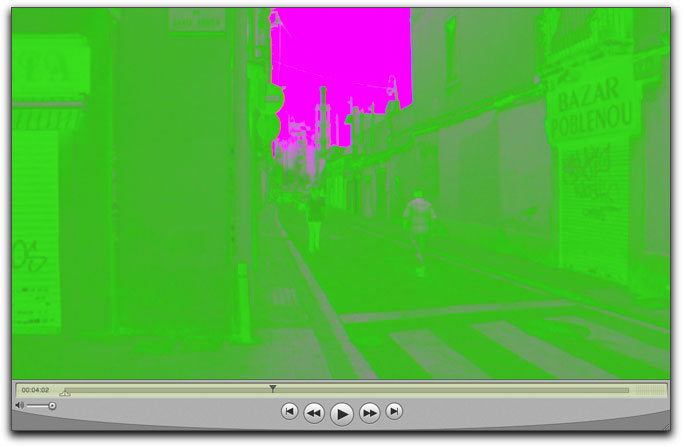
It is only the MAX 'High Quality' encodes that have the 'Hardware scaling' box checked by default, so each time you apply a 'High Quality' Matrox Preset, you must go into the Inspector and uncheck this box. I have discovered that even after I have unchecked the box for a Matrox 'High Quality' Preset and clicked on the 'Save' button, if at a later time, I need to re-use that Preset, the setting can be set back to default with the box checked. If you encode video and the 'Hardware scaling' box is checked, your output will look something like the screen shot below.
With the Matrox MAX 'Fast' encodes, the Hardware scaling option is unchecked by default, so this is not an issue with Fast encodes. In fact, it is recommended by Matrox that we use only 'Fast' MAX encodes at this time, as the 'High Quality' MAX encode Presets are still in 'Beta'.
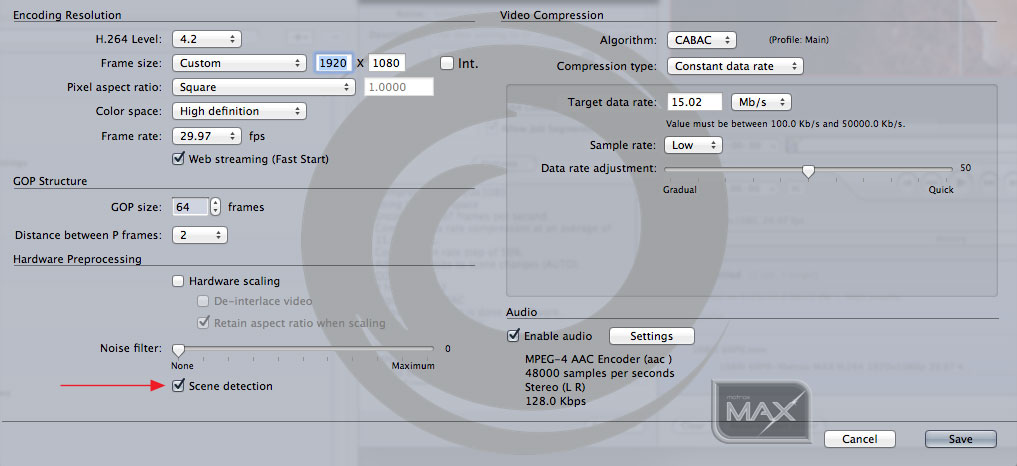
While doing some encode speed tests, I encountered an issue where, at an edit point, the first number of frames of the incoming clip were pixelated. There is an encoding option, 'scene detection', found in the Options pane of the Encode tab in the Inspector, that resolved the pixelization issue. What the scene detection option does is place an I-frame and start a new GOP wherever it detects a major change from one frame to another. Encoding with 'scene detection' enabled will produce slightly larger files, will increase the bit rate of the encoded file and add slightly to the encode time. I have done a large number of encoding tests using MAX and only encountered the pixelization issue once, so my suggestion would be to leave 'scene detection' turned off unless you encounter a problem. You may also want to engage scene detection when encoding at low bit rates.
MAX
Adding the 'MAX' feature at the time of purchase will cost you an additional $400, so what do you get for your money? As MAX uses hardware acceleration, (there is a special hardware chip inside the MXO2 unit), what you get is decreased encoding time, with excellent encode quality. But how fast is it? Generally speaking, you should expect to get close to real time performance. 2 hours of video should take just a bit more than 2 hours to encode.
I did some tests using QuickTime and Compressor and then transcoded using MAX and compared the encode times. Obviously the resulting encoding times using QuickTime or Compressor will depend on your Mac's hardware, processor speed and amount of ram. I'm testing on my 27" iMac, with a i7 processor, 16 gigs of ram and a 2 gig monitor card. What I found was, that when using MAX, my encode times were reduced by about 35% to 45% compared to encoding using QT and Compressor without MAX. Point of interest, I mentioned that the internal light inside the MXO2 is red, denoting that the MXO2 unit has MAX installed. When encoding using the MAX Presets in Compressor, the red light will blink showing that 'MAX' is processing the video.
There are a large number of MAX encoding Presets, however, you can modify any of the MAX Presets to suit your particular needs and then 'Save As', to create a new Custom Preset.
If you only deal with the occasional short movie that needs to be encoded to H.264, then QuickTime or Compressor will suffice. If you frequently encode to H.264 or have large video files, like encoding for Blu-ray, then the MAX options will have a real time saving value. You will need to decide if you want the MAX feature before you purchase, because it can not be added at a later time.
Hardware Inputs - Matrox Vetura Capture
I mentioned that there are two different versions of the Matrox drivers, one for FCP 7 and the other for FCP X. When installing the FCP 7 driver, 'Matrox Vetura Capture' software, which is a stand-alone capture application, is installed along with your MXO2 software in the Applications folder > Matrox Utilities on your hard dive. Through the use of your MXO2 hardware's inputs, Vetura Capture lets you capture video clips with up to 16 channels of audio, including AFD and closed caption data. You can use any codec that is installed on your system to capture your clips using the Vetura Capture software. The captured clips are saved as .mov files. The Matrox MAX H.264 codec is not supported for capture with Vetura Capture.
The drivers for FCP X are still in Beta and at this point in time, the Vetura Capture software is not included in the Matrox installed software. What this means is that, for now, when running FCP X, we can not capture video through the Matrox MXO2 units.
Inputs for the MXO2 Mini. (Screen shots from the Matrox PDF manual.)
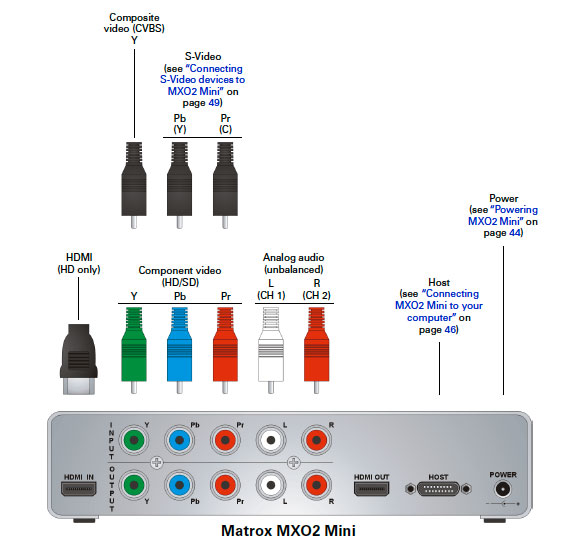
Inputs for the MXO2 and the MXO2 LE are the same.
Hardware Outputs
The MXO2 Output ports include Analog component, two SDI, Composite, S-Video and HDMI. There are also RCA unbalanced audio and 2 channels of XLR balanced audio. As I'm using a 32", 1080P TV as my broadcast device, I'll be running HDMI from the Matrox box to the TV.
There are complete lists of the MXO2 supported video output formats in the Matrox MXO2 Installation and User Guide (Mac OS version).
Broadcast Monitor Calibration
We use our Broadcast monitors to check the visual attributes of our video, brightness, contrast, white balance, and color. Whether we are using a consumer TV or a much more expensive professional broadcast monitor, the video output device will need to be calibrated. That is to say that all of the attributes of the video signal need to be adjusted to match the REC 709 specification. Many years ago, with my first Matrox, I had someone come in and calibrate my broadcast monitor, it was a rather complex and difficult process, especially for the uninitiated. Now, with my new MXO2, it's time to calibrate my new monitor. Matrox now provides a calibration assistant, built into the Matrox Utility, that provides you with a step by step walk through, of the calibration process.
We can calibrate either a Professional Broadcast monitor or a consumer TV, but the process is slightly different and easier to do on a Professional Broadcast monitor. In any case, many of us, myself included, will be using a consumer TV as our Broadcast monitor. If at any time during the calibration process you are unhappy with how it is going, you can always quit the Matrox Utility to return to the default monitor settings.
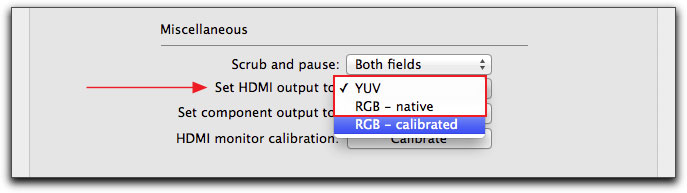
Have all of your Matrox hardware hooked up and have your monitor turned on for at least 20 to 30 minutes so that it is warmed up. If FCP X is running, be sure to quit it. In the Mac System Prefs, click on the Matrox Utility icon at the bottom of the window. With the Utility open, click on the 'Video Output' tab. In the Video Output pane, we will be working with the 'Miscellaneous' section.
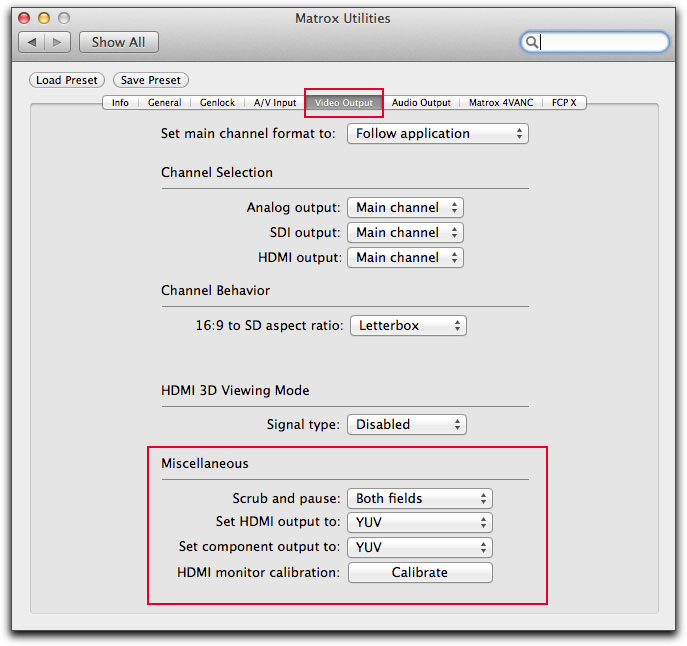
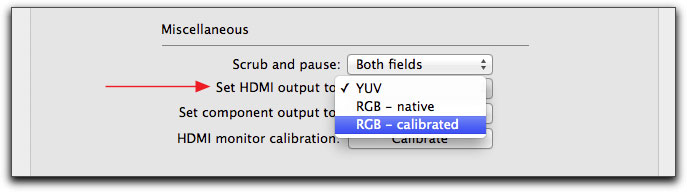
As I'll be using HDMI to connect the TV monitor to my MXO2 box, in the 'Set HDMI output to' menu, select RGB - calibrated.
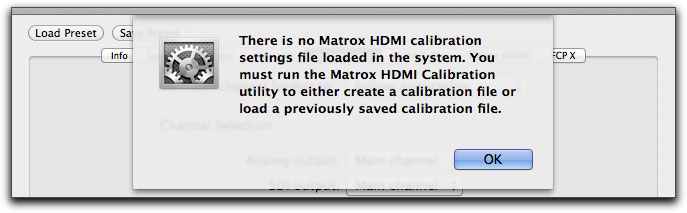
If this is the first time that you have calibrated your monitor, after selecting 'RGB - calibrated', you will see a orange caution icon.
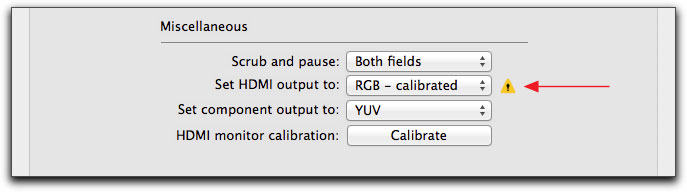
This is okay, click on the caution icon, it's telling you that there is not yet a calibration setting.
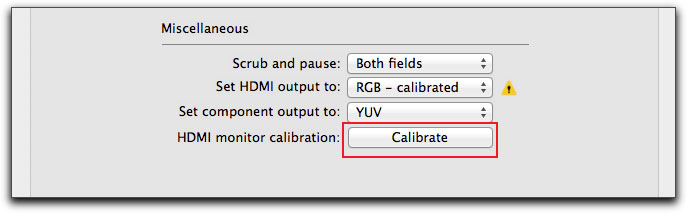
Click on the 'Calibrate' button to start the process. You will be asked to enter your Administrator Password.
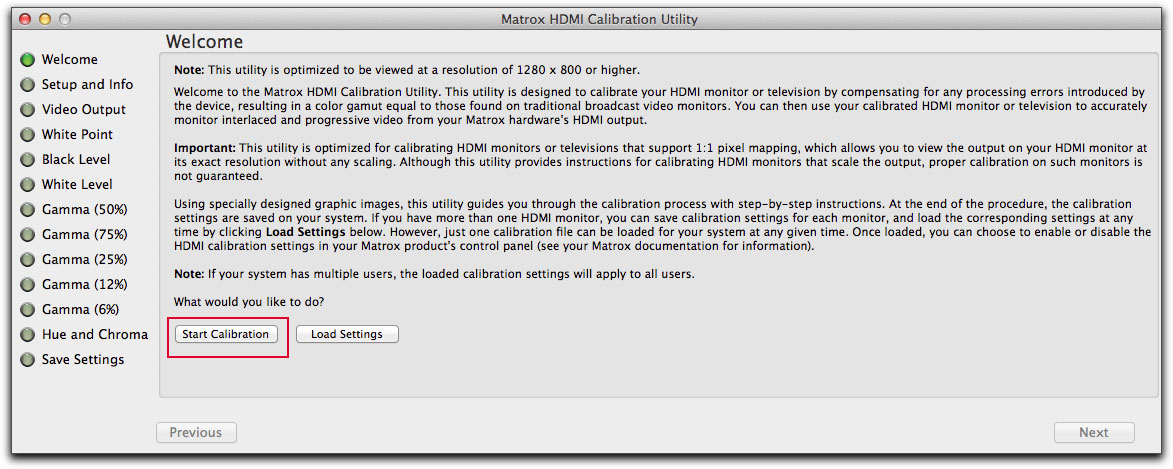
This brings you to the 'Welcome' page and you'll want to read it. What it is saying is that the Calibration Utility is designed for Professional Broadcast monitors that support 1:1 pixel mapping, "which allows you to view the output on your HDMI monitor at its exact resolution without scaling". However, commercial TV monitors, like the one I have, do scale the image and so we are warned that exact calibration is not guaranteed. Click on the 'Start Calibration' button.
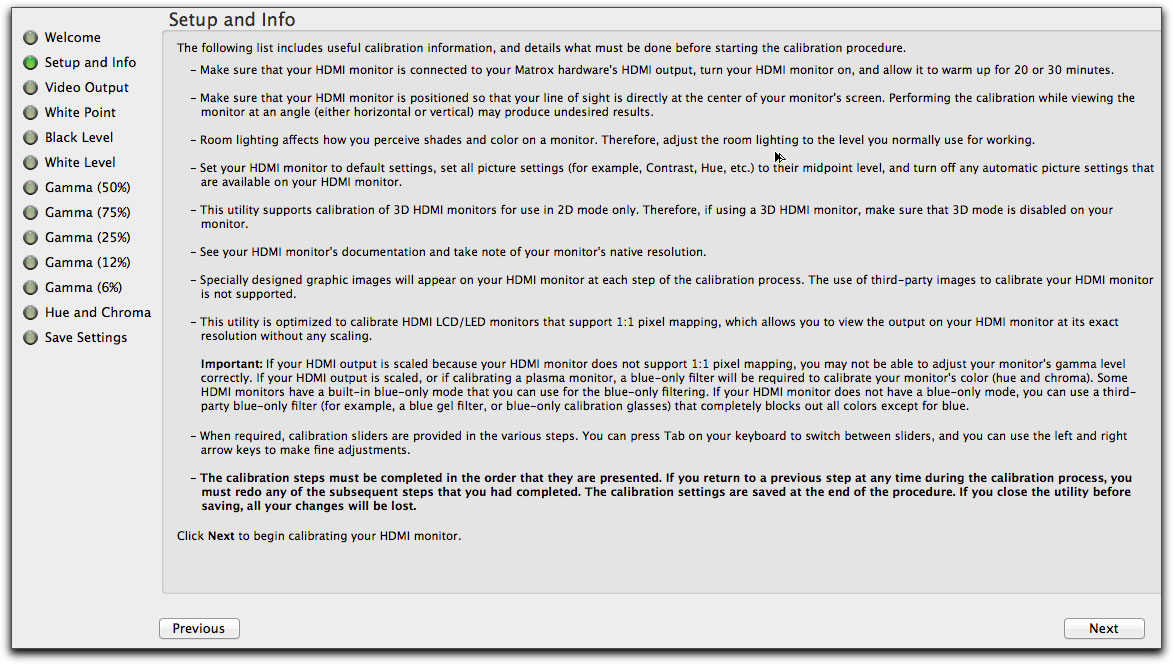
This opens the 'Setup and Info' window. This window provides more information. After you have read the page, click on the Next button to start the calibration process. You will be guided through the calibration process with step by step instructions. For some steps of the calibration process, a sample graphic of what is being displayed on the Broadcast monitor will be shown in the instructions on the computer monitor, demonstrating how to make adjustments for calibration.
The 'Video Output' page opens. From the drop down menu, select the video format that you be working with. Most new commercial TVs and Professional monitors are Progressive, pick a setting that matches the native resolution of your Broadcast monitor. The list of choices is incomplete so I've picked the 1280 x 720p 59.94 fps even though I work mostly with 23.98 fps. I guess you just want to get as close as possible. The Video Output page contains two graphic representations, one showing what Non-scaled output would look like on your TV monitor, the other shows what Scaled output will look like. Looking at your TV monitor you'll be able to determine if your monitor is scaled or not.
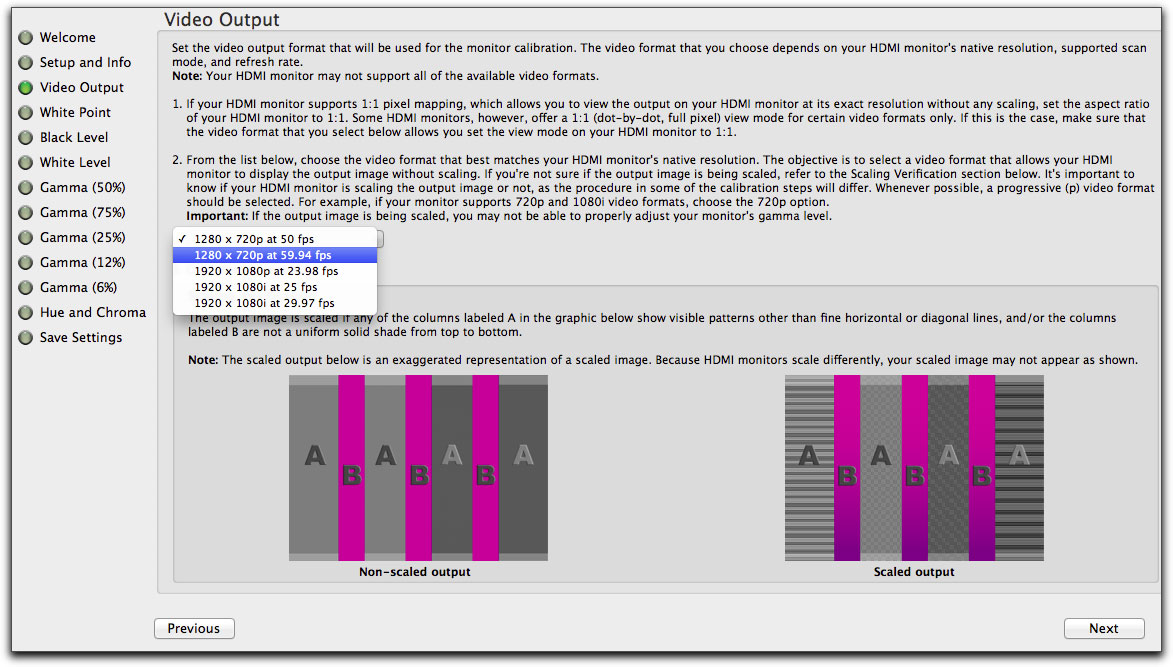
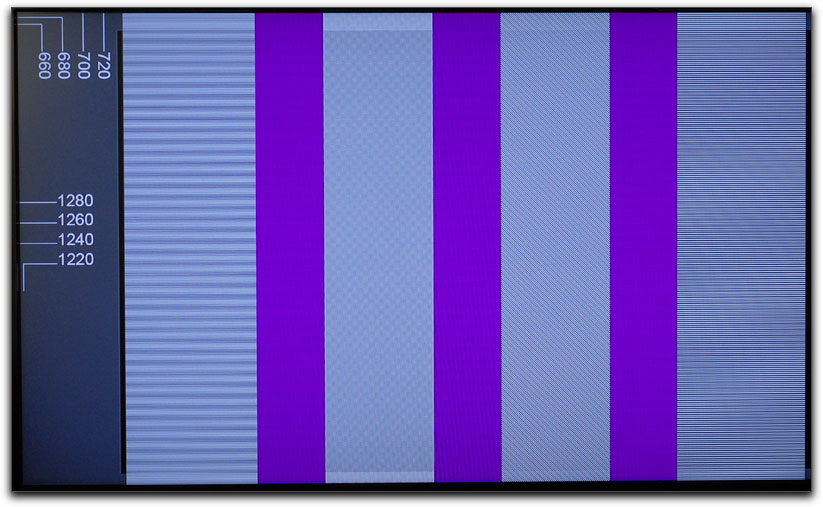
My TV monitor is shown below. Comparing the image on the TV monitor with the image in the Video Output page shows that my TV monitor produces Scaled Output. Click Next.
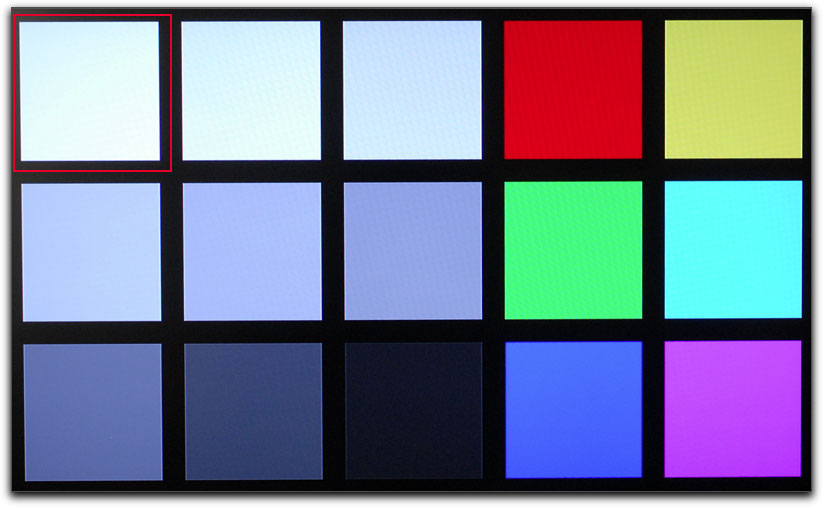
The White Point window opens on the computer monitor and a color checker chart is displayed on the TV monitor. Setting the White Point achieves a pure white on the Broadcast monitor in accordance with REC 709 that specifies 6500K.
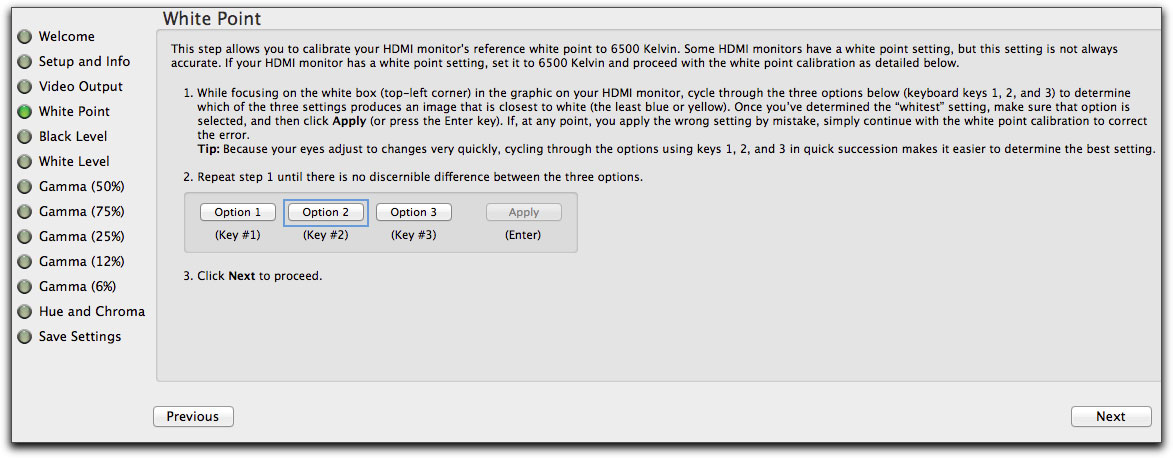
My TV monitor is shown below. Even though an entire color checker chart is showing on the TV, the only element of the chart that we are concerned with for White Point is the white box, top left corner, red box below. Looking at only the white box in the upper left corner on the TV monitor, from the computer monitor, cycle through Option 1-2-3 (you can use the numeric key pad), looking to see which option produces the cleanest white, the one that has the least color tint. At the start of this process, the white box will have a color tint to it. When you have found the whitest Option, 1, 2 or 3, click 'Apply' (Enter). Now, again, cycle through Option 1-2-3 to find the best white and Apply again. Each time you do this, the three different Options will display a cleaner white. Continue doing this until all three Options, 1,2, and 3 are uniformly white showing no color tint. When done, click on Next. It took me 7 cycles to get all three Options to be clean white.
Next up is Black Level. In the instructions it says that you can use the controls on the TV monitor or the controls in the Matrox Utility to adjust the Black Level. I have chosen to use the controls in the Matrox Utility to adjust the Black Level. The black level is the intensity at which a monitor will display a black
pixel. So this basically sets how dark your blacks will be displayed. There are several ways to set the Black Level. I worked the vertical black bar on the left (A). Adjustments are made using the Black Level slider. When you get close there is a 'Up - Down' button, red box below, that will allow you to make changes in very small increments.
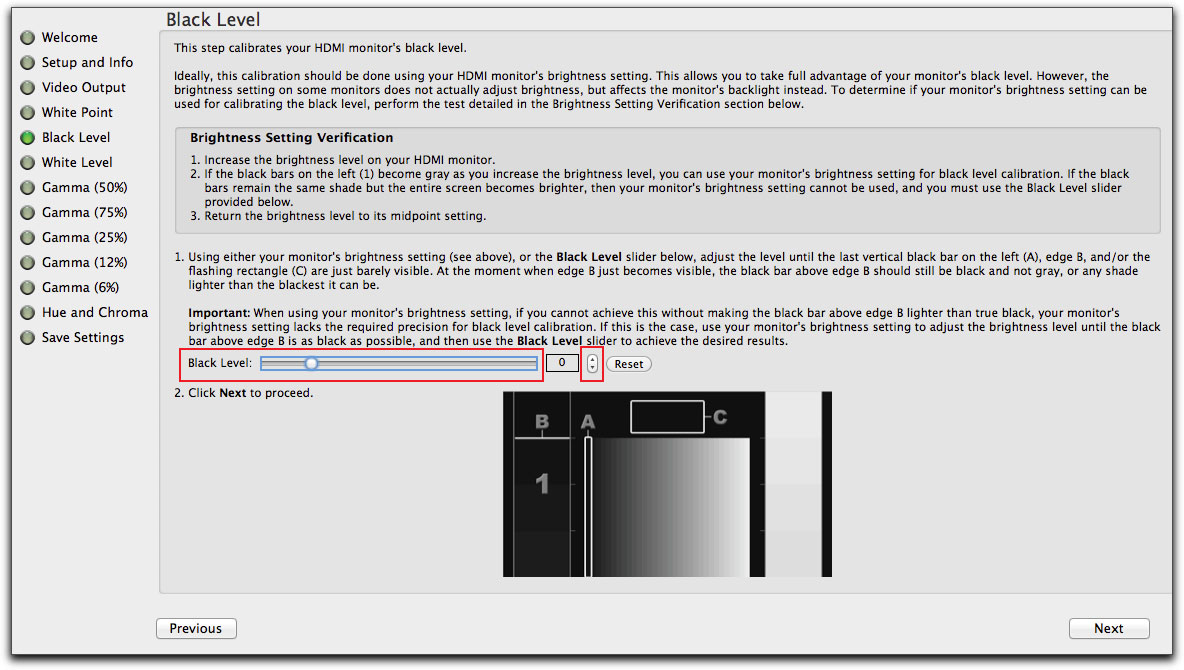
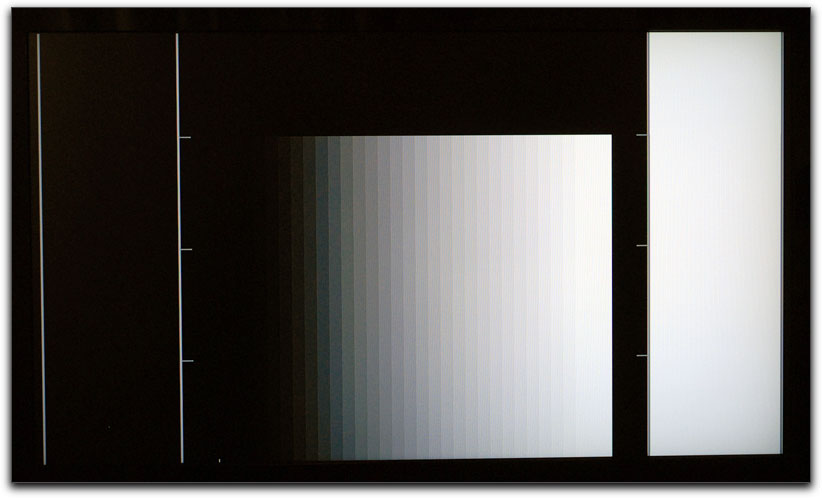
Black Level shown on TV. For Black Level you will be working on the left hand side, the black side of the graphic.
White Level works in the same manner as Black Level except that you'll be working with the white part of the graphic on the right hand side. The white level is the intensity at which the monitor will display the whitest pixel. This setting basically sets how bright the whites will be. If your white level is too high it would hurt your eyes when looking at images that contain white.
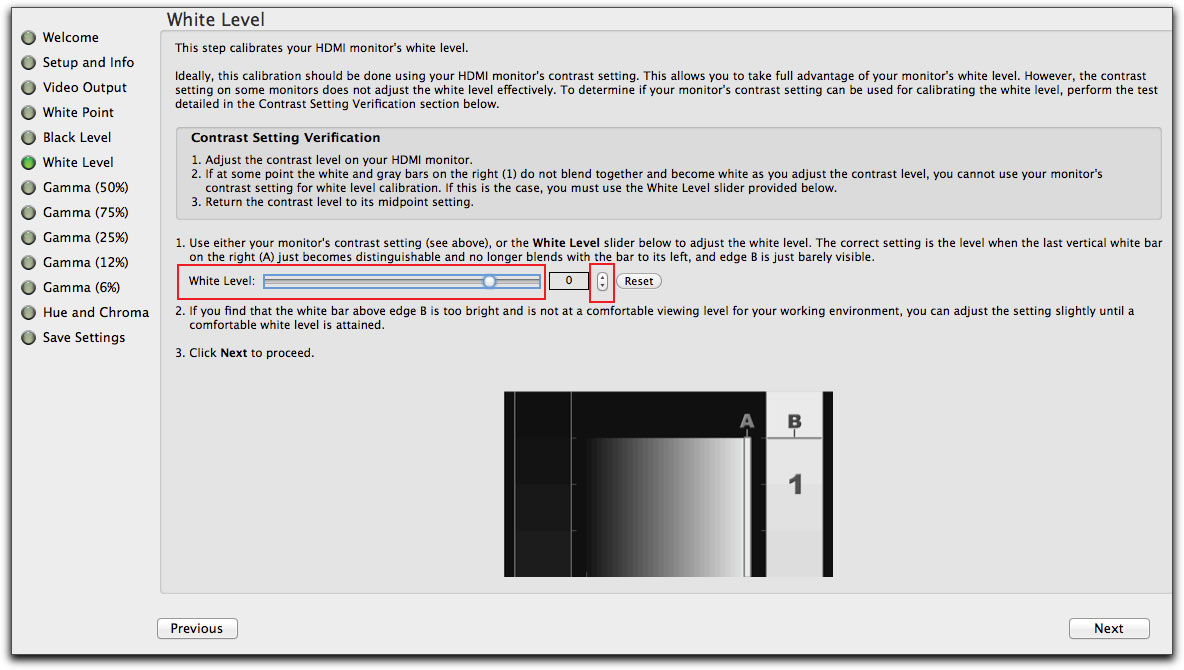
White Level shown on TV (same graphic as the Black Level). For White Level you will be working on the right hand side, the white side of the graphic.
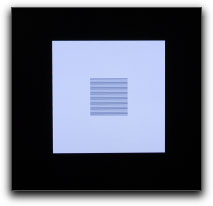
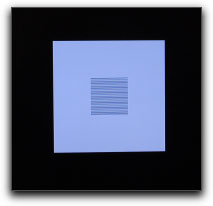
The Gamma setting is the most difficult to do and is why the Matrox instructions tell us that when working with a Broadcast monitor that scales the video, that it can be very hard to achieve accurate calibration. The idea here is to move the Gamma slider so that the small 'A' square is the same shade as the surrounding 'B' square. It is suggested that you squint while trying to make this adjustment. I'm not sure just how accurate I was while doing this process. If you are not getting the results that you are expecting, Matrox tells us that we can just leave all of the Gamma settings at their default. This will allow your TV monitor to use its own gamma default response level. Not only is it very hard to set 'A' and 'B' to have the same shade, but we have to do the Gamma process 5 times. If you struggle with this, then just click the Next button for all 5 Gamma settings, leaving them at default. Leaving the Gamma settings at their default will cause the TV monitor to use it's own built in Gamma settings.
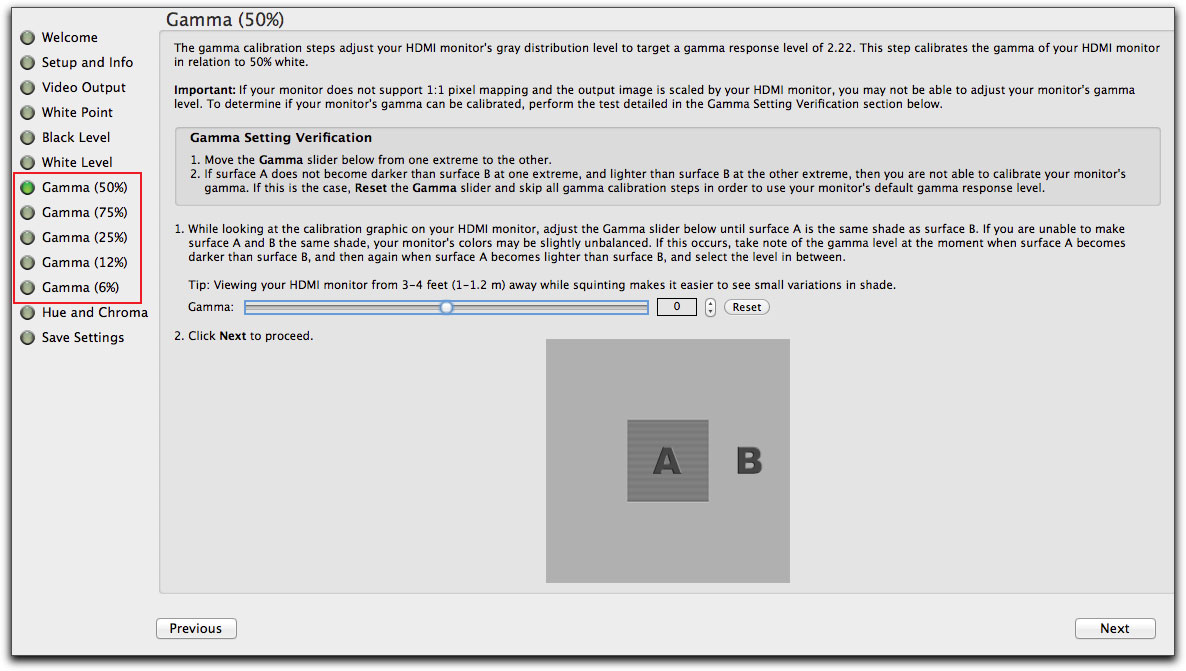
My TV monitor is shown below, displaying 'A' and 'B' squares. Each of the 5 different Gamma steps will display the 'A' and 'B' squares at different intensities. Three samples shown below.
Hue and Chroma. Before we adjust the Hue and Chroma of our Broadcast monitor, it is important to tell the Matrox Utility if our Broadcast monitor produces Non-scaled output or Scaled output. The 'Scaling Verification' graphic that is presented in the Hue and Chroma page is the same as earlier on when we first check to see if out Broadcast monitor is scaled or not. The difference here is that now there are two buttons, red boxes below.
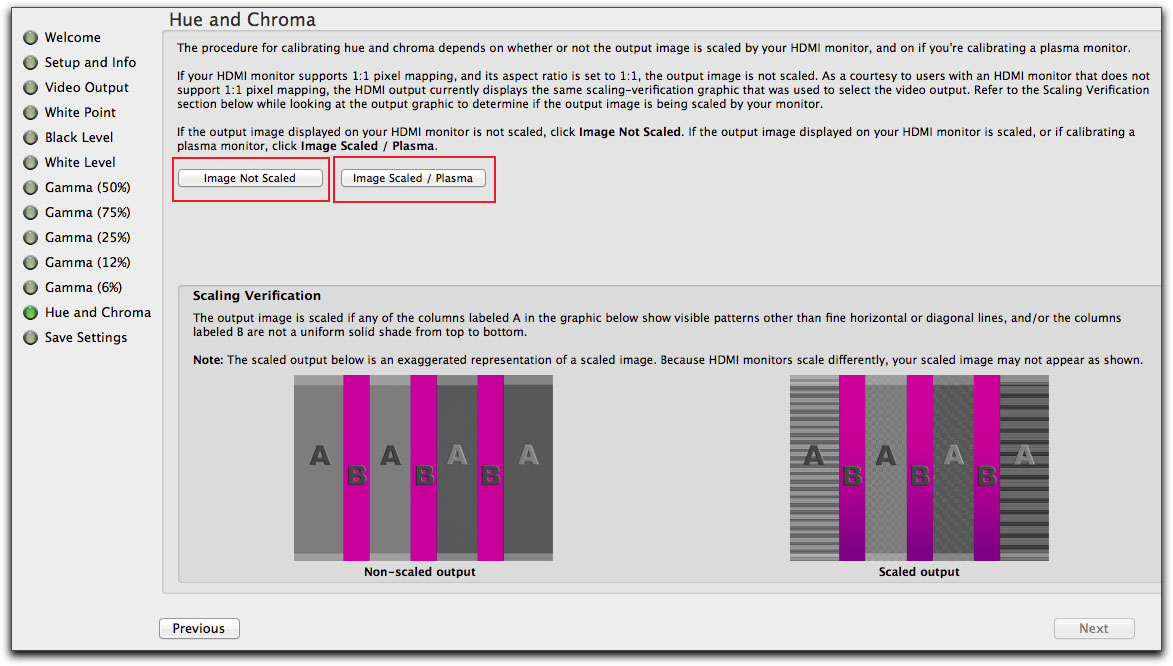
My TV monitor is shown below, the TV monitor does scale the video image, so I'll click on the 'Image Scaled/Plasma button.
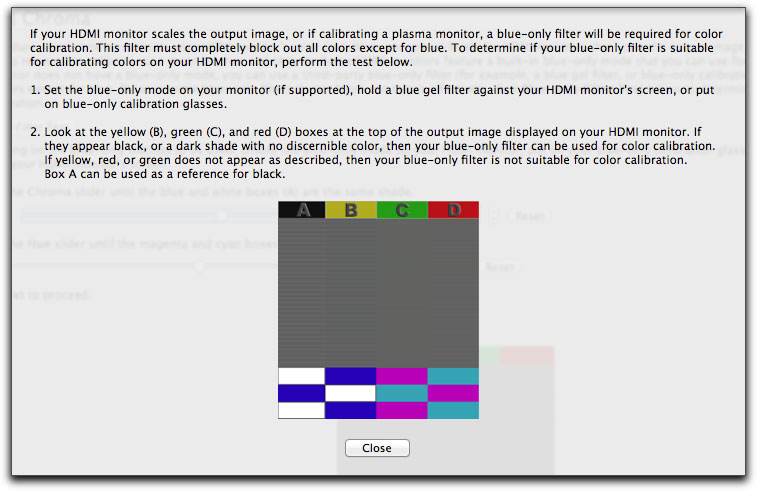
When we tell the Matrox Utility whether or not our TV monitor scales the video image or not, a new window will open up based on our selection. If your Broadcast monitor has a 'blue only' mode you can move on to the Chroma and Hue calibrations. 'Blue only' is found almost exclusively on professional broadcast monitors and would be accessed through the monitor's menu. Once again, because I'm using a commercial TV as my monitor, there is no 'blue only' mode. In order to do the Hue and Chroma calibration I'll need to use a 'Wratten 47b blue' filter, which is a small 3" x 3" or 4" x 4" gel that is held up to your eye. You adjust the graphic on the Broadcast TV while looking through the blue filter. A 'Wratten 47b blue' filter can be found at photographic stores or online. I paid $14.00 for mine. It is important that we be sure that we are using the correct filter and the Matrox Utility provides us with a blue filter test. Click on the 'Blue-only Filter Test' button, red box below.

This will open up Blue filter test instructions on your computer monitor.
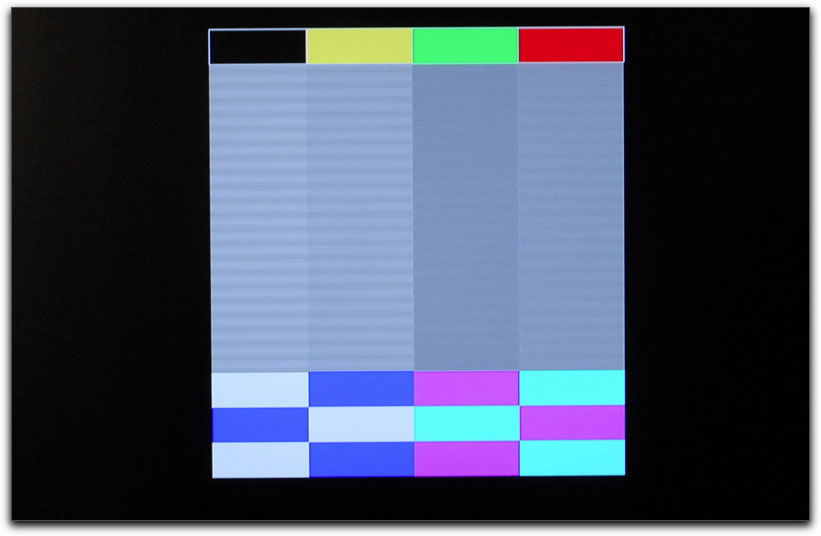
The Blue only test graphic is displayed on my TV monitor.
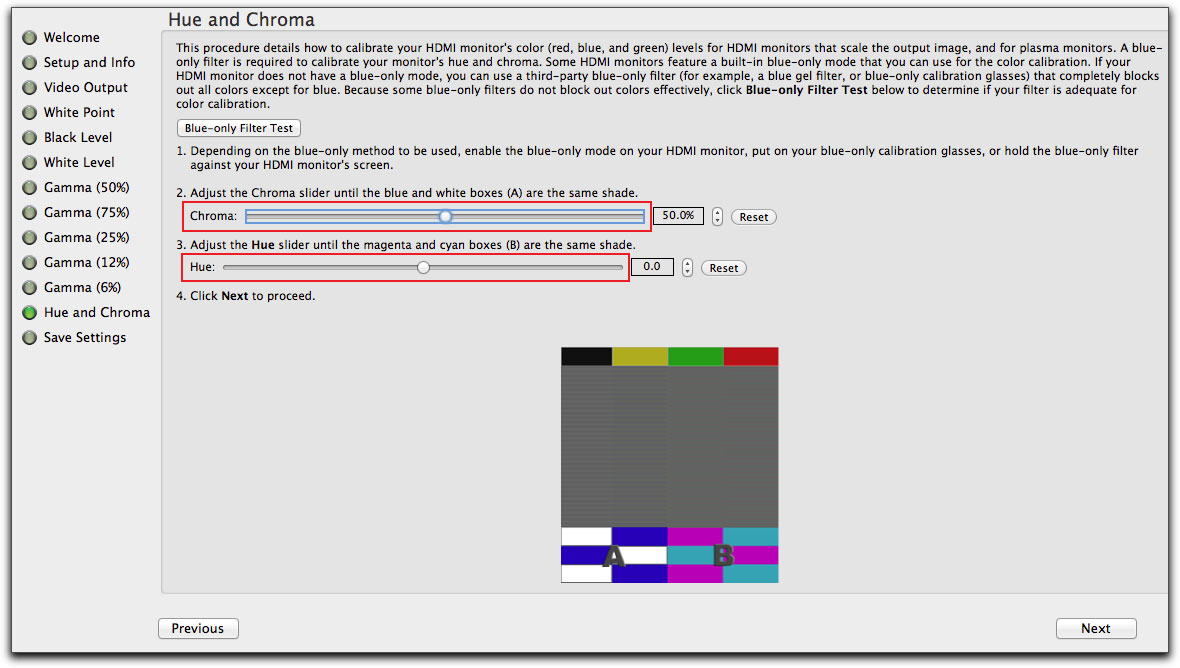
After you have tested your blue filter, click on the Close button to return to the Hue and Chroma instruction page. Following the instructions, working with the blue filter, calibrate the Chroma and Hue using the sliders. When done, click on Next.
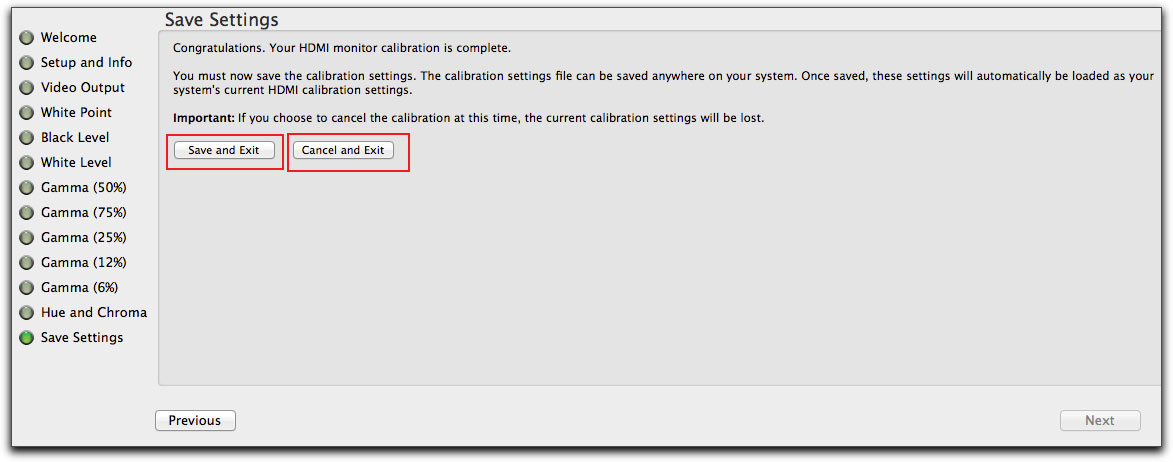
Save Settings. From the Save Settings window you can either 'Save and Exit' or 'Cancel and Exit'.
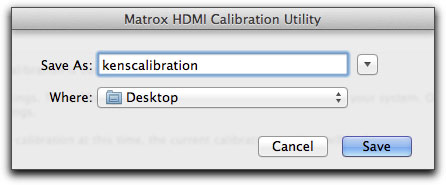
You will be asked to Name and select a destination for your Calibrated Preset. While I first Saved my Calibration Preset to my Desktop, I later put it away in my Matrox folder for safe keeping (I also backed the Preset up to another drive as well). The is a caveat here. When you name your Calibration Preset, make sure that there are no spaces or punctuation in the name. You will then be asked to enter your Administrator password to save the Preset.

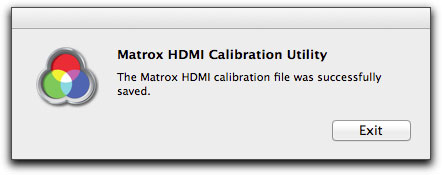
After Saving your Preset, you'll exit the Matrox Calibration Utility .
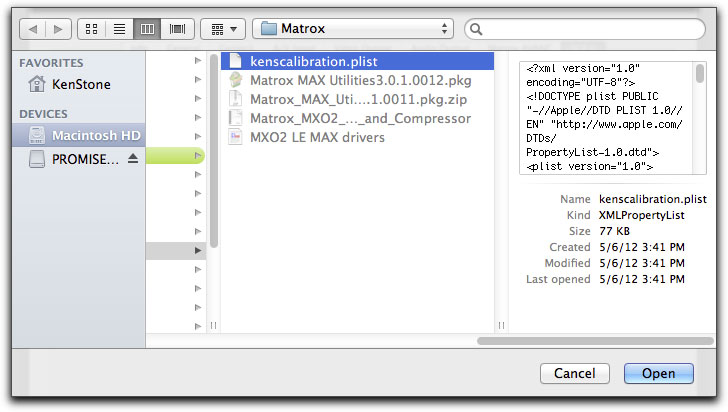
Almost done. Now it's time to load our Calibration Prest into The Matrox Utilities. Open System Prefs and Click on the Matrox Utility icon. Then Select the FCP X tab. Near the top left of the window is the 'Load Preset' button.
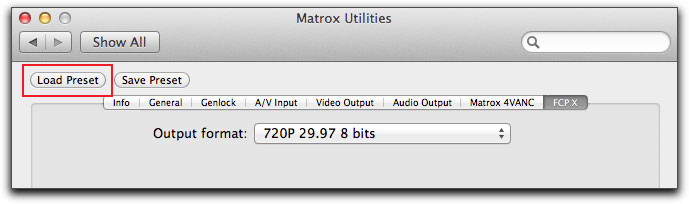
Click on Load Preset and navigate to where you saved your Calibration Preset, select it and then click Open. Note that the name of the Preset has a .plist extension.
If you have multiple calibration presets, there is no way to tell which one is currently running. When using RGB calibrated, the last profile that was used will be loaded. If you are not sure which one is running you
would need to open 'Video Output' tab in the Matrox Utility and click on Load Preset and then choose the calibration Preset that you want, maybe one for a particular monitor that you have connected.
To switch back to the default non calibrated HDMI output you just need to switch the HDMI output back to either RGB native or YUV.
If you have already created a calibration setup but you want to do the process again (for whatever reason), but then, during the process, you want to stop working on the calibration, you can quit the Matrox Utility. However, when you go back to viewing your video on your Broadcast monitor, you may find that the colors are displayed incorrectly, with a heavy brown color cast. If this is the case, quit FCP X, open the Matrox Utilities in the System Prefs, in the FCP X tab, click on Load Preset and then reload your Calibration Preset and launch FCP X. Things will be back to normal.
Final Thoughts
If you are looking to purchase a consumer TV to use as your Broadcast monitor, there are several features that you must look for, 32" in size, LCD or LED with native 1080P. However, you might want to stay way from Plasma TVs, as they have internal processing that hinders calibration when working with the Matrox Calibration utility. Another thing to check is the frame rate that the TV can handle natively. The frame rates for any particular TV will be listed in the TV's specs. Many new TVs can run the frame rates that we work with, however, not all new TVs can, so be careful. Also, some TVs sold just a few years ago, while being 1080P, were still limited to what frame rates they can run. Some of these 2 and 3 year old sets can run 23.98 but not 29.97. Additionally, some consumer TVs have an ambient room light sensor that continuously adjusts the brightness of the image. This is not a good thing. If the TV has LightSensor Technology, see if you can turn it off in the TV's menu or, at least, maybe tape over the sensor. Some commercial TVs don't have LightSensor Technology. You would also want to check the number of HDMI ports on the TV, should have at least two HDMI ports.
It would be helpful if the TV had 1:1 pixel mapping, that is to say that the TV will not scale up the video signal sent from the MXO2 box. This is helpful, in part, because calibrating a monitor that has 1:1 pixel mapping will facilitate Gamma calibration. Another feature that would be useful would be a 'blue only' setting in the TV's menu, again to help with monitor calibration (instead of the need for a Wratten 47b blue filter). Alas, these last two features, 1:1 pixel mapping and 'blue only' are almost exclusively found on the much more expensive Professional Broadcast monitors.
Apple recently released FCP 10.0.4 which now includes Broadcast monitoring and Matrox has issued new MXO2 drivers to give us Broadcast monitoring in FCP X. But it is important to note, that while the MXO2 drivers for FCP 7 are full featured and complete, the MXO2 drivers for FCP X are still very much a work in progress. Not yet available in the FCP X version of the MXO2 drivers is the Vetura Capture application and Hardware scaling. The 'MAX' High Quality encode Presets are still in 'Beta'. There is still work to be done by both Apple and Matrox, but I'm confident that both parties are working on this and that these missing features will be added to updated versions of the drivers.
Having said that, I want to point out, that for me, having Broadcast monitoring is the most important feature and I need to say that Broadcast monitoring works perfectly in FCP X. Make a change in the color corrector and the change is instantly displayed on my TV. Select a clip in the timeline and then scrub your cursor over an effect in the Effects browser and you can see the filter applied in real time on the TV. I probably have at least 100 hours of Broadcast monitoring now and I can say that it is rock solid, not one single hiccup. Using the MXO2 MAX hardware accelerated H.264 encoder produces high quality encodes at reduced encode times and, for those who do a lot of H.264 encoding, this is an important feature that also works well.
There is a Matrox MXO2 Installation and User Guide (Mac OS version), that contains a great deal of information that you may want to peruse to get a complete picture of the Matrox MXO2 and it's abilities.
Here is an interesting situation. It is very important that when setting the Broadcast format in the Mac System Preferences > Matrox Utility > FCP X, that the settings you select here, match exactly, your FCP X project settings, frame size, progressive or interlaced, frame rate, and bit depth (8 or 10 bit).
Now suppose that your project is set to an 8 bit codec, like DVCPRO HD running natively (or any other 8 bit codec), and in the FCP X Inspector's Project settings, you have chosen the Render Format of Apple ProRes 422, which is 10 bit. Will working with two different bit depths cause any problems for Broadcast monitoring? The answer is no, an 8 bit source to a 10 bit destination should be a non
issue for Broadcast monitoring.
While many Thunderbolt devices have two Thunderbolt ports, one for input and one for output, so that the multiple devices can be daisy chained, the Matrox Thunderbolt adaptor is an endpoint device, no further Thunderbolt daisy-chaining is possible. If you have multiple Thunderbolt devices, you would want to put the Matrox Thunderbolt adapter at the end of your Thunderbolt daisy chain.
The Broadcast monitoring format settings found in the Mac System Prefs > Matrox Utilities > FCP X, reverts to 1080i, 29.97 8 bit, on system startup. So each time you start up your Mac, you'll need to check and reset this setting. When using MAX hardware accelerated H.264 encoding, in the Compressor Inspector window > Encode tab > Options, the Hardware Scaling box can revert back to enabled (you'll want to disable this setting), so you need to keep an eye on this as well.
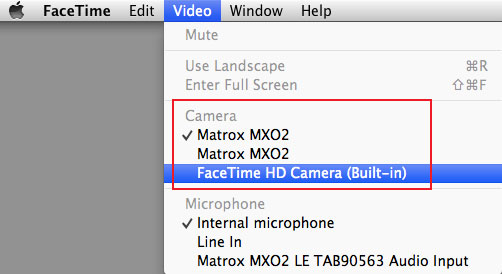
Installing the Matrox software will disable FaceTime. If you attempt to launch FaceTime, no windows will open. If you look in the FaceTime Video menu, you'll see that Matrox MXO2 is selected. In order for FaceTime to work, you would need to select the FaceTime HD (Built-in) camera, but attempting to do so causes the 'spinning beach ball of death and you'll need to force quit.
Having Broadcast monitoring out to my 32" TV from FCP X is very important to me. It is crucial that I can view my video at the Broadcast level, for color correcting, chroma keying, checking the final look of applied effects, and the finished look of my movie. But having Broadcast monitoring is important to me for another reason. The Viewer window in FCP X is very small, and when I work, I always want to have my scopes on screen. Having the Waveform monitor open in the FCP X interface makes the Viewer window even smaller. Now that I can view my video on my Broadcast TV, I can leave my scopes window open all the time. Now, the only time I even look at the Viewer window, is when I'm making adjustments in the Viewer window itself.
Enjoy,
--ken
copyright © www.kenstone.net 2012
are either registered trademarks or trademarks of Apple. Other company and product names may be trademarks of their respective owners.
All screen captures, images, and textual references are the property and trademark of their creators/owners/publishers.