
Media Management September 15, 2003
Media Management in Final Cut Pro 4
By Andrew Balis
Section Links
Media Management September 15, 2003
Media Management in Final Cut Pro 4
By Andrew Balis
Section Links
Fundamentals
|
Managing Clips
Copying and Moving Media
|
Consolidate Media Usage
|
When I first sat down to write this article, I thought it would simply be an update to the media management article that Ken Stone and I wrote a while back for Final Cut Pro 2. I would go over some different scenarios that we face during a project, and which media management tools will cover them.
But a lot has changed in FCP 4. There are not only flashy new features, there is also a lot of under-the-hood enhancements to clip and media organization and tracking. For me, some of the best discoveries of FCP 4 have not as much to do with new features as much as the improved handling of a project's elements.
Instead of just discussing the Media Manager and Make Offline features I thought it might be more complete to include discussion about a broader range of subjects for managing all the assets of a project, not just the media. This includes the new clip relationships/affiliations, search features, subclipping, syncing and merging, dupe frame detection, and batch export and how to combine different techniques for effective project management. Because so much is changing pretty fast, I've tried to be current throughout, including how these features are working with the latest update to this point, Final Cut Pro 4.0.1.
Before diving into other arenas, just a few basics first about the new clips relationships in FCP 4 and how some clip management has evolved in the latest version.
Clip Relationships in Final Cut Pro 4
In previous versions of FCP, every instance of a clip was separate and unique from all other instances. What was that? In other words, if you were to take a clip from the Browser and edit it into a Timeline, you would then have two clips: the one in the Browser and the one in the Timeline. Once the clip was "duplicated" by adding it to the Timeline, the two clips only shared one thing in common: they both referenced the same media file on the hard drive. Aside from that, they were distinct from one another in every way. If you added a label to a Browser clip, for instance, it would not add the label to the Timeline version of the clip. If you changed the name of a clip in the Timeline, then the Browser clip name would have remained the same. Name, labels and other alterations would only affect one clip instance, as each clip was separate from all others.
In FCP 4, a lot has changed. First off, unless you specify otherwise, all instances of a clip are related to one another. When certain actions are performed on a clip, those things are then updated or shared wherever that clip is used in a project (but not across multiple projects). Before I get ahead of myself, let's take a quick look at the new terms and what they mean.
Ok. Now that we've got those terms out of the way, you might be wondering just what things can be altered on a clip that will update across all versions(instances) of a clip. And what if you didn't want everything to be updated across all clips. For example, if you are working in the Timeline and come across a clip that you want to flag by adding a label, perhaps because there is a technical issue with the content of the scene like a focus problem, if you put a label on this clip, you would benefit from having that label wherever that clip is located in the project, not only in the Browser, but perhaps also in other locations in the Timeline (and even any alternate sequences in the same project). But on the other hand, if we add an effects filter to a clip in the Timeline, we wouldn't necessarily want to add it to any other affiliate as well. In another example, if you changed the in point of a clip in the Timeline, you wouldn't want that change to be applied to every instance of the clip.
Here's the good news. Only certain actions affect all instances of a clip, other actions do not. In fact, its quite intuitive. The alterations that you would expect to update across all versions of a clip now will update. Those alterations that you wouldn't want to update won't update across all related clips. To make that less vague, I've listed below those clip properties that are shared between masters and affiliates.
A project from earlier versions of FCP can be updated to an FCP 4 project, but because clip relationships do not exist in earlier versions of FCP, then certain functions will not translate properly by default from earlier projects. Although this is the action by default, we can create relationships between the Browser and Timeline clips. We haven't yet detailed the benefits of these new clip relationships, but there are many, and they all make your life easier.
To create the master/affiliate relationship between the Timeline clips and Browser clips from an updated project, then you can use a new feature called Create Master Clips.
The result is that the Browser clips are now linked to the Timeline clips. If there was no Browser clip for a Timeline clip, then a new Browser clip is created, and is linked to the Timeline clips.
There has been a lot of discussion about just what will and will not function properly when using media and projects created with an earlier version of FCP. For me, I have found this Create Master Clips function really does work well. I haven't yet tested every possible scenario, but the new features and options discussed in this article work for an updated project just as if the project and media were created with FCP 4. To test out this new bond between Browser and Timeline clips, you can do a simple check.
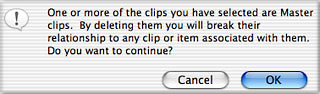
A warning will appear on the screen that says you are about to delete a master clip that is linked to other clips.
If you go through with the action, then you would end up "orphaning" any affiliate clips from that clip. This a confirmation that this clip is linked to another. Press Cancel in the box to avoid deleting the master clip.
A lot of the topics in this article refer to how to be able to move around and rename media without leaving the FCP interface. This is important, as this prevents you from accidentally breaking the link between a clip and its associated media. If you rename a media file or move it to another volume from the Finder (desktop), then FCP will return with a media offline warning, indicating that it can not locate the media file, and it is unavailable for playback.
Of course it would be great if we lived in a perfect world, but we don't so let's look at how to reconnect offline clips in those situations where it just can't be helped.
When opening a project where media files have been moved to another volume, you will be presented with an Offline Files dialog box.
There are three options given in the window.
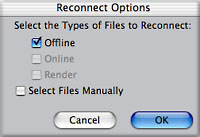
When you click on the reconnect button, you will be prompted with a new dialog box, listing your reconnect options. Because this box was brought up because of offline media, the correct option is automatically checked: Offline.
Once clicking OK in this box, FCP will present you with options for reconnecting the first offline clip. Unless the media is completely unavailable (hard drive not mounted or media deleted), then FCP returns automatically with a new window and a choice for connecting the first offline clip. Although this is set up to be a fairly automatic process, there are a few important things to notice here.
Occasionally, FCP will return unexpected behavior and will indeed want to search based on the clip name and not the media name. I have not found there to be any common denominator to explain why this happens, but I�ve seen it.
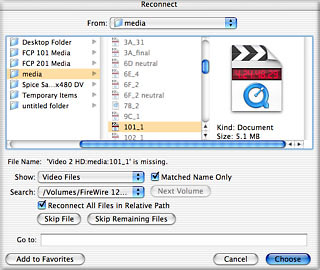
In the bottom half of the window, the name of the first media file that is offline is listed. In the top part of the window, FCP has searched the currently mounted drives and has highlighted a matching named file. The Choose button at the bottom of the window is active (blue). All of this indicates that FCP has found a match, and is awaiting you to confirm that this match is correct.
If FCP finds a match, you may be wondering why it doesn't just connect the two (clip and media) automatically instead of presenting you with the option to connect. The reason is simple: what if there is more than one file on your hard drives with the same name? In some situations, you may have a low and high resolution file of the same name, or a file that has been altered in some way, but still has the same name. By FCP simply highlighting a file instead of connecting it, you have an opportunity to make sure this is the right file. If, after looking at the path to that file, if you determine that it is the wrong one to connect to, then you can click on the Next Volume button (if active). This would cause FCP to locate the file on other hard drives (by the way, this Next Volume feature had mixed results in previous versions, but in FCP 4 it seems to be rock solid).
If the media file is correct, then there is still one other option in this window, that may be checked on by default. It is the option: Reconnect All Files in Relative Path. This is very helpful with multiple offline files. If checked, then after connecting the first file, other offline clips are automatically connected to other media files from the same hard drive folder.
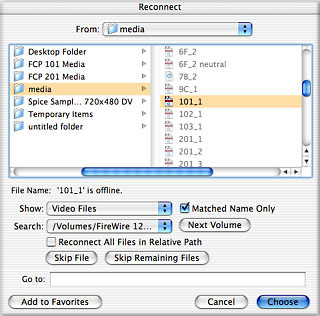
If you have used Reconnect Media before, you may have found what seems to be strange behavior when reconnecting multiple media files, but actually, its quite logical. Sometimes, even with the option checked for reconnecting all files in relative path, you may find that this box re-opens after clicking Choose, and is prompting you to connect other files. But other times, this box does not come back, and all files reconnect anyway. What's going on here? Well, the important thing to remember here is that FCP will reconnect all files from a specific folder on the hard drive, but once it has to look to another folder, the box will re-open, and again the reason is to ensure that you connect to the correct files, instead of another version with the same name.
Name
Reel
Timecode
Media Start
Media End
Good
Log Note
Label
Label 2
Anamorphic
Capture
Offline
Scene
Take
Master Comments 1-4
Open the FCP 3 project with FCP 4.
You will be asked whether or not to update the project, click Yes.
Once the project is opened and updated, click in the Browser window to make it active.
Go to the Tools menu > Create Master Clips.

Select a clip in the Browser.
Press Delete.


In addition to the automatic Offline Files dialog box, you can reconnect a media file at any time. Select any and all clips to be reconnected, either in the Browser or in a Timeline. Go to File menu > Reconnect Media and follow the same prompts as listed before.
One of the great new benefits of the new clip relationships is only having to link up one version of a clip for all affiliates to be reconnected as well. You can select either Timeline or Browser clips to reconnect, but there is no need to select both anymore. The only time this will not update other clips is if the relationship between the two has been broken.
Renaming Clips
If you rename a media file, then the next time you open a project that references that media file, it will go offline, as mentioned earlier. But what about renaming clips inside the project? Is it acceptable? What about the link between clip and media.
The link is retained. The only actions that break the link are moving and renaming the media file from the Finder. But inside FCP, you have much more flexibility to alter the clips and retain the link between clip and media.
In fact, even if the clip has been renamed, if it subsequently goes offline (from another action), then reconnecting the media is still very easy. When reconnecting media in the earlier example, you may have noticed that the reconnect dialog box listed the name of a file that matched the name of the offline clip. But there is an important distinction here that should be made, although in that case they shared the same name, FCP is not searching by way of clip name. Instead, FCP is searching by file name. FCP keeps track of the original file name, separate from clip name. And this original reference is retained even when you rename the clip.
For example, if a clip is renamed from 101_1 to wide shot, then if the clip ever needs to be reconnected, the reconnect dialog box will list and search for the name of the media file to which it was linked, not the name of the new clip.
The Source Column
If you want to see the media pathway and the name of the file referenced by a clip, you can always display the Source column in the Browser. Control/click over any column header and choose Source from the list of hidden columns.
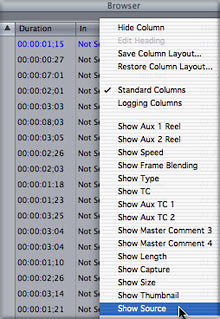
The Source column shows the path from the volume and folders to the file.

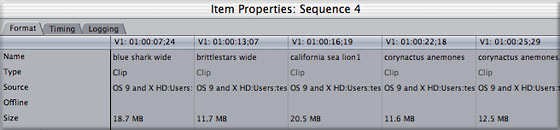
The New Item Properties
Not going to spend much time here, just thought its important to acknowledge that the Items Properties window has matured, and is way more helpful for comparing clips to one another. Not only does the window have a sportier new layout, it can display multiple clips if desired.
To open the Item Properties for a clip in the Timeline or the Browser, do either of the following:
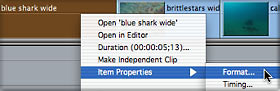
There are three tabs to the new window, which combine the different Browser columns of information for this clip.
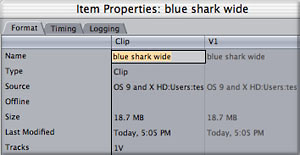
By the way, notice that the name is highlighted when opening the window. When working with Timeline clips, this makes it quick to rename a clip.
Most importantly, or at least most different, is what happens when multiple clips are selected in the Timeline before opening the window. The Item Properties window is then a combination of the different clips.
The following several sections cover those tasks you may need to perform before starting to work with clips.
Syncing/Merging/Linking
No, those aren't traffic signals. With the release of FCP 4, there are now several different options for syncing separate picture and audio. Let's review the original way, and then look at the new options.
1. Edit the video and audio clip to be synced into the Timeline.
2. On each clip, find the sync reference like a slate clap, and place a marker on each one. To place the marker on the clip, select it first before pressing M or clicking on the Marker button in the Canvas.
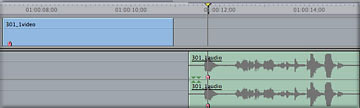
By the way, when looking for the exact spot in the audio waveform that contains the sync reference, there are a couple different options to making this task very easy. You can quickly re-size the audio track in the Timeline by clicking and dragging downward on the border of any two tracks or you can open the clip back into the Viewer to see an expanded waveform display.

3. In the Timeline, snap the markers of the two clips together. Do this by clicking and dragging directly on the marker of one of the clips and snapping to the marker of the other clip.
If you don't click and drag on the marker itself (instead of clicking anywhere else on the clip), FCP will not snap the two clips together at the marker positions, and instead will only snap to in or out points (and keyframes).
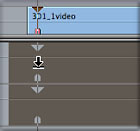
4. Link the two clips together by selecting both clips, then go to the Modify menu > Link. You'll know the two clips are linked when the name of the video clip is underlined.
5. Click and drag this new linked clip back to the Browser to turn it into a new video/audio master clip that will behave like any master clip.
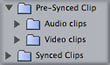
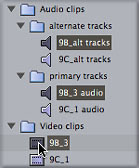
To keep from confusing the individual elements from the newly synced clips, it is helpful to create two sets of bins. Put all the pre-synced clips into one set of bins to keep them separate from the synced clips.
With FCP 4, you can now sync any one video clip to up to twenty four audio tracks. The process is the same as with only one or two audio tracks.
1. Arrange the video clip and audio tracks in the Timeline until in sync and select them all together.
If any audio tracks have timecode that matches the video track, then you have the option of lining this up with a timecode overlay. Click on the View button in the Canvas and choose Show Timecode Overlays and the timecode of each Timeline track (the clips at the playhead location) is shown. As you move a clip left or right, this overlay will update to show the frame that is currently at the playhead location, helping you to align the two tracks.
2 . Go to the Modify menu > Link.>
3. Drag linked clip back to Browser to create a new master clip.
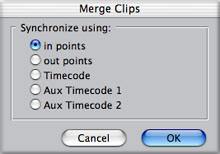
These options are all new to FCP 4. We can now avoid the Timeline altogether when syncing and linking video and audio clips to one another. When syncing in the Browser, you have several choices to determine how these items will be synced and linked:
If a slate is shot at the head of the take, then syncing by in points would be a good way to go. If the slate happens at the end of the take (tail-slate), then syncing by out points can be a good way to go. If video and audio clips have the same timecode as one another, then syncing by timecode is the right choice.
To sync any one video clip to up to twenty four audio tracks in the Browser:
Go to the Modify menu > choose Merge Clips. In the dialog box that appears, choose the appropriate option for your situation, and exit the window.
The new clip appears in the same bin as the original video clip. The new clip will be named for the original video clip, with "Merged" appended to the end of the name. The new clip is a linked combination of all the clips that were highlighted.

Leaving the new clip name as is with the Merged suffix is a nice, simple way to always recognize which version of the clip you are working with.
Subclipping
What's better, to create subclips as a way to break down the videotape, or to log each individual clip before capturing? Aside from an editor's preference, different scenarios often require different approaches. If the project is narrative, and each take is broken up by a slate, then its probably a good idea to simply log each take as a clip, and then batch capture.
On the other hand, if you are working on a documentary, and a lot of the footage is B-roll of an event as it was happening, then there may be a lot of short shots, some good, some bad. Logging this type of tape one clip at a time would be more time consuming as you will rely on the shuttling back and forth of the deck, which is not as instantaneous or accurate as it is to scrub back and forth through an already captured clip.
If the project calls for subclipping, I like using markers to create subclips instead of using the Make Subclip command as it can offer a another possible level of organization as well, as we'll discuss next.
1. Capture a long section of a videotape all as one clip. You may even capture the whole tape as one long clip.
2 . Open the clip into the Viewer.
3. Scrub through the clip, adding a marker at any point you want a new subclip to begin.

To make scrubbing through this clip a little easier, stretch out the Viewer horizontally so that its pretty much edge to edge on the screen. This makes the scrubber bar for the clip longer, and easier to scrub through.
4. In the Browser, you will now find that the clip that you marked now has a disclosure triangle next to it just like a bin would have. Twirl down the arrow and voila! There are all the markers, listed below the clip just like clips would be listed in a bin.
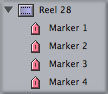
These markers will behave, in most respects, just like a subclip. When you double click a marker it opens as a subclip into the Viewer. If you drag a marker directly from the Browser to the Timeline it will be added just like any clip.
You can re-name these markers, which in effect, re-names the subclip.
What about the in and out points for each subclip? How are those set? The in point of the subclip is the same point as the marker from the original master clip. The end of the subclip, the out point, is the next marker from the original master clip. In other words, the subclip duration spans from one marker to the next.
If the next subclip doesn't begin for another 30 minutes, then a previously set marker will stand for a subclip of at least 30 minutes in duration. In these cases, you would probably want to limit the subclips "out" point more specifically. You can set another marker in-between the two "in" markers, or use an extended marker, which can be set quickly with a keyboard shortcut.
Creating Extended Markers:
With a master clip opened in the Viewer,


When using an extended marker for a subclip, it will behave like other marker-subclips except that it has a built in "out" point, the end of the extended marker.
This is optional, but if you use the previous outlined methods for creating subclips by setting markers, you may want to separate out these subclips into a separate bin.
To create stand-alone subclips:
Drag the selected markers into the new bin.
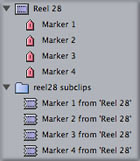
This action duplicates the markers as separate subclips which are now available in the new bin.
There are pros and cons for leaving the subclips as markers, or for using the markers to create brand new stand-alone subclips.
Pros and cons for leaving subclips as markers:
Pro and Cons for creating separate stand-alone subclips from the markers:
Overall, you have more flexibility when separating a clip's markers into stand-alone subclips. You just sacrifice a little speed for the flexibility.
If you are using material recorded in DV, then there is another option for subclipping automatically. Capture an entire DV tape as a clip. Open the clip into Viewer and go to the Mark menu > choose DV Start/Stop Detect (in FCP 3, this option is located under the Tools menu). FCP will automatically add a marker to the clip wherever it encounters a spot on the original tape where the camera started recording. This is possible because of the embedded information in the DV file that takes note of date/time information. These markers can then be used as subclips just like other markers.
One note to working with subclips, however they are created. When you subclip, you not only set an in and point for a subclip, you also set new "limits" for this clip as well. When a subclip is edited into the Timeline, you will find that you can not extend the clip past the in and out point set to create the subclip. If you need a few extra frames, or it would be convenient to see more frames from the original master clip, then you would want to remove these artificial limits, and give the subclip the same handles as the original master clip. Highlight the subclip in the Timeline, then go to the Modify menu > Remove Subclip Limits.
Trimming Media of Subclips
When subclipping from a lot of raw material, as in documentary B-roll footage, it may be easier to bring in the whole tape and then subclip, as we just discussed. If the ratio of usable footage to unusable footage leans toward unusable, then you may need to trim the amount of media stored after you create subclips. This would allow you to capture large amounts quickly, but still keep the hard drives slimmed down to just what you think you may use, allowing you to then capture more raw material than if you hadn't trimmed down the media.
When you complete the process detailed here, you will end up replacing the one long original media file and replace it with several shorter media files, one for each subclip. Each media file on the hard drive and each subclip in FCP will share the name you choose for each subclip. Additionally, any media that you choose not to save will be trimmed away.
However subclips are created, before you begin, make sure the subclips to be saved are located in their own bin first. You can not trim media directly from markers.
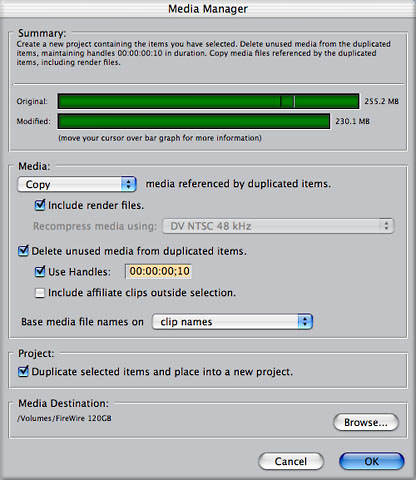
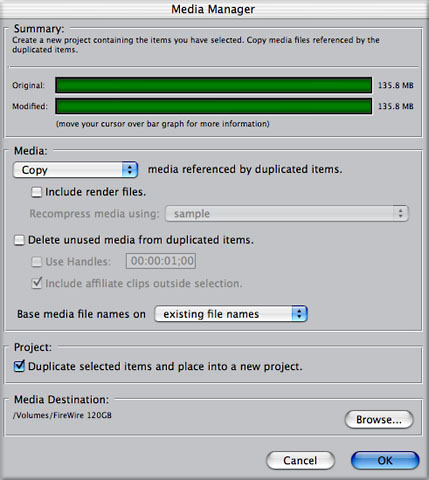
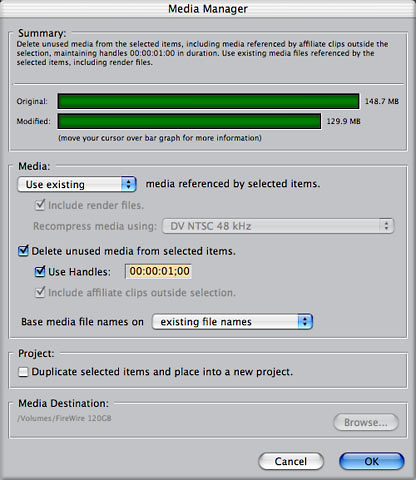
To trim down the amount of media used for the subclips incorporates the use of the Media Manager. Before jumping to the subclips scenario, let's outline the basic uses and sections of the Media Manager.
The Media Manager incorporates several features: trimming or consolidating media on the hard drives, moving and copying media and projects, recompressing sequences, and creating a project as a bridge from a low resolution edit to a high resolution edit. That's an assorted list, and as such, it means that through the options of the Media Manager, there are a lot of possible variations and results. It makes the Media Manager both powerful and scary to use as you are making modifications to actual media files, with results that can not be un-done.
Before opening the Media Manager, you first make a selection. When the Media Manager is then opened, it references the selected items. That selection could be made in either the Timeline or the Browser. You can select whole sequences, groups of clips, or a combination of both. If no selection is made, then the Media Manager will reference the entire contents of the active window (be careful).
There are four basic sections to the Media Manager:

Back to the reason for using the Media Manager in this case, to trim the media for subclips.
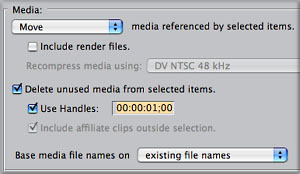
Check the box Delete Unused Media. When this box is checked, then the Media Manager operation will trim away the media not being used. This means that if a clip has an in and out point, then anything before or after this point will be removed from the media file(s). If no in or out points are set for a clip, then nothing will be trimmed.

If the box for Use Handles is checked, then uncheck it. Later, we will look at other Media Manager scenarios where this option will be helpful, but it is not needed here.
In the Media section, click on the drop down menu labeled Base Media File Names. Choose Clip Names from the menu. This option is a great new feature in FCP 4. If you choose this option, then when a clip is broken up into several clips, each new media file will have a name that is the same name as the subclip.
![]()
If the box for Project is checked, then uncheck it. This option is useful in other situations, but is not what we want here. Click OK to process the subclips.
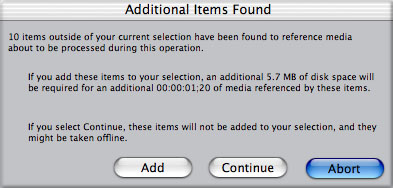
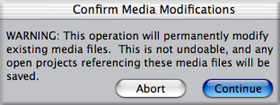
After clicking OK in the Media Manager, you may bombarded by a series of messages from FCP. The particular messages that you get are triggered by the type of operation you are about to perform, taking into account the media files about to be used. Even though you probably sweated your way through choosing the right options in the Media Manager up to this point, after pressing OK you may need to make a couple more choices, depending on the situation.
In this case, you will be flagged by two warning boxes.
When trimming subclips, a dialog box will open on the screen with the header Additional Items Found, and it prompts you to make a choice in the window. As a general rule of thumb, you will almost always select Continue in this dialog box.
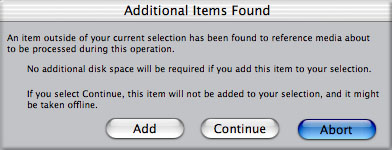
Not Add. Not Abort. But why? This dialog may seem confusing at first. FCP is prompting for your input to clear up a discrepancy that was found: there is at least one instance where you are about to trim a media file that is being used elsewhere in the project. In other words, there is another clip in the project that is also using this media, maybe a copy, maybe an affiliate, maybe a subclip from, or an independent clip that was created from the originally captured media. This "other" clip may go offline if it isn't also selected. If you made a proper selection, choosing any instance that you need to protect, and not selecting any clip instance that you don't want to keep, then you would choose Continue, not Add.
In this case, you would also choose Continue. The additional item found here is the original master clip used to create the subclips. As we are trying to trim down to less than the original, it would not make sense to include it. In fact, if you do choose to Add using this dialog box, it would alter the master clip in a way that it won't be useful if you ever need to recapture the media (it would alter the timecode of the clip). If the original clip is left alone, then should you need to re-capture the full media, you could re-use the offline master clip instead of having to log the tape again.
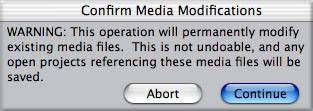
Just to make you sweat just a little more, you may also see this box. FCP is giving you one last chance to chicken out of the operation.
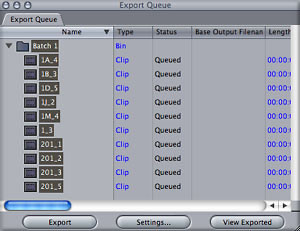
Batch Export
It's the Rodney Dangerfield of features: it gets no respect. Well, actually, it just isn't known well. Basically, Batch Export is used to select a group of clips, modify their properties, and then export them into new media files.
This is a great feature that can be used for a number of situations, including:
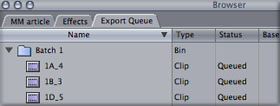
The Batch Export Queue window opens, listing your clips in a "batch" bin.
If you are not ready to actually export yet, and are just adding to the queue of files to be exported, you can close this window and keep choosing items from the Browser, which will then be added to the Export Queue window. You can even drag items directly from the Browser into this window.
As a side note, if you want to keep the window open, you can click and drag on the tab of the Export Queue window and join it to the Browser. The window then becomes another tab on the Browser, like any bin or project.
To re-open the window, it can be chosen from the Window menu.
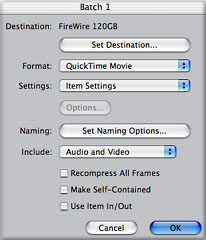
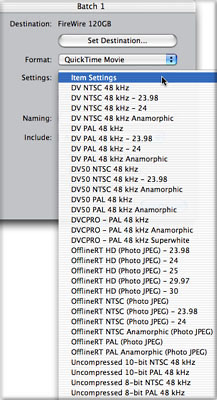
After clicking on the Settings button the Settings window opens.
4. Leave Format at the default option of QuickTime Movie. Aside from other benefits, this will preserve the clip's original timecode.
5 . Under the Settings drop down menu, choose from the list.
This list of options comes from your Sequence Presets, and its preferable to use one of these presets or create a new preset before using Batch Export. This is a great way to choose clip export settings, as you will easily be able to generate sequences to use with these clips without any mis-matching properties.
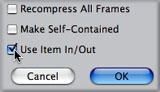
Additionally, in this window, there is an option to use the clip's in and out points as the new media duration.
6. When ready to export the clips, choose the Export button in the bottom of the Export Queue window.
New media files will be created at the destination chosen in the Settings window (if no location is chosen, it will default to the current render folder).
To use this feature:
1. Select a group of clips in the Browser.
2. Go to the File menu > Batch Export.
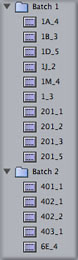
3. Each batch bin needs export settings. Click on the Settings button in the Export Queue window to set each bin's settings. Tip: if you created several batch bins, but they should all have the same settings, just drag the contents of the batch bins into one bin.
![]()
![]()
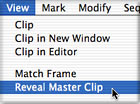
Reveal Master Clip
One of the small but handy new features is simple.
Position the playhead anywhere over a Timeline clip or select a clip by clicking on it, and go to View > Reveal Master Clip (Shift/F).
In the Browser, this highlights the original master clip for the Timeline affiliate. If the clip was in a closed bin, the bin would open and highlight the clip.
One of the things that just got better in FCP 4 is the match framing options and behavior.
If you're not familiar with match frame, its a quick way to open an original version of a clip into the Viewer. Think of match frame as show me a matching frame from the original. However you remember it, its an editor's best friend. There are so many uses for match frame, but that's not the point here. Anytime you need it, here's how it works.
We now have two options, both available from the View menu.
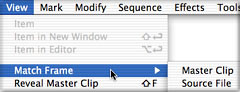
Choosing this option is the one most similar to match frame in FCP 3, and the one you'll probably use most often.
To use:
The Browser clip that opens into the Viewer is stamped with in and out points matching the clip in the Timeline. The Viewer playhead is positioned at the same place on the clip in the Viewer as in the Timeline, in other words, at the matched frame. Unlike previous versions of FCP, this will open the actual Browser clip, not a copy of the Browser clip.
This one now works as it should. Well, in my opinion at least. When match framing (F) from a Timeline affiliate of a merged or linked clip, this correctly opens the merged master clip into the Viewer (try and say that one fast five times).
When you want to open the original video clip used to create the merged clip, then choose View menu > Match Frame > Source File (Command/Option/F). This also matches the playhead positions of the Timeline and Viewer, yet does not place any in or out points on the clip.
Does this one work as it should? It depends who you ask. I like the way it works, but what do I know? If you match frame from a subclip in the Timeline (F), it opens the original subclip into the Viewer. If you want to get back to the original master clip used to create the subclips, then use Match Frame to Source File.
Make Independent
This action can be done to a single clip, a group of clips or a whole sequence of clips. What is it you say? It breaks the master/affiliate relationship between a Browser and Timeline clip. This is handy in combination with certain media manager operations (as we'll discuss), but its also nice anytime you want to rename a Timeline clip to better match its specific content. If you want to do the same thing for different portions of the same clip as its used, you wouldn't want every clip to share the same name. Make Independent allows you to rename a clip without it updating any other clips in the Browser or Timeline.
There are a few different ways to make use of this feature:
Find
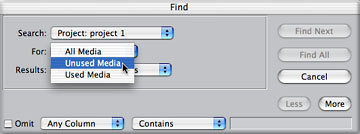
Find what? Whatever you need. The Find feature in FCP is flexible to perform many types of searches. Let's examine a couple of them.
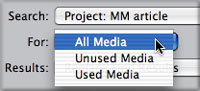
This can be used to determine what Browser clips have been used in a sequence (s) and what remains in the Browser that has not yet been used. This is a quick, simple search that you can do anytime you feel you may be running out of fresh source material, and you want to know just what is still available to be used (without repeating material)
Click the Find All button to perform the search.

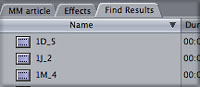
The Find Results window then opens. The list of clips in this new window are directly tied to the Browser clips. If you highlight a clip in the Find Results window, it will highlight that clip in the Browser. If you label a clip here, it labels the Browser clip. Clips can also be used directly from this window if desired. Tip: if the browser bin for a clip is closed, highlight the clip in the Find Results window and click on the button at the bottom of the window labeled Show in Browser.
There are a couple ways you can keep this list of clips at hand after performing the search.
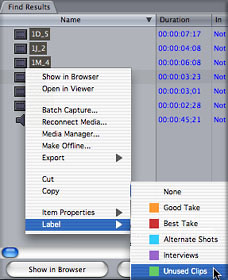
After closing the Find Results window you would find that anytime you visit a bin with one of those clips, it will be color labeled to make it easy to find.
Instead of labeling the clips, the other approach would be to add the Find Results tab to the Browser window so that it can be accessed easily during editing.
Click directly on the Find Results tab (not the title bar for the window) and drag to Browser, letting go when the Browser is highlighted by a thin dark bar surrounding the window, like the next illustration.
The Find Results window joins as a tab to the Browser.
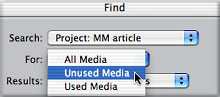
Aside from unused clips, you can base a search on used or all clips.
In addition, from the bottom of the Find window, you can add specific search criteria to search for names or information from other Browser columns. To add a criteria, click on the More button.

When searching be sure to clear any previous results from the window and update all options as needed or the result will not end up as you intended.
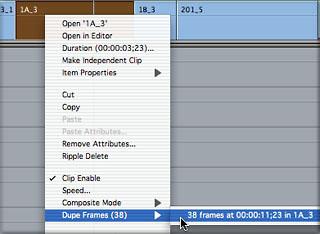
Dupe Frames
This new feature can be a help in a number of different scenarios. When turned on, it will look for any portion of a clip used more than once in a sequence. Any duplicated frames are visually flagged so that you immediately know of this status.
Its crucial for those working on a film based project that will go back to film, as any duplicated frames would need a costly optical process to create new negative frames. Although Cinema Tools will provide you with all of the correct lists for these situations, a duplicate frames indicator in the Timeline let's you know as it happens, giving you an opportunity to re-evaluate whether or not these frames are needed or not.
In other situations, its simply a quick way to know whether or not you are duplicating previously used material, which could be a problem in itself, depending on the situation.
To turn on dupe detection, it can be accessed from a new Timeline options menu. In the Timeline, in the lower hand corner, next to the track resize buttons, is a new button, a small right arrow.
Click on this button to bring up a menu where you can choose Show Duplicate Frames.
Once on, any frames used more than once will be indicated by a colored line along the bottom of both Timeline clips sharing the same frames.
If there are multiple cases of clips using dupe frames, then each set of clips will have a different color indicator.
If you control/click over one of these clips, go to Dupe Frames from the contextual menu, and then choose a clip from the sub-menu, you will be taken to the clip using the same frames.
![]()


![]()
These two tasks are both handled using the Media Manager, but both also benefit from a little Finder organization as well. For an outline of the Media Manager features, see the earlier section on Trimming Subclips.
Copying An Entire Project
If media and projects elements are being shared by multiple editors or effects artists, start out by logging and capturing all the elements on one station first. Then use the following steps to make a copy of everything, transfer it to another computer and make sure that clip/media links are retained so there is no need for reconnecting media.
Click OK in the Media Manager. A save dialog box will be opened, prompting you to save and name the new project file that will be created.
Name the project and choose the same "project folder" as you did for the media location. By default, FCP will automatically choose the same folder as you chose in the previous steps. This is a good default. Leave as is.
When FCP then processes the operation your project folder will look similar to this next example. Notice that FCP creates a folder called Media inside the "project folder".
If you view the folder in list view, you can also see the sub-folder structure that is created by default. I recommend leaving these folders as you find them.
To move this project to another computer:
Create a folder on the hard drive to be used to transfer the project to another computer. This folder will be used for the project file and the media. As long as the contents of this folder stay together, then you shouldn't need to reconnect later.
Select all the items in the Browser (Command/A).
Go to File menu > Media Manager
Make selections in the Media Manager as listed next:
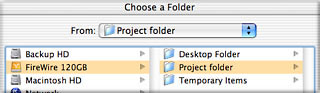
Click Browse button to choose a media location. In the window that opens, select the "project folder" you created in the first step (you can also create one directly from this window).

Transfer the entire "project folder" to the new computer. You may move the folder to any drive you desire, just be sure to keep the folder itself intact. As mentioned earlier, as long as the contents of this folder stay together in the same relationship to one another, then you don't need to reconnect. Simply open the project file directly from the project folder. After that you can always use save as to move the project file to a new location but the first time its opened should be from the transferred folder itself.
This next scenario assumes you want to copy a project, but to only copy the clips between any set in and out points. This could help preserve drive space if space will be more limited on another system. This involves the same steps as above, with one crucial exception.
1. Open any Browser clips into the Viewer and set in and out points (to shorten the copied clips).
2 . Make a selection in the Browser of all clips to be copied.
3. Go to File menu > Media Manager.
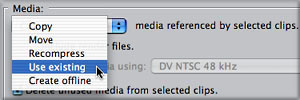
4 . Make the same selection as before for the Media menu: choose Copy.
5. In the delete unused media checkbox, place a check mark. This will cause the copied media to be trimmed down to the sections between the in and out points.

This action will make active the Use Handles checkbox. In this scenario, handles are not needed as the clips haven't been edited into a sequence yet. If the handles box is checked, uncheck it.
6. Other choices in the window should be the same as with the previous steps.
7. From the Browse button, choose a project folder to be transferred, as in the previous steps.
8 .When you click OK, choose the project folder as the location for the new project, just as in the previous steps.
In those situations where a project is small enough, you can burn DVD data disks to backup a finished project so that it may be restored later if needed.
1. This is similar to the steps for either process above, just start out by creating the project folder on your desktop.To restore this project from the DVD, drag the project folder to a hard drive and then open the project file from there.
2. After the media management process, insert a blank DVD in your computer (if you have a Superdrive or comparable DVD burner).
3. Drag the project folder to the DVD icon on the desktop (this will take a while if not using third party software to make the DVD).
4. Once the copy to the DVD is done, go to the File menu (from the Finder) and choose Burn Disc.
There are numerous scenarios when you may want to get rid of any media not currently being used, and they all revolve around wanting to free up hard drive space. You can use the following options whether you are archiving the media for a project for future use, or making room for new media or projects. One small word of caution: don't use these steps unless the project is pretty much "locked", or you could have to re-capture some of your media.
Trim Sequences
So we're on the same page, this process refers to trimming down the media used in a given sequence by trimming down the media used for each clip in the Sequence. Specifically, we'll outline how to trim each clip's media to its in and out points plus a handle on each side.
Although handles in other situations is optional, here its pretty much mandatory. In the past, FCP might make Timeline clips offline if the media was trimmed without handles. Although I have not seen this behavior (yet) in FCP 4, there are still other reasons for maintaining handles. If you want to preserve for transitions or other small revisions like a little slipping, rolling or rippling of any edit points. If no handles are preserved at all, you are locking in the edit without any options for alterations.
1. Select a sequence in the Browser. If multiple sequences share the same media, and they must all remain online after the trim, be sure to select them all together. This includes sequences from other projects as well that share some of the same media (you could open all projects sharing media, copy all sequences into one of the projects, then select all sequences together).
2. Control/click over the Sequence(s) and choose Make Sequence Clips Independent. Once the media management process is complete, the Browser clips will go offline. This is natural as the Timeline clips are probably shorter in duration. The Browser clips can always be recaptured if needed down the road.
5 .Click OK and await the warning box-barrage. Chances are, this will trip off up to three consecutive warning boxes, starting with a warning about handles.
If this box appears, it is simply warning you that at least some of the clips do not have enough media handles to be preserved to your instructions. That's ok. FCP will retain handles on those clips where there is available media. After leaving this box, you will probably get an Additional Items Found dialog.
As stated earlier, this box is usually dismissed by choosing Continue, and it's the same in this case. We don't need to add any other affiliates or original Browser master clips for this situation.
The third and last dialog that opens is just trying to test your nerve I think.
This can be done in conjunction with the previous steps for trimming a sequence if you want to remove all media not currently used, whole clips and unused frames from used clips. But this process can also be done anytime on its own whenever you want to get rid of clips you don't plan on using to perhaps make room for new media to be captured.
Click Find All. This opens the Find Results window.
Select all of the clips in the Find Results window.
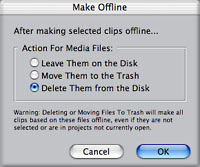
Press Shift/D or go to the Modify menu > Make Offline.
In the box that opens, choose Delete Them from the Disk.
When you click OK the media files for these clips are deleted from the hard drive. The clips are left in the project as offline clips. Hold on to these if you ever need to recapture those clips, without having to re-log these clips.
If you are archiving a project's media when trimming media, consider another option in the Media Manager.
When opening the Media Manager to trim media, instead of choosing Existing Media, you can choose Move from the Media menu.
This would also trim the existing media, but takes the result and places it in one location (folder). As the original media may be scattered over multiple drives before archiving, its desirable to put all final elements together in one place. Using Move instead of Use Existing accomplishes this task and trimming the final media at the same time.
For more information about offlining and onlining (moving between two resolutions), check out another article that I wrote for Ken's site From Offline To Online . Because the other article was written for FCP 3, just be sure to include the step to Make Sequence Clips Independent before the "up-res" workflow discussed in that article.
copyright © www.kenstone.net 2003
3. Choose the Media Manager (you can go to the File menu or Control/click over the Sequence and choose Media Manager from the contextual meny).
4. Make choices as shown below:

Select all current sequences in the Browser.
Go to Edit menu > Find.
Clear out any previous entries in the Find Window and choose Unused Media from the For menu.
Andrew Balis
After receiving an undergraduate degree in film from NYU, Andrew moved west to Los Angeles where he has worked in the film industry for more than a decade. Andrew works as a cinematographer, editor, post production consultant, and regularly teaches classes in Final Cut Pro to industry professionals. Andrew has lectured for institutions including Apple, UCLA, Moviola, AFI and IFP among others. He is the co-author of the soon to be released Apple Pro Series book titled Final Cut Pro: Advanced Editing and Finishing Techniques and was the co-author of the original Apple certified curriculum for introductory, advanced, and effects classes, developed at Moviola Education.