
Software Review
April 1, 2002
MovingPicture Plugin - Pan and Scans
From StageTools LLC
Price: $199Review by Ken Stone
As you know, it is quite easy to do "Pan and Scans" directly in FCP. So why would someone be interested in a $199 plugin that does the same thing? MovingPicture does offer a few features that are not available in FCP, most notably, Real Time preview from within MovingPicture interface. Let's take a look at Moving Picture.The MovingPicture plugin is an AE/FCP plugin that runs in FCP 2 and 3 and in OS 9 and X, and in both NTSC and PAL. You can down load an evaluation/demo copy of the MovingPicture Plug-In which is fully functional, but places a red stripe across the image until it is registered. Installation is simple. For OS 9, drag the MovingPicture file into the Plugins folder. For OS X, drag the MovingPicture file into the Library\Application Support\Final Cut Pro System Support\Plugins folder.
There is a certain work flow that must be followed for this plugin to function properly.
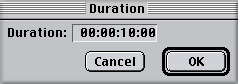
1) The first step is to place a dummy clip or placeholder clip on the TL. This dummy clip can be any video clip, slug or still. Control click on the dummy clip and select Duration from the contextual menu. Set the duration of this dummy clip to the time length that you want for your Pan and Scan. This is important as MovingPicture will use the duration of the dummy clip for the Pan and Scan that it creates.
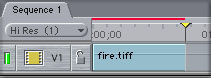
2) Double click on the dummy in the Timeline to load it into the Viewer. This step is very important as this is how MovingPicture knows what duration to make the Pan and Scan.
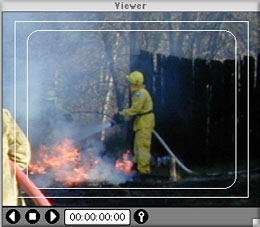
3) Apply the MovingPicture plugin. In FCP 2, Menu > Effects > Video filters > AE. In FCP 3, Menu > Effects > Video filters > Motion Control. You will notice that as soon as you apply MovingPicture both your Viewer and Canvas windows turn black.
4) Click on the Effects tab in the Viewer > 'Options' button and you will be presented with the 'Stage' which is a full screen MovingPicture interface. When the Stage first opens, no image will be displayed. From the File menu select Load picture and navigate to the picture that you want to use in your Pan and Scan.
MovingPicture accepts TIFF formats (uncompressed only) and PICT files. Actually, it will also accept Photoshop format, if you load a PS file you will be presented with a FCP QuickTime Translator box, click open and your picture will open into the Stage.
It is important to note that Moving Picture does some things behind the scenes. First, it is expecting square pixels and will convert square pixels to the Video format of rectangular pixels for you, so there is no need to pre-squeeze your images in Photoshop. The other item is that MovingPicture assumes that you are working with an Aspect Ratio of 4:3 and so your DV Aspect Ratio of 3:2 will be convert to 4:3. This may cause some distortion of the image. As is standard with any Pan and Scan work, you will need a file that is higher resolution. Like FCP, MovingPicture can accept a file up to 4,000 x 4,000 pixels, but this is much larger than is normally needed unless you plan to do a high power zoom.
5)
When you load your picture into the Stage it will appear in two places. On the left which is called the 'Move Camera' and and the Viewer window on the right. In the lower left of the Stage you will see 'size' buttons. These different size options are for your viewing convince and have no effect on the actual size of the image. Below the size buttons is 'Pos' which gives the numeric position of the yellow + which is in the Move Camera window. 'Wid' shows the width of your original image. 'Rot' shows the degrees that you have rotated your image. The Rotate feature is a $69 add on to MovingPicture. Just to the right of these buttons is a 'OK' button. Clicking on the 'OK' button at any time will return you to the FCP interface. In the lower center of the Stage is the Timeline. Below the Timeline is the frames per second indicator which is always set to 60 fps, you'll have to ignore this fps setting.
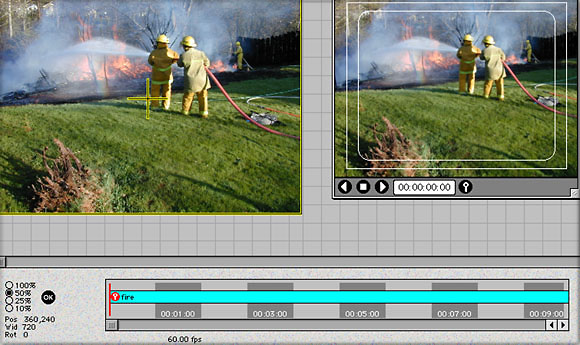
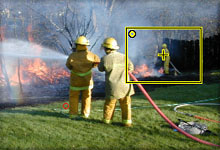
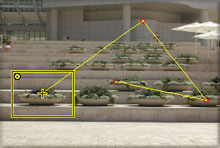
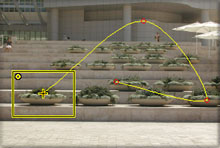
The 'Move Camera' window is where you will position the center of your zoom and do your scaling work. Your picture will have a yellow + in the center of the picture. Click on the + and drag to the position that you want to be the new center of your picture. Click on the lower right hand corner of the yellow bounding box and drag in to zoom in on your subject. As you move the yellow + or zoom in on your subject, the Viewer window will display your changes in real time. Shown below, in the Viewer window lower left are the player controls. Clicking on the play button at any time will play your Pan and Scan so that you can preview your work. Next to the play controls is a time code box. It should be noted that this box will display frames at 60 fps and not 29.97 or 25 fps. To the right of the TC box is a white key in a black circle. Clicking on this black key in the Viewer window will set a key frame.
The Timeline opens showing a vertical red line. You can click anywhere in the timeline or drag the red line to the position in the timeline that you want to set a keyframe which you set by clicking on the white key in the Viewer window. Looking at the Timeline you can see that it is not very articulate. When you have completed your work click on the OK button which takes you back to FCP. You can then render your Pan and Scan. As this is an AE plugin you will have to render in RGB.

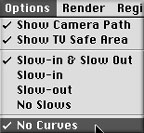
MovingPicture has a number of options shown below. There are other controls as well. Control clicking on a keyframe will allow you to adjust the 'Slow-in & Slow-out functions. Additionally there are 32 levels Undo/Redo. Uniform Speed' will adjust the distance between the keyframes that you have set, so that the time durations between key frames will be equal. The 'Curves/No Curves' option, shown below, is similar to the Bezier curves that are available in the FCP Canvas window but without the Bezier handles that we use to alter the shape of the curve.


Conclusion.At $199 plus $69 for the 'Rotation' module this is a very expensive plugin. If you just do a few Pan and Scans then I would recommend that you do them in FCP. If you do a large number of Pan and Scans then you may be interested in MovingPicture. The advantage of MovingPicture is the ease of working in the 'Move Camera' window for setting the center position and zooming in or out. The other advantage is the Viewer window which gives an excellent real time preview of your work while still in the MovingPicture interface.
There are two drawbacks. I find that the Timeline in the MovingPicture interface is too inarticulate for precision placement of keyframes. The other point is an issue that StageTools LLC is working with Apple to resolve. When after completing your work in Moving Picture, returning to FCP and rendering you discover that you need to make a change to your Pan and Scan, you can not simply return to MovingPicture make the changes and re render in FCP. If you were to do this, you would discover that after making changes to your Pan and Scan and returning to FCP that no render is called for. In other words, your changes would not show up in FCP. To work around this you have to first change some attribute of your dummy or place holder clip, then go into MovingPicture and make your changes, return to FCP and render.
I would suggest that if you are interested in MovingPicture that you download the evaluation/demo and take it for a spin. There will be some who will find that MovingPicture is a useful tool.
Enjoy,
--ken
Copyright Ken Stone, 2002.
All screen captures, images, and textual references are the property and trademark of their creators/owners/publishers.