June 20, 2005
Creating Movement with Replicated Objects
By: Mark Spencer
It may sound like something straight out of a Blade Runner sequel, but the Sequence Replicator is, in fact, an extremely useful behavior for animating copies of objects. It is designed specifically to be used with the Replicator, an exciting new feature of Motion 2. Using the Replicator in combination with this unique behavior, you can create beautiful background patterns, complex animations, interesting mattes, and dynamic transitions.
In this article, we explore the wide and deep world that is the Sequence Replicator by using a simple example and discussing its various parameters. The article assumes that you have had some experience working with the Replicator.
While the Replicator allows you to quickly and easily create copies of an object and arrange the copies into a variety of patterns, the potential to animate the objects in different ways is fairly limited: you can keyframe its parameters or apply parameter behaviors, but every object animates at the same time. Enter the Sequence Replicator Behavior. As its name implies, it is a specialized behavior that can only be applied to a Replicator. Once applied, you can choose parameters that will animate by sequencing, or passing through, each of the replicated objects over time. If you have worked with the Sequence Text behavior, you already have a strong foundation for working with this behavior. If not, no worries - we'll start with the basics. Let's look at an example. Let's get started by applying the Replicator to a simple object. Here, I've used the Rectangle tool (R) to draw a small rectangle. I then used the dynamic guides to position the object in the exact center of the Canvas. To replicate the object, simply click the Replicate button on the toolbar (or press L), which will create identical copies of the object arranged into the default rectangle shape. In the Replicator tab of the Inspector (press F4 to reveal it), let's change Shape parameter to Line, the Start Point x-value to (-250), the End Point x-value to (250), and increase the Points to 16. Now that we have a simplified Replicator, let's apply the Sequence Replicator Behavior and see what kind of magic we can work. To apply the behavior, either drag it from the File Stack region of the Library or select it from the Replicator category under the Add Behavior icon in the Toolbar. The behavior should now appear below the Replicator object in the Layers tab. It should already be selected. If not, click on it, then go to the Behaviors tab of the Inspector (the keyboard shortcut is F2). Looks pretty tame, doesn't it, at least compared to the long list of Replicator parameters? And if you play your project, you'll see that nothing new is happening. The secret of the power and flexibility of this deceptively simple behavior lies in choosing which parameters to animate, and then making the appropriate adjustments in both the Behaviors tab and the Replicator tab. Let's try it out. First, click the Add button and select Rotation from the drop-down list. The controls for the choosen parameter are added to the behavior. Set the Rotation value to (-90) and play the project. Okay, now we are getting somewhere! Each of the replicated objects rotates 90 degrees clockwise, one after another, starting with the first and working left to right. That's the basic gist of the sequence behavior - it allows you to create an animation that moves across, or sequences through a set of replicated objects. However, it's quite slow! This is because when you apply the behavior, by default it lasts as long as the duration of the Replicator, which in our case is 10 seconds. To speed things up, trim the behavior by either dragging it in the timeline (press F6 to reveal the timeline) or drag in the mini-timeline, or simply select the behavior, place the playhead at the frame you want it to end, and press O on the keyboard to set its Out point. Now press Shift-O to move the playhead to your new Out point (make sure the behavior is still selected), and then press Command-Option-O to set the end of the play range to the same frame. Now when you press play, the project should just play over the two seconds of the behavior. Make sure looping is turned on (Shift-L toggles it on and off) and you can let the project continue to play as we make further adjustments. This real-time interactive capability is one of my favorite aspects of Motion. Now that you know how to appy the behavior and choose a parameter to animate, let's take a look how you can modify the way the behavior, well, behaves - by adjusting the Sequence Control parameters. The first parameter, Sequencing, allows you to determine how the animation moves between the original parameter values of the cells (we have chosen Rotation - the other options are Color, Opacity, Scale, and Position). The default selection of "To", as we have seen, has each cell move from its original state "To" the new value we have set - our case, rotating clockwise 90 degrees. "From" does the opposite: it animates "From" the new value (here, -90 degrees) back to the original value. "Through" combines "To" and "From": each cell moves to the new value and back to its original state. "Through Inverted" does the opposite of "Through": each cell starts at the new value, then moves to the original value and back to the new value. Finally, we have the "Custom" option. Custom is a little hard to wrap your head around. Bascially, it allows you to use keyframes to drive the animation in two different ways. First, you can keyframe the parameters that you have added to the Sequence Replicator behavior (Rotation, in our example). By selecting "Custom", those keyframes will drive the animation as it moves through the replicated objects. For example, rather than a simple one-time 90 degree rotation like we have been examining, you could keyframe the Rotation parameter to rotate back and forth a few times. This rocking behavior would then sequence through all the objects. Second, if the source object that you used to build your Replicator (in our case, the rectangle shape) has been animated with keyframes, then you can use the object's animation instead of the selected parameter(s) (again, Rotation in our example) as the basis for the sequencing behavior. To do this, you need to select "Custom" for the Sequencing parameter, and then you need to select "Use Source Animation" from the new Source parameter that appears when you select "Custom". Let's examine the rest of the Sequence Control parameters: Unit Size determines what range of the field of objects are affected by the animation. The default is Object, which simply means each object will animate separately as a unit. By changing the value to All, every object animates at the same time - not very interesting! The final option, Custom, allows you to set a range over which the animation happens as it moves across the replicated objects. By default, each object completes its animation before the next object begins. That's where the next parameter, Spread, comes in. By increasing the Spread value, then next object(s) begin to animate before the current object has completed it's animation. You can use Spread to create more natural, flowing animation. The Traversal parameter lets you make the animation start off slowly and get up to speed (Ease In); slow down before coming to an end (Ease Out); or both (Ease In/Out). I wish it would keyframe each instance of the animation - meaning, in this case, that each block would rotate more naturally by speeding up and slowing down - but it doesn't work that way. It eases in and/or out the entire animation, not the individual parts. To do have the individual objects ease in and out, you would need to animate the Rotation parameter with keyframes as discussed above (using the Custom choice in the Sequencing options), and then change the keyframe interpolation. Finally, you can use the Custom option for the Traversal parameter, which causes a new parameter, Location, to appear. You keyframe the location parameter to determine how the animation moves through the replicated objects over time - you can even make the animation move back and forth. The Loops parameter simply tells Motion how many times to loop the animation over the duration of the behavior. If you choose a value greater than one, then you can choose an End Condition which determines whether the animation simply repeats ("Hold"), acts as if it is a continuous loop by allowing the Spread value to have the first object begin animating again before the last object has finished ("Wrap"), or bounces back and forth ("Ping-Pong"). There are two parameters that belong to the Replicator itself which have a direct impact on the Sequence Replicator behavior, so let's take a peek at those. Click the Replicator tab in the Inspector, or press F4. The Origin parameter determines the direction of the sequence animation. By default it is set to Start Point, which means for a line shape, the animation moves from left to right. End Point, naturally, will move from right to left. Center will move from the center outwards. Note that if your Shape parameter is set to a two-dimensional object like Rectangle or Circle, you will have more options. The Shuffle Order parameter, when checked, causes the animation to sequence through the objects randomly. If you don't like the pattern, click the Generate button that appears just below the checkbox. Some More Examples The simple example we have been working with may give you the impression that all the Sequence Replicator is good for is to animate a row of white rectangles. Let me assure you we have only scratched the surface! You can use the Sequence Replicator behavior to create incredibly varied and complex animations. Here are a few examples I cooked up to hint at the possibilities - I'm sure you can come up with completely different ideas. The source object can be any shape, graphic, movie - experiment! I've included both the Behaviors and Replicator tabs from the Inspector in each figure so you can see exactly what parameter values I used. The Sequence Replicator behavior, in conjunction with the Replicator itself, is a powerful new tool in Motion 2. Spend some time playing with all the different parameters to get a sense of how you can use it in your next project. Mark Spencer is a freelance producer/editor, Apple-certified instructor for Final Cut Pro, Final Cut Pro Advanced, and Motion, and the author of the Motion Visual Quickstart Guide from Peachpit Press.
What is the Sequence Replicator Behavior?
A Simple Example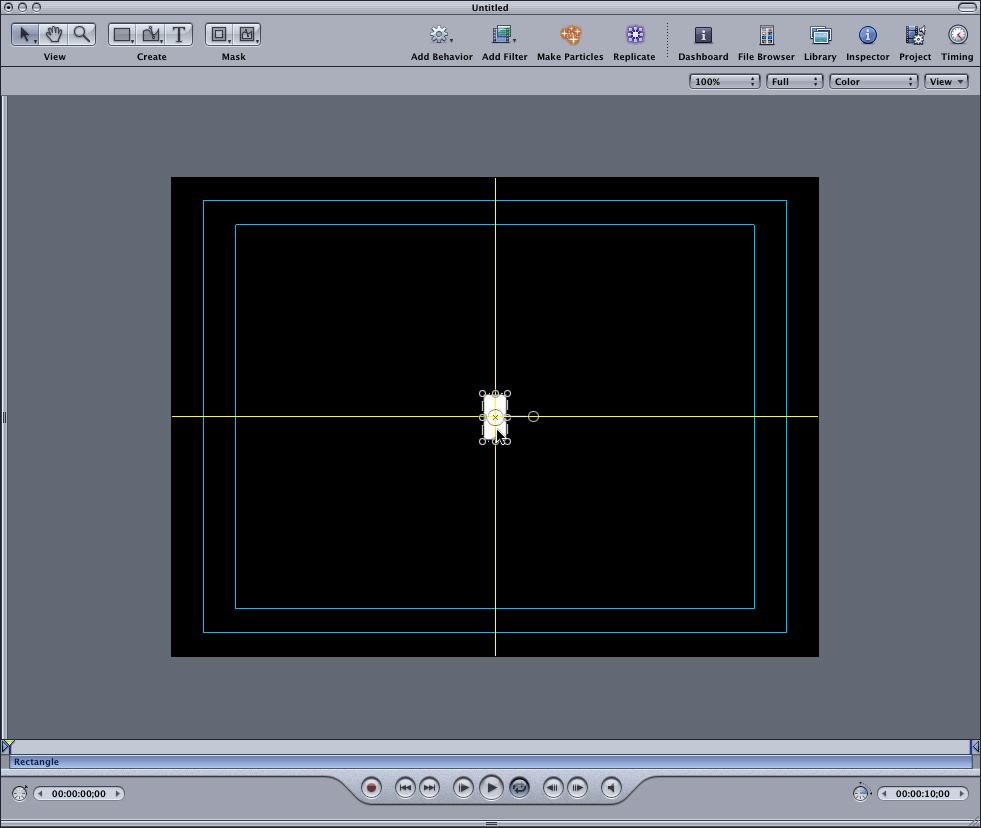
Figure 1. By centering the object before replicating it, we ensure that the field of replicated objects will also be centered in the Canvas.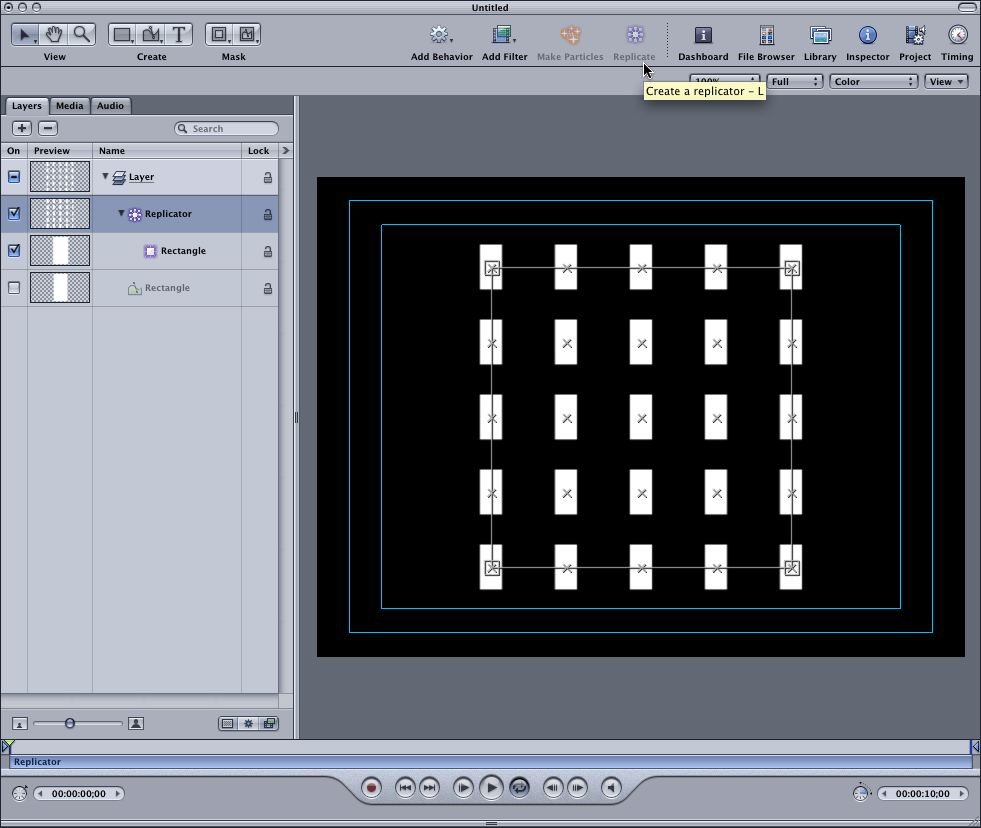
Figure 2. The look of the default settings of the Replicator. Notice in the Layers tab how the original Shape object is automatically made invisible.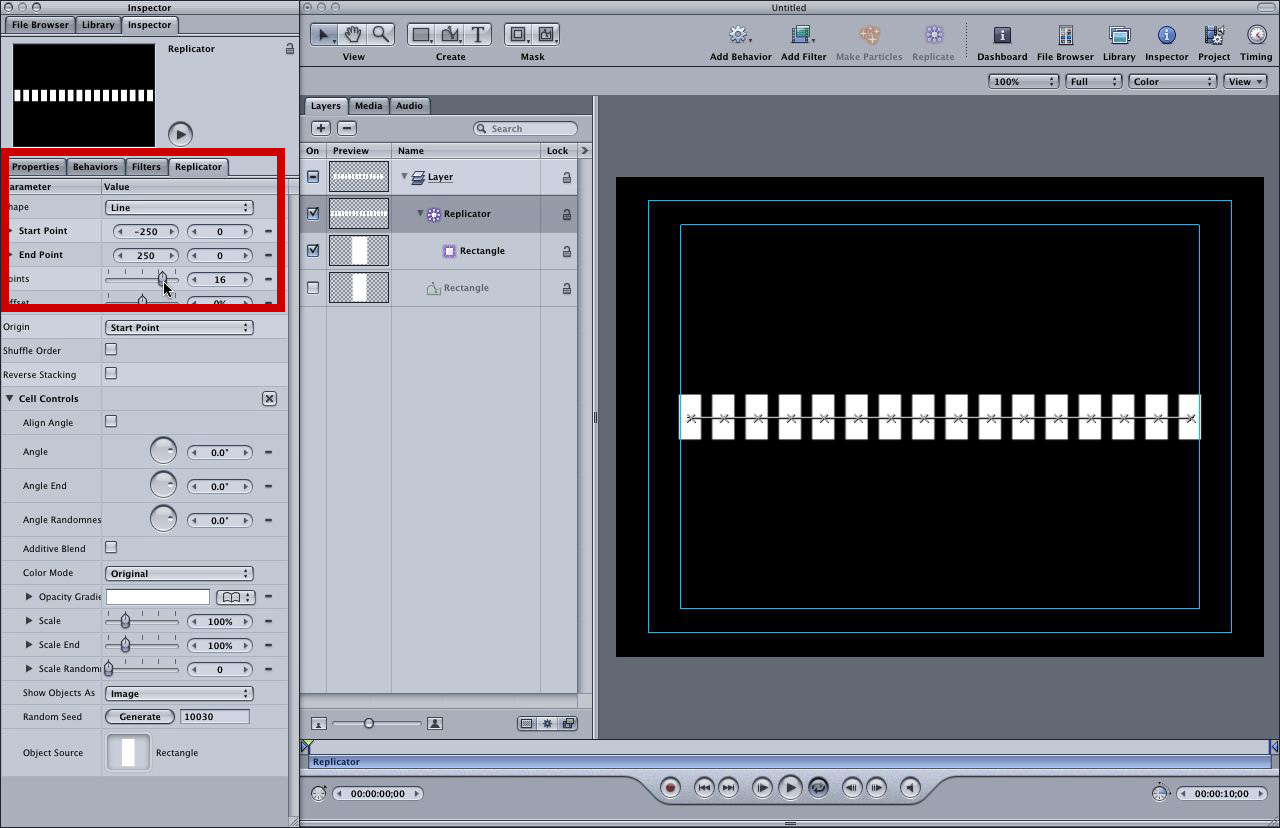
Figure 3. Our simple rectangle, replicated in a straight line, all within title safe.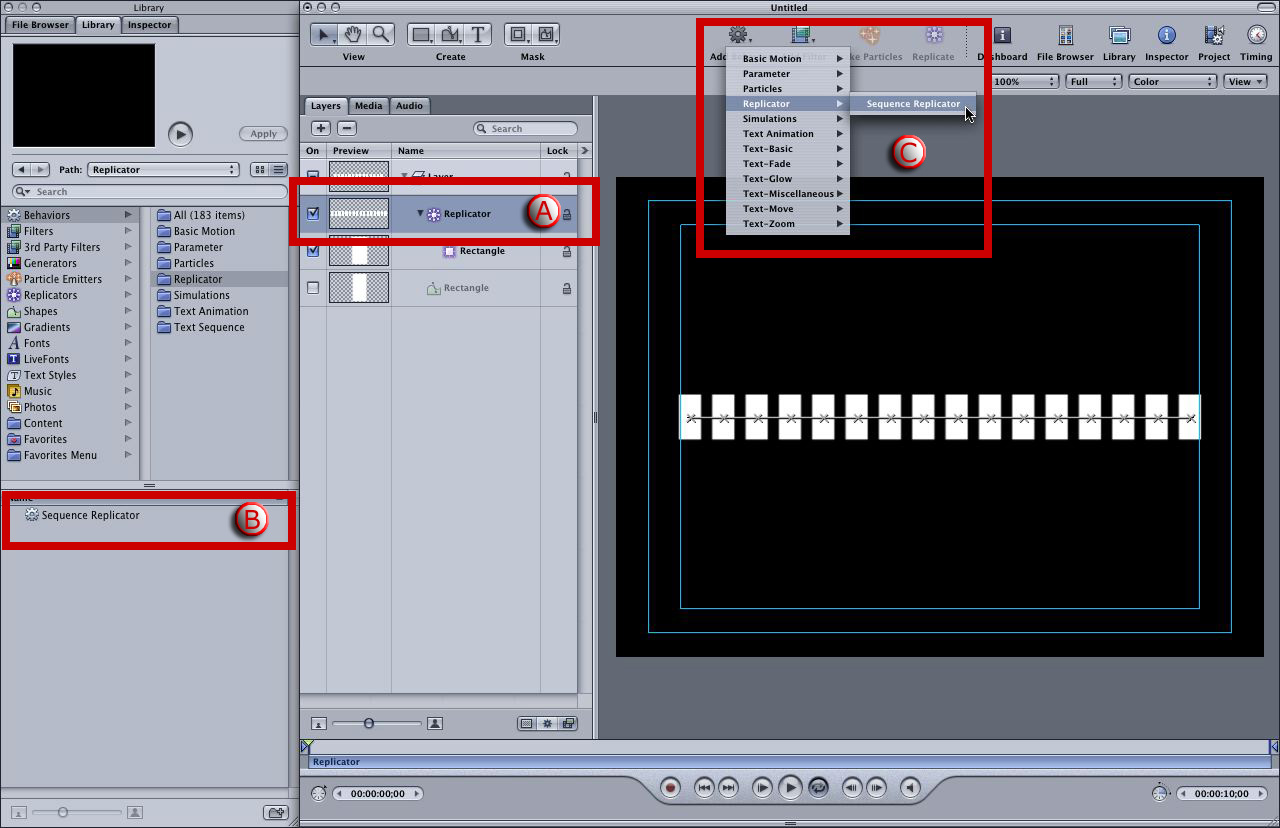
Figure 4. To add the Sequence Replicator Behavior to a Replicator, first make sure the Replicator object is selected (A). Then, either drag it onto the Canvas from the Library (B) or select it from the Add Behavior icon in the Toolbar (C). 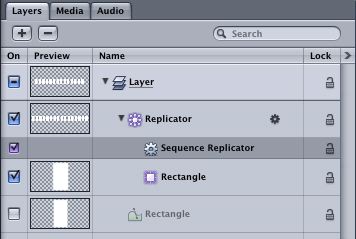
Figure 5. The Sequence Replicator applied to a Replicator. Note the gear-shaped Behavior icon next to the Replicator object, which indicates there is at least one behavior applied. 
Figure 6. The parameters for the Sequence Replicator Behavior.
Adding a Parameter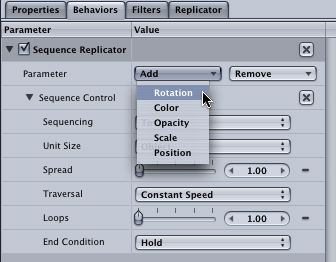
Figure 7. To make the Sequence Replicator actually do anything, you first need to choose at least one parameter from the Add list, and then adjust its value.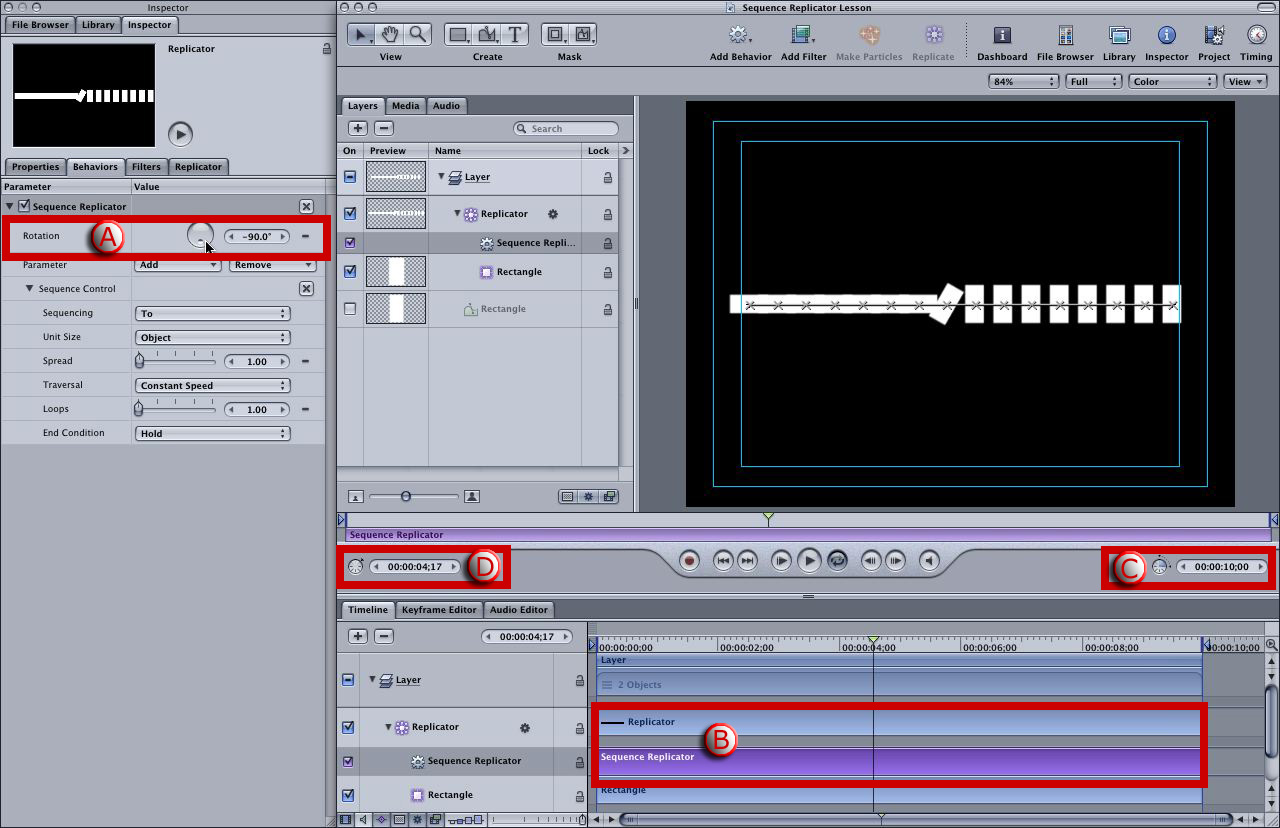
Figure 8. By adding the Rotation parameter and setting its value to -90 (A), each rectangle turns 90 degrees clockwise, one after the other. However, the animation is quite slow because the behavior lasts as long as the duration of the Replicator object (B) which is 10 seconds long (C). So at 4 seconds and 17 frames (the current playhead location, (D)), the animation is only about half way completed.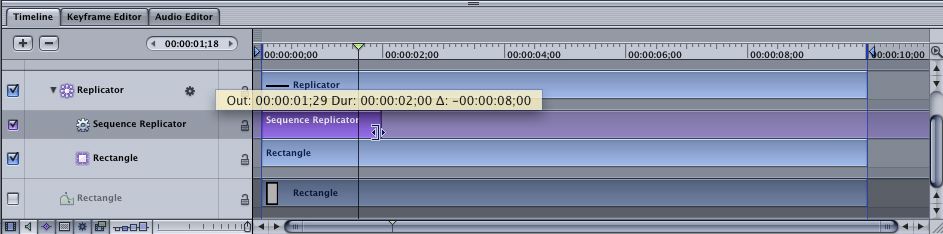
Figure 9. Trimming the Sequence Replicator behavior in the Timeline.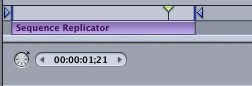
Figure 10. Note the playrange is the same length as the behavior.
Sequence Control Parameters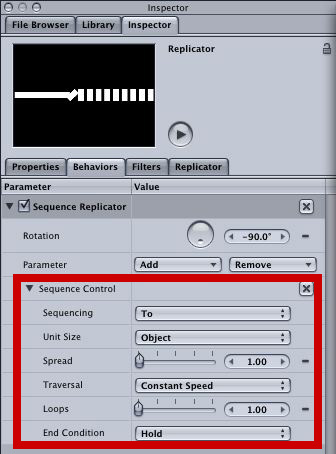
Figure 11. The Sequence Control parameters - let the fun begin!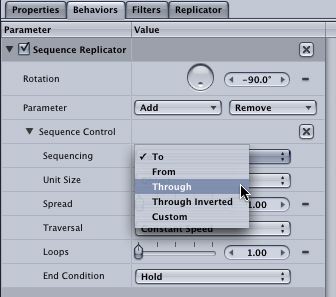
Figure 12. The Sequencing options.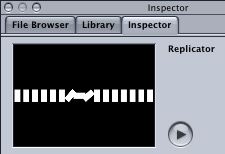
Figure 13. The "Through" Sequencing option (with the default Spread value of 1): each block turns 90 degrees clockwise and back again.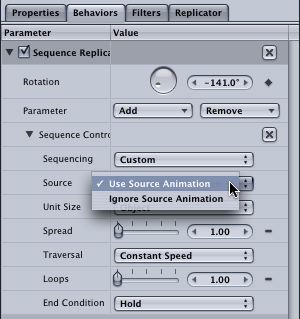
Figure 14. If you select Custom for the Sequence parameter, a new parameter appears called Source. By choosing Use Source Animation, any keyframes that are applied to the source object are used to drive the Sequence Replicator instead of the selected parameters. So in our example, the Rotation parameter will be ignored. If you have keyframed the Rotation parameter (note the solid diamond next to the Rotation parameter value), then selecting Custom will use those keyframes. You can choose whether or not you also want the source object animation to be included - if you don't, choose Ignore Source Animation.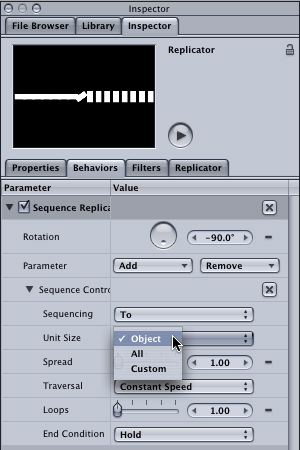
Figure 15. The default unit size is Object, which means that the animation gets applied to each object one at a time as it sequences through all the replicated objects. Note how only one object is turning in the Preview area of the Inspector - the ones to the left have already rotated 90 degrees and the ones to the right are waiting their turn.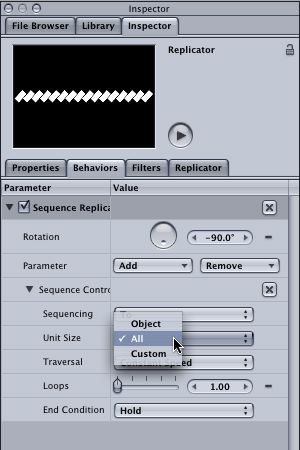
Figure 16. Choosing All makes all the objects animate at the same time. Boooorrrring!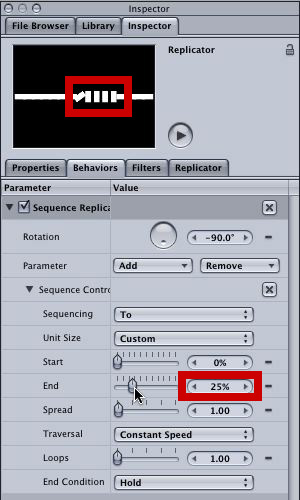
Figure 17. A Unit Size of Custom defines a range over which the animation occurs - think of it as sort of a window that passes along and the animation happens only within the window - and you set the size of the window. Here, we have set 25% of the animation to be in progress at any one time. The Preview window shows the animation when it is half-way completed (meaning the playhead is currently parked at the halfway point).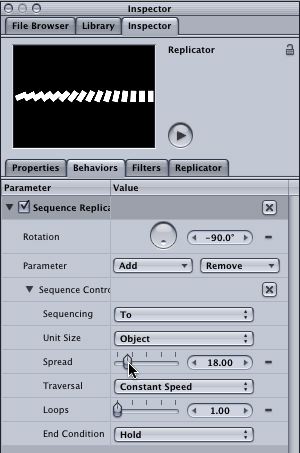
Figure 18. By increasing the Spread value, the animation overlaps - the second object starts to move before the first one stops, and so on. Notice the domino-like effect.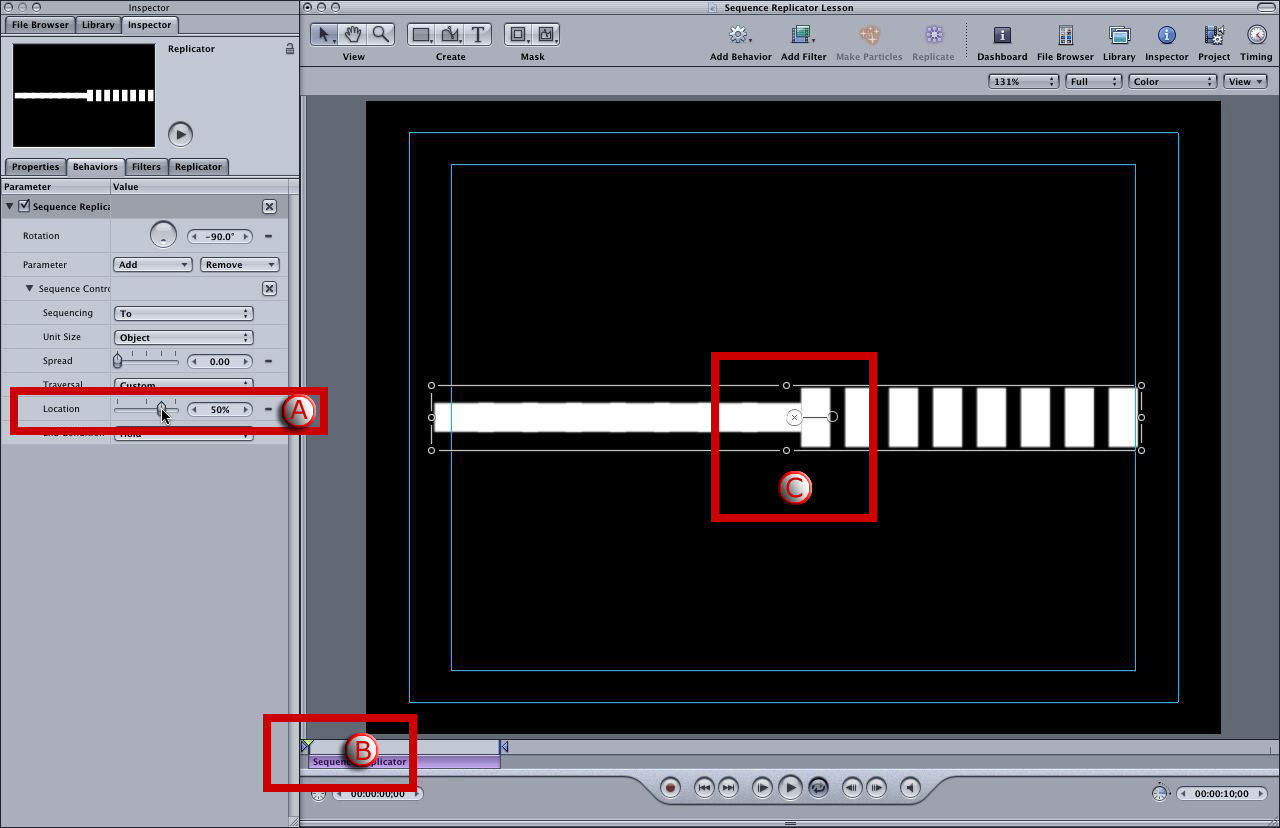
Figure 19. Setting the Traversal parameter to Custom reveals the Location parameter (A). The Location parameter is designed to be keyframed so you can decide how the animation moves through the replicated objects. Here, we have set the Location value to 50%. So even though we are at the first frame of the animation (B), the animation is 50% completed (C).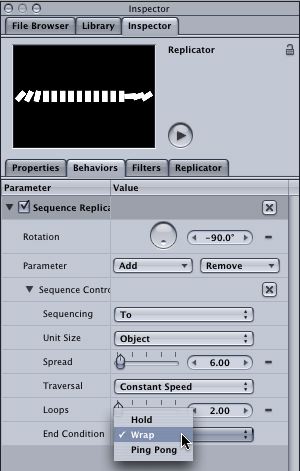
Figure 20. Note the frame of the animation in the Preview area, which is nearing the end of the Sequence Behavior. With a Loops value of greater than 1 (2, in this case) and a spread value of greater than 1 (6, in this case), we can set the End Condition to Wrap to make the animation "wrap" around the end and start at the beginning again seamlessly - notice how the first few blocks have started to rotate even though the last blocks aren't quite finished.
Important Replicator Parameters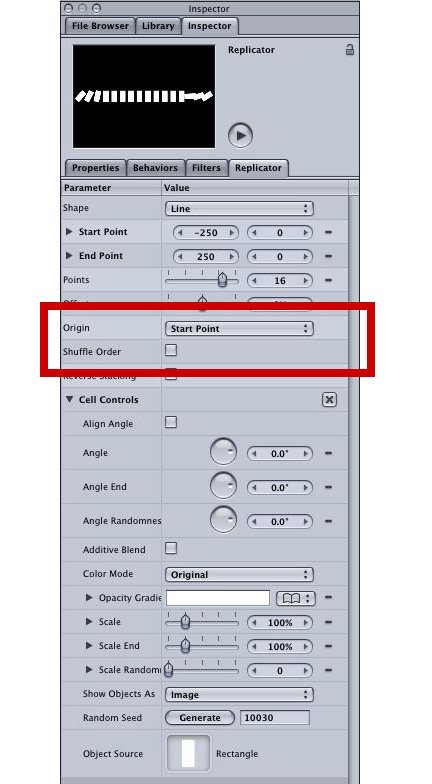
Figure 21. On the Replicator tab of the Inspector, the Origin and Shuffle Order parameters will affect your Sequence Replicator behavior.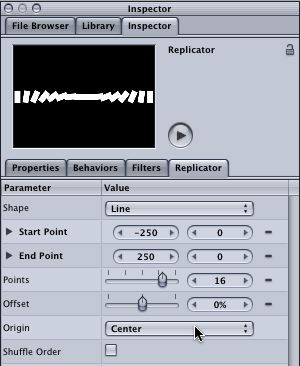
Figure 22. Changing the Origin parameter to Center causes the animation to start in the middle and move out in all available directions.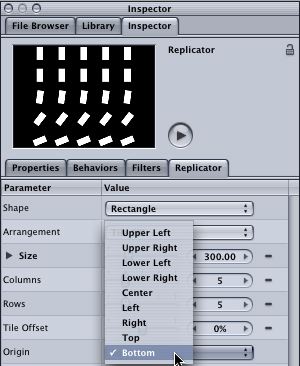
Figure 23. Here, our Shape parameter is set to Rectangle, which allows more choice when selecting the Origin.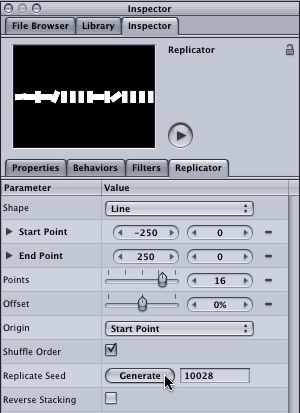
Figure 24. Shuffle Order randomizes the sequencing animation. Click the Generate button to change the random pattern.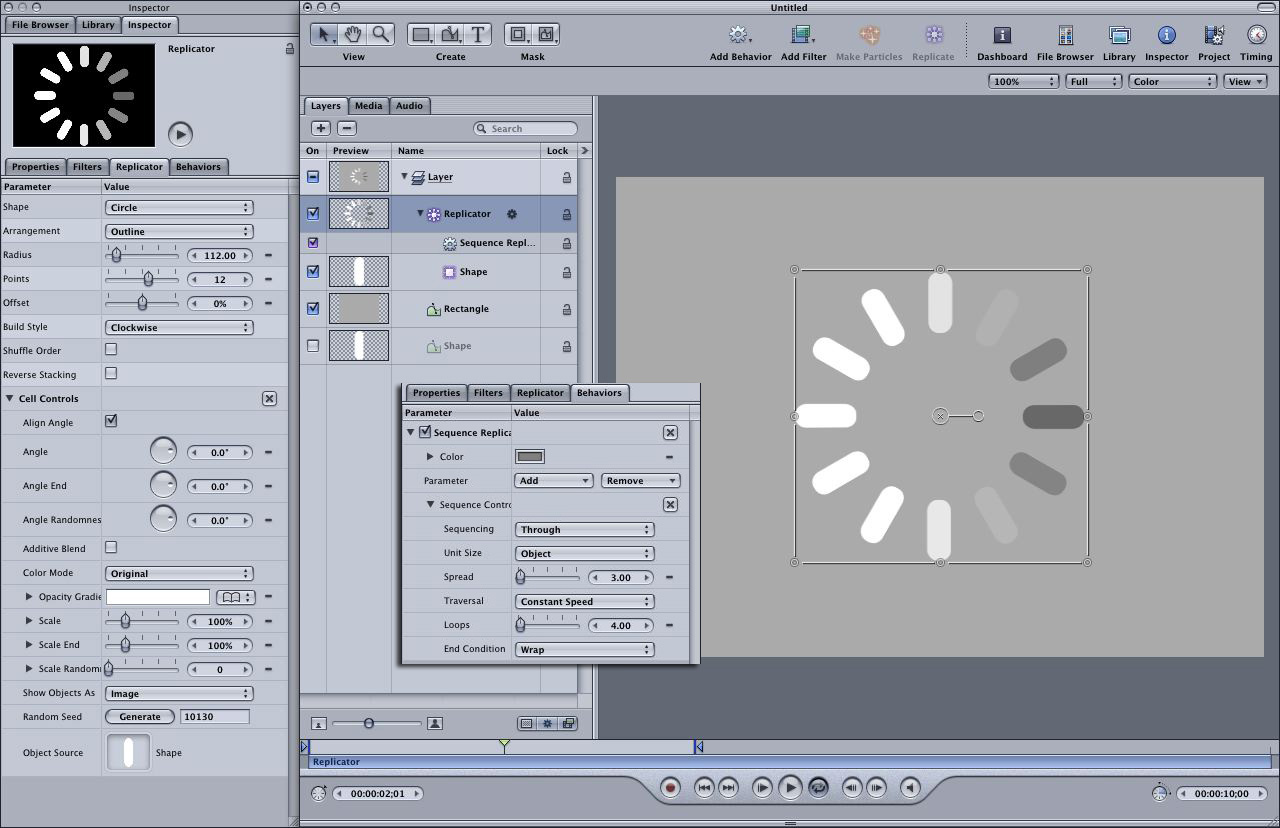
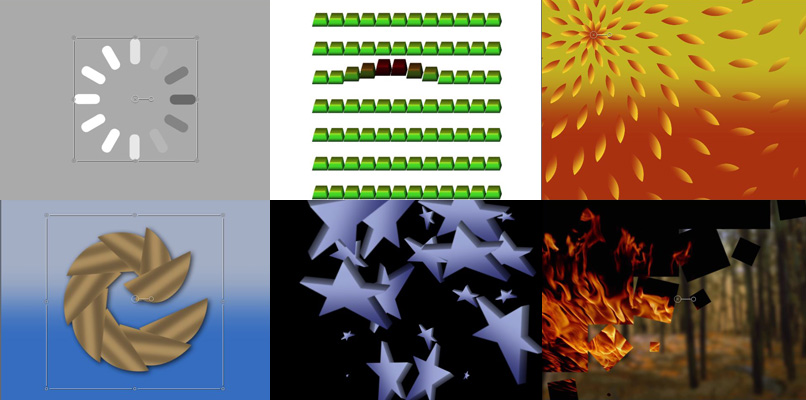
Figure 25. Recognize this figure from when you start up your Mac? It's easy to make: first, use the shape tool to make the little pill. Then apply the Replicator and add the Sequence Replicator behavior. Add the Color parameter and set all the values as above. Tweak to taste
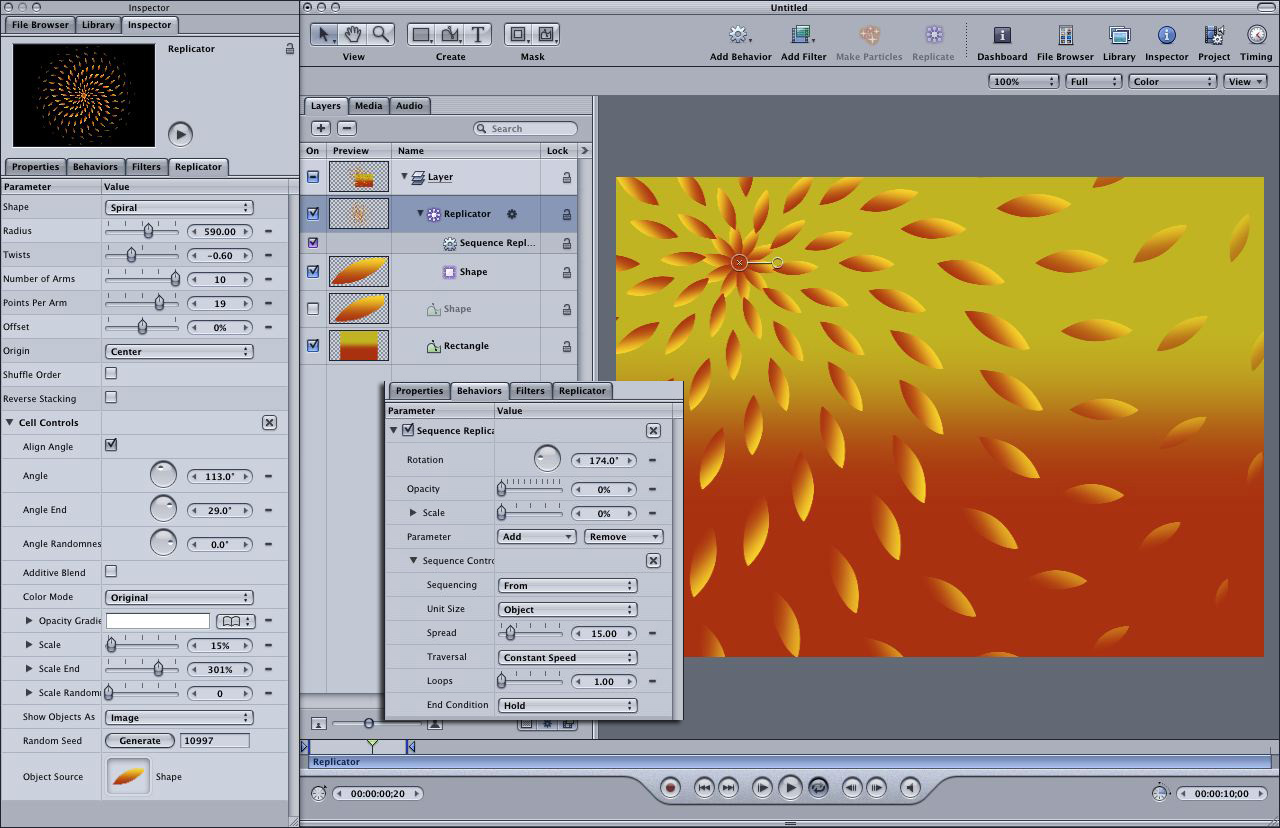
Figure 26. A fun animated flower or sun-like pattern. Created with a simple shape filled with a gradient (along with another gradient-filled shape for the background) and using the Spiral shape parameter for the Replicator. I've animated the Rotation, Opacity, and Scale parameters with a large Spread value to make a soft, flowing, opening type of motion.
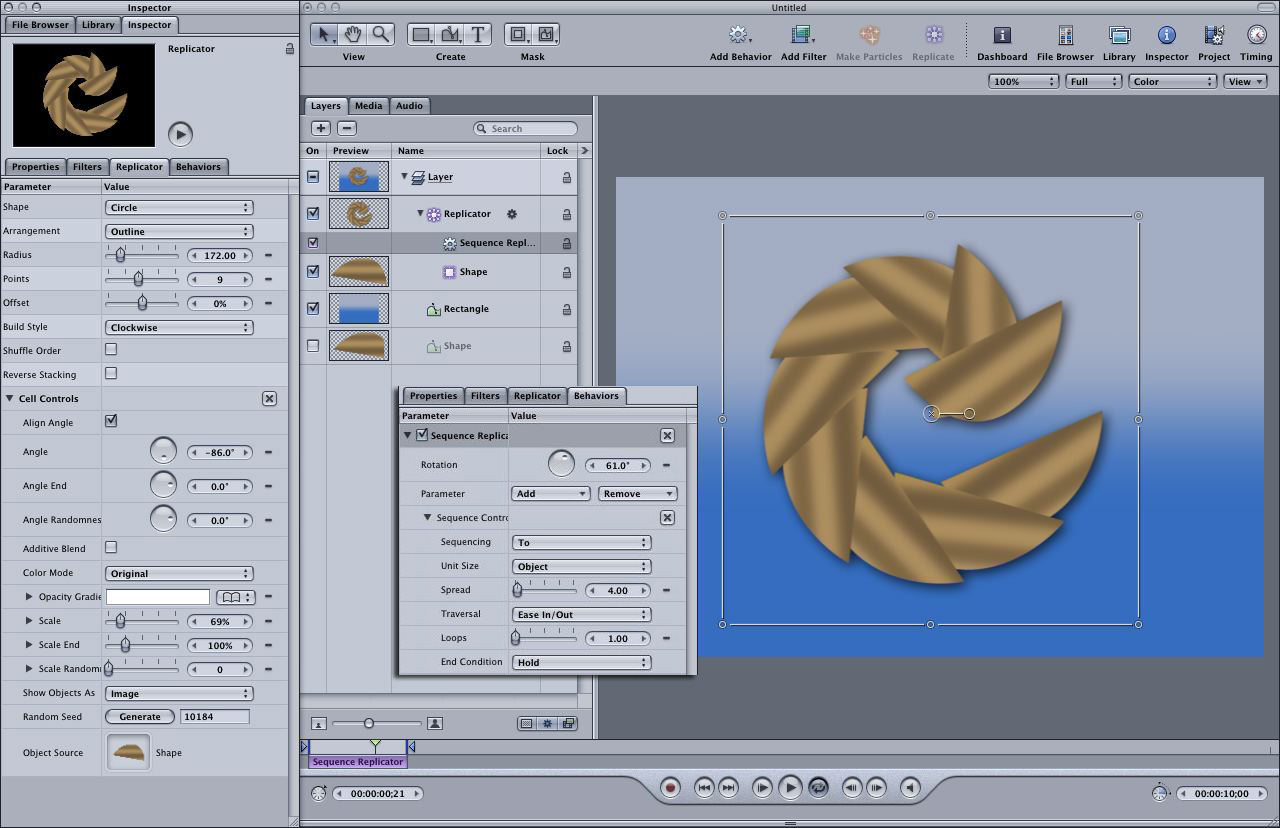
Figure 27. Something akin to an opening camera iris - or maybe some artfully arranged potato chips, I'm not sure. By adjusting the location of the Anchor point, you can change how the Rotation and Scale parameters affect the animation quite dramatically.
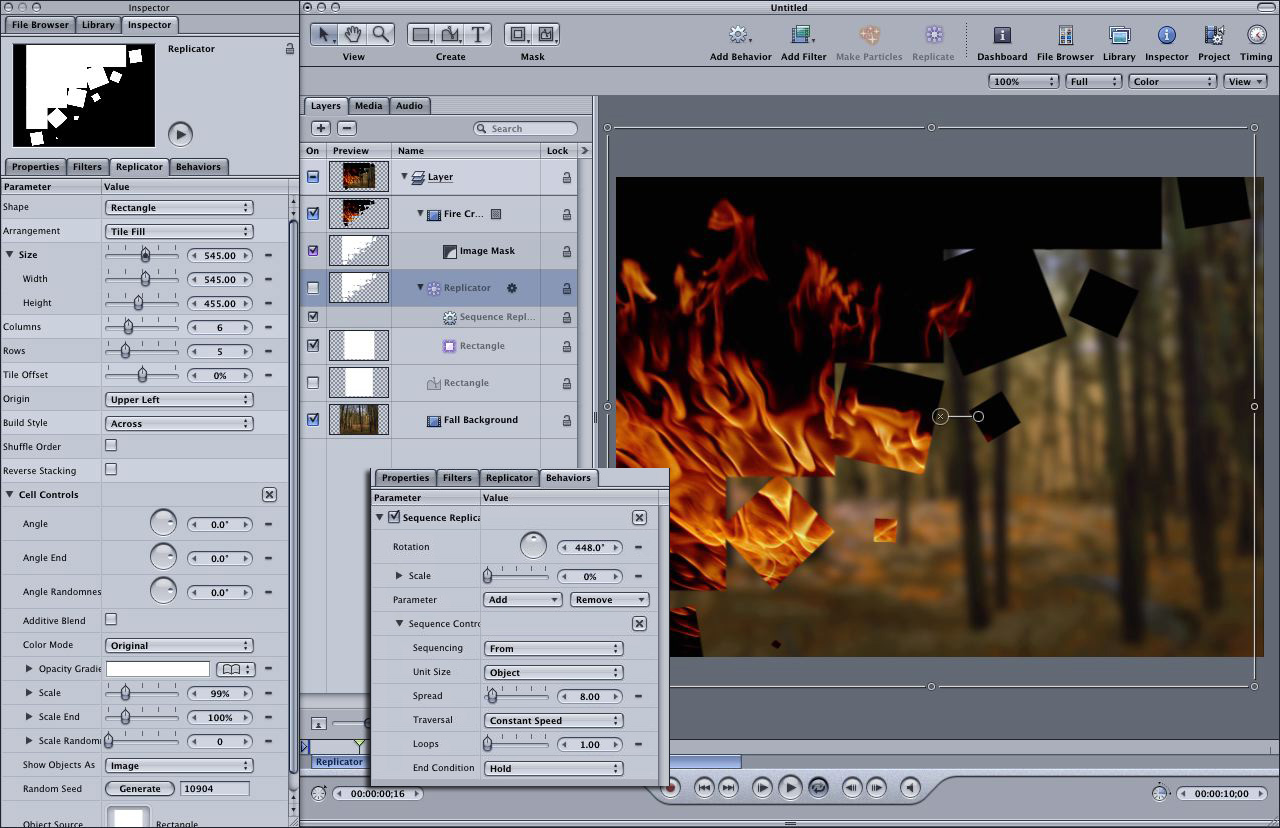
Figure 28. The Sequence Replicator behavior is great for creating animated mattes. Here, growing spinning blocks are used as a transition element. After creating the Replicator and adding the behavior, add an Image Mask to your object (in this case, the fire movie). Then, in the Layers tab, drag the Replicator onto the Image Mask.
Summary
copyright © www.kenstone.net 2005
are either registered trademarks or trademarks of Apple. Other company and product names may be trademarks of their respective owners.
All screen captures, images, and textual references are the property and trademark of their creators/owners/publishers.