
White Paper - Apple Soundtrack August 25, 2003
Let There Be Music - Getting Started With Soundtrack
By Dan Brockett
White Paper - Apple Soundtrack August 25, 2003
Let There Be Music - Getting Started With Soundtrack
By Dan Brockett
Didn't you already write a Soundtrack article?
 I recently wrote an article that was intended to serve as an introduction and overview of Soundtrack I highly recommend reading this article before jumping into this one. The article you are reading is aimed at getting the beginning to intermediate video editor up to speed and productive with Soundtrack. As you go through these tutorials, you will learn about Soundtrack's interface, tools, a little bit of music vocabulary and you will learn about several different methods for composing music tracks for your video projects.
"But How Do I...?"
Together, we'll explore step-by-step several typical scenarios that you may encounter when trying to effectively integrate Soundtrack into your video editing workflow. The great thing about Soundtrack is that you don't have to be a musician or composer to turn out at least acceptable music tracks. Be aware though, the better your ear and musical skills, the better your finished compositions will be. Some editors use Soundtrack to generate temp tracks, which are later replaced with custom composed tracks or library music tracks at the end of the postproduction workflow. Other editors are using their Soundtrack music tracks as the final music for their productions. Soundtrack is a very effective tool because almost any video editor can use it in several different ways, from very basic to quite advanced. Like any effective media tool, you are only limited by your skills and imagination. It's important that you realize that following these tutorials, step by step, will not make you a good composer, but hopefully you will learn how most of Soundtrack's tools and functions work and will pick up some basics about instruments, arrangements and how to set levels and panning to do a basic mix.
Tutorial One
For The Beginner
The Hookup
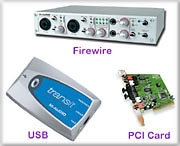
In this tutorial, it is assumed that you have read at least the part of the Soundtrack manual that explains how to physically setup your system. If you are not using a soundcard, Firewire or USB audio interface, Soundtrack defaults to using your Mac's built-in audio system. USB, PCI cards and Firewire audio interfaces are generally a much higher quality way to get audio in and out of your Mac, if you can afford them. Regardless of your Mac's audio interface, hopefully you have routed your audio signal from your Mac out to a pair of quality audio monitors so you can really hear what you are doing. Cheap computer speakers and low fidelity home audio speakers really don't cut it for music composition. Note that since Soundtrack is not a video editing application, you will be monitoring your audio through your Mac, not through your Firewire deck or camcorder (assuming you are working with DV) as you would be when editing in Final Cut Pro. The audio output from the G4's unbalanced 3.5mm output jack leaves something to be desired as far as audio quality, but its sound is good enough to effectively use Soundtrack. The Soundtrack manual offers several sample routing illustrations for various ways to hookup your Mac for the best sound quality in your particular situation.
How to Score Your Two Minute Vacation Video
Simple enough, right? Let's begin...
In order to prepare this tutorial, I edited a one minute piece of my vacation video in FCP.

Saving your ref movie for Soundtrack from Final Cut Pro 4.0
The first step in scoring your video is to make a reference Quicktime movie that you can use to see picture and timing cues in Soundtrack. Export your movie from FCP by marking in and out points on your Canvas or Timeline. It's a good idea to put some handles of video black, about two or three seconds on the beginning and end of your video clip. This gives you a little bit of pre-roll and post roll in Soundtrack to work with.
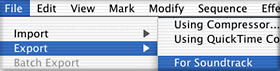
After marking your in and out points in the timeline or canvas, go to File>Export>movie for Soundtrack. Save the reference movie to your desktop. (No need to make a self-contained movie assuming you will be using Soundtrack on this same computer).

Before Moving On To Soundtrack...
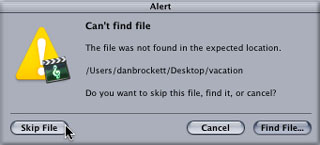
Click and download this Soundtrack project file, called "Vacation", 152 k. So that you can easily locate the file, it would be a good idea to create a folder on your Mac's desktop. Label it "Soundtrack Tutorial". Save this project file in the folder you created. Open the "Vacation" Soundtrack Project file by going to File>Open and select the "Vacation". Assuming you have correctly installed the Soundtrack application and have all of the included audio loops installed, this project file will playback and sound exactly the same on your system as it did on the system I used to compose this piece of music. This project file will become your roadmap for this beginner tutorial. If, when attempting to open the project file, you get the Alert box below, click on 'Skip File'.
For the purposes of this tutorial, you can download this "My Vacation" Quicktime movie, 228 k. It contains three scoring markers that you would have been able to view in QT player or Soundtrack. We did find out that by running our tutorial movie through Media Cleaner that the scoring markers are lost so you won't see them in this file. If you want to have this movie for doing this tutorial, it could be helpful, although it's totally optional. Alternately, if you'd rather not download this Quicktime movie, you can generate one with your own material on your system but, of course, your pictures, marker locations and descriptions of shots won't match the tutorial project.
Note This tutorial assumes that you have installed your Soundtrack loops on your main HD. If you have installed your loops in another location, the file path specified in these project files will not work and you will have to manually link each file as the project loads OR you will have to re-locate the loops called for in the project file to the same file path location.
Get Familiar With The Interface

Before we jump into the tutorial, let's take a quick look at the Soundtrack interface. In Soundtrack, you do most of your work in two main areas: the Media Manager and the Project workspace. The Media Manager and the Project workspace can appear in a single window or in separate windows, depending on the layout you choose and the type of monitor setup you have.
File Browser
The File Browser displays the disks connected to your computer. You can use the File Browser to navigate to your audio and video files on your hard drives. Once you locate the files you want to use, you can preview them in the File Browser and drag them from the Media Manager to the Timeline.
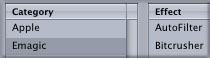
Search
![]()
When you have thousands of loops and one-shots to search through to try to locate a specific sound, you need a system that can sift through the data quickly and simply. Using Search, you can search for audio files based on a variety of criteria, including instrument, genre, mood descriptors, and other categories. You can also search using specific keywords. Once you locate the files you want to use, you can preview them in Search or drag them to the Timeline.
Preview Area
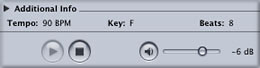
The lower part of the Media Manager contains the Preview area, with controls for previewing audio files. The Preview area also displays information about the file, including the file path, tempo, key, and number of beats. The Preview controls and information are available in all three Media Manager panes.
Project Workspace
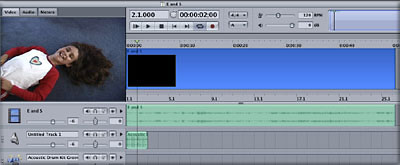
The Project workspace is where you arrange your Soundtrack projects. It includes the Timeline, which contains tracks where you place and edit your project's loops, and also includes the Viewer, track controls for each track, Timeline controls, Beat and Time displays, transport controls, master controls, and the Global Timeline view.
Video track
When you add a video to your project, the video clip is displayed in the video track, starting at the beginning of the project. Each project can have only one video track.
Audio tracks

The main area of the Timeline contains the project's audio tracks. Each audio track extends from the beginning to the end of the project. You can have up to 127 audio tracks in your project.
Audio clips
Audio clips are the basic building blocks of a Soundtrack project. You add audio clips to a project by dragging them to an audio track in the Timeline at the position you want them to begin playing.
The Viewer
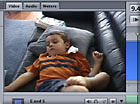
The Viewer has three panes, Video, Audio, and Meters. Each pane displays different information about your project. Click the Video, Audio, or Meters tab to display the corresponding pane in the Viewer.
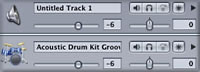
Track Headers and Track Controls
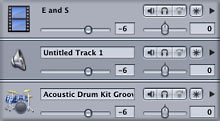
Below the Viewer are track headers for the audio tracks in the Timeline. Each track header contains a track icon, track name field, and a set of track controls.
Timeline Controls
![]()
The lower-left corner of the Timeline contains controls for various aspects of Timeline display and operation.
Beat and Time Displays
![]()
Beat Display and Time Display
In the upper-left corner of the Project workspace are the Beat display and Time display. Both show the current playhead position, using two different formats.
Transport Controls
![]()
Below the Beat and Time displays are the transport controls. You use the transport controls to control playback of your project, and to open recording sessions.
Master Controls
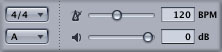
To the right of the transport controls are the master controls. You use the master controls set project properties and control overall project volume.
This covers the basic components of the interface. We'll get into some of the hidden and less frequently used controls as we move through the tutorials.
Check those preferences

Open Soundtrack. If your project is a DV-based project, chances are it has a 48KHz sample rate. Make sure that your preferences Soundtrack>Preferences>Project in Soundtrack
are set for 48KHz so that the music tracks you create will smoothly and cleanly integrate with your DV tracks. Alternately, you can just go to Project>Sample Rate and make sure that 48KHz is checked. Of course, if you have a 32KHz or 44.1KHz non-DV project, you would set Soundtrack's preferences to the appropriate sample rate.
Importing your reference movie into Soundtrack

You also need to make sure that the three music clips you are going to compose for the three segments of the video will work together as far as length, key and tempo. Locate the "My Vacation" ref movie that you saved to the Soundtrack Tutorial folder on your desktop and drag it to the viewer window in Soundtrack. Move the playhead to the beginning of the Soundtrack timeline by hitting the keyboard shortcut, "home". Then hit the space bar to playback your movie and its accompanying sync sound, if there is a sync sound soundtrack for it. Check to see that your movie plays back smoothly and in-sync with it's own sound.
Drag the project length indicator down the timeline to the end of the length of the track for your movie. You have now the length of your Soundtrack project. Soundtrack will play through the timeline, all of the way to this indicator before looping back to the beginning of the timeline.
The Project
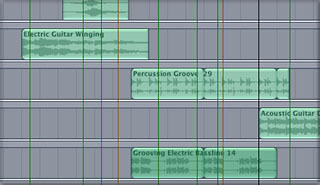
Your next step will be to play back the completed project that you have just downloaded. If you also downloaded the movie file for the video portion of the lesson, you should have it loaded into the viewer. If not, just the instrument tracks will be shown on your timeline.
The tracks will read, from the top of the track window to the bottom:
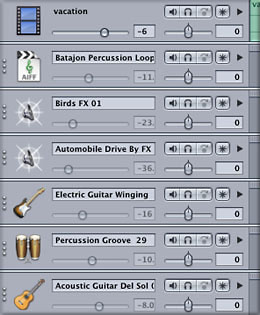
Vacation - this is your video track, if you loaded it
Batajon Percussion Loop 12
Birds FX 01
Automobile Drive By FX
Electric Guitar Winging
Percussion Groove 29
Acoustic Guitar Del Sol 01
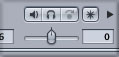
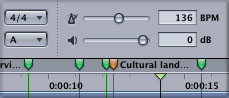
Assuming that all of the tracks are present and accounted for, check the BPM in the master control window near the top of the screen. It should be set for 136 BPM. If, for some reason it's not, move the slider until the display reads 136 BPM. Now, hit the space bar and listen.
This project is more of a demo of what Soundtrack's capabilities are than a perfectly composed piece of music. I added not only musical instruments, but also a couple of sound effects. Keep in mind that the QT movie, if you downloaded it, is totally silent, there is no sync sound.
Break It Down!
Now, we will discuss what was done to create, arrange, sync and modify each track.
Track One - Vacation

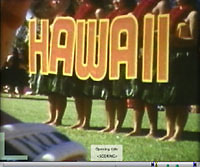
This track is obviously our video track. It was edited together in Final Cut Pro 4.0. There were three scoring markers inserted that were labeled, "Opening Title", "Interview" and "Cultural landmarks". If you have loaded this movie from your system HD, you would see the orange scoring markers and the marker titles at the top of Soundtrack's timeline.
Track Two - Batajon Percussion Loop 12 - located under "Percussion" in the Media Manager

I chose this loop because it sounded like travel, not totally Hawaiian, but definitely exotic. This was the first loop I started the track with because I needed a good rhythmic foundation to begin with. The only modification I made to the track was that I set it into the timeline and extended it from one measure (8 beats) to about two and a third measures, using the loop extender tool. I also clicked on the track envelope control and placed four keyframes on the track volume display.
By default, there are two lines in each track envelope, one for volume and one for panning. If you have applied effects to a track, you may sometimes see some effect parameter envelop lines as well. You set envelope points by placing your mouse on the line at the point that you want to set the envelope points (keyframes). Double click your mouse on the line to set an envelope point. To do a volume ramp, you must set a minimum of three points but preferrably set at least four, two near the beginning of a clip as shown and two at the end of a clip. Having four points lets you keep a constant level once you have ramped up the volume. With three points, you can only do a volume swell since you only have an open point, a mid and an ending point.
I then used the mouse to adjust the four volume keyframes for a smooth ramp up and then a smooth ramp down at the end of the loop. This concept of setting volume curves with envelope points is performed the same way as keyframes are used in Final Cut Pro, either manually with Final Cut Pro's volume keyframe tools or automatically, using FCP 4.0's mixer and key frame automation. You can also adjust the overall volume of the track just using the track volume slider, but it usually sounds better to use keyframes and to ramp the volume up and down as needed.
Track Three - Birds FX 01 - Located under "FX" in the Media Manager

This track is not a music track, but since the movie had two scenes with palm trees and lush looking garden areas, I felt that adding some birds might make the clips a little more natural sounding. If you open the track envelope by clicking on the small arrow in the right hand side of the Birds FX 01 track heading area, you will see that I applied a very similar type of volume ramping up, then down as I did to most of the tracks. The goal is to make the tracks smoothly blend with each other so that the tracks all work with each other, not against each other.
Track Four - Automobile Drive By FX - Located under "FX" in the Media Manager
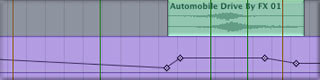
Same thing as the track above, not exactly a music loop, but I had a driving shot in the movie so I tried this and it kind of works although it's not ideal because it's a drive by instead of a steady driving sound. Supports the picture well though. Open the envelope and you'll see that the volume ramp up is more sudden than the fade out.
Track Five - Electric Guitar Winging - Located under "Guitars" in the Media Manager
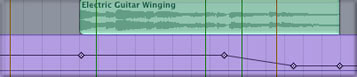
I felt that this little guitar riff worked interestingly with the surf footage. It did, except for the end of the loop, it went on too long. So I faded down the volume early. Check the envelope for seeing how I keyframed and faded the volume down early.
Track Six - Percussion Groove 29 - Located under "Percussion" in the Media Manager

I needed another percussion track, but one that was different than the opening percussion track so this one fit the bill. Check the envelope for the usual volume up and down smoothly by keyframing.
Track Seven - Acoustic Guitar Del Sol 01 - Located under "Guitars" in the Media Manager
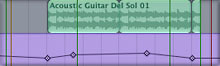
I looked at the two Hawaiian musicians in the second to last clip in the movie and tried to find a guitar piece that at least sort of matched the tempo of how they looked to be playing. Added the usual volume up and down with the volume keyframes.
More About Envelopes and Keyframes
Hopefully by looking at this project, you have a better idea about how to use the envelopes on each track. Keep in mind that the envelopes function in a manner that is very similar to how the keyframes function in Final Cut Pro. To use the track envelope controls, click on the envelop control triangle in each track to reveal the envelop controls, then you double click on the envelope line in the envelope track area to place an envelope mark. Then just put your mouse and click and drag the envelope point it to where you need it. If you can use keyframes in Final Cut Pro, you can use envelopes here in Soundtrack. Also, you can adjust over time, not only volume, but also track panning (whether a sound comes from the center, right or left speaker) and even some various plug-in effect parameters.
Some other important tools
A few other tools that you will find yourself using a lot are the solo and mute keys. The solo key is the small headphone icon. The mute key is the small speaker icon in the track header. The solo key turns off all other tracks in the arrangement and let's you hear the one loop or track you are soloing. The mute button merely mutes the selected track so you can take a specific loop out of your total mix without removing the track.
Ready, steady, compose!
Before you begin composing your first project, it's probably a good idea to spend an hour or two listening to some of the loops that are included with Soundtrack. You will find that using the media manager in different modes lets you group the thousands of loops that are included in several ways. You will be surprised at how quickly you'll become familiar with the included loops, even though there are thousands of them. As far as how you work with loops and locate them on your timeline, it's pretty intuitive. You can cut, copy, paste and or drag the loops, using the same sorts of standardized commands that you use in Final Cut Pro and many other programs.
The cool thing about loops
By performing this operation, the power of loops will become apparent to you. Just place your mouse over the right hand edge of the loop on the timeline and you will see a drag/extension tool appear. Click and hold down the mouse button and drag and you will see the loop drag along with your mouse, until you release the mouse button. Between copying, cutting and pasting, you can now can tweak the tempo, length and volume of the any loop until you heart's content. This is the fun part of the process. Try different loops, try different tempos. You can stack multiple drum loops, or stack on percussion. Then add more elements. Bass lines, guitar and piano, effects, whatever.
Let's change the arrangement
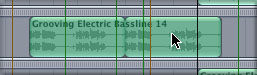
Now that you have seen how I built this track, let's try modifying it. Here, I am adding the "Grooving Electric Bass Line 14" to the timeline. Try following along on your system. I am adding it at the same point in the arrangement that Percussion Groove 29 begins at and I am dragging it out to approximately the same length.
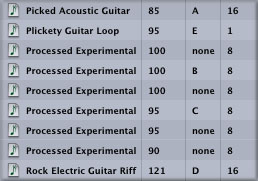
Notice how when I drag this loop to the timeline, even though we can see by looking in the Media Manager that the loop itself has a tempo of 110 beats per minute, is in the key of C,
the loop fits into the tempo that I have already setup for the project on the timeline, in this case, 136 BPM?
Most of the drum and percussion loops don't have a key, but if I add in the bass line loop in the key of A, Soundtrack's default key, any subsequent loops added to the timeline will automatically be transposed to the correct key. You can manually change the key at the top of the Soundtrack interface, just to the right of the transport controls.
Arranging
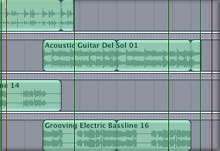 I have added the "Grooving Electric Bass Line 14" to my timeline, but notice how it is only eight beats long? I will obviously want to either put multiple copies of the bass line onto the timeline, or I will want to extend it out to provide a bass line for the entire piece of music. Or I may want to do a combination of both. If I only used were this single bass loop, my arrangement would get pretty monotonous, pretty quickly. I am going to look for another bass loop that will compliment the bass loop that I already am using and in this case, will also compliment the closing acoustic guitar riff, "Acoustic Guitar Del Sol 01". After listening to some more of the bass loops, I find that "Grooving Electric Bass Line 16" provides a nice alternate counterpoint to the first loop and works well with the acoustic guitar riff as well. Try adding "Grooving Bass Line 16" to the same area as the closing guitar track and see what you think. Try muting "Grooving Bass Line 16" by hitting the small speaker icon in the track header. Then go through the bass loops and experiment with listening to the arrangement using several different bass line. Anytime you are auditioning a loop in the Media Manager, you can hit the space bar on your keyboard and the arrangement will begin playing. Then you can hear the loop you are auditioning along with your arrangement. I could switch and alternate between the first "Grooving Electric Bass Line 14" and "Processed Experimental". Try laying in and alternating "Grooving Electric Bass Line 14" then "16", then substitute "Processed Experimental" for "16" and you'll see what I mean. Neither choice is really the right or wrong choice; they are just radically different aesthetic choices and each set up a radically different feel. A lot of your choice about how smooth and grooving about versus how discordant and dissonant should stem from your video editing style, the style of your footage and most importantly, the story you want to tell and how you want the viewer to feel about.
Mixing
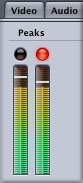 By now, you have probably noticed that Soundtrack doesn't really have a separate mixing console, per se, like Final Cut Pro 4.0 now has. So how do you mix your arrangement? Have you noticed the volume sliders moving in the track control areas each time you play the project? These are the results of the volume keyframes we have been building into each track's envelope controls. You can also adjust the pan controls to place your tracks in the left right or center of the soundstage. The soundstage is basically a description of the stereo effect. Mixing your relative levels on each track within the overall arrangement is fairly simple. Adjust the relative level on each track so that the summed total of all of the tracks doesn't make Soundtrack's audio meter go into the red or clip. Unfortunately, Apple didn't include a calibrated audio level scale in Soundtrack, so much like consumer and prosumer DV camcorders "meters", you just have to guess in regards to your exact recording and output levels. Letting the signal go into the red is probably a bad thing, keeping the peaks to about 3/4 of the total scale is a good thing. Use your monitors and use your ears as well. There are quite a few more advanced mixing techniques using envelopes in the Intermediate tutorial that follows this one, but for now, just adjust the relative track levels and pans to your liking using the envelope controls for each track.
Output
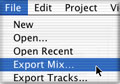 Outputting your finished musical masterpiece in a format that Final Cut Pro can use is quite simple. Assuming you have saved your Soundtrack Project and are editing in Final Cut on the same Mac, you will create your arrangement, modify and work with the arrangement, mix the relative levels of all of your tracks and export the track as a finished two-track AIFF file. If you are working in DV, once you are finished with the arrangement and mixing it to your liking, go to File>Export Mix. Name your track and save it where you will be able to easily find it for when you import it to Final Cut Pro.
My hope is that after doing this tutorial, you can then try to tackle the more advanced tutorial below as your abilities and skills grow. It's very much like editing in Final Cut Pro. Remember how slow and unsure of yourself you were in Final Cut Pro the first few times you edited with it? Right now, these concepts are a little foreign and the interface is a bit weird, right? Play with Soundtrack and experiment. You will soon begin to understand how to use Soundtrack more effectively every time you boot it up.
The Intermediate User
Are you are a more advanced user, possibly an experienced video editor, but new to Soundtrack? Perhaps you have some musical ability or experience? If so, this tutorial is for you. We'll explore not only the basic workflow functions, but we'll also get into some more advanced techniques like how to effectively build and arrange music tracks, apply plug-in effects, use envelopes and how to use FCP scoring markers to your advantage.
Step One - Your Game Plan
In this scenario, let's say that you are editing together a :30 spot for one of your regular clients, in this case, a temp agency. You have all of the footage you will need to put the spot together, but this spot is low budget and the client doesn't really want to spend $200.00 or $400.00 required to license a library music track. Since the spot will obviously still need some cool music, you decide to try scoring a piece of music yourself, using Soundtrack.
Downloads
We are going to work backwards here, deconstructing the arrangement that has already been created so that you can see which loops and tools in Soundtrack were used to create the score. Download this project file, "intermediate tutorial.loop" 216 k and download this video file, "intermediate temp.mov", 320 k. .
The Soundtrack Workflow
If you are reading this intermediate tutorial, I am going to assume that you have at least the basics of Soundtrack down and that you experimented with Soundtrack for at least a few hours. This tutorial also assumes that you understand how to export ref movies for Soundtrack from FCP and how to export AIFF files from Soundtrack back into FCP.
Since you have already edited together the final version of the commercial yet, we are going to assume that you want to generate a :30 piece of music. You at least have a rough idea of the feel and emotion that the client wants the commercial to convey. This commercial is aimed at local employers so the client's ad agency wants you to use shots of employees at work, being trained and looking positive and upbeat. The music will need to be exciting, up-tempo and show that the client is professional, progressive and can meet the local company's staffing needs in a cost effective way.
Jumping Into It
So those are the goals for the music for this project. Let's begin the process.


Before I exported this movie to take into Soundtrack so that I could compose music that would support and compliment the visuals in tempo and emotion, I tried using some of FCP's scoring marker capabilities to mark a few of the key areas in the spot. Unfortunately, as we compressed the movie for you to download and follow along, we learned that FCP's scoring markers are eliminated during the compression process so the small QT movie you download will not have these scoring markers. In general though, by intelligently placing scoring markers while in FCP, you can be more efficient in locating specific cue areas in Soundtrack and spotting music and sound effects to those events. Since this is only a :30 spot, these markers would probably not be as crucial as they would be in a longer project, but by using them here, you get some idea of how they could be used effectively on longer projects.
What Are Scoring Markers?
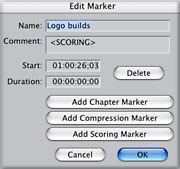
You set up audio scoring markers in Final Cut Pro (4.0 and later versions) as a text track that is embedded in your exported QuickTime movie file. These markers are visible when opened in Soundtrack. A scoring marker is distinguished by the text "SCORING" appearing in the Comment field of its Edit Marker window. If your Final Cut Pro project includes scoring markers, be sure to choose Audio Scoring Markers in the Markers pop-up menu of the Export dialog.
Using Final Cut Pro Scoring Markers
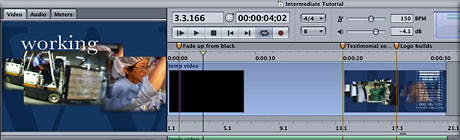
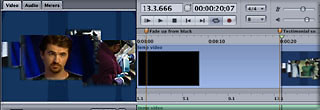
When you import a video file from Final Cut Pro, Soundtrack displays any Final Cut Pro scoring markers included in the video file in the Timeline. Scoring markers have an orange handle in the area above the Time ruler. You cannot move or edit Final Cut Pro scoring markers in Soundtrack. In this case, by parking Final Cut's playhead where I want to insert a marker, I hit the "M" key twice, once to insert the marker and a second time to open up the marker dialogue. I am setting scoring markers for the opening music piece, the area where I want to not use the mid-range frequency instruments so that they don't interfere with the voices in the testimonial clips and I set one near the end of the project, where the client's logo first appears. There are numerous ways that markers can be utilized in FCP and Soundtrack that range from giving you a beat map to cut picture to all the way to just acting as electronic "Post-It" notes to remind you about something on your clip or timeline. Since we are assuming you are at least an intermediate user, I am sure that you have your own marker techniques and effective ways of using them that improves your workflow. In this case, we are using the scoring markers to easily see where the different
Instrument-arrangement shifting points might be.
Track breakdowns
I think that the most efficient way for you to learn about how a complex arrangement was created isn't to build up a complex arrangement from scratch, the easiest way is to deconstruct an existing arrangement. Let's go through the project together and we'll take a look at each track, how it was created and why certain effects, techniques and artistic choices were made.
Track One - Temp Video

This is obviously our finished video track. Normally, if you had edited this piece, you would have your VO, dialogue and sync sound show up on this track as well. This is pretty standard, a regional TV spot created in Final Cut Pro and After Effects.
Track Two - Looping Music Bed 31

I mainly used this loop as a timesaver. If you push the solo button (the small headphone icon) on this track header, you will hear that this track already is composed of pre-arranged bass, drums and percussion. So rather than building three to five separate tracks, you can begin with a track like this one and you save a lot of time. If you click on the envelope control arrow on the right hand side of the track header, you'll see the four keyframes that I set in the volume envelope, a medium volume ramp up and a quick volume ramp down. Since this loop is already pre-arranged and probably pre-compressed, I didn't see a reason to add any more effects so I didn't use any of Soundtrack's built in plug-in effects.
Track Three - Bodhran Loop 5

Since I have decided that I wanted this piece of music to begin with an attention grabbing flourish, I decide to try a dramatic plug-in effects on the first loop.
I decide to try an ethnic bed, in this case, an Irish drum called a Bodhran with "Bodhran Loop 05". This sounds pretty dramatic, you don't hear a Bodhran everyday in commercials, but to me, it sounded a little too "real" so I added an Emagic Modulation Delay and panned the Bodhran to the left channel. By clicking the envelope control in the track header, you can see that I didn't need to do any volume or panning adjustments to this loop. When this spot is viewed on a mono TV speaker, it won't make any difference but since the majority of viewers now have some kind of stereo output from their televisions, hearing the Bodhran in the far left of the Soundstage with a modulation delay is somewhat of an ear grabber, just because it's so unusual. We're not making a commercial about Ireland though so I just used it briefly as an opening element. Its function is more to grab attention than purely musical. You can also see that I also used another loop and 2/3 of a loop of "Bodhran Loop 5" to end the piece. It's not always desirable to end with the same loop the project began with, but in this case, it worked well.
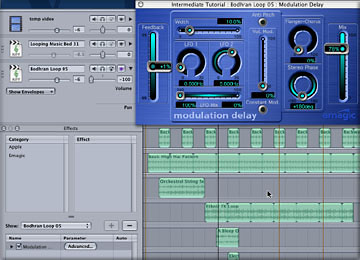
By clicking on the small asterisk-looking symbol in the track header, you can then view the effects dialogue for each track. Go ahead and bring up the effects dialogue now for this track. Click on the "advanced" button in the dialogue to view the plug-in effect and how it was setup to get the sound I wanted. The modulation delay lends a subtle phasing sound that makes the instrument sound more interesting when it is soloed like I am using it here. After affecting the Bodhran loop with the Emagic Modulation Delay, I was basically happy with the overall sound of it.
Track Four - Backward Accents

I decided to put this loop into the arrangement to give a little bit of a mysterious or interesting layering. You can see that I put this loop into the arrangement to begin immediately after the Bodhran loop plays. I then copied and pasted the same loop eight or nine more times. Open the envelope dialogue by clicking on the envelope arrow in the track header and you will be able to see the volume and panning changes that I applied. You can see that I set this backwards sound to continually pan from the left, to the right speaker throughout the arrangement. Since this is a subtle sound within the entire arrangement, I felt that using this extreme panning would lend a subtle amount of interest for those viewers with a stereo TV speaker setup.
Track Five - Basic High Hat Pattern

When you are arranging tracks, you will learn that every track needs an element to function as the "glue" that holds the piece together, especially when there are a lot of disparate elements. A basic high hat is very effective for doing this. You can see that besides the basic volume ramping in the envelope settings, I didn't add any other effects or panning.
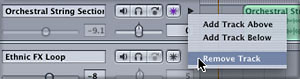
Track Six - Orchestral String Section 68

I recently saw an image spot for Boeing and I really liked how the composer used a string quartet for just one segment of the piece, yet the it was a very modern, progressive use of the strings along with techno type of percussion. After some searching through Soundtrack's loops, I found "Orchestral String Section 68". After tweaking the tempo of the timeline up to 150 bpm, using the tempo control slider master control panel I was happy with this chord progression. I also liked the sound better after moving the key of the project from A to B, which I adjusted using the master key control in the master control panel. Click the effects toggle button; the one that looks like an asterisk, and you'll see that I applied a flanger and a compressor also to this loop. The flanger lends a nice, airy effect to the loop and the compressor helped these soft sounding strings better cut through the rest of the track. You can check the flanger's settings by clicking on the small arrow to the left of the flanger in the effects dialogue. To see the compressor settings, click on the advanced button.
Track Seven - Ethnic FX

I used this percussion-based loop when I wanted to shift gears and move the feel and tension up in the arrangement. By hitting the solo button on the track header, you'll be able to hear that the percussion instruments are already pretty heavily affected so I didn't add any effects to this track although I did put in some subtle panning effects using the envelope controls. You can see the panning settings by hitting the envelope control arrow.
Track Eight - A Bleep Odessey

I used this loop because it had sort of a high-tech feel and it nicely supported the timing of the "funding" and "training" graphics as far as the timing. By clicking on the envelope control, you'll see that I had a gradual volume swell setup with the five volume envelope points and the curve that they formed and you can see that I did another panning setup that went from centered, to hard left, then hard right, back to hard left then back too centered. I applied the Emagic Platinumverb reverb to this track. You can click the effects tab in the track header, then click on the advanced button in the effects dialogue to see the reverb settings I used. Because this is a busy sound that sort of danced all over the place, I thought that a reverb might "smear" it a little bit and let is blend in better with the overall track.
Track Nine - Electric Bass Bomb

You definitely need to cue the playhead near the beginning of this loop, and then solo it, to hear what it is. It's basically what a bass player would do to add more excitement to the beginning of a riff or when a riff shifted gears. I didn't add any effects or panning to it, but I did do a minor volume swell. If you look at the loop's waveform, you can see that until the loop's sound actually begins, there is nothing to be heard. So by lowering the loops volume level before the actual desired sound plays, I am also decreasing noise in the overall arrangement. Many of Soundtrack's loops have a lot of extraneous noise before and after the desired sound is heard. It's up to you as to how to use this extra noise, but for me, I like to reduce extraneous noise as much as possible. There are some loops where the extra noise isn't noticed or is actually even desirable. These are some of the more subtle points to Soundtrack, using your ears carefully to really build your arrangements.
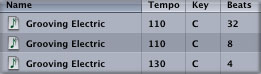
Track Ten - Grooving Electric Bassline 27

This bass line is another shifting point in the arrangement where the new loop changes the feel and mood. This track is actually made up of two bass loops, alternated, Grooving Electric Bassline 27 and Grooving Electric Bassline 35. Yes, I did pull a sneaky one here. If you drag out the individual, alternated bass loops in length to where you can see their complete names, you will see that yes, there are two separate bass loops on this track. You can put separate loops on the same track; you don't always have to give each loop its own, individual track. Depending on the type of arrangement you are creating, it can get really messy, from a track layout standpoint, to have too many separate tracks, one for every single different loop. Think of this feature as very much akin to nesting tracks in Final Cut Pro. It let's you apply the same volume, panning and effects to a single track, even if the track is composed of more than one loop. For organization's sake, I usually only try to keep related loops on the same track but feel free to experiment.
Track Eleven - Delayed Guitar String 02

This loop musically signifies when the spot's logo comes in. Since it is a fairly mid-range frequency loop, I used it after the second soundbite clip so that it wouldn't compete with the talent's voice. By looking at the track's envelope settings, you'll see the volume dip I put on the end of thee loop as the spot fades to black. You will also see that I applied a compressor to the loop to help it to cut through the rest of the mix, which by now has become quite busy with a lot of stuff happening to grab the listener's attention. Click on the effects tab to see the compressor settings.
Track Twelve - Echo of Something 01

This loop is fairly subtle but helps to add to the buildup of tension as we near the end of the spot. Because of the loops echo-like sound quality, I didn't have to add any panning or volume envelopes but I did add a chorus and ensemble effect in the effect's tab. The chorus helped to fill out the weak sound of the loop a little better and the combination of these two effects almost gave the loop a guitar wah-wah pedal type of feel that works nicely.
Track Thirteen - Percussive Sweep
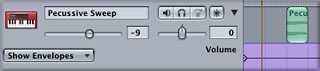
Once again, solo this track too hear what it is really adding to the arrangement. I used this sweep to transition from the relatively dry, close-mic'd sound of the Bodhran loop that opens the arrangement. This is another one of those loops like the Electric Bass Bomb loop that, on it's own, sounds lost, but when you use it in a full arrangement at the correct time, it can add a lot of impact. Other than lowering the overall volume in the mix, this loop didn't need any envelope adjustments or plug-in effects.
Adjusting the loops and tempo

In this case of this project, I needed the tempo of the piece to be a little quicker than Soundtrack's default 120 bpm (beats per minute) tempo, so I slid the tempo slider to something faster, that better matched the rhythm of how I envision the speed of the transitions and cuts would be in the finished video, 150 bpm in this case. I then experimented with the actual location of the loops within the timeline. Since I wanted to do a sort of instrumental buildup, I moved around the individual loops to different locations on the timeline. There aren't really a lot of hard and fast rules for this part of the process, other than make sure that what you are doing sounds interesting.
Changing or Modifying
Now that we have done a full tour of this arrangement, it's time to modify it so that you can try building some of your own creativity into this arrangement. Suppose you played this arrangement for your client and overall, they liked it, but they remarked about how they weren't crazy about the Orchestral String Section 68 loop. They ask if you can change this sound for something more modern with more impact to better match the rest of the project. Let's change it out together. First, to get rid of the orchestral loop, highlight the loop in the timeline and hit the delete key. The Orchestral loop will disappear. But the Orchestral track header will remain. It's up to you on if you want to delete the track header and begin again from scratch on this loop or if you want to save the volume, panning and plug-in effects you applied to the track. If you keep the track header, all of the volume, panning and effects stay in place and are applied to the new replacement loop, but the name on the track header and the new loop itself will not match.
If you delete the loop and the track header, you will have to start all over again and build the volume, panning and effects from scratch. In our example, we are going to be switching instruments, but if we were keeping the orchestral loops, just switching to a different one, you would probably want to keep the track header and just switch out the loops. This would save you time and extra work.
Since we are going to put a new loop in place that will probably have quite different characteristics, I am going to delete the track header and loop. In order to delete the track header and loop in one operation, hold your mouse over the right hand area of the track header and control>click and a dialogue pull down will appear with the options to add track above, add track below and remove track. Click on remove track.
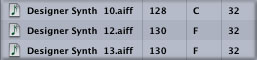
In order to add the new loop that will replace the orchestral loop we removed, we need to go to the media manager and try out some different loops to see what will work. Since in this scenario the client asked for something more modern with more impact, I am going to try a synthesizer loop first. Go to the search tab on the media manager and click on the box marked "Synths". After trying several synths, I landed on "Designer Synth 12" which works very nicely to replace the orchestral sample. The track is now evolved to a much more modern type of sound.
Adjusting the envelopes
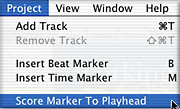
The new loop we have placed onto the timeline, "Designer Synth 12" already has a fairly smooth beginning and ending but we are still going to want to do some slight volume envelope work. Click on the envelope arrow control on this track and you will see the volume and pan envelopes. This is a fairly breathy synth loop so I personally wouldn't put any effects on it for this project but it could use some ramping up and down. Click on four envelope points, one at the beginning of the loop, one at about a measure in, one at about a measure from the end and one at the end of the loop as shown. Then adjust the envelope points to reflect smoothly ramping the volume up at the beginning and then down at the end of the loop. There is no exact way to do this, other than using your ear and adjusting the envelope points for the desired effect.
![]()
If you have adjusted your "Designer Synth 12" loop to reflect roughly to roughly what is show in these screenshots, you will notice that although the synth loop is working well with the rest of the loops, the "Bleep Odessey" loop is now kind of competing for your ear as the new track plays. Let's mute the "Bleep Odessey" track. There, does that sound better? It does to me.
![]()
Spotting to FCP's scoring markers
In this case, I used the markers to delineate where I wanted to switch moods and where the sync dialogue from the employer testimonials came in so I would know where to lower the volume of the music tracks and where I could raise it back up. The marker here will also serve as a reminder to me that I will want to minimize or at least watch the mid-range frequency content so as to not compete with the voices of the employers. When you import a video file from Final Cut Pro, Soundtrack displays any Final Cut Pro scoring markers included in the video file in the Timeline. Scoring markers have an orange handle in the area above the Time ruler. You cannot move or edit Final Cut Pro scoring markers in Soundtrack. Unfortunately, as we have learned, running a QT movie through any external compression results in the loss of scoring markers.
You can score a Final Cut Pro scoring marker to the playhead, so that you can synchronize the music with the action in a video. Scoring a marker to the playhead adjusts the tempo so that the number of beats exactly fills the amount of time between the last tempo change and the marker's position in the Time ruler. When you score a marker to the playhead, a set of special envelope points is created in the project's tempo envelope, from the previous envelope point (or the beginning of the tempo envelope, if no previous envelope point exists) to the position of the marker. These special envelope points are locked and cannot be moved (but can be deleted). The locked envelope points, and the segment of the tempo envelope between them, show up as red. The tempo change created when you score a marker to the playhead is always instantaneous; that is, the tempo changes from the previous tempo immediately, without ramping. The distance between the two envelope points determines whether the resulting tempo change can be heard easily. If the resulting change in tempo sounds too abrupt, you can edit the tempo envelope to make the tempo change less noticeable.
To score a marker to the playhead:
How to use the envelopes
You use envelopes by displaying the relevant track or master envelopes in the Timeline, adding envelope points, and moving the envelope points to new values at different points in time. You can use envelopes to shape both the sound of a track, and the overall sound of a project. Think of envelopes in Soundtrack as having a very similar function to how key frames in Final Cut Pro work. They allow you to change parameters over time in a precise manner.
By default, both track and master envelopes are hidden. You can display a track's envelopes below the track in the Timeline, and display the master envelopes in the lower area of the Timeline below all existing tracks.
To display or hide a track's envelopes:
To display or hide the master envelopes, do one of the following:
You adjust an envelope by adding envelope points (just like keyframes in Final Cut Pro), and then moving the envelope points up or down to new values. You can also drag an envelope point to a new position in the Timeline. Each envelope has a drag handle at the beginning of the Timeline. You can also adjust the envelope by moving the handle up or down. If no envelope points have been added, dragging the envelope's handle adjusts the envelope for the entire project. If the envelope contains envelope points, the envelope changes value evenly ("ramps") from the handle to the first envelope point in the same way as it does between two envelope points.
To add an envelope point to an envelope:

Plug-in Effects
Soundtrack ships with it's own plug-in effects, a folder of them from Apple and a folder of effects from Emagic. Both groups of filters are pretty good, overall. The easiest way to learn what the effects do and how to best use them is to just dig in and try them out. It does take some time, but you find it time well spent. Since each filter has at least two or three parameters and some have up to a dozen or so, it would take an entire book to be able to show you how to effectively use each filter in specific situations. My advice is to just spend a few hours and sit down and experiment with them. They will, of course, give you highly variable results with different types of instruments and loops.
Soundtrack includes the following audio plug-ins:
Bandpass
GraphicEQ
Hipass
Lopass
LoShelfFilter
Fat EQ
Subbass
PeakLimiter
Compressor
Noise Gate
Delay
MatrixReverb
Soundtrack Reverb
Modulation Delay
PlatinumVerb
Stereo Delay
Tape Delay
Chorus
Ensemble
Flanger
Phaser
BitCrusher
Clip Distortion
Distortion
Overdrive
Phase Distortion
Soundtrack Autofilter
Autofilter
Tremolo
Recording Your Own Loops
If you have used the VO Tool in FCP, you will have no trouble using the recording tool in Soundtrack. The big secret is to remember what you are doing. You are recording sound loops. Think about it. What this means is however you record the loops, whichever mic, and pre-amp, room, etc. that you use, the end result will be a result of the care that you took when recording the loops. You may want a lo-fi kind of scratchy sound with a lot of background noise; it may suit your purposes. If you want clean, clear and dynamic sound though, you will need a decent microphone, cables, mic pre-amp and room to record your loops in.
There are really a number of ways to do this. If you lack the proper microphone and interface for your Mac, you can go to a professional recording studio and record your loops with a quality microphone in a quiet V/O booth. Or you can just buy some more loops. The ones included with Soundtrack are good, but there a thousands available on the market that sound better although they cost extra, of course. Realistically, the only reason to record your own loops is if you are recording a voice, or an acoustic instrument. If you are recording an electronic instrument, you will do better to record in a separate recording application and just import the loops into Soundtrack. But let's say you are recording a voice or acoustic instrument. Depending on if your Mac is setup with an external audio interface or if you are just using the Mac's internal audio support, you will need to route the signal to the appropriate input. Soundtrack has two recording modes, Single Take recording (use this when you are recording something simple, like a handclap) or Multiple Take Recording (you use this when you are recording a performance where you might want to have multiple takes to choose from, manage and play with).
Single Take Recording
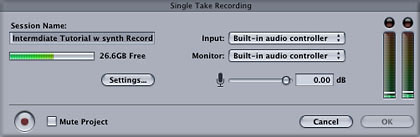
To record a single take, press the red record button in the transport window. The single take recording dialogue will open. You will notice that there is a set of audio input level meters on the right side of the interface along with input and monitor pull downs. If you don't have an audio interface, they will default to "built-in audio controller". If you do have an audio interface installed, you lay need to chose your recording input source and your monitoring source. Turn down your speakers before doing anything else because if you have the speakers turned up loud near the mic, you may get a loud, nasty sound called a feedback loop. It is best to record loops using headphones, either plugged in to your Mac or into your audio interface so you can hear what Soundtrack is hearing without causing a feedback loop. You will also notice a small microphone icon with a dB slider, this is your input level control. Once again, apple has given us meters with no scale or calibration reference so my rule of "don't let it clip or go very far into the red" applies here. Without a scale, that's all you can do. You will see the hard drive you have default set as the place where Soundtrack should store these recorded loop sessions.
Once you have a suitable microphone, audio interface, etc. hooked up, you should slowly raise the mic input level as you play or have your talent you are going to record play or sing their loop. Once you have achieved a satisfactory level, you merely have to hit the record button and play or perform or have the talent perform. Soundtrack will default locate these files in the folder where you saved your Soundtrack project.
Multiple Take Recording

Multiple take recording works the exact same way as single take recording except you need to define a recording length by highlighting a region on the beat bar in the timeline. The dialogue that will pop up will be similar to the recording dialogue that single take recording uses, except there will be a file management area to the left that will let you record, keep and label multiple takes. The multiple take recording dialogue also gives you the option of saving as recording as a loop (repeatable) or a one shot (single, non-repeating sound). The Multiple take recording dialogue also presents you with scaling tools so that you can expand and contract the portion of the timeline you are viewing in the multiple take recording window.
Loop Utility
Once you have recorded loops or one shots, you will then take them to the Soundtrack Loop Utility. This is kind of a separate, helper application to Soundtrack.
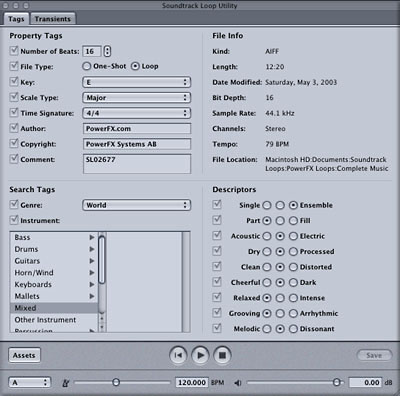
The two main areas that you work with in the Soundtrack Loop Utility are tags and transients. Tags are how Soundtrack electronically catalogs all of the vital statistics about a loop.
The Tags tab includes:
Property tags contain:
Number of beats
v
File type
Key
Scale type
Time signature
Author
Copyright
Comments
Search tags contain:
Genre
Instrument
File info tags contain:
Kind
Length
Date modified
Bit depth
Sample rate
Channels
Tempo
File location
Descriptor tags contain:
Single or ensemble
Part or fill
Acoustic or electric
Dry or processed
Clean or distorted
Cheerful or dark
Relaxed or intense
Grooving or arrhythmic
Melodic or dissonant
The bottom of the Tags tab also includes transport controls and the same beats per minute control and master level control as the transport window in Soundtrack.
The Transients tab includes:
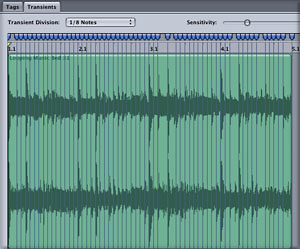
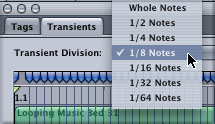
Transients are the points in an audio file where beats occur. Typically, transients occur at the widest areas of a waveform in the waveform display. During playback, Soundtrack adjusts loops using a technique called stretching to achieve the best audio quality, based on the loop's transients. One-shots are not affected by stretching. When you open a file in Soundtrack Loop Utility, it looks for transients at every 16th note position, based on the file's tags for tempo and the number of beats. You can change the beat value at which Soundtrack Loop Utility detects transients using the Transient Division pop-up menu. This dialogue contains a viewing screen where you can look at the waveform of each loop and see how the loop has been tagged as far as transients. This window allows you to view the transients for each loop by:
Whole notes
1/2 notes
1/4 notes
1/8 notes
1/16 notes
1/32 notes
1/64 notes
To the right of this transient division area is a sensitivity slider. You can see by sliding this control how more transients or fewer transients are tagged, depending on the sensitivity. You probably don't need to redo the transient settings on the internal Apple loops but you may want to play with the loops that your purchases separately or even record yourself. The best analogy here is that this control functions much in the same way that the keyframe thinning control works with the audio mixer automation in Final Cut Pro 4.0. You can read about keyframe thinning here
Caveat Emptor
In Closing...
Unexpected Developments
In the past few months since Apple introduced Soundtrack as part of the FCP 4.0 package, some interesting things have happened.
I hope that this article was helpful in guiding you in the right direction to using Soundtrack to give you more creative control over your projects. The more you use this program, the more valuable, both creatively and economically, it will become to you.
Dan Brockett is an independent television producer/writer/director based in Camarillo, Ca. Dan is a guide on 2-pop.com and the vice president of the Los Angeles Final Cut Pro User Group.
Big Little Films, Inc. ™
5235 Mission Oaks Blvd - Suite 373, Camarillo, Ca. 93012 USA
(805) 388 4689 E-Mail: dan@biglittlefilms.com
copyright © kenstone.net 2003