
How to do Split Edits January 7, 2002
Getting to Know Split Edits with FCP
How to do Split Edits January 7, 2002
Getting to Know Split Edits with FCP
Blending Picture and Sound
An edit of picture and sound in this way is what we are referring to when we talk about what are called: Split Edits, J-Cuts, and L-Cuts (which are roughly the same thing). In these kinds of edits, either audio or video will precede or follow its corresponding piece of audio or video (or in some cases, as you will soon see, it will both precede and follow within the same cut).
Before we look into the "How-Tos" of Split Edits, let's first look into the motivation of why we would do a Split Edit in the first place. The motivation may simple as what we see or hear, or, on a deeper level, what we experience psychologically. If you aren't an experienced editor, you may struggle with this a bit. This is normal and marks the beginning of your research regarding the psychology of the cut. This is explored in a number of books and articles you can find on editing.
In fact, before reading this section, you might want to read Ken's review of Michael Wohl's book on editing techniques, located here:
The review touches on some of the concepts you should be well aware of as an editor. In fact, some of you are probably already thinking about the best way to cut things, such as, how to build suspense in a scene, how to best cut a dialogue scene, etc.
Knowing that you have some work ahead of you in understanding what's behind the cut is probably enough to know for now. Just don't forget that you really should strive to learn the vernacular, as well as, the actual techniques of editing picture and sound.
My suggestion? Study the best books and trade journals, watch as many old movies-both foreign and Hollywood, of all genres and schools-that you can get your hands on (and pay attention to the style of editing of each), talk to other working editors, try to re-cut a famous scene from a film using your camcorder and own friends to stand in, or take a Film History Class at your local community college. In general, get to know your craft if you wish to grow as a professional editor. I make these suggestions, because these things I do myself. For me, learning about editing is a lifetime pursuit. Each step you make towards the knowledge of your craft puts you in a much more powerful position, especially when it comes to making the right choices in a timely fashion.
At this time, let's take a brief look back to the history of filmmaking as it relates to sound. This should offer us some clues as to when and why we make the edit where we do, especially as it relates to the subject of the article, the Split Edit.
Early Examples of Sound on Film
At that time, critics charged that sound was merely a novelty, and a commercial vulgarity. The aesthetics of picture and sound would not be approached by producers of the day, they were interested in making money and pleasing audiences. There is some weight to this complaint as the expressive camera movement of early auteurs like D. W. Griffith and Sergei Eisenstein were thrown by the wayside in favor of a camera that was tethered according to where the microphone was placed in early Hollywood "talkies".
Regardless of the aesthetic quality of theses stilted "talkies" pumped out by pre-Golden Era Hollywood, by the late 20's, "sound" film was available and widely preferred by audiences world wide.
Early Examples of Contrapuntal and Asynchronous Sound
King Vidor's "Broadway Melody", which won the Academy Award for Best Picture in 1929 probably offered up the first examples of asynchronous sound (Split Edits). For the first time, off screen sounds were heard. One example is a close up face in anguish while we hear a car drive off. In another instance, a single sob is heard after a scene fades to black. In these instances, sound actually replaces the shot. These are examples of the ideas of the first uses of contrapuntal and asynchronous sound in a motion picture, extremely innovative concepts in their day.
The controversy over using sound with picture raged on throughout the thirties with many films being produced as "talkies" for the masses, while masters like Eisenstein and others like French film auteur Rene Clair continued to experiment with contrapuntal sound in only its purest sense, e.g. sound effects, music or off camera dialogue.
This argument was finally solved when a process called "post-synchronization" or "dubbing" was discovered and brought into the modern lexicon of filmmaking. In modern films, both synchronous and asynchronous editing techniques are used consistently and simultaneously through dubbing.
We, as editors, have the power to manipulate sound and picture as we see fit, and we should strive to not only blend both synchronous and asynchronous techniques with sound and picture, but also to do the blending at the appropriate moment in the scene. True, there's no right or wrong place to make the edit, but there are places that are more "right" then others. Hopefully, you can begin to discover the answers to some of these questions yourself based upon your own research and experience.
What happens in this Edit?
Clues to Help You Locate a Good Place for a Split Edit
If you are cutting a scene that is driven more by narrative, like a dialogue scene in a film, you will look for moments of "unspoken" or non-verbal feelings to motivate the split edit. In fact, you should probably try NOT to do a straight cut in this instance.
An example of this would be a "break up" scene between two people where, let's say, the boyfriend is explaining why he must leave a relationship. You should find appropriate moments to cut away to the girlfriend being sad, happy, or whatever the reaction the story offers. So a prime example of the split edit would be to cut away to other people in the scene, even though they have no spoken lines.
Recall that in books, paragraphs can fly by without a speck of dialogue, as a lot can be internal thoughts, visual descriptions or the like. Use the split edit to illustrate the world around the speaker. We don't have to be visually trained on the subject to be cognitive of his dialogue. Indeed, sometimes more meaning can be derived from the dialogue by cutting away to another actor, object or even parallel action going on in a completely different scene.
Setting up a Split Edit
First Steps
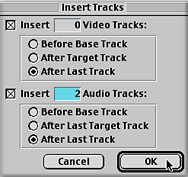
Back to the task at hand: there are a couple of ways to easily make new audio tracks. The first is to call up the Insert Tracks dialog box from the Sequence Menu.
Sequence Menu>Insert Tracks should bring up the dialog.
Choose to add two Audio Tracks after the last track. This will place 2 more Audio Tracks into your Sequence in one move.
So you're fairly new to editing and things are going along fairly nicely. Maybe you've even got a few projects "in the can", yet you know that you can and should improve your editing skills. But how? How can you add some variety to your editing style? This article is written with the intention to help you approach this problem. Learning how to arrange pictures and sound in an esthetically pleasing way involves gathering not only the technical knowledge required, but also looking to the psychology behind the cut laid out for us by the pioneers of cinema.
As previous filmmakers have proven to us over time, the cutting of associated picture and sound should not always occur at the same time. If you think about it, film and video has been cut asynchronously (cuts not made at the same point in time) soon after the introduction of sound to motion picture.
Believe it or not, when films were first introduced with sound, directors and theorists of film were unsure of its use or effectiveness. Melding sound and picture was an anomaly, even though that is what was originally intended by Edison when he introduced the Kinetograph as a companion to the phonograph earlier in the century.
In 1928, Soviet film theorist, Eisenstein, provided us the idea of contrapuntal sound. This is the idea that sound provides a valid "counterpoint" to picture. He argued that the use of sound as a counterpoint to visual imagery, would offer up new possibilities to develop and perfect the art of the edit, or montage. According to Eisenstein, sound would be incorporated into film because it offered up new ways to solve old problems of silent filmmaking, like title cards, and added a new set of dynamics in this burgeoning fine art, as well.
 What is an Asynchronous or "Split" Edit?
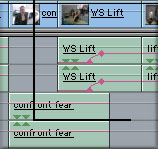
Up to this point, we've learned that the Split Edit is one where audio or video precedes or follows its counterpart. In an edit where the audio track follows the video cut is often called an "L-Cut". The expression L-Cut is often used because of its "L" shape of the video track and an audio track which extends ahead of it resembling the letter "L". An L-cut is depicted here. The stem of the "L" is in the clip "Confront Fear" while the extended part is "WS Lift. You probably can now imagine what a "J-Cut" might look like now, right? That's right! It is when the audio from the incoming Clip precedes the video in the cut. In fact, it's possible to have an audio split BOTH precede AND follow the video in the Clip. Picture an upside down "T" shape.
The subject of the piece is a woman standing in front of her Chevy Nova. The dialogue in the "Confront Fear" Clip is, "Weightlifting has helped me confront every fear that I've ever experienced in life." As soon as she finishes saying "helped me...", I cut to the clip "WS Lift" which shows the woman doing a clean and jerk lift over her head with some barbells. I cut right on the word "confront", because I feel that it is the most powerful word in the line. I emphasize the dialogue by adding picture actually showing her confronting fears by lifting that huge barbell.
A Split Edit should have some sort of motivation to it, regardless of the type of production. On the "magazine style" piece we are looking at, I decided to cut away to the B-roll shot on the word "confront". The bottom line is that you need to look for logical places to make your cut. With some experience, you will get better at choosing the location for a split edit that makes sense to both you and your intended audience. It is often based on your gut feeling, psychological motivation of an actor in the scene, or some other reason you may see, so don't be afraid to listen to yourself and make the cut where you feel makes the most sense.
Up to now, we've only talked about the motivation of making a Split Edit, let's now see how this is actually done. Technically, it's pretty easy to make a split edit. Where and when you make the asynchronous cut is probably the toughest decision to make. Largely, the cut will be based on an audio cue or piece of dialog. You can make the decision in the Viewer, directly in the Timeline, using Contextual Menus in the Canvas, or my preferred location, the Trim Edit Window.
 The first step in this process is to make some new audio tracks. This is so you can easily overlap them in a Split Edit. You will definitely want the option to overlap dialogue. In "Citizen Kane", at several points, so many layers of dialogue are overlapped, that you can't even discern what is being said. How's that for contrapuntal sound?
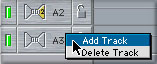 Another really simple way to add tracks is to merely Control-Click near where the "A2" lies. A contextual menu should pop up, allowing you to "add" a track.
Make sure that you've got 4 tracks of Audio in your Sequence and you're ready to start planning for the Split Edit. You should be well aware of how to target specific audio tracks, as we will be placing audio on different tracks as we edit.
Choose the best Interface in which to perform the Split Edit
As I mentioned earlier, you can make your Split Edit in a number of places. The Viewer, The Timeline, The Canvas and The Trim Edit Window are all places you can perform a Split Edit. It's really a matter of personal choice or how you conduct your workflow to choose the proper interface to make your Split Edit. Let's go through the various windows to see the place that would work best for you. We'll first look performing the Split Edit in The Viewer.
Performing a Split Edit in The Viewer
In performing a Split Edit in The Viewer, we must first load the Clip in question. After the Clip is loaded into The Viewer, and it is evaluated for content, you have to ask yourself a few quick questions,:
"Do I want the Audio to precede the Video, or do I want it to follow-or both?"
Or
"Do I want the Video to precede the Audio, or do I want it to follow-or both?"
"Once I decide whether Audio or Video will precede or follow, where should I mark the Split Audio or Video In or Out?"
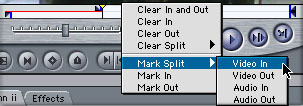
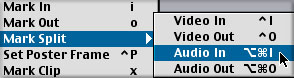 Let's assume that the Clip has been viewed and the decision is that it will have Audio preceding Video and the Audio and Video Out Points will be a straight cut. You'll now have to do what is called Marking a Split Edit. In this case, we want to mark the Audio In only in one place and the Video In in another place. This is done in the Mark Menu:
Note that the Keyboard shortcuts for all Split Edits are located directly next to the operations that describe them. You should take the time to memorize them, as they come in extremely handy when making Split Edits.
Control + I Set Video In Only
Control + O Set Video Out Only
Option + Command + I Set Audio In Only
Option + Command + O Set Audio Out Only
These Keyboard shortcuts are useful in the Viewer, the Canvas and in the Timeline.
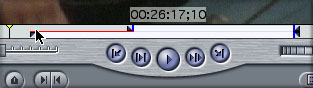
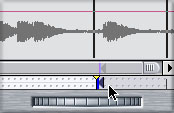
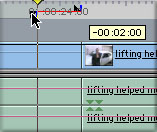
When choosing a Split Edit in The Viewer, the In and/or Out Point(s) will "split" in half. In the example below, you should note that the In Point has been literally bisected. The lower "half" of the In Point represents where the Audio is set to come in and the top half will indicate where the Video In Point lies. A small red line will show the offset of the split.

The audio bite in this example begins, "At the time when I was suffering and my heart was broken, lifting was all I could do...", so I marked In an Audio Only edit by first dragging the Playhead to the proper location (I could also J-K-L, or shuttle using the transport controls), then choosing the Keyboard shortcut, Option + Command + I.
My plan is to show the subject lifting weights in an overlaid B-Roll Shot of this woman in a gym during that part of the bite. After that part of the sound bite was complete, I marked a Video Only In Point by moving the Playhead to the proposed Video In, then choosing the Keyboard shortcut, Control + I. I could choose to adjust the In of both Audio and Video simultaneously at this point, by dragging either the Audio OR the Video In Point. They would both move in unison for lengthening or shortening maintaining the offset between Audio and Video. A Split Out Point would behave in the same way.
The line then continues, "but then I realized that, after awhile, lifting was helping (me become) more confident, stronger and making me feel better about myself." At that point, I wanted to be back on the subject's face. After this particular Clip was marked Out with Audio and Video simultaneously with the Keyboard shortcut, O, I was then ready to Insert or Overwrite the Clip into the Timeline.
My next duty would probably be to look for that B-Roll shot that would best depict her lifting weights while appearing to be "suffering" or appealing to "lifting was all I could do...". I would then Overwrite the shot into place (for placement ahead of the proposed Video In Point) and the Split Edit would then be complete. I would then Play through the Cut and make any necessary adjustments.
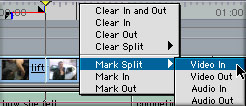
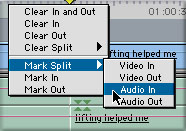
Using Contextual Menus for Split Edits
At this point, for those of you that are more menu driven folks, I should share the location of a very useful Contextual Menu as it relates to performing Split Edits in The Viewer. Merely Control-Click on the Scrubber Bar in The Viewer to locate the Contextual Menu relating to Split Edits as shown below:
The Split Edit can be made with Contextual Menus in the Timeline and in the Canvas as well albeit, they are slightly different methods.
Looking ahead a bit, the Contextual Menu for the Canvas is located in the exact same place as The Viewer, directly on the Scrubber Bar. Feel free to use it as you see fit.
Looking ahead further, the location for the Split Edit Contextual Menu located on the Timeline can be brought up by Control-Clicking directly on the Timeline Ruler, the light gray area of the Timeline, as shown below:
 In making the Split Edit in the Timeline, which we will discuss in detail a little later, you can adjust the Split Edit before you edit it into the Timeline. Just set a new In or Point for Audio or Video before you Insert or Overwrite the Clip into the Timeline using the Contextual Menu or other method.
Advanced Split Edit Techniques for The Viewer
Getting back to the task at hand in discussing making and adjusting Split Edits the Viewer: Another really cool way to make a Split Edit is to merely Option-Drag either the upper or the lower "half" of the In or Out Point to a new place in the Scrubber Bar. The lower half indicates Audio In or Out, the upper half indicates Video In or Out. Look for the faint gray line that divides Split Audio from Split Video In and Out Points. You can also adjust an existing Split Edit, using the above method. Just Option-Drag it!
 If you choose to Option-Drag to make or adjust your Split Edit, a helpful Timecode Box will appear indicating how far you have dragged it.
If that weren't enough control, you also have the ability to Slip the Split Edit by dragging an In or Out Point in the Viewer with the Slip Tool or by holding down the Shift Key.
As you Slip, a "Two-Up" Display kicks in as the Viewer will indicate the new location of the Video In and the Canvas becomes a visual display indicating the location of your Video Out. Note the Timecode Displays in both Windows indicating the placement of your source's new In and Out.
So now you've made your Split Edit Choices and it's time to put your edit into the Timeline. There is really only a couple of things to think about before you complete this operation.
Taming Split Edit Behavior
Even though you have chosen your Split Edit points in the Viewer, it is possible to Mark Split Ins and Outs in the Timeline to place the Split Edited Clip as well. Be careful here. The Split Edit Points on the Timeline will take precedence, up to the point of running out of media. If you run short of media in this operation, you will get an "Invalid Edit" dialog box. Personally, this would confuse me, so my suggestion would be to make Split Edits by marking Points either in The Viewer OR The Timeline/Canvas, but not in both places. Split Edits will behave more predictably this way.
Split Edits brought into the Timeline behave in this fashion:
If you mark an In on the Timeline, and Insert Edit the Split Edit into the Timeline between two Clips, the leading "Split" In, be it Audio or Video will be laid in at the In Point on the Timeline. This is often the preferred way to place a Split Edit between two Clips.
If you mark an In on the Timeline, and Overwrite Edit the Split Edit into the Timeline, the leading "Split" In also takes precedence. This edit is used when cutting away to a reaction shot or B-Roll while assembling the sequence, or more commonly, when overlaying an Incoming Clip.
If you mark an Out on the Timeline, and Insert Edit the Split Edit into the Timeline between two Clips, the leading "Split" In, be it Audio or Video will be "backed in", but if the Split Edit has Audio following the Video Out, it is ignored and the Video Out Point is honored. I can't think of too many reasons as to when I would put an edit like this into The Timeline, as it appears I'll have to do another operation to trim out my originally intended Audio Out Point.
If you mark an Out on the Timeline, and Overwrite Edit the Split Edit into the Timeline, the leading "Split" In, be it Audio or Video will be "backed over" the outgoing Clip, but if the Split Edit has Audio following the Video Out, it is ignored and the Video Out Point is honored. As with the previous example, this is usually a poor choice because it will cut off an intended Audio or Video Split Edit point. I might choose this method if my Split Edit was at the head of the Clip and my Out was a straight cut.
If you're a "drag and drop" type of person, Split Edits drag right into the Timeline. This is only if the Clip is brought from the Viewer and if the Split Edits are marked prior to dragging the Clip into the Timeline.
Before moving on, make sure you try each of these methods and be sure you understand the behavior of each operation, so you won't get confused when you are in the trenches.
 Making Audio Split Edits in the Audio Tab of the Viewer
If you have an "audio only" Clip, say from a CD file, you can adjust its In and Out Points in the Viewer's Audio Tab. Just double click to reload it into the Viewer and adjust the In and/or Out Point of the Clip.
You can also adjust a regular Split Edit for Audio in the Audio Tab of the Viewer. You can do this by first:
Unlinking Audio by clicking the Link Button on the Timeline
Or
Option + Selecting the Audio on its own
 Then you would double click on the audio portion of the Clip if it was "Unlinked"(just hit Enter if you used the other method) to reload the Timeline Clip into the Viewer. Look for the "Sprocket Holes" or double dotted lines in the Scrubber Bar to ensure you are indeed working on the correct "copy" of the Clip.
Adjust the Cut's Audio by first shuttling to your new In or Out Point and marking a new In our Out Point
Or
Click and drag the In or Out Point to a new location with the Selection or Roll Tools. The changes you make will be updated in the Timeline as soon as you make the adjustment.
Or
Enter a relevant Timecode value on the keypad, tap Return, then Mark a new In or Out.
These options would also work for a Video Only Clip you wished to adjust in the Viewer.
Removing Split Edits
If you wish to remove any individual Split Edit, you can do so by:
Selecting one of the options in the Mark Menu, or the Contextual Menu.
Or
By merely clicking and dragging up or down directly on the Split In or Out.
If you wish to clear all Split Ins and Outs you can choose to do so from one of the menus or by the keyboard shortcut (Option + X).
Split Edits in the Timeline
Most people prefer to do their Split Edits once the cuts are in the Timeline. In my experience, I often rough cut the sequence with straight cuts and then do the Splits right in the Timeline. You will likely do most of your Split Edits here as well. Before you try this, you should be aware of a few strategies to make this easier.
Strategy: "Checkerboard" your Audio
You should already have four Audio Tracks in your Sequence. What you will want to do as you do your straight cuts into the Timeline is to edit every other Clip's audio onto Audio 3 and Audio 4. This isn't hard to do, all you really have to do is Target your Audio Tracks to Audio 3 and 4. You can merely click on the yellow speaker icons or you might try your hand at doing it directly from the keyboard. Here's some helpful keyboard shortcuts for you.
F7 + 1 Targets Ch. 1 to go to Audio 1
F8 + 2 Targets Ch. 2 to go to Audio 2
F7 + 3 Targets Ch. 1 to go to Audio 3
F8 + 4 Targets Ch. 2 to go to Audio 4
Your Timeline should now look like this:
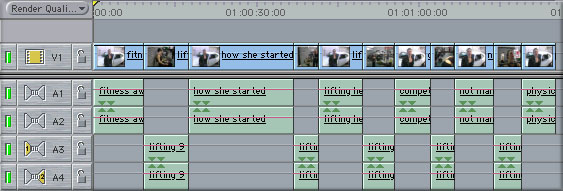
Once your Audio looks like the above, where every other track is "checkerboarded", you are ready to start manipulating your edits. If you haven't set up your sequence to be checkerboarded, you can drag down the audio portion of the Clip to another track. You may have to Lock or Unlink to do this, however. Consider that you can do this quickly by Command + Selecting every other Clip. Knowing this, we will how discover several ways to offset our audio and video. Let's first look at some of the more obvious ways to make the Split Edit directly in the Timeline.
Split Edit by Overwriting with the Incoming Shot
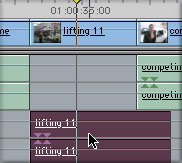
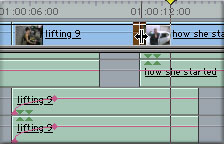
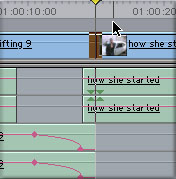
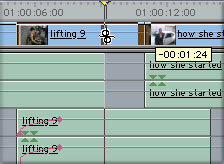
This is one the easiest ways to make a Split Edit in the Timeline. This is easily accomplished by playing through the Outgoing Clip until you find a good spot for the B-Roll to come in. I'll now play through the shot and will stop the Playhead when she says, "I played Baseball in Elementary School...". At that point in time, I'll grab the Select All Tracks Forward Tool (TTTT is the keyboard shortcut) and click on the Incoming Clip. I'll then drag the Clip and the rest of the Sequence to the Playhead, so that during the operation, the Timeline will look something like this:
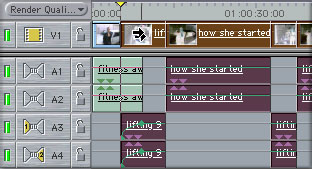 So after the move is complete, you can see that the shot "Lifting 9" now overlaps her interview at a relevant point. Her line then continues as we see a shot of her in action lifting a barbell over her head. Note that I've Keyframed the audio to gradually fade up as to not obscure her line as she finishes, "...and got a Presidential fitness award from Richard Nixon.". I probably should check and see if a level adjustment of the audio at that point would be needed before I move on. After that, I would play through the cut and see if I needed to make any small adjustments.
Of course, you can also Overwrite this shot directly into the Timeline from the Viewer at that point, if you wanted to. It's nice to have the option to do this cut either way and if things are "checkerboarded", it makes it easy to swap shots in the Timeline, which everyone invariably does at some point.
Making and Adjusting Split Edits using the Resize Edit, Extend Edit and Roll Edit
Once you have your cuts set up in a checkerboard fashion, you can also use other methods to perform or adjust a Split Edit directly in the Timeline. You simply use the Trim Tools available to extend or shorten Audio or Video Tracks. Let's look at how best to do these things. We should first learn how to "Unlink" our Audio and Video Tracks which can be done a few different ways.
Locking or Unlinking Audio and Video Tracks to enable a Split Edit
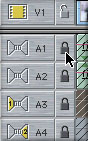
Keep in mind that it's impossible to do a Split Edit in the Timeline without either Locking the alternate track (locking audio if you are adjusting video and vice versa) or Unlinking it. As you may already know, the easiest way to Unlink your tracks is to click the green button on the upper right corner of the Timeline. When clicking this green button to turn Linking off, you can then adjust Audio OR Video Split Edits without any trouble.
 There is another cool way to "temporarily" Unlink a Clip and that secret lies with the fabulous Option key. With the Option Key used in combination with ANY Trim Edit tool, you can temporarily Unlink that Clip's Audio and Video. If you think about it, that's a pretty powerful keyboard shortcut to know, and is one of my personal favorites in use in just about every one of my Projects. You may wish to try this with all your Trim Tools right now to get the idea. Want to select the Video Only on all Tracks Forward? Option + Select it with the Tracks Forward tool. Cool, eh?
If this notion of Unlinking tracks is not your cup of tea for adjusting Split Edits, you can always Lock the opposite track (Audio if adjusting Video and vice versa) and do your trim.
 You can easily Lock All Video Tracks or All Audio Tracks by either clicking on them to close the Locks or you can also try the often speedier keyboard shortucuts:
Shift + F4 Locks All Video Tracks
Shift + F5 Locks All Audio Tracks
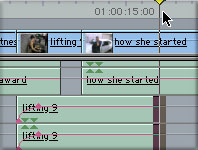
Making and Adjusting Split Edits with the Resize Edit
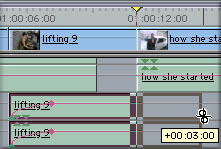
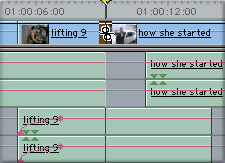
In the next example, I want to show you just how easy it is to make Split Edits using only your Selection (aka The "Arrow" Tool). In my last cut, I overlapped a B-Roll shot over an Interview Clip. The next cut involves "Lifting 9" as the Outgoing Clip and "How She Started" as the Incoming Clip. I want to extend some of the ambient sound from the gym in "Lifting 9's" Audio to extend into her Interview Clip, just a bit. With the Option Key held down, I take the Selection Tool and select the transition area from "Lifting 9"
 After I have selected the the transition area by Option + Clicking on it, I can then drag out the audio underneath the "How she started" Clip keeping the Option Key held down. You may find it helpful to have "Snapping" disabled as you do many of these Split Edit Operations, as well. As you can see from the below example, the audio only has extended underneath the Incoming Clip

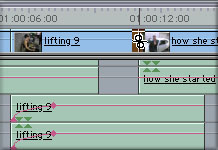
Making or Adjusting Split Edits with Extend Edit
Another cool trick in the same vein, is to do what is called an "Extend Edit". In this case, you use your Playhead to define where the Clip will extend to (up to the amount of media you have on your drive). To do this:
First select the transition area you want to Extend by Option + Clicking on the Audio or Video you wish to Extend.
Then, park your Playhead where you want to extend the shot to.
Then you tap the "E" key and, as if by magic, the Clip will extend to the Playhead, as shown in the below example.
The Extend Edit also works in reverse. This means that if I move the Playhead to an earlier spot in the Timeline and do an Extend Edit, the Clip will move in a negative direction to the meet the Playhead, rather than positive.
First select the transition area you want to Extend by Option + Clicking on the Audio or Video you wish to Extend.
Then, I move the Playhead to an earlier spot on the Timeline.
Then I tap the E key, and the audio snaps, in a negative direction to the Playhead, as shown.
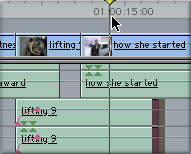
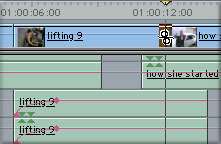
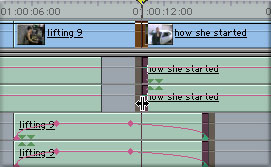
Of course, this also works with the Video track. I can choose to offset that with the Extend Edit as well. Let's say that I want to extend the Video of "Lifting 9" a bit further into "How She Started."
I first move the Playhead to where I intend the new Video In Point should be. Then I Select the Video Cut Point by Option + Selecting the transition area.
Then I just tap the E key and cut point will snap to the newly placed Playhead.
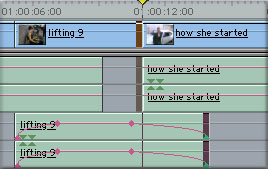
I would probably fade the audio down of Lifting 9 to complete the Split Edit. Then I would playback the Split Edit and continue to adjust Audio and Video independently, if needed.
Extend Edit with Timecode Entry
You can also Extend the Split Edit by entering in a Timecode value on the keypad of the keyboard by first:
Selecting the transition area of the Clip by Option + Clicking on it.
Then entering in a Timecode number. A positive or negative number will work. So if I wanted to Extend "Lifting 9" by another second, I merely type +100 then the Enter key.
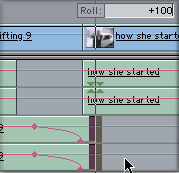
Note that the "pop up" display for a Roll Edit popped up when you tried this. This is indeed what is going on here, a Roll Edit, so that is why the display appears.
Of course, if you wanted to adjust the Split Video In or Out Point, you could use the same method.
Option + Click on the transition area of the Video Clips and type in the Timecode value on the keypad of the keyboard and then hit the Enter key.
After tapping the Enter key the Split Edit will be adjusted.
After the Split Edit has been made, you should then play through your cut and make any necessary adjustments.
Making and Adjusting Split Edits using the Roll Tool
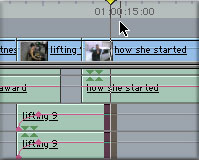
Now that you understand how the Extend Edit works, it's a snap to learn how to make Split Edits with your Roll Tool. Essentially, it's the same principle, except you only have to click and drag to adjust the Cut, rather than moving your Playhead first. To do this:
First, get your Roll Tool out (R is the keyboard shortcut) and Option + Select the Cut Point you want to adjust with the Roll Tool.
After you have dragged out your Clip to the desired location while keeping the Option Key held down, let go of the mouse. The result of your Trim should look like this:

Also similar to adjusting the Video Track with Extend Edit, you can also do this with the Roll Tool.
First, Option + Select the Video Cut Point you wish to adjust with the Roll Tool.
After the Cut Point is selected, you can drag it to your desired location.
Remember, as with the Extend Edit this works as you drag the Roll Tool in a Negative direction as well.
Again, Option + Select the Cut Point with the Roll Tool and begin to click and drag in a negative direction keeping the Option Key held down. You should also have Snapping off for easier manipulation of the edit. If you wish to "slow down" the amount of frames you are dragging, engage "Gear Down" mode by holding down the Command Key as well. You will then be trimming your Split Edit frame by frame as shown below:
The result of your trim, once you let go of the Mouse, should look like this:
Adjusting Audio and Video with the Ripple Tool
Up until now, you may have noticed that I didn't touch on using the Ripple Trim tool for adjusting Split Edits. The Ripple Tool is not a good choice in adjusting the Audio OR Video in a Split Edit, however if you need to adjust both the Audio AND Video of your L-cut, it is fine to use, as long as you are "kind" to all your tracks.
Being "Kind" to all of your Tracks to prevent Sync Problems
This is a very important relationship that trips up a lot of folks attempting to do any sort of Ripple Edit, so listen up because this is a HUGE concept that will make you a more knowledgeable editor. In this kind of edit, the transition point of ALL tracks have to be selected on that particular side of the Cut. If I am not "kind" to all my tracks, I will, indeed, start knocking things out of sync. Make sure that every track on that side of the cut is selected along ALL Audio AND Video tracks.
First Command + Select ALL tracks with the Selection (Arrow) Tool affected by the Cut Point, as shown.
OR
 Marquee (click and drag to surround) all tracks with the "Edit Selection Tool". Once tracks are selected, close the Trim Edit Window
Once all Cut Points are selected, as is shown here, you can toggle the "U" key. Toggling the "U" key is a powerful shortcut is for going between selecting either or both sides of the Cut in anticipation of a Ripple or Roll Trim of any kind.
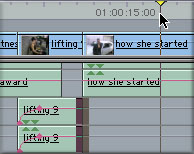
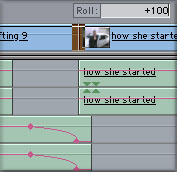
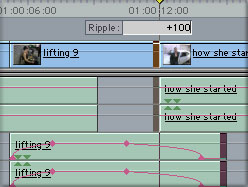
In this example, I would like to extend BOTH the Audio and Video for the Split Out Point of Lifting 9. Two taps will do it. It should now look like the following example.
 The thing most worth noting is that I have been "kind" to all my tracks,
including the outgoing "blank" area of the track preceding the Audio portion
of "How She Started". If you aren't "kind" to the blank area of the track,
it will throw the audio portion of "how she started" out of sync. This is
the operation which is what most people forget. It has to be set up in this
way so that the Audio and Video of "Lifting 9" will move down the Timeline
the same distance as "How She Started".
The thing most worth noting is that I have been "kind" to all my tracks,
including the outgoing "blank" area of the track preceding the Audio portion
of "How She Started". If you aren't "kind" to the blank area of the track,
it will throw the audio portion of "how she started" out of sync. This is
the operation which is what most people forget. It has to be set up in this
way so that the Audio and Video of "Lifting 9" will move down the Timeline
the same distance as "How She Started".
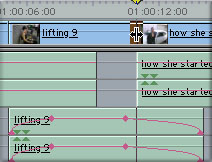
You can also ripple trim multiple tracks with your keypad. In that case, let's extend my L-Cut 1:00 in the positive direction. To do this quickly, I only need to type in +100 Enter.
Hopefully now, you'll see how important it is to be "kind" to all your tracks. Being "kind" usually is needed if you have multiple tracks and choose to do some kind of Ripple Trim in the Timeline or in the Trim Edit Window.
Be a thoughtful editor. Always be "kind" to all of your tracks and they'll be kind to you!
Using "Play Around Current" to Adjust Your Split Edits
Before you move on to the next cut, it is always a good idea to play through your Split Edit and see how it worked (and if it didn't work, you should adjust it). The Play Around Current function is VERY useful for this. As you are parked on a cut and wish to adjust it, you can do so, frame by frame, as the cut loops. You should strive to be good at this. At first, as you get the hang of it, things may be a bit harried, but keep trying and you will be "Trimming a Split on the fly" in no time.
To get this set up right, you'll have to do a couple of things. First, ensure that "Loop Playback" is enabled. You can do that in the View menu or by the keyboard shortcut (Control + L).

You also might want to check out your Edit>Preferences>General Tab to adjust Preview Pre-Roll/Post-Roll for Play Around Current. I find that while looping, for best results, both numbers should be equal. I usually go for 2 seconds of Preview Pre-Roll and the same for Preview Post-Roll.
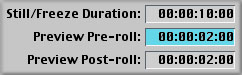
If you loop with equal numbers, it will give you more of a sense of rhythm for the cut. The looping behavior also affects the Trim Edit Window as well, and that should suit you well in that interface as well.
Next, you'll want to park your Playhead on the Audio or Video Split you want to adjust using what is called "dynamic trim". Another important step is to make sure that you are targeting the tracks you plan to adjust "on the fly".
Then, you'll want to select the Audio or Video Cut Point by Option + Selecting it.
 At this point, you should begin "Looping" the Cut Point by engaging "Play Around Current" by either engaging the Play Around Current Button or by using the keyboard shortcut (Backslash), which is located just above the Return Key.
As the Loop begins to engage, you should then begin to "Add" or "Subtract" frames from both sides of the Cut. The only to do this without going into the Trim Edit Window is to use the Left and Bracket keys. If you've never discovered the Bracket Keys, you should familiarize yourself with them, as they are extremely powerful.
Left Bracket Subtracts 1 Frame from the Cut Right Bracket Adds 1 Frame to the Cut
Continue to Loop the Cut as you tap the Bracket Keys. Evaluate your Cut, THEN and add or subtract frames between each Loop. To demonstrate: I use this method:
Loop and see if you like the cut>if so, then stop and move to the next cut by tapping the down arrow key on the keyboard.
If not>tap the bracket keys before the next Loop engages.
If you need to keep adding or subtracting frames, continue to tap the Bracket Keys between each Loop. You can get a very exacting Cut this way. Don't stop this process until you are completely satisfied with the cut.
If you tap a Bracket key multiple times, it will add or subtract that many frames from the Cut. For example, if you tab Left Bracket 3 times in rapid succession, you will subtract 3 frames from both sides of the Cut before the next Loop.
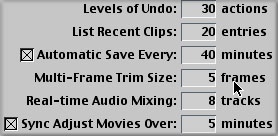
You can trim more than one frame at a time, but you will have to enable your Shift Key as a Modifier to the Bracket Key. This is adjustable under the "Multi-Frame Trim Size" in your Edit>Preferences. This also affects Multi-Frame Trim Size in the Trim Edit Window, in case you weren't aware of what Multi-Frame Trim Size affects. In my case, I leave it at 5 frames.
To adjust Multi-Frame Trim Size, open your Preferences and adjust it in the "General" Tab.
 Now that my Multi-Frame Trim Size is set, I can now use the Shift Key as a Modifier Key with the Left and Right Bracket Keys.
This means that if I begin Looping around my cut, I can now lop off or add on 5 frames per Loop, rather than single frames.
This also means that if I hold down the Shift Key and tap the Left Bracket Key more than once in rapid succession it will subtract or add 5 frames for each tap. For example, if I hold down Shift and hit the Left Bracket Key 3 times, 15 frames will be subtracted from both sides of the Split Edit in Roll Edit mode, one side in Ripple Edit mode.
I should mention that the Play around Current and Bracket method works on regular Trimming as well. Try it with the Ripple Tool. This method should revolutionize the way you trim your cuts and Split Edits. You DEFINITELY want to be good at this.
Making Split Edits by Marking Split Ins and Outs in the Timeline
Another way you can make Split Edits in the Timeline is to mark In and Out Points asynchronously for Audio and Video directly in the Timeline. Note, you can't "drag and drop" a Split Edit into the Timeline in this fashion.
To do this, mark standard In and/or Out Points in the Viewer.
Then either:
Mark In and/or Out on the Timeline, then Option Drag either the lower or upper portion of the In and/or Out to the desired location.
Control + Click on the Timeline Ruler to bring up the Contextual Menu for Split Edits and Mark the Split In and/or Out Points you desire.
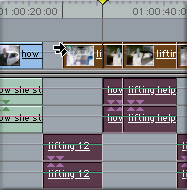
If you Insert Edit, it's likely that you will need the All Tracks Forward Tool (TTTT) to close any "Track Gaps". The Insert Edit will place the In Point from the Audio of "Lifting 12" at the Split Audio In on the Timeline. The Video comes in where the Split Video In Point is on the Timeline. So the result is a Track Gap in the Video portion of "Lifting 12", as you can see here.

Using the Canvas Window to Adjust Split Edits
Indeed, you can also mark your Split Edits directly in the Canvas. Doing so in the Canvas is possible by using the Mark Menus while the Canvas is active. You can also use the Contextual Menus as was explained earlier in the article. All split edits made in the Canvas are immediately updated directly on the Timeline. As you should well know, any adjustment to the Canvas is an adjustment on the Timeline since they represent the same thing; your Sequence. Most folks won't usually opt for doing this operation in the Canvas, however, it should be pointed out that it is a viable way to execute a Split Edit.
Using the Trim Edit Window to Adjust Split Edits
There are many folks that never use the Trim Edit Window either because they don't understand how it works or aren't sure in which instances should the Trim Edit Window be useful. I think of it as "Ripple and Roll World", and as we've discovered, that is just what we want to do as we make and adjust Split Edits. Sure, you can do many of these operations fairly easily directly in the Timeline, so why go to the Trim Edit Window?
You see, for making and adjusting Split Edits that are particularly related to dialogue of any kind, for me, the obvious choice is the Trim Edit Window. Consider the following argument: if indeed you wanted to overlap dialogue between actors or overlap dialogue into a B-Roll shot, there should be some measure of precision to arrive at the desired Cut Point as it relates directly to an exact point in time at a particular point in the script (maybe only a word) or interview. As you drag out the Clip in the Timeline using the Ripple Tool, Roll Tool, Extend Edit or by Resizing the edit, there is no possible way to go directly to a word and mark your Split. This can really only be done in the Trim Edit Window because we can actually hear the audio cue point, which we can't while in the timeline without playing through. Let's now see how this works.
Launching the Trim Edit Window
If you have no experience or are having trouble with the Trim Edit Window, it might be wise to review Damon Abacherli's excellent article about the interface.
You really should know what to expect as I explain how to properly make and adjust Split Edits with the Trim Edit Window.
The simplest way to launch the Trim Edit Window, as it relates to Split Edits is by:
Option Double Clicking on the Cut Point, Audio or Video you want to adjust with the Selection Tool or the Roll Tool.
Holding down the Option Key and marqueeing around the Audio or Video Cut Point with the Edits Selection Tool (G).
You can also launch the Trim Edit Window by Option Double Clicking on the Cut Point with the Ripple Tool if you want to adjust Audio AND Video. Careful here: before you launch the Trim Edit Window this way, you may have to Command + Select additional tracks first, using the methods I described earlier, so make sure you are "kind" to all your tracks, or you will knock your Sequence out of sync.
The obvious reason for engaging the Option Key while launching the Trim Edit Window by the aforementioned methods, is that you will be working on Audio OR Video right away, so you won't have to deselect any Cut Points.
In our example, we'll adjust the Audio, which is often the first operation you perform when doing a Split Edit adjustment in the Trim Edit window as many cuts are based upon some audio cue point.

Note that the "Speaker" icon shows up on the left hand side of the Trim Edit Window. Don't be confused by this. The icon indicates that you are going to work on the Audio portion of the Clip in this interface.
Both "Green Lights" are alight in the upper half of the interface, indicating that I am set up to do a Roll Edit, which is just what I want to do. If only one side of the cut has the Green Light, I would Ripple, likely causing the Sequence to go out of sync. To prevent this, toggle the "U" key until both sides of the cut are selected. You can also mouse click in the area between the Outgoing and Incoming shot to get both Green Lights on.
The Trim Edit Window should be selected and is ready for you to shuttle, J-K-L or scrub to your new Audio Out Point.
Click the Mark Out Button on the Trim Edit Window
Or
Choose Mark Out from the Mark Menu
Or Just tap the keyboard shortcut for Out (O)
Your adjusted edit should now look like this:
As you Loop, you can adjust the Cut Point by adding or subtracting Frames by clicking on the Trim Forward or Trim Backward buttons between each Loop, located just below the Transport Controls of the interface.
You should notice the similarity between the methods previously discussed in "Using Play Around Current to Adjust Split Edits" and trimming in the Trim Edit Window. Indeed, they both involve a similar behavior by lopping off or adding frames as the interface continues to Loop.
You should also note that as you Loop, the interface will switch from the Speaker Icon to the actual Video in the cut so you can adjust the Split Edit by both eye and ear.
Continue to Loop while adding and subtracting frames until you are satisfied with the cut before you move on to the cut. If you tap the down arrow key on your keyboard, you will automatically move to the next cut.
Keep practicing making Split Edits in the Trim Edit Window until you are completely comfortable with each kind of operation, including a Ripple trim being "kind" to all of your Tracks.
Split Edit with Impunity!
By now, my hope is that you have learned not only a lot about the mechanics of making Split Edits, but also to begin to question as to why you make your Split Edits where you do. If you're not sure about these things, it's perfectly fine for now. As long as you are aware that the best editors make their cuts while constantly polling themselves for motivations that reach far below the surface of the edit. If it is your desire to learn as much as you can about this, you are on the right track. You, too, should be asking questions about what is motivating your choices in the placement of your own Split Edits. The elusive craft of editing picture and sound will not escape you if you are indeed dedicated to learning everything you can about it. Good luck to you!
By Kevin Monahan
Kevin Monahan, aka "Telly", is a video editor, motion graphics artist and educator from San Francisco, CA. Kevin has a degree in Radio, Television and Film from San Jose State University and has been working professionally in radio and television for over ten years. He is an Apple Certified Instructor for Final Cut Pro and teaches both privately and at the Bay Area Video Coalition (BAVC) in San Francisco. Kevin co-founded the San Francisco Final Cutters, the world's first Final Cut Pro User's group and runs a small video post-production house called Shadowcraft Studios. For bookings and more information, contact Kevin by e-mail at: videoweb@pacbell.net
copyright © www.kenstone.net 2002