

Creating Titles November 5, 2001
TypeStyler and Final Cut Pro
By Ken Stone
It has often been said that FCP has the best 'text generator' around. It's called Photoshop. True, Photoshop is excellent for preparing art and text, 'Credit Rolls' for example. But what if you want large titles, titles with shape, color, outlines, fills, strokes, drop shadows, backgrounds or a 3 D look? Maybe you need to be able to do this type of work for print or the Web as well as video.Well, there's another game in town. Called Type Styler by Strider, it can be found for $128.95. There is a fully functional 60 day 'demo' available at their web site.
TypeStyler is designed to create art for; print, the Web and yes, Video. With transparent backgrounds, layers, NTSC and PAL frame sizes and even Title Safe borders, you can create your art, export and drop right on to the Timeline in FCP. So let's take a look at TypeStyler.
Setting Up for FCP
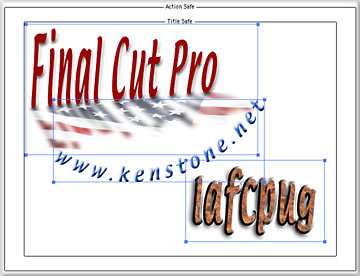
With TypeStyler open, File menu > Document Setup. This is where we will set up our TypeStyler work space for video. Checking the 'Show Safe Areas' box will produce a Titles Safe border in the work space (Red arrows). I have set the background color to white, but it should be noted that the background color is only a visual aid for setting our type. When we export from TypeStyler the exported file will have a transparent background. Also of interest is the fact that when we export only the area that contains text will be exported, not the entire 720 x 480 area.
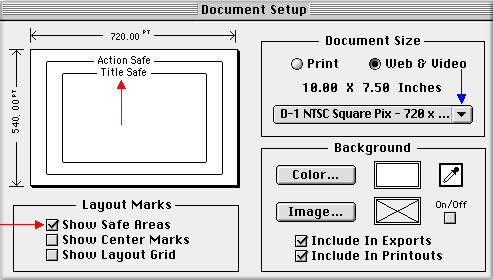
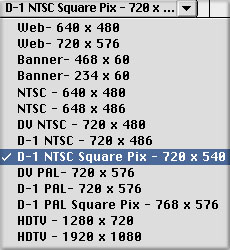
In the Document Size window check 'Web and Video', then click on the drop down menu (Blue arrow above) to select the correct frame size. In my case I have chosen 720 x 540 as I plan to take my art into PS to compensate for the stretching effect when computer square pixels are converted to video rectangular pixels in FCP. See Preparing Photoshop files for FCP. TypeStyler offers a 720 x 540 preset. If you do not plan to use PS then select 720 x 480 from the drop down. Without going through PS your final art in FCP will be taller than the art you create in TypeStyler, you can take this into consideration when designing your art in TypeStyler. Remember that all this is for guiding us when we set our type so we have a good idea of relative size and placement of the type in the video frame, and that our type does not fall outside the Title Safe area.
Setting Type in TypeStyler
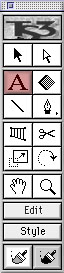
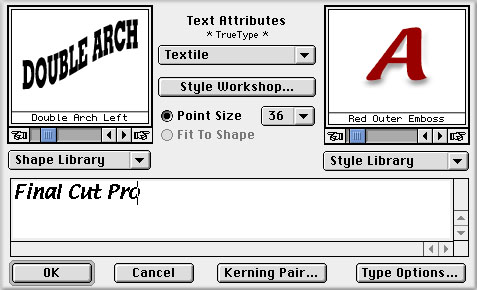
With our document set up we now can click on the 'A' button in the TypeStyler Tool Palette then click anywhere in our document to open the 'Text Attributes' box. The upper left side of the Text Attributes box is the 'Shape Library' drop down menu. This Library contains about 40 different preset shapes for the text that you set. These preset shapes can be customized later to suit your taste. As you slide down the Shape list TypeStyler will show you the actual shape for each of the presets. In the center, top, of the Text Attributes box is the Font drop down menu, below this is the 'Style Workshop' button and a 'Point Size' drop down to set the size of your type. In the upper right is the 'Style Library' with about 70 different styles. Again, TypeStyler will demo the styles for you. TypeStyler's ability to show actual shapes, fonts, and styles is one of the big pluses of this program.
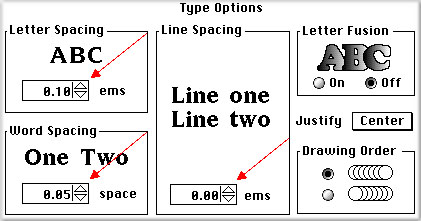
Now, having typed in our text it is time to use some more of TypeStyler's abilities. Click on the 'Type Options' button lower right of the box. The Type Options box gives us the ability to add spacing between letters, words and lines of type. Clicking on the up and down triangles will change the spacing in very small increments (Red arrows). When setting large type or headlines, spacing is critical to the over all look.
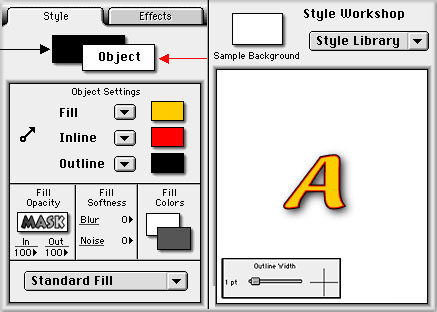
Clicking on the 'Style Workshop' button opens a new window with two tabs. The first tab, 'Style' opens with the 'Object' box selected (Red arrow) and allows us to change the color of our type, 'fill color', as well as the color and width of 'Inline' and 'Outline' borders. We can fill the type with objects found in the Library by clicking on the small boxes. We can also apply 'Blur' to the type.
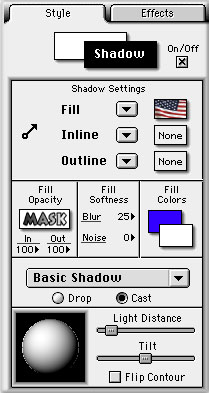
Just behind the 'Object' box is a Black box (Black arrow above) that opens up a 'Drop Shadow' box which gives complete control over drop shadows but also allows us to create a 'Cast' shadow of any color with or without outlines or we can pick an object like the American flag to use as a 'Cast' Shadow.

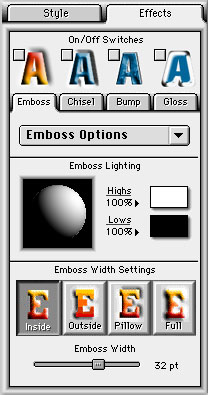
Clicking on the Effects tab (sounds like FCP, doesn't it) gives you access to Emboss, Chisel, Bump and Gloss. There is control of lighting direction, highlights and shadows and other settings as well.
Each time that you click on the "A" in the tool palette and then click in the work space you create a new layer. As you can see below, each of my three blocks of type are layers and can be selected. At any time, selecting a layer and clicking on the 'Edit' (text attributes) or 'Style' (workshop) buttons in the Tool Palette will reopen that layer. In TypeStyler's work space, when a layer is selected there are tools in the Palette which change the size, position, proportions and rotation of the layer. TypeStyler is a Vector program, that is to say that it does not work with bitmapped pixels like PS but rather uses mathematical formulas to describe the shapes that you have created. The real advantage to Vector art is the fact that you can change the size and shape of the type without causing a loss of quality.
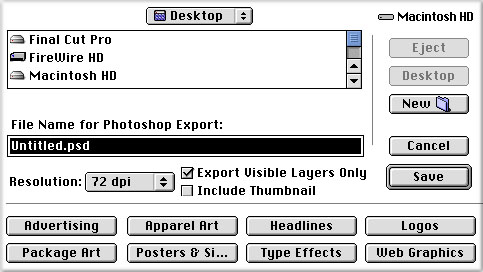
Exporting from TypeStylerOkay, we're done. Time to export. From the Menu bar > File > Export > Photoshop. Even if you plan on taking your type straight into FCP 'Save' as a Photoshop file (.psd) When you import your TypeStyler .psd file into FCP it will show up as a Sequence. Opening this Sequence you will see that each of the layers that you created in TypeStyler are discrete, with each layer on it's own V track.
While TypeStyler is an extremely powerful text generator it is very easy to learn and use. Just click on different boxes to see what they are about. Talk about 'user friendly', TypeStyler is more like a video game than an application. It is fun to work with.Enjoy,
--ken
copyright © Ken Stone 2001