
Under Water Techniques December 10, 2001
Underwater Camera Housings
By Ian Sutherland
Under Water Techniques December 10, 2001
Underwater Camera Housings
By Ian Sutherland
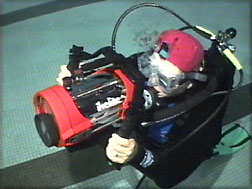
I think I can safely say that most people are aware of the basic manufacturer's recommendations pertaining to their video camera. As we fast forward through the instruction booklet, we are warned against the damage the camera will sustain if we subject it to moisture. Therefore when we consider taking our very expensive video camera into a lake or the ocean for the first time, there is a tendency for the blood pressure to elevate considerably.
If we intend submerging our camera below the surface, a waterproof and more importantly, a pressure proof housing is mandatory. Understanding the second part of my statement is crucial, so let's begin by explaining a few basic principals of water pressure.
Unless you are reading this article in your bath tub, the atmospheric pressure surrounding your body is approximately 14.7 psi (pounds per square inch). Water is much heavier than air, a fact that everyone is aware of. Each foot of descent in the ocean, increases the pressure by an additional 0.445 psi. Naturally, this pressure increase will build substantially as we descend. At 33 feet in the ocean, the total external pressure is very close to double that of normal surface pressure.
How will this pressure increase effect us and our video housing? For many years, the recommended limit for sport diving has been established at a maximum depth of 130 feet as a result of the multiple effects the pressure increase will have on our bodies. Various considerations such as Nitrogen Narcosis, Oxygen Toxicity and Decompression Sickness are discussed in detail during every reputable scuba certification course.
All good quality underwater housings will have a depth limit of 150 feet. As most of my shooting will be in a much shallower range than this, I have peace of mind as to the housing's integrity. So you can now understand why a plastic zip lock bag will not suffice. The outside pressure will crush the air space in the bag, setting up an internal sucking action which will result in the water being pulled into the bag. If you were in need of an excuse to replace your existing camera with a nifty new VX 2000, you've just found it.
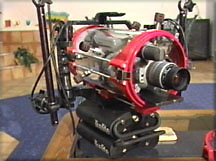
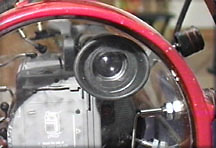
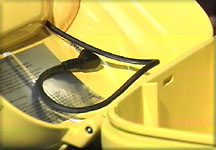
Underwater housings must not only be waterproof, but must also be able to withstand the outside pressure. They must also have an opening somewhere to enable installation of the camera and it's in this area that we find the first potential trouble spot.
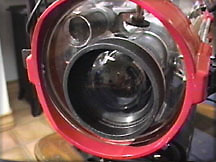
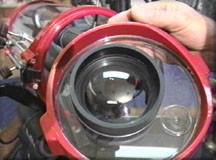
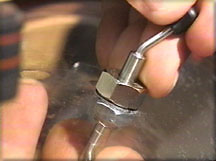
The junction between the front cover (dome port) and the housing body is sealed by a high quality, silicone o ring. We must exercise extreme care each time we expose this very important area, as even a hair lying across the o ring will mean a potential catastrophic failure.
Depending on the manufacturer, some of these o rings must be lubricated with silicone grease each and every time they are disturbed. I personally dislike this type of o ring, as the grease will give the o ring a sticky texture which will attract sand particles in the water. If I miss just one of these sand particles while cleaning the o ring, I could be in for big trouble on the next dive.
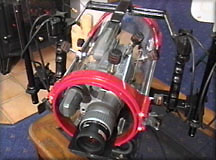
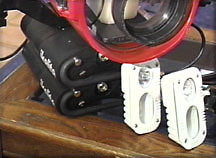
Ikelite Housing front port open |
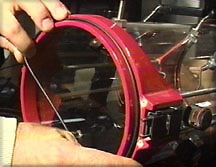
Housing showing o ring |
Ikelite dome port with o ring |
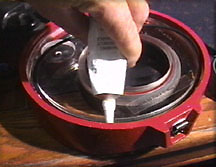
A dry o ring is much more efficient and easier to keep clean. Knowing which one my housing manufacturer recommends is very important. Lubricating a dry o ring with silicone grease can cause the o ring to swell and/or distort , destroying it's integrity.
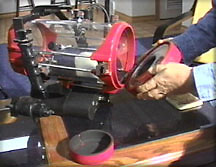
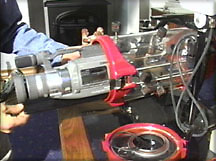
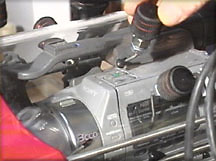
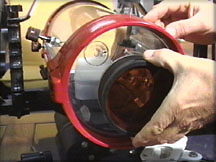
Installing Camera into Ikelite Underwater Housing.
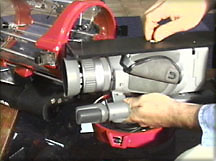
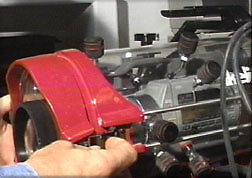
Holding the camera solid within the housing is accomplished with the use of an aluminum base plate. The camera is first inverted and the base plate is screwed firmly in place.
The whole assembly is then slid into a dovetail groove which runs parallel along the bottom of the housing.
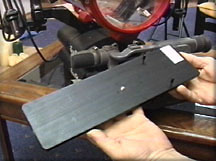
Camera base plate |
Installing camera base plate on camera |
Sliding camera into housing |
Using Camera Functions in the Ikelite Underwater Housing.
The clear lexan housing utilizes external access to the buttons and switches on the video camera. As a result of it's transparent exterior shell, I can visually check for leaks on a continual basis.
If I wanted to clean the inside of the Ikelite housing, I could completely flood the internal cavity with water, (obviously with no camera inside), rinse it under the tap, dry it off with a towel, install my camera and go diving.
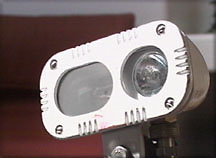
Lexan is an extremely strong plastic composite which when molded into the cylindrical shape of an underwater housing, will guarantee it's integrity against pressure implosion. It's clear characteristic makes it a perfect choice as a housing material, giving the user the ability to see the camera functions. In spite of this clarity, it will not give the required optical performance needed to shoot high quality imagery.
In line with the camera lens is the dome port, which is constructed from optical glass and is specifically designed for underwater photography. The dome also corrects for refraction, which is the optical illusion of water to make objects appear 33% larger and 25% closer than they actually are. Lighting Below the Waves covers this illusion in more detail. Maximizing the coverage provided by the wide angle lens, the dome port also increases color saturation and definition of the underwater image.
In the event of the optical dome being scratched, the manufacturer can install a replacement. This cannot be done by the user as pressure integrity must be maintained.
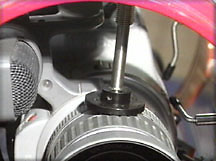
However, each control rod which passes through the outside of the housing is an additional junction between the air pocket inside the housing and the water. In this area, extreme care must be exercised. The control rod slides through a very robust grommet which is factory installed and must never be disassembled in the area where the grommet meets the lexan housing. However, inside the stainless steel grommet there is another o ring which seals the shaft of the control rod. This one needs to have some maintenance procedures performed.
Control Rod & Grommet |
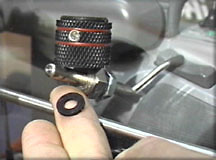
Control Rod o Ring |
Unlike the main dome port o ring, these ones need not be disturbed on a day to day basis but before every trip, the o ring requires scrutiny and lubrication if necessary. Removal of the control knob will give me access to the o ring and if any wear points are discovered, a new o ring must be installed. I personally take this maintenance procedure to extremes and replace each o ring prior to every excursion. At 25c per o ring, I think I can handle the expense.
The control rods are covered on the ends with a small plastic shell. These ends will be making contact with the camera controls, so they must have a soft plastic cushioned end.
Soft ends on control rods |
Manipulating camera's controls |
By gently sliding the control rod inwards until contact is made with the camera control and manipulating the direction of the control rod, all of the camera's functions are accessible.
The large knurled knob at the outside of the control rod gives more control for fine adjustment, as in sliding an auto switch onto the manual setting or adjusting a focus ring for finer detail. The knurled outside edge also assists the cold water diver who's dexterity is hampered with thick neoprene gloves.
Large knurled knob |
Manually focusing the camera is also accomplished with the use of the control rods. One of them makes contact with the auto focus lever which when pushed, will allow the camera's focus to fix on a solid object. I will usually pick a large coral head or other solid object to perform this task.
Control rod on focus button |
Manual focusing control |
Once the focus appears clear in the viewfinder, letting the focus knob return to the manual setting will lock the focus. Having a wide angle lens installed on the camera will maintain the clear focus from approximately 4 inches to infinite. This technique definitely takes some practice but being able to see through the lexan housing makes the procedure easy to learn.
For close macro work, the above manual focus control takes preference over the capabilities of the wide angle lens to maintain focal range. The round pad on the bottom of the control rod has raised nodules on the bottom edge which match up to the grooves in the camera's focus ring. By twisting the external control knob, the focus ring can be adjusted for macro detail. Subjects smaller than half an inch can be brought into focus, filling the viewfinder.
One word of caution: After utilizing this feature, the videographer must remember to reset the depth of field for further subjects by repeating the steps mentioned previously. Aim at a solid object 3 to 5 feet away. Slide the focus button to auto until clear focus is attained. Then allow the focus button to lock on the manual setting. Failure to perform this procedure will mean that all further footage will be out of focus.
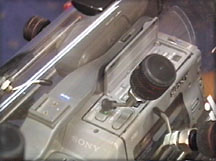
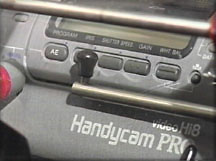
Top Control for Camera/VTR |
Top Control FF/REW |
Unless you are more consistent in your video results than myself, there will be times when having access to the VTR features of the camera will make life more bearable. A typical example could include having shot 10 minutes of footage of a Moray Eel which was being less than accommodating. As it so happens, the piece of substandard footage is your last 10 minutes of your tape. This happened on my last trip to the Exuma Islands in the Bahamas.
There is plenty of air left in your scuba tank when you meet up with another Moray Eel in a much more picturesque setting. In addition, the second one is much more sociable and would like to become a movie star.
All that's required is a flip of the switch from the camera onto the VTR setting. One other control rod will access the rewind and play feature, allowing me to key up the tape at the last scene before spending time with the anti-social Moray Eel. Re-engage the camera setting on the top switch and I'm back in business. Don't forget to reset the focal range. You lost the setting when you disengaged the camera setting and went to VTR.
Back View of Manual Features |
Side View of Manual Features |
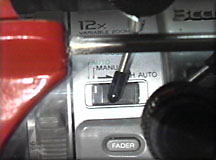
As everyone knows, there are manual features on most cameras for Iris control, shutter speed, gain and white balance. One of the control rods, usually in the back of the housing, gives me access to each setting.
Although most of my final adjustments are usually made in post with Final Cut Pro, there is the odd time where I will want to do some pre adjustment of my images. A typical example is when shooting silhouettes. Manually opening or closing down the aperture can give me unlimited variations on this theme.
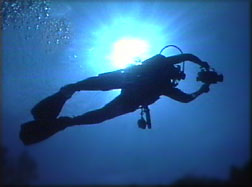
In the shot below, I was positioned at 120 feet, the diver passing above at around 90 feet. I closed down the iris from the auto setting of f 5.6 to f8 and held on the diver for 30 seconds as she passed overhead with the filtered sunlight from above casting her as a silhouette.
Viewing the image through the viewfinder is no different than in any other videography situation. Once again, the lexan housing gives us the capability of seeing every function on the video camera. If my camera has a flip out screen, the housing will be constructed to allow for it's use. I will have as much flexibility as when shooting topside.
One must give consideration to a well known characteristic of flip out LCD screens on cameras. They have a tendency to eat up battery power at an alarming rate. In above water work, a spare battery can be installed very easily but when working underwater, this luxury is non existent.
Even if my camera were to include an LCD screen, I would only use the viewfinder for underwater work. I've been caught a few times over the years with low battery power, once when a fifteen hundred pound Manta Ray was posing 4 feet in front of my dome port. Believe me when I say, I was not a happy camper.
Underwater Audio.
Let's now consider sound. Every diver will attest to the fact that the experience of being underwater is far from silent. Fish can be surprisingly noisy in their eating habits, not to mention the sounds of our own bubbles.
We need to hear the sounds of bubbles underwater behind our narration and background music. In my article 'Producing Quality Underwater Video' I have described my methods for accomplishing this important part of the production.
Most manufacturers of remote controlled underwater housings have included an external underwater microphone in their package. Attached to the camera's microphone jack, it's purpose is to record the ambient sound.
My opinion on this way of capturing the ambient sound is that it resembles the noise of glass marbles falling from a great height onto a tin roof. To date, I have never heard any results that remotely come close to acceptable. My advice to anyone who owns one of these housings is to unplug the mini jack from the camera and scotch tape the jack to the inside of the housing.
The internal microphone of the camera, inferior as it may be, will do a much more superior job of picking up the sounds of bubbles. Considering that it is encased in a ready made echo chamber, it will actually do a better job inside the underwater housing than it is ever capable of doing on dry land.
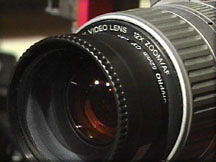
Filters for Underwater Shooting
The addition of filters to our videography results can be accomplished in one of two ways. Either by installing the filter on the external dome port or by installing a smaller version between the wide angle lens and the camera.
External filter |
Camera, filter & Wide Angle Lens |
My personal preference is the latter as I have found the external installation to be less than satisfactory. Depending on the shooting angle, light can reflect off the dome port and bounce back from the filter. This reflection will of course be recorded on your footage and spoil the results.
Underwater Lighting Units
Successfully lighting underwater subjects will mean the difference between an acceptable image and a great one. But once again, no ordinary lighting system will do the job.
A twelve volt batter pack mounted below the housing and cabled to double 100 watt light heads is my own personal preference. For most close up work, one of the two lights can be switched off.
Adjacent to the 100 watt main lamp is a 20 watt modeling light. This can be employed to line up the light head accurately for detailed work or in my case, I prefer to use it as a light for night diving. Only being 20 watts, it will conserve the bulk of my battery power for shooting my subjects.
All the bulkhead connectors on both the battery pack and the light head are, you guessed it, sealed with o rings and must be treated with the same consideration as the others. If water were to leak by, the result would be either a blown bulb in the light head or a fried 12 volt battery pack.
Battery Pack and Double Light Heads |
Light Head with Modeling Light |
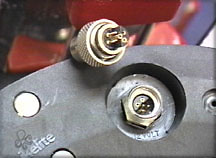
Bulkhead Connectors |
Using Camera Functions in the Sony Underwater Housing.
The other alternative to manual control is remote cabling. Depending on our skill level in the art of underwater videography, we may need access to every function the camera provides.
If the housing was manufactured for your particular camera and has a remote function inside, it means that your camera has a remote mini jack. When the mini jack is engaged, the electronic functions will be transmitted to buttons and switches on the outside of the housing.
On the surface (no pun intended), this may look like an ideal set up but in my own personal experience, I have found three main problem areas.
There is a small computer chipboard inside the housing that is very susceptible to moisture. As a result of the high humidity in the warm shooting locations, the computer chip has a tendency to malfunction. Keeping the chip dry can become a pain very quickly. I've witnessed divers attempting to dry out these chips in kitchen ovens, using hair dryers on them. All in an attempt to dry them out for the next day of diving.
The removal and replacement of the mini jack causes excessive wear to both sides of the mating parts. If the mini jack loses it's electrical contact with the remote port in your camera while shooting, your underwater video excursion is over.
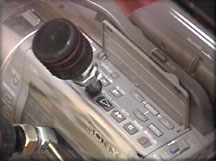
Sony Housing Buttons |
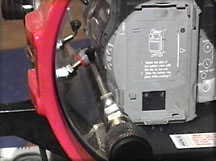
Computer Chipboard & Cable |
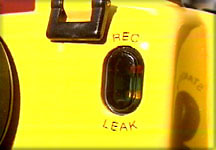
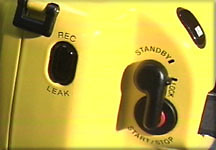
Leak Detector |
As a result of the housing not being transparent, there is no way of seeing the camera inside the housing and no way of checking the integrity of the o ring seal. The manufacturer, having relied on electronics for the functionality of the housings will have installed a leak detector.
Designed to sound a warning buzzer when moisture is introduced into the housing, this method is in my estimation doomed to failure. I have personally witnessed a number of cameras destroyed with no warning from the detector. I've always been under the impression if you introduce water to an electrical circuit, it shorts out?
Underwater video housings have been around in one form or another for many years, but only in the last 10 years have they reached their present level of reliability. With care and attention to detail there is very little possibility of a failure.
Ian Sutherland is the owner of Gaelic Digital Video Productions located in Winnipeg, Manitoba, Canada. Individual episodes of his ten part series Planet Ocean have won Videography awards in the adventure documentary category from 1998 through 2001 inclusively. Planet Ocean is presently being broadcast on Shaw Cable 11 TV to Manitoba audiences.
Ian Sutherland
To see excerpts from the TV series 'Planet Ocean' visit www.gaelic-video.com
Gaelic Digital Video Productions
Winnipeg, Manitoba
Canada.
copyright © www.kenstone.net 2001