
Feature Article March 23, 2001
Feature Article March 23, 2001
Producing High Quality Underwater Video
By Ian Sutherland
During my impressionable years, my old grandfather had passed on a piece of advice. "Pick something you love doing son, make it your job and you will never have to work a day in your life". I must admit, at the time I had no idea as to the wisdom of his words but having since put them into practice, I am now forever grateful to the old guy.
Working as a Scuba Diving Instructor kept my excitement quotient high through the early 80's, but invariably I began to look for a new challenge. My employer at that time owned an old Sony TR81 8 m/m video camera, so after some searching I managed to come up with an underwater housing of sorts and with tools in hand, headed down a path that has turned into a never ending quest for superior quality underwater video footage.
As most TV audiences are aware, there is a wide variety of quality and craftsmanship in the the underwater footage that they see on TV.
Sometimes the reason for this is economics. If the producer is stretched to his or her budget limits, the inexpensive way to go is the purchase of any underwater footage that happens to be available in that particular area of the world. The footage is usually gleaned from local video enthusiast's results at the resort where the film crew are based for the shoot. Rather than running over budget by attempting to shoot their own stuff, they rely on the fact that most people won't be able to tell the difference anyway. (good underwater video equipment and skilled videographers don't come cheap).
Once the already sub standard footage hits the editing phase, nine times out of ten the editor who is in charge of chopping it up has no idea what a coral reef looks like and after throwing on a few filters and dissolves, is quite pleased with his or her creation. After all, there are bubbles in the scene so everyone must know that it's underwater, right?
As in any videography, there are two distinct areas we have to contend with in producing a quality result. "Equipment" and "Technique", but unlike topside where the latter can sometimes compensate for a lack of the former, both are equally important in the underwater application. A leak in the video housing and the best technique in the world goes down the tubes at a very high rate of speed.
So let's begin by developing an understanding of the necessary hardware.
Hanging on the fringe of the video camera manufacturer's coat tail's are a number of companies who will gladly accommodate the underwater enthusiast. Some of their products work well and then again, some of them don't. The trick is in being able to distinguish what works and what doesn't. While you are in the process of pouring the salt water from your video housing onto the deck of the dive boat and your XL1 battery has fused to the camera body, it's definitely not the right time to do some research on the effects of salt water and electrolysis.
The solid housings are usually constructed from an aluminium alloy, (or aluminum as you folks south of the border like to call it) and have the characteristic that the user cannot see what is going on inside. Therefore being unaccesible, the buttons and switches on the camera are useless. The way the housing manufacturer gets over this problem is by transferring the electronics, via a remote cable to buttons and switches on the outside of the underwater housing.
My personal experience with this type of underwater housing is less than satisfactory. Seeing as I intend using the piece of equipment primarily in a part of the world that inherently has high humidity and salt sea air, I have discovered that they develop moisture problems, usually around the third day of the trip. No matter how attentive a person is, the little chip board on the inside of the housing soaks up all that moist air and I'm in for a bunch of problems. I've lost track of the number of divers I've encountered with a tear in their eye reporting that their video camera just would not power up underwater, or that the record/pause function bit the big one.
The other consideration with this type of housing is that it relies on a "leak detector", in the form of a small warning light on the outside of the housing, designed to let you know that you are a candidate for a bank loan. Now with my limited knowledge of electricity, I can understand that if I introduce water to an electrical circuit, it will invariably short out and that's just what happens to these little gizmo's. If this transpires, I'll continue on my underwater excursion until such time as I notice water slopping around in the viewfinder. This invariable produces a painful sensation akin to a mother undergoing childbirth.
Made from a clear Lexan material, the buttons and switches on the housed video camera are accessed through control rods which pass through the outer body. No electronic remote cables and leak detectors to worry about. I simply have to concern myself with keeping the video camera dry and functional and forget about remote features going belly up.
When it comes to the possibility of a bad O-ring seal, it's a simple procedure to adopt the habit of "visually" checking that all is well inside. This should always be done in the first few feet of water after jumping from a dive boat. Spinning the housing around and checking for bubbles becomes a routine and if by some chance a leak is detected, I have more than enough time to climb back on the boat and save the video camera. It is secured to a plate approximately one inch above the bottom of the housing, so even although there is a cupful of water inside, as long as I keep the housing level I can save the day. I may add that in 15 years, I have never had this happen. (touch wood).
Not adhering to this preliminary step is one of the main reasons for flooded housings. As we descend, the water pressure increases and what began as a few drips in shallow water progresses at depth to the equivalent of switching on your garden hose inside the housing. Say goodbye to your video camera.
To see colors, our eyes need light. That's a simple fact. So we have to be aware of what happens to light underwater. Even in very clear water, the light rays from the surface are absorbed in the first 20 feet or so and even although we can still see very clearly in the deeper water, most of the bright colors have been filtered out of the spectrum. The first ones to vanish are at the upper end, the red's and yellow's.
Now as a result of the camera seeing what our eyes see, our footage starts to take on a very cold, dismal persona. The captured colors are anywhere from blue through green and anywhere from black through white. All the warm colors of the rainbow are gone.
We have two ways to counteract this, the first one being color correction filters. Positioned over the front dome port of the housing, they assist in putting back those colors which have been filtered out by the water. There is however a limitation to this way of fooling the camera lens. The filter works anywhere between 20 and 80 feet, optimum depth around 50 feet.
Shallower than this range, they are overpowered by the ambient light and the resulting footage gives the impression that someone has spilled a bucket of red ink into the water. A pink tinge to our footage maybe has some use if your subject is flower gardens, but doesn't have any place in the underwater application.
Deeper than this range, and your subject looks like it has virtually started to bleed. Everything, including the water turns to bright red. This kind of footage has only one place in my underwater library and comes under the heading of never to be seen again with the naked eye. I save a few clips of my own mistakes and use them when teaching an underwater videography course to show what happens deeper than 80 feet.
A diffused beam is of primary importance. Most divers have an underwater light for poking around in crevices, but this type of light is useless for illuminating a subject. The penetrating beam of the dive light throws an enormous hot spot, especially if the subject is partially white in color.
My own angle of attack is two 100 watt light heads, one on each side of the housing. One is positioned to illuminate the foreground subject and the other is deflected towards the background. This technique gives a far better result than blasting the poor little fishy with 200 watts of light at close range.
Last but not least in the equipment department, we have to be concerned with the additional complication of focusing the lens through water. Everything underwater is magnified by a factor of one third and the light rays striking the lens have been bent somewhat. It's known as refraction.
 Twenty five years ago, I quit my humdrum clock card punching day job to pursue a career that had fascinated me since childhood. Having been born and raised in a small fishing village in Edinburgh, Scotland, the ocean and all it's wonders had always held a fascination for me.
 There are more than a few people under the impression that the video manufacturers such as Sony etc. must produce some kind of underwater camera. I've come across this line of thought quite a few times over the years. One of the first things to understand is that this is "not" the case. I'm pretty sure that if you check your warranty on your PD150 or XL1, you will find that there is a clause which states that if you do subject it to moisture, you will be heading to your bank for overdraft coverage. The manufacturer definitely did not take into account the fact that you wanted to take their product underwater.
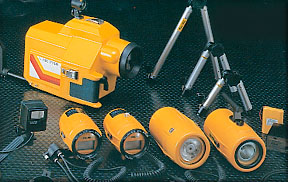 All the underwater housings on the market fall into two categories. For want of a more technical designation, let's call them the "solid" and the "see through".
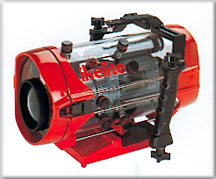 In comparison, the "see through" type of underwater housing is by far, a more trouble free setup and is my own personal choice.
 Now we have to turn our attention to the subject of what it takes to record all these wonderful colors onto the camera tape.
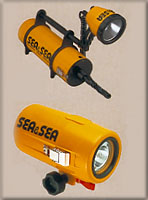 In addition to the color correction filter, we can introduce artificial light to the subject which will put the red's and yellow's back where they belong. But as in studio lighting topside, we can mess up underwater video footage very quickly if we position the lights badly.