
Feature Article March 23, 2001
Feature Article March 23, 2001
Producing High Quality Underwater Video
By Ian Sutherland
Page Two
The convex front dome port of the housing corrects for refraction so that the image travels to the camera lens minus the light ray distortion.
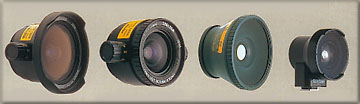
Another issue that has to be addressed is focal range. A good depth of field is accomplished by introducing a wide angle lens between the camera and the front dome port of the housing. Having to focus on an arrow crab, a pretty little creature about one inch long, at a distance of about four inches and then expecting to capture a humpback whale that cruises by at a distance of twenty feet would leave your humpback whale an unsightly blur. Manually focusing topside, where you have all the time in the world to adjust to your heart's content is no problem. But try getting that humpback whale to stay where it is while you re-adjust your focal distance and you'll be staring at nothing else but blue water.
We need to be in focus from about 4 inches off to infinite at all times underwater to capture the variety of scenarios that present themselves. The wide angle lens lets us accomplish this.
After dropping from the surface to the bottom, I'll pick a solid object such as a large coral head and position myself about 3 to 4 feet away. With the auto focus on, I'll let the camera do it's thing until I have good focus on the coral head, then hit the manual lock. Check a subject about 12 inches away and again a subject about 10 feet away. If I have done it correctly, both subjects will be in focus.
Why don't I just leave the auto focus on all the time, you say? Well, we are not shooting through air, that's why. The water between your camera and the subject will occasionally bring an unwanted guest into the frame. Fish have no consideration for the fact that you are not concentrating on them exclusively and when that auto focus hits them as they go about their journey, your focus will jump to accommodate the fact that they have appeared. This continual half second blurring will continue throughout your entire shot, giving you and your audience a migraine headache.
These sub standard results are only surpassed by a bad case of "vignetting". Adding a wide angle lens, plus a dome port to the front of the camera will cause the top two corners of the frame to be cut off with two black triangles. The video camera is picking up the corners of the additional hardware. In extreme cases, the bottom two corners as well. This type of footage shows up on many of the prime time TV spots and always aggravates me intensely.
It's a simple procedure to set the manual zoom forward slightly to cut these areas out of the picture. After running some initial tests in your local pool, you can make a line on your zoom control with a felt pen to indicate the setting that works best for your particular camera and lens combination. No more vignetting.
 Now that we have all the equipment necessary to do the job, we next have to learn how to use it effectively. No different than in the topside world, but with a few extra factors thrown into the equation.
If we want to achieve nice steady footage up top, we simply mount the camera on a tripod, right?
Now that we have all the equipment necessary to do the job, we next have to learn how to use it effectively. No different than in the topside world, but with a few extra factors thrown into the equation.
If we want to achieve nice steady footage up top, we simply mount the camera on a tripod, right?
Well, when we take into consideration that we are wearing about 50 pounds of scuba equipment which occasionally requires one of our hands, a camera housing that usually requires two hands and subjects that have a tendency to want to move in a three dimensional world, expecting to set up a tripod on the bottom and have the action come to you would be a large stretch of the imagination.
All the previous examples of bad camera work can be surpassed by adding jumpy footage into the balance. Usually, as a result of the videographer's poor scuba diving skills, the subject spends very little time in frame and the viewer's balance sensors in the inner ear begin to rebel about five minutes into the show.
In order to position ourselves for the shot, our legs and feet have to be moving somewhat. The trick is not to transmit this movement to the camera housing. This is where we re-designate our elbows and shoulders as "shock absorbers". Keeping any movement below the waist from effecting the smooth movement of the housing is where the skill comes into play. Try jogging and holding the camera steady on a subject. You will get the idea. But unlike topside free hand use of the camera, we have the additional natural cushioning effect of the water to assist in this regard.
It definitely takes some practice to get the skill down.
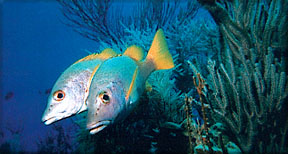
 The next area where technique comes into play, is in capturing the wild critter in a pose. One must remember that we are not working in a zoo environment or on safari, where the wildlife is conditioned to sit there while we do our thing.
Chasing the wildlife around will only give us lots of good footage of fish tails as they disappear into the wild blue yonder. That technique is doomed to failure as the fishy knows that any larger creature moving in his direction has him earmarked for lunch. Especially when the larger creature makes noisy gurgling sounds, as in inhaling and exhaling through a regulator.
My angle of attack is to watch the creature from an unthreatening distance and try to figure out it's intended journey. Move into a spot ahead of where he's traveling and with the camera rolling, wait for his arrival. When he does stumble across you, in many cases his natural curiosity takes over and I have had many situations where I've had to move backwards slightly to keep him in focus. Once they see their reflection in the housing dome port, you've got it made.
I had to change the dome port of my housing last year after a brief encounter with loggerhead turtles in the Bahamas. The technique worked so well that I was for a short period of time the object of one large male's desires. Now I've been accused of many things over the years but I'm pretty sure I do "not" in any way resemble a female loggerhead turtle. The scratch marks on my front dome port were beyond repair and "No", I'm not releasing any footage of the nuptials.
 Using models is another badly misused technique. There's nothing more uninteresting than the back end of someone's scuba tank cluttering up the scenery.
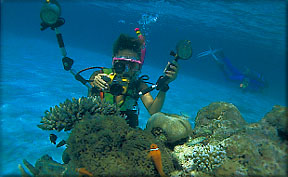
Now unless you are independently wealthy, in many cases your models will be other divers who just happen to be in the water at the same time as you and your video camera. None of them have any modeling skills, so expecting them to do what is required will only lead to aggravation. So they have to be fooled in order to make the scene work.
Once again, watch them and establish their line of journey. Pay attention to what lies ahead in their path and if a particularly nice piece of scenery comes into view, put the "pedal to the metal". Get ahead of them and turn around to frame the shot with the nice piece of scenery in the foreground and with the camera rolling, once again waiting for them to appear. You'll probably get the few seconds of footage you had in mind before they catch on to your whereabouts and invariably "wave" at the camera. Cut and print.
One step better than this is to spend a few minutes with them up top and tell them what you want in the way of footage. Coach them to pretend the camera is not there at all. They shouldn't touch the wildlife unless it touches them first. With a pre designated signal from you, request that they slide into the frame, only paying attention to whatever subject it is that you are shooting. No eye contact with the camera.
Most people get a big kick out of helping an underwater videographer and the possibility that they will be appearing in your production makes them very eager to do what is asked. It's a snap.
 Let's diversify for a moment into the subject of sound. Quite a few underwater segments that appear on the networks have either no background sound at all or worse still, have "canned bubbles" dubbed into the scenes. I don't know which one of the two I hate the most.
The former has a sort of anesthetic appeal where the creatures are swimming around behind the narrators voice with a piece of cheesy music for fill. As every diver will tell you, the experience of being underwater is far from silent. There's always the sounds of the bubbles and all the little crackles and pops of the marine creatures going about their daily routine. Remove these sounds and it's an unnatural feeling.
The "canned bubbles" are usually produced by dangling a microphone over a fish aquarium and blowing air through a plastic hose while recording.
In retrospect, I think I know which one I hate more. This is definitely it.
Now if we capture the video and audio together and proceed to insert the clips on the timeline, the result is a bad sound mix. One clip ends half way through an exhalation, the next starts half way through an inhalation, the next has an abnormal sound as the videographer burps in his regulator and so on. The viewer knows that something sounds odd, but can't quite grasp what it is. It's the unevenness of the background bubble sound.
Here's my technique, a closely guarded secret until now. Having told you, I'll have to kill you if you ever pass it on to another underwater videographer.
When I capture my footage, I capture video only. I have one clip on my hard drive that's called "Bubble Track". Where did it come from? I delved through all my underwater footage way back when and discovered a segment where I had been lying on a sand bottom shooting manta rays in Palau, Micronesia. Not having exerted myself at all since I lay down on the sand, my breathing rate was relaxed and even, with no unnatural noises in the audio. I captured this 60 seconds "audio only".
When working on an underwater segment, I'll import the clip in, open it in the viewer and stretch out the waveform. I set my "in point" right at the beginning of an inhalation. Then 50 seconds or so later near the end of the clip, I'll set my "out point" right at the end of an exhalation. Then drag it to the correct position at the beginning of my underwater segment. A two second audio dissolve at the beginning brings it in smoothly as the video transitions to underwater. I usually drop the Db to about -7 or -9, which puts it well under the music and narration. I then select the clip and copy. Move the play head to the end of the audio clip and paste, paste, paste, paste. As many times as it takes to cover the length of the underwater segment. Razor cut the excess where I transition to topside and drop in another audio dissolve. The result is a smooth, uninterrupted bubble track that is not distracting to the viewer. There's no way of telling that you are listening to the same 50 seconds or so over and over again. The sound of the bubbles adds a "depth" to the audio track. (no pun intended).
 In the way of some last few tips, many of the techniques that have served me well over the years include breaking most of the rules of photography and videography. You more than likely already know that shooting into the sun can give some interesting silhouette's. When this technique is used underwater, it can be even more dramatic. The sun's rays deflecting through the water can be manipulated by increasing your depth, or putting more water between the video camera and the subject. I've spent many hours playing around with all these possibilities. Some worked and some didn't, but the creative process was always fun.
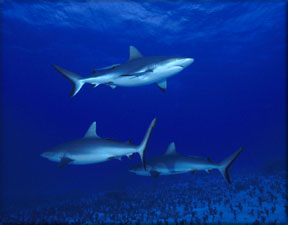
Getting sharks to pose 12 inches from the lens has given me a problem over the years. I discovered a neat trick about two years ago. When they present the opportunity, I begin humming a tune through the regulator. They seem to like this noise and will come close to investigate, giving me some nice close up's. I don't think they care what tune you hum as long as it has a deep timbre. I'm in the process of experimenting.
Shooting moray eels can sometimes be a pain, especially during the day. They are night feeders. I always carry a couple of hot dogs in my pocket for just such a situation. (only the sausage, not the buns). They will come right out of their holes for a free handout, giving some good shooting possibilities. Just remember to ditch the hot dogs if anything with big teeth takes a fancy to what's in your pocket.
The sport of scuba diving in general has been going through an increase in popularity for quite a few years. The advances in technology available to the underwater video enthusiast are also far superior than when I picked up the old Sony TR81, 15 or so years ago and dragged it below the waves.
But for many, witnessing the underwater world from the living room couch is as close as they will get to the real thing, and there's nothing at all wrong with that. I have no intention of convincing everyone to take up the sport of scuba diving, even although it is part of my livelihood.
My desire is that those of us who do create the underwater images for TV documentaries can make the effort to portray what we know and love as close as possible to reality. Hopefully this article has helped in the endeavor.
 Ian Sutherland is the owner/operator of 3 Fathoms Scuba, a retail dive store in Winnipeg, Manitoba, Canada. Through the store's travel program, he has had the opportunity to travel to most Caribbean destinations, the Exuma and Bimini Islands of the Bahamas, the Baja Peninsula of Mexico and the islands of Palau, Yap and Truk Lagoon in Micronesia.
He shoots, narrates and edits his own 28 minute production called "Planet Ocean". The show is broadcast on 19 time slots per week on Videon Cable 11 in Manitoba, Canada.
"Planet Ocean" has won an "Award of Excellence" in the annual Videographer Awards for 1998, 1999, 2000 and 2001.
Ian Sutherland is the owner/operator of 3 Fathoms Scuba, a retail dive store in Winnipeg, Manitoba, Canada. Through the store's travel program, he has had the opportunity to travel to most Caribbean destinations, the Exuma and Bimini Islands of the Bahamas, the Baja Peninsula of Mexico and the islands of Palau, Yap and Truk Lagoon in Micronesia.
He shoots, narrates and edits his own 28 minute production called "Planet Ocean". The show is broadcast on 19 time slots per week on Videon Cable 11 in Manitoba, Canada.
"Planet Ocean" has won an "Award of Excellence" in the annual Videographer Awards for 1998, 1999, 2000 and 2001.
He is also the owner of Gaelic Digital Video Productions, a Winnipeg based company producing corporate training and promotional video. This year marks his debut in the wedding videography field. He is looking for something to do in his spare time apart from spending it on the boards of 2-pop.
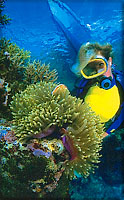
The lady in the picture is Liz, his wife. She's the one who dresses him up nice and makes him presentable to the public.
copyright © Ian Sutherland 2001
All screen captures, images, and textual references are the property and trademark of their creators/owners/publishers.