Software Review
Page Two
Better Media Management
For me this was a big ask. Coming from another NLE system that managed all the media, pretty much transparently to the user, Final Cut Pro was a bit of a shock when it came to media management. In Final Cut Pro 2 it's got a whole lot better, but I still find it a little lacking. Maybe I'm too picky but let's get the 'bad news' out of the way first.
Capture & Render Scratch
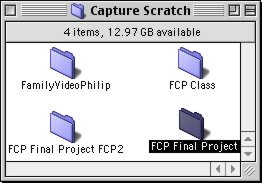
My own preference is to have one folder for each project and into that folder I'd like my Captures, Renders and other media related files (Photoshop titles, After Effects renders or 3D render files) for that Project to stay together. I want the Project to know where that folder is and to only ever point to the folder (or folders) I allocated.Final Cut Pro 1 did no management of Capture & Render scratch effectively just dropping anything into the last selected location regardless of Project. To their credit this has been hugely improved in Final Cut Pro 2 which will create new Capture Scratch sub-folders for each Project and the same in the Render Scratch. Trouble is, when you incrementally name your Project as many do for security a self created 'Attic' of backups if you capture more footage it goes into yet another new Capture Scratch sub-folder. This makes locating any given file a problem and for someone who is editing a Project with a producer across the Pacific (as I currently am) then this is an added level of complication we can do without.
That being said, it is a huge improvement over dumping everything into the last selected folder. Close, but room for improvement.
The rest of the changes to Media Management are all good.Disconnect Media, Delete it or move it to the Trash
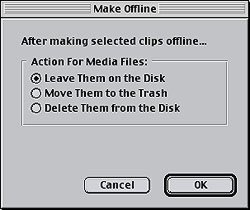
A new menu item in the Modify menu Make Offline opens a dialog with the same name. Here you can choose how exactly you want to make media offline. I was hugely pleased to find the first item leave them on the disk will make media offline but leave it where it is. There are times when I want to know what I might kill if I were to lose one particular piece of media and making it offline while leaving it in place is a useful tool. Of course, there are now other ways of finding if a piece of media is used or not.See Find used and unused Media
The other two options are obvious but it would take a brave soul to delete directly from the hard drive. Once deleted media is gone, it might need to be recaptured, presuming it had clean Timecode. Now we can disconnect, delete or move media to the Trash for later deletion, all from within Final Cut Pro 2
Reconnect Media
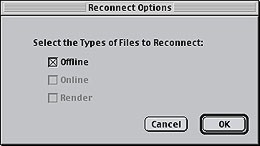
Relink Media has been renamed as the more obvious Reconnect Media and given new powers that make re-linking or reconnecting media. Select the Reconnect Media item from the File menu and the Reconnect Options dialog opens.Previously it was only possible to reconnect Offline Clips often meaning that hours of rendering was lost if render files lost their link to the Project. Reconnecting Online media gives us the option to change the media file that the Clip points to. This would be useful if, for example, there were both PhotoJPEG and DV versions of the Clip available Online. When combined with the long standing ability to relink, now Reconnect, all Files in Relative Path, Reconnecting Online media would allow easy swapping from PhotoJPEG to DV versions, for example, at will.
Even better, the dialog that opens from the Reconnect Options dialog has a Find button so Final Cut Pro will look for a media file by the name of the Clip being reconnected and locate it on the hard drive. This simplifies and speeds the entire process of reconnecting media.
Offline Clips dialog
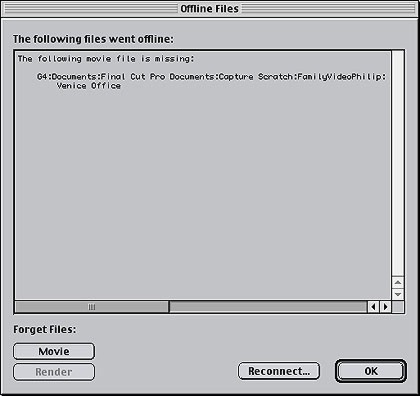
Final Cut Pro has always warned if Clips or Render files are missing when a Project is opened but until Final Cut Pro 2, you had to manually go and relink or reconnect the Clips. Now, if Clips are missing when a Project is opened, or after returning to Final Cut Pro from the Desktop or other application, an Offline Files Warning dialog opens. Moving media while Final Cut Pro is running no longer runs the risk of damaging the Project file.
The dialog notes which files are missing and where they were last located. At bottom left are two buttons which tell Final Cut Pro not to bother any further the files are gone and you don't care. If you OK the dialog, Final Cut Pro continues to remember the files but doesn't attempt to reconnect them.But click on the Reconnect button and Final Cut Pro 2 searches for the files to reconnect them in the same way that it does when the Reconnect files menu item is selected. Media files and render files can be reconnected this way.
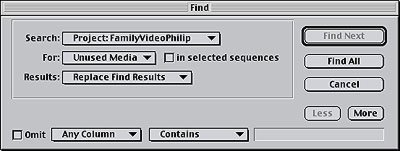
Find Used and Unused Media
New options in the Find dialog - Edit menu - Find, give the ability to search for All Used Media or all Unused Media so we can immediately and quickly check a Project for any unused media. The most common reason for doing this would be to find which shots still hadn't been used thus far so they could be used, or removed from the Project (using the Delete media options above).Cache Manager becomes Render Manager
The final item before I get to the 'big one' in terms of media management, the obscurely named Cache Manager has been renamed so it now sounds like what it does Render Manager. Even better the renamed Render Manager has acquired a new column. Last Modified so it's easy, quick and clear which are the most recent renders for a Project so they we know which ones to delete and which ones we should keep. Small improvement, big payback.Media Manager
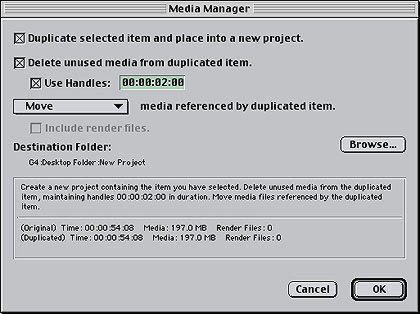
One of the most common questions asked is if it is possible to somehow get rid of the parts of a media file that are no longer being used in a Project. The answer was always no. 'Consolidate' (the Avid term) feature in Final Cut Pro. Search the DV Companion and you'd come to the Trim Sequence pages because that was as close as you could get. No longer. Media Mover has been replaced by Media Manger, with new Super Powers to manage media!We now have full control over what we move and what we keep. Depending on how we use the Media Manager controls we can do everything from delete unused media from an existing media file while retaining the part used by the Clip, to creating a new Project with trimmed media files. As well as the Move selection shown in the graphic, we can Copy media files, Use Existing Media files or create an offline Project.
With Projects being copied or moved we can take the render files along with it or wait to create new render files. Plus, there is no limit on where the new Project and media files go. If you are very brave the Media Manager will even delete unused media from selected Sequences or Clips.
Best of all, in my opinion, are the two report areas at the bottom of the dialog. In the top panel there's a full description of what will happen making it much less likely that a disaster might take place. Below that is a readout of the duration, media files size, and render files for the original item, and the Modified item for a further 'reality check'.
This is the level of Media Management control that people have been asking for.Audio Meters, Track Level and Pan Control
I had held out hopes for a track mixer window in Final Cut Pro 2, particularly after seeing the track mixer with mixer automation that Adobe had in Premiere 6. But it was not to be, well not in this release anyway. However, my disappointment melted a little when I explored what Apple has given us: an audio level meter (stereo only but very colorful) and the ability to proportionally modify audio levels for selected clips including track selections.
Audio Meter
The Stereo Audio Meter holds the last level when stopped and has peak, or overload, indicators above each of the two indicators. Somewhat more colorful than most, it stands out on the normally gray Final Cut Pro interface.
While I'd accept an argument that it would be nice to have multiple audio meters for more than two audio tracks the problem is, where do you stop? Given that Final Cut Pro can have up to 99 tracks per Sequence, where would you fit 99 audio meters? In any case each Sequence mixes down to a Left and Right stereo signal for output, so monitoring the combined mix is the most important need. A single Clip can be monitored by selecting it in the Viewer and checking the audio level, while a single track can be monitored by turning off the other tracks. Not a true solo, agreed, but useful anyway.
The apparent lack of a track mixer was more of an issue. I like to keep specific audio content to tracks dialog to tracks 1 & 2, atmosphere track 3 & 4, music tracks 5-8 and so on. I then take pains to keep the level within each track consistent, preferring to do my final track balance between tracks. In Final Cut Pro 1.x there was no way to balance tracks without resetting levels on every Clip in the track. Not something I enjoyed doing.
Track Levels
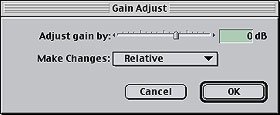
Then I discovered the Modify Levels menu item which opens the Gain Adjust dialog. Gain adjust can be applied to one Clip, a few selected Clips or all Clips in a selected Track. The most important setting in this dialog is in the Make Changes pop-up menu make the changes Relative!I can use the Gain Adjust dialog to adjust relative levels for a Track take the level down a few dB or up a little. The adjustment is immediately applied across all selected Clips. Not exactly a track mixer, no automation but a huge improvement on the functionality of Final Cut Pro for editing audio. The Gain Adjust dialog can also be used to set a Clip or Clips to a standard level, or reset them to zero dB.
See also Export to OMFIf you have Video only Clips selected or only video tracks of a Linked Clip, the Levels menu item opens an Opacity Adjust dialog with the same options and functionality as the Gain Adjust dialog. I haven't worked out when or how I'd use that function, yet, but I'm sure it will be useful.
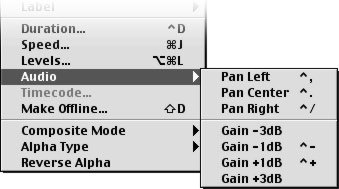
Pan Selected Clips & Modify Gain
Using these menu items you can pan one clip, a group of selected Clips or an entire selected Track. Select the Clips, choose the menu item and the audio tracks are now panned how you want them. This is quite a lot easier than setting pan for a Clip then Pasting Attributes to the other Clips.More importantly, the same submenu has the option to adjust audio level on the selected Clip or Clips by 1 or 3 dB at a time up or down. Quick and subtle audio adjustments.
FCP Home Page