Software Review
Page Three
Export to OMF
Not every Final Cut Pro user will use this function, in fact I'd be prepared to bet a very large portion won't even know what it's for, but for those who know and those who wanted it, this is a huge bonus in Final Cut Pro 2.The biggest irony is that since OMF (Open Media Framework) was superseded by the Advanced Authoring Format (AAF) it's had more support than ever it had before. OMF was developed by Avid as a means of taking editing information, and optionally media, between software tools. In practice it has mostly been used to take Audio edit information and media from Avid's NLE systems to ProTools, the audio post production software from the Avid-owned Digidesign. Final Cut Pro is only the second NLE to support it (as far as I know) but the 'resurgence' includes a new tool for going from OMF video from an Avid Sequence to an After Effects Composition. (A feature that could be added to Final Cut Pro 2 by Apple or a 3rd party.)
While the Peak VST audio editing tool now bundled with Final Cut Pro is a very nice audio tool, ProTools is one of the 'heavy guns' of audio post production with a whole range of options, plug-ins and hardware add-ons.
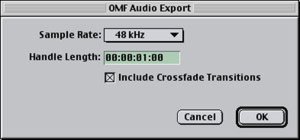
What the Export audio to OMF feature gives is the ability to export your audio tracks, edited and in the same positions as your timeline, in one file to take to an audio post production suite ready to be added to, modified, improved and 'sweetened'. If you search 2-pop.com you'll find a clumsy workaround there which is now superseded by the Export Audio to OMF function. Choose you sample rate (keep it the same as the Sequence as always), allocate a trim size so the audio editor has a little extra audio either side of your edits to accommodate fades, and decide if you want to include any crossfade transitions you've added and export.
A new file will be created that contains copies of your audio and the location on the timeline. All laid out, all in sync and with frame accuracy so you can import the finished stereo pair back to Final Cut Pro tooutput with the video.
Faster all Round
Lots of Final Cut Pro 2 have been recoded to take advantage of the Velocity Engine (a.k.a. Altivec) of the G4 processor as well as taking advantage of multiple processors where they're present in the computer.All round the rendering is much faster. I haven't done extensive testing but Apple claim 30% faster rendering (on average) on a single processor machine and 70% speed up on a dual processor Macintosh. Those numbers should be relative to the previous version i.e. Final Cut Pro 2 should be 30% faster on a G4 than Final Cut Pro 1.2.5 on the same G4.
Certainly, everything in the program feels faster. In particular, the Trim Window is much faster. Most of the 'latency' that limited it's usefulness has gone and it's much snappier. This is to be expected as the Trim window was a later addition to Final Cut Pro and not part of the long development time of the rest of the application. The way software development works is that a feature is written first then later the software engineers go back and see how they can make it function faster - 'optimizing the code'is the jargon. There's been lots of optimizing gone on for Final Cut Pro 2.
Automatic Scene Detection in DV Captures
This has to be about my favorite Final Cut Pro 2 feature. I'm positive it will save me more time than a real time card would for the long form documentary work I do these days.The scene detection uses signals that were added to the DV tape by the camera and are part of the DV stream that Final Cut Pro captures. The feature only works with DV, not with analog capture (even if the analog capture is converted to DV) or with any uncompressed or HDTV source. Apple makes that clear by labeling the tool DV Start/Stop Detection.
In principle it's a little like iMovie's capture except that iMovie automatically breaks each shot into a new Clip. In Final Cut Pro 2 there is no change to the Log and Capture window and Clips are captured with Batch Capture or Capture Now exactly as in earlier versions. This means that the tool will work on Clips captured with Final Cut Pro 1.x.
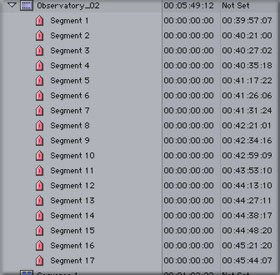
After Capture, run the DV Start/Stop Detection tool by selecting a Clip, or Clips in a Bin or Browser and selecting the tool. After analyzing the Clip, there will be a single frame Marker at each shot change, on the first frame of the shot.
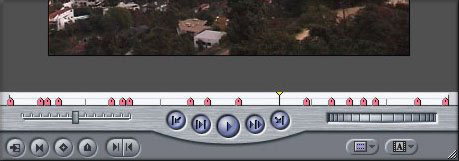
I have to admit, the first time I ran this tool and saw the results I was a bit disappointed. Being a big user of Markers, my experience was that, if I double-clicked any of those markers only one frame would load into the Viewer. Sure, open the whole Clip in the Viewer and you see exactly where every shot starts and stops along the Viewer timeline, so I wasn't totally unhappy. I did expect that this Clip would still need work to get it broken into individual shots.
Was I ever impressed, however, when I actually did double-click one of the markers created by DV Start/Stop detection to find that the entire shot loaded in the viewer perfectly trimmed to the start and end of the shot. Same thing if I dragged a Marker to the Timeline or edit overlay the shot was used.
Since I wouldn't want to use beyond the shot in a Clip, particularly likely if I used one of these Clips and applied a transition, I'd select all the Markers, probably after renaming them, and convert them to Sub-clips. (Modify - Make Subclip).
By the way, there's now the option to remove Subclip limits if ever you do decide that you've cut a Subclip too tight and need to get access to the full length of the Clip again.
With the improvement to Capture Now by setting a limit to the Capture duration Capture Now could finally become useful! I still have a strong preference for using Log and Capture, particularly when working with large amounts of interview footage because I can log the content of an interview (into Markers of late) and only capture when I need it, but using Start/Stop detection will speed workflow a huge amount.
One nearly 6 minute Clip took 1 minute to Log (find start, set in, find end, set out); 7 minutes or so to capture. Less than 20 seconds for Final Cut Pro 2 to isolate all 17 shots in the 6 minutes and then less than 20 seconds to convert all to Subclip. Naming those Subclip will be the slowest part, but the whole process will still be much faster than Logging each Clip.
Like I said at the start, I love this new tool.
Character Generator Improvements
Final Cut Pro was much maligned for the Character Generator tools available. I think a lot of that was somewhat unjustified and largely because the concept adopted was different from other NLE tools. Final Cut Pro's CG concept is much more integrated into the whole workflow with Text elements being created by Generators and complex titles, with or without animation, built into a Sequence. The combined Sequence then became the Title Clip in the main edit.I like the approach as it enabled the use of multiple elements, both animated and static, generated or imported, to be used, combined and animated. However, where it fell down for me was the quality of the generated text. With no high quality outline, or keyline, text generator I didn't feel able to prepare 'professional level' titles. Sure, we shipped the free Outline Text generator developed by Ryu Takasha with the DV Companion but it only looked acceptable on large text.
The great news is that Final Cut Pro 2 has 4 new Text Generators, including a very powerful Outline Text Generator, as well as shipping with a 'Graffiti Lite' plug-in called Scripter.
Animated Generators
There are 3 new animated Text Generators: Scrolling Text, Crawl and Typewriter and their functions should be fairly obvious. The only trade-off for these useful tools is that they do not have an outline. Beyond that they are simple to use and do the job better than the Crawl generator that shipped with the DV Companion. The animation duration in all 3 cases is the length of the Clip as it's used in the Timeline i.e. the trimmed length. Set Scrolling Text to 3 minutes long and the scroll (a.k.a. roll) takes 3 minutes for whatever text is entered.There is still no center column style 'credit layout' available but I am pleased to report that Left and Right justify in all the new generators are set the correct way Left goes to the Left, Right justify goes to the right unlike the original Text Generator where, even in Final Cut Pro 2, select Left Justify and the text is justified right, and vice versa.
Outline Text
Outline Text is the gem in the pack and goes beyond simple outline text generation. In this generator you can easily add an image or video Clip directly to the text face by simply dragging the relevant Clip to the well in the generator, likewise add an image or video to the outline. (Video does not animate it uses the first frame only.)As well as complete control over text, outline width and softness, face or outline graphic and text opacity, the Outline Text Generator has controls for a background to the text that can be opaque or transparent, hard or soft edged, and animate changes over time along with most of the text attributes.
The Outline Text Generator would be the greatest text improvement in Final Cut Pro 2 if it wasn't for...
Boris Script Ltd
Boris Script Ltd has not had the publicity of, say Bias Peak's bundling deal, but for the average video editor will have a lot more affect on the day to day work.Boris Script is the first release of a Boris Text Plug-in in the native After Effects Filter format. While not as fully featured as Boris Graffiti (not by a long shot really) Script has the advantages of working within the normal Final Cut Pro interface as a Filter and the price is very good (free!). It's an optional install so don't miss it. Get your serial number from the Boris website (you'll have to read the Read Me file I'm sorry <G>) and it installs as another filter.
I'd most likely apply it to a Slug so I can place it over my other edited Clips and use all the Final Cut Pro composite modes between the Script title and the underlying video. Script's controls appear in the Filters Tab of the Clip or slug and if you are using Script on a Slug, be sure to check Composite on original 'off' so the Text has an automatic alpha channel when it's added to a Sequence.
For a supposedly limited version of a product, Script has a whole slew of features borrowed from it's big brother, Graffiti. Most limiting is the need to work on only one track at a time, and the absence of 3D text or any of the Boris filters that Graffiti supports - all good reasons to upgrade to the full version of Boris Graffiti which also has more control over soft shadows and borders although soft shadows can be done with Final Cut Pro's shadow settings in the Motion Tab.
But, if you can live with the limitations, or don't need 3D text, Boris Script Ltd is one huge improvement for Final Cut Pro and is a professional Character Generation tool. Be sure to click on the Style Palette button to check out the pre-built style library. You can add your own styles to the library and apply them repeatedly to new text.
Script also does Rolls and Crawls using automated settings so you can have outlined text credit rolls or crawls.
Now that we have improved Text Generators and an introduction to a professional level tool like Boris Graffiti included, it's my firm belief that Final Cut Pro 2 is now set to deliver on the promise of having title media truly integrated into the NLE environment, not as some form of software equivalent to a 'stand alone box'.
FCP Home Page