Software Review
Page Four
Browser and Bin enhancements
Clip Labels
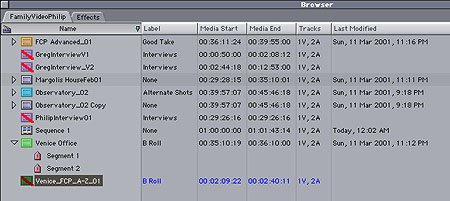
About 4 months ago I realized how much I missed having Clip labels. We'd been using Finder labels fairly extensively to manage Movies during Companion development and I'd used them quite a lot in Media 100. I didn't even expect to find them in Final Cut Pro 2, but had a small hope in the back of my mind that they might. While it's not the most crucial feature, it does make managing Clips in Bins and Brower a little easier.As well as coloring the Clip with one of the set colors, there is a new column in the List view that displays a name related to the that color. The default names are quite useful for video production: Good take, B roll, Interview etc, but I was pleased to note that the label names are easily and quickly customized to my own needs.
New Columns
More importantly, as well as the new column for Label, there are three new columns available in Bin and Browser List view: Media Start, Media End and Date & Time.The addition of Media Start and End columns will kill the dozens of questions that arise after people capture their Clips. In Final Cut Pro 1.x the In and Out points that had been Logged displayed as 'Not Set' because there were no In or Out points set of the Captured Clip. In order to avoid confusion - after all the Clip always retained the Media start and end Timecodes - the new Media Start and Media End columns display the Timecode originally set for the Clip. As well as boosting user confidence levels, they are useful to refer back to when we need to know what was captured into the file. This can be referenced in these new columns without needing to open the Clip and set the Playhead to each end to see the Timecode.
back to table of contents Sequence Timeline Enhancements
Status Indicators
In the top right hand corner of the Timeline window, two new icons appear. They function as switches to change Link Selection Status and Snapping Status. However I find them more useful as status indicators so I can tell at a glance whether Snapping is on, and whether Linked Selection is on or not.New Timeline Indicators
Because of the introduction of real time, there needed to be some changes to the status bar indicators.
- Red still indicates a need to render while a Gray bar requires no rendering or hardware to play in real time.
- New is a Blue-gray bar that indicates effects that have already been rendered
- A Green bar displays for a real time effect while a Yellow bar means that a proxy image (i.e. lower quality) is being used for a real time preview.
On Clips that have had their Speed changed, a percentage displays after the Clip name in the Sequence.
Icon Display
Scroll thumbnail
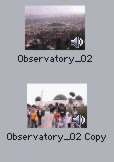
If you have thumbnail images displayed in your Timeline, or in any Bin or browser View, you can use the new Scrub Video tool to scroll through the Clip. No longer limited to the Thumbnail displayed in List View it puts Final Cut Pro on a par with the far more expensive *edit. Select the Scrub Video tool and drag through any icon display in a Bin or Browser without taking up the extra screen real estate of the List View thumbnail display.Set Poster Frame
In any view that uses a poster frame for Bin or Browser you can set your own frame as the displayed icon. In Final Cut Pro 1.x it was always the first frame, now you can scroll through the Clip and when you find the most representative frame, set it as the poster frame by choosing the Mark menu and selecting Set Poster Frame.
Another of the features I'd missed in Final Cut Pro that I'd grown used to in other NLE interfaces.Other Enhancements
Set Limit for Capture Now
While Final Cut Pro still functions best by Logging first and capturing later, many users prefer to use Capture Now and more will want to do so with the DV Stop/Start detection tool being available. Previously, Final Cut Pro had no limit to the amount of time captured during Capture now so it reserved all the available hard drive space in case it was needed. This led to a delay when starting Capture now. The delay was somewhat unpredictable, because it depended on how much hard drive space was available and varied from 1-3 seconds for smaller hard drives right up to a productivity killing 30 minutes or more when there were Terabytes of storage available.With the capture time limited to a much shorter time, Final Cut Pro knows in advance how much hard drive space to reserve and the large delays on Capture Now are eliminated. The default is 30 minutes so if you're editing Projects with long captures, perhaps some form of performance or ceremony, then adjust the maximum duration in the Capture Scratch dialog before starting capture.
More Information for Batch Capture
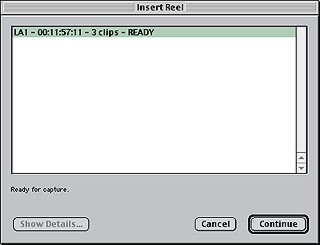
When you start a Batch Capture a new dialog opens that lists all the reels that will be needed for capture, the amount of time to be captured off the reel and the number of Clips. Although the image doesn't show it, you can also change the batch capture order so reels will be captured in the order you set. I like this because I generally would capture reels with the shortest amount first then leave the longest reel till last while I have a break away from the computer. Apart from my longer breaks, changing the reel order allows you to effectively skip reels by making them the last to be captured.Cutting Station User Mode
Because Edit Decision List (EDL) technology was developed in another time, long before fully featured non-linear editing software was widely available, they are limited to an a & b video track with no fancy effects or filters. In Final Cut Pro 2 you can select Cutting Station as the User Mode on install and that hides all the compositing feature like filters, reduces the Motion Tab settings to basic motion with Opacity and drop shadow in order to remove the likelihood that effects will be applied that can't be reproduced via an EDL on anther edit station.The Tool palette only displays the selection tools, Slip, Slide, Ripple, Roll, Blade and Zoom tools in Cutting Station mode.
User Mode can be changed at any time with from the User Mode tab of General Preferences and changes take place next time Final Cut Pro starts up.
More Frame rates and support for Film Logic
Final Cut Pro now supports HDTV frame rates (60, 59.94, 24, and 23.98) and enhanced support for the Film Logic plug-in. That is going to be valuable for a small group of people using Final Cut Pro for film editing or editing HDTV shows.But deeper down, in order to provide the enhanced support for Film Logic, some more significant changes were made to Final Cut Pro. There is now improved access to Sequence information for 3rd party Plug-ins. The first to benefit is Film Logic and those editing film or 24P video, but this new programming interface makes it more likely, at least possible, for an 'Export Sequence to After Effects' option to be developed by Apple or 3rd party provider.
No rendering of bars and tone for Master to Tape
No longer the long wait while Bars and Tone are generated every single time you want to Master to Tape or Print to Video.Custom countdowns.
We can now choose our own file to use for the Countdown that's applied during Master to Tape or Print to Video. In the MTT or PTV dialog, select the file you want for the Countdown and, as long as it is already rendered to the appropriate size and codec, it will play out in real time without a render delay.Restore Workspace
Another one of those seemingly small enhancements that I love a lot. Final Cut Pro 1.x always reverted to Viewer and Browser only when restarted into a Project, no matter what Sequences or how many Projects were open when you quit. Final Cut Pro 2 remembers what Sequences and Projects were open when you last shut down and restores them when you next start the Project. While not seeming to be earth shattering this has two advantages: it saves a fair amount of time locating and opening Projects and Sequences and it lets me get back into the mindset of the edit where I left off much quicker.Dual Preferences
Final Cut Pro 1.2.5 and 2.0 have different preference settings so it is practical to keep both installed. This allows you to not have to upgrade mid project and yet take advantage of the new version straight away because you can keep working with Final Cut Pro 1.2.5 on an existing Project, while starting new project on version 2.0. You will need to run the version you want to use first, then open the Project otherwise the Project will be opened in 2.0 and there's a danger in that. Once opened in 2.0 and saved in the 2.0 format, the Project cannot be opened in 1.2.5 or earlier.
Philip Hodgettsis the author of the DV Companionand co-developer of the Intelligent Assistance approach to "What you want to know, when you want to know, how you want to know." Philip has had his own video production company since 1980 and worked on everything from long form documentary to corporate video to national TV commercial (Australia) with a strong emphasis on education and training video production.He fell in love with Non-Linear Editing the first day he saw an Avid MCXpress, and purchased a Media 100 in late 1994. His first exposure to Final Cut Pro was at NAB 1998 when the alpha version was on limited display and immediately recognised its potential. His first Final Cut Pro job was a TV commercial that was on air in PAL the week Final Cut Pro 1.0 was released. FCP 1.0 did not officially support PAL.
His current major project (apart from updating the DV Companion, extending the Companion concept to other software and building a new website) is editing a long form documentary with 40 hours of source tapes in Final Cut Pro across the Pacific. Editing in LA with a Producer making revisions in Sydney by sending Project files by email.
copyright © Philip Hodgetts 2001
All screen captures, images, and textual references are the property and trademark of their creators/owners/publishers.
This article was originally published at LAFCPUG and is reprinted here with permission.