| Studio Pro 2 - Menus |
December 29, 2003
DVD Studio Pro 2
All About Menus
Standard Menus vs. Layered Menus
Motion Menus: Compositing / Looping with Highlights
Aspect Ratios between Compositor and Photoshop
and Basic Scripting with three project examples
By: Alex Alexzander
[Main] [Chapter One] [Chapter Two] [Chapter Three]
Chapter Three: Basic Scripting with DVD Studio Pro 2
- Create a Hollywood style setup page for audio and subtitles
- Smart random playback of tracks with track elimination and counter
- Scripting to test for aspect ratio setup (4:3 / 16:9)
Here we will go over three different projects, each with their own scripts designed to teach the structure of a few of the commands you have available to you as well as enhance your abilities with Studio Pro 2.
Project One:
Creating a Hollywood style setup page for audio and subtitles.
Commands used: Set System Stream St, Set System Stream Au, Jump.
[Link]
Project Two:
Create a random playback option that not only plays randomly, it also counts the plays of the tracks and stops when all have played. This also features how to integrate this into an existing option to play tracks one at a time.
Commands used: mov, ran, add, sub, jump.
[Link]
Project Three:
A smaller project designed to illustrate how to check your own players setting. This is very simple project that illustrates a complex command.
Commands used: mov, and, jump.
[Link]
[ Create a Hollywood style setup page for audio and subtitle options ]
Description:
Sometimes you want to create a single menu where audio and subtitle options can be selected and turned off. This is actually a lot easier than you might think. Creating a setup menu is a very convenient way to setup DVD playback. You can use this system to control what audio language you want to hear and in what combination with any subtitle you wish to see. You can turn on and off the subtitles as well.

Hollywood Style Setup Page
Here you see I have my project outline, which contains a few scripts. Also, you see my setup menu, which has many buttons. Each of the scripts in the outline works with one of the options in this menu. The idea here is that each button on the setup page selects an audio stream, a subtitle stream, or turns off the subtitle streams. We will perform each of these functions with tiny scripts. The best part is, they mix up well so you will be able to set French audio and Spanish subtitles easily, then change your mind, come back to the setup page and switch off subtitles, which will not affect the French audio at all.

Four Audio Streams / Two Subtitle Streams
I will use my Compressor default AIFF stereo track as my A1 track. Just below that is my AC-3 track, created with A.Pack. Notice the two language tracks under that. Both of these are created with A.Pack but they are both simply left and right channel stereo. Using A.Pack helps reduce the size of the audio tracks and the DVD as well as guard against the famous bit rate too high error. I suggest you use A.Pack often when creating multiple tracks this way.
As described, each button on this page points to a tiny script. Let's start with button 1, which is our stereo audio option and by the way, is the default track if the setup page is never visited.
[ Script: Stereo Sound ]
- Set System Stream Au(Audio Stream 1)
- Jump setup
Whew!! Wasn't that hard? Every script in this example is this easy. We could slightly complicate this script by adding a few lines of code that would determine which audio track is playing and play the appropriate subtitle, but you likely would not want that type of functionality. Despite this being such an easy method to use, it is also the appropriate method to use. Using very simple methods such as this one allows the user to mix and match audio and subtitles in any way the user wants. That is more powerful and configurative then assigning a specific subtitle to a specific audio stream.
Let's continue with the next button, which is button 2, AC-3 5.1 Sound.
[ Script: AC-3 ]
- Set System Stream Au(Audio Stream 2)
- Jump setup
See a trend here? A1 really means audio stream 1 and A2 means audio stream 2. I put my AC-3 audio on the A2 track so it is audio stream 2. The next line of code is Jump setup. Setup is the name of the menu we are using now. The function here is to allow the user to select an audio option, then stay within this menu and make another choice. You may only play one audio choice and one subtitle choice at any one time. That means, you play one of the four audio streams. Stereo, AC-3, Spanish, or French. In addition to playing one of those audio streams you may also play one of the subtitle streams simultaneously. Using the Jump setup keeps us in this menu until we leave it. Let's skip past the Spanish and French buttons which are both Set System Stream Au(Audio Stream 3), Set System Stream Au(Audio Stream 4) respectively.
Let's look at the Spanish, French and None buttons under Subtitles.
[ Script: Turn on Spanish Subtitle ]
- Set System Stream St(Subtitle Stream 1) (On)
- Jump setup
[ Script: Turn on French Subtitle ]
- Set System Stream St(Subtitle Stream 2) (On)
- Jump setup
[ Script: Turn Off Subtitle ]
- Set System Stream St(3 (Empty)) (Off)
- Jump setup
The first two scripts turn on the Subtitle Stream St(Subtitle Stream x). X being 1, 2, and so on. This is exactly the same as the audio streams except audio holds the designation Au and Subtitle holds St. Otherwise they are identical.
Notice the ends of the script where we see (On) after the System Stream St command. This is a forced view. You will notice both in the simulator and in your DVD video playback that this will turn on the subtitle text on your screen. This allows you to completely control the setup from within this DVD menu.
The last script shows Set System Stream St(3 (Empty)) (Off), which sends the subtitle to an empty track and turns off the forced view. This is our none button. None turns off subtitles.
All three of these scripts also bring you right back to this menu. To leave this menu, you can press button 8, and go back to the main menu. Now, the main menu has a play button for the single track in this demo. That play button has a property in which you may assign streams to play back. Those must remain at the default state which is not set, otherwise that set will override our setup page.
This also brings up an important point about using a setup page that you must understand, especially if your project uses multiple tracks A Hollywood movie might simply have the one movie and so a setup page such as this is fine. However, for your own projects you may have multiple tracks. Once a stream value is set as shown in this example, it is the default setup until something overrides these settings. That means, if you have two tracks and play the second track, it will try to use whatever streams you selected in this setup page example. What if that second track doesn't have a Spanish and French audio option or an AC-3 and Stereo option? This is where trouble begins. Consider that when you create a page such as this, you are really telling the user that these are global settings.
Optional Support:
- Setup Page Scripts: Download
[Top]
[ Smart Random Playback ]
Description:
These scripts allows you to random playback tracks with a twist. Tracks already played are removed from playing again. You can set how many times a track can play in the random playback.
Optional Support:

Random Play Until All Have Played Menu 1
This is a more sophisticated random play back script. Three tracks are selected from to play randomly, except that if a track has already played, it is excluded from playing again. So in effect, we play all tracks randomly until they have all played once and then stop playing them and return to the menu.
This script uses many conditions, and as such you can adjust it to play each track more than just once. You might decide each track should play a total of five times then will no longer be eligible to repeat play anymore.
In addition to this, each track can be played individually.
In this example, we have one menu, three tracks, and seven small scripts.
[ Menu ]
Our menu contains four buttons. The first three play one of three tracks directly while the fourth button on the bottom kicks off a random player script that chooses one of the three tracks, plays it, then excludes it from playing again. At least, that's how this looks. In actuality I have it written so that tracks monitor themselves and refuse to play if they have already played when the random generator asks them to play.
Menu 1 makes use a pre-script as well.
[ Menu Pre Script ]
- mov GPRM 5 ,0
- Exit Pre-Script
This pre-script acts as a method to clear GPRM 5 of a value we will set later on. When ever the DVD returns to Menu 1, we clear GPRM 5 by giving it a value of 0.
[ Button 1 - Play Video 1 ]
The first play button is directly told to play the Track 1, my first video. Once Track 1 has completed its play it runs another small script. This is the End Jump assignment.
[ Track 1 - End Jump ] - [ Script: Track Ending Script ]
- Jump Menu 1 if (GPRM 5 != 1)
- sub GPRM 0 ,1
- Jump Menu 1 if (GPRM 0 = 1)
- Jump random engine if (GPRM 0 > 1)
Each time a track finishes playing it has a couple choices to make. The first line, Jump Menu 1 if (GPRM 5 !=1) refers to the pre-script assigned to Menu 1. The Menu 1 pre-script always sets the value of GPRM 5 to 0. So each time a track is played it checks immediately to see if that GPRM 5 does not equal 1. If it doesn't it goes back to Menu 1. The reason for this is, that when we run our random generator script we will set the value of GPRM 5 to a 1. This will allow the rest of the track ending script to finish executing. If the random generator is not being used, the rest of the End Track script is not valid and shall be ignored.
Each of the three tracks when played individually function this way. The remaining scripts are all bypassed because the GPRM 5 value must be set to a value of 1 in order for the scripts to function. In addition to this, each time the track does return to Menu 1, the GRPM value is always returned to 0, as described in the pre-script assigned to Menu 1. This will make sense when I describe the next set of scripts that run from the random engine script assigned to the last button, which is our random play button.
[ Button 4 ] - [ Script: set master counter ]
Our button 4 is our random play button. It sets off a series of scripts, the first of which is set master counter.
- mov GPRM 5 ,1
- mov GPRM 0 ,4
- mov GPRM 1 ,1
- mov GPRM 2 ,1
- mov GPRM 3 ,1
- Jump random engine
This script is very simple. Its entire reason for existing is set a few values we will use to keep count of what track has played and if the reason they are playing at all is because Button 4, the Random Play button told them to.
mov GPRM 5 ,1
The first line in this script shows that GPRM 5 now has a value of 1. Remember, this is the same value that tracks after they play test to see if the value is not a 1. If it is not a value of 1, the track end jump always goes back to the menu. You can see now that when the button Random Play is executed, that value does equal 1. Because of that, the rest of the script executes when a track is finished playing and its End Jump will vary depending on these other scripts.
mov GPRM 0 ,4
This value will be used to count down. We will subtract from the 4 until it becomes a 1. More on this later.
mov GPRM 1 ,1
mov GPRM 2 ,1
mov GPRM 3 ,1
Each of these starts another counter that begins with a value of 1. Each of the three tracks we will monitor each will use one of these three values to count how many times that track has actually played when the random engine picks the track. In our example, each track will only be allowed to play once. So this value will start with a declared value of 1 and never go beyond a value of 2. When this value reaches 2, it will know it has always been chosen to play and will refuse to play, then goes back to the random engine script and forces it to pick another track. If all the tracks each have a value of 2, then the random engine simple is no longer a valid script to run because it has completed randomly playing all the tracks.
Jump random engine
This final line sends the task over to the random engine for further execution. So let's look at the next script.
[ Script: random engine ]
- mov GPRM 7 ,0
- ran GPRM 7 ,3
- Jump track 1 check if played if (GPRM 7 = 1)
- Jump track 2 check if played if (GPRM 7 = 2)
- Jump track 3 check if played if (GPRM 7 = 3)
This is a simple random generator. Let's go over each line, one at a time.
mov GPRM 7 ,0
This clears the value of GPRM 7. We will run this script over and over again until all the tracks have been played. Each time the script is run it will clear any value it already has.
ran GPRM 7 ,3
This line randomly selects a number between 1 and 3 and holds that value.
Jump track 1 check if played if (GPRM 7 = 1)
Jump track 2 check if played if (GPRM 7 = 2)
Jump track 3 check if played if (GPRM 7 = 3)
The next three lines all point to one of three other scripts. Each of the tracks in this example has a script that tests a condition before they will actually play the track. The condition is, has this track already been played before. If it has, it refuses to play. If it has not played before then it will play now.
Let's look at one of the three scripts that is for one of the three tracks.
[ Script: track 1 check if played ]
- add GPRM 1 ,1
- Jump Track 1 if (GPRM 1 = 2)
- Jump random engine if (GPRM 1 > 2)
add GPRM 1 ,1
Let's take this apart and understand what is happening here. The first line in the script, add GPRM 1 ,1 adds a value of 1 to GPRM 1. When the choice was made to run random play, remember a script called set master counter was executed which set the value of GPRM 1 to 1. Now that this track has been chosen to play, that same value is being added to. It now becomes a value of 2.
Jump Track 1 if (GPRM 1 = 2)
Jump random engine if (GPRM 1 > 2)
These two lines make a choice. If GPRM 1 = 2, which it will the very first time this script is run, only then shall it play Track 1. The next line states that if the same GPRM 1 is greater than 2, to go back to the random engine script. So basically, before Track 1 can be played, it checks to see if it has ever played. If it has played once before than it will have had to arrive at this script once before and each time this script runs it always adds a value to GPRM 1 of 1. Since it starts with a value of 1 the first time it plays it will equal 2 and if called upon to play a second time, before it can, it will have a value of 3 or more which is greater than 2. So in that case, the last line of this script becomes a true statement. If the value of GPRM 1 is greater than 2 then go back to the random engine.
Each track has its own independent script just like this one. Track 2 uses GPRM 2 and Track 3 uses GPRM 3 to track its first play.
So let's work through the two possible outcomes of this script. GPRM 1 either is equal to 2 or it is greater than 2. Let's take the first outcome first, that the value of GPRM 1 is equal to 2. In that case, we Jump to Track 1.
Track one plays and when completed, it jumps to the script called tracks ending script.
[ Script: tracks ending script ]
- Jump Menu 1 if (GPRM 5 != 1)
- sub GPRM 0 ,1
- Jump Menu 1 if (GPRM 0 = 1)
- Jump random engine (GPRM 0 > 1)
Let's look at this script again. The first line tests to see if GPRM 5 is not a value of 1. It is, because a 1 was declared when we ran the random play option. Had we not played the track by itself, it would not be a value of 1 and there would be no need to run the rest of this script. It would simply go back to Menu 1.
Now, this is the first time next line is allowed to execute. It says to subtract 1 from the current value of GPRM 0. When we first chose to play random tracks we set the value of GPRM 0 to a 4. So each time a track is allowed to play the end script is run. Each time the end script runs it subtracts a value from GPRM 0. Since each track can only play once, we know that this script can only run three times. Each track when done runs this script and subtracts a value of 1 once it does. If the value has been subtracted three times, it can only be that because each track has played, and thus the next line in the script, Jump Menu 1 if (GPRM 0 = 1), becomes a valid statement. In this case, since this is the first time we have visited this script, the value will actually be 3. It started as 4 and we subtracted a 1 because Track 1 is the first track to make it this far. So the value of GPRM 0 is 3. In that case it is not a value of 1 and so the next line of the script becomes true. Jump random engine (GPRM 0 > 1). This statement jumps back to the random engine script if the value of GPRM 0 is greater than 1. In this case, we know it is 3.
Now remember, this is a description of the two possible outcomes. We just covered the first possible outcome. We now will cover the second possible outcome. What if the value of GPRM 1 in the script track 1 check if played is greater than 2. The scripts then goes back to the random engine script.
Let's again look at the random engine script one last time, since we are going back that way anyway.
[ Script: random engine ]
- mov GPRM 7 ,0
- ran GPRM 7 ,3
- Jump track 1 check if played if (GPRM 7 = 1)
- Jump track 2 check if played if (GPRM 7 = 2)
- Jump track 3 check if played if (GPRM 7 = 3)
Again, GPRM 7 gets a value of 0. A random number between 1 and 3 is chosen and held. If the number is 1, 2, or 3 then go to one of the three scripts assigned to each track. So we can see, the random level is always 3. We always pick from 1 to 3. A number may be picked for a track that has played and that track will refuse to play if already played. In that event it goes back to the random engine scripts and tries again. This happens over and over until a track is selected that accepts being played and it wont accept being played unless it has never played before. Once all three tracks have accepted being played, a GPRM value that subtracts values will become valid and terminate the random play back and go back to the main menu. The Main menu has a script that then resets a special value back to 0, which means all tracks look for when played independently.
[ Project: Random Until Done ]
You can test these scripts in your own test project. All seven scripts are available and ready for you to import into your test project.
The seven scripts you will need are:
- set master counter
- random engine
- track 1 check if played
- track 2 check if played
- track 3 check if played
- tracks ending script
- menu-pre-script
Instructions for sampling these scripts:
Create a new project with one menu and three tracks
Label the only menu as Menu 1
Label the three tracks as:
- Track 1
- Track 2
- Track 3
Import all seven scripts.
Start with your menu asset.
Create four buttons.
From the top down assign the first button to play track 1, the second to play track 2, the third, track 3.
The forth button set to the script: set master counter.
Set Menu 1's pre script option with the script menu-pre-script
Set each of the three tracks in the outline tab to use the end jump script: tracks ending script.
The rest of the scripts use themselves during the execution process and are not directly assigned by you.
You can also download the project file itself, and substitute your own tracks into my project file.
[Top]
[ Detect 4:3 or 16:9 aspect ratio for setup ]
Description:
Here is an interesting script designed to help you understand the and command using a bit-wise operation. This script will detect the aspect ratio settings of the DVD play and load the appropriate menu.
To accomplish this, we're going to learn a tiny bit of binary (no pun intended). Down below we are looking at SPRM 14. SPRM 14 is a 16 bit SPRM, but the bits we're going to talk about are 10 and 11. Note the top row of digits starting from 0 and going to 15. That is a total of 16 digits, or bits. The next row also the bottom row also has 16 digits; however, these digits exactly double the prior digit in value. In binary, we were either on or off, as they say one or zero, respectively. By giving each value to the right double the value of the left value, each value is not only unique, no matter what combination of values are added together, we will never get an overlapping value. That means, if I add the first two bits together, 0 and 1, I will have a value of 3. There is no other way to get that value of 3 adding any combination of these bits together. As a result, when I see a value of 3, I know the first two bits, 0 and 1 must be on. So with a single value, I know the current state of two bits. With any one value I would also know the state of the entire 16 bit register. This is how bit-wise works.

Aspect Ratio Script
Say for example the two bits I am interested in are the first two, 0 and 1. I only need to think about the value of 3. 3 tells me that only 0 and 1 are in use. That makes sense, but lets make this a little harder. What if I said the value was a 7. Then I must be talking about bits 0, 1, and 2, because those values are 1, 2, and 4, which is represented by a single value of 7. Let's get this a little bit harder. What would a value of 65 be? That would bits 0 and 6. I am adding the values of the bits on the top row. Bit 0 is equal to a 1 and bit 6 is equal to a 64. Therefore, 65 is bit 0 and 6.
Now that you are getting the hang of this, let me throw you a curve ball. Let's say I want to talk about bit 10 and bit 11. That would be a value of 3072. If you take a look at my script, you will see I am using 3072 as a value. I want to explain why that is.
When we talk about bits we are really talking about something that is either on or off. If it is off, it is 0 but if it is on, it depends on its placement, for its value. Bit 10 is either a 0 or a 1024, simply because it is bit 10. Bit 11 is either 0 or 2048. Get ready for the curve ball because here it comes. If I want to talk about only bits 10 and 11, I will use a bit-wise function, which is like a mask. To do this, I will address these two bits as 3072. That is bit 10 and 11 added together. Now, there are four possible outcomes when talking about these two bits.
- Outcome one: they are all off and that is a value of 0
- Outcome two: bit 10 is on, 11 is off and the value is 1024
- Outcome three: bit 10 is off, and bit 11 is on, and the value is 2048
- Outcome four: bits 10 and 11 are both on, and the value is 3072.
Read that over again if I lost you; if not, let's go forward and look at the script and how to use this information.
In SPRM 14, bit 10 and bit 11 are used to determine aspect ratio so we are only interested in those two bits.
[ Script: Bit-Wise and ]
- mov GPRM 0 ,SPRM 14
- and GPRM 0 ,3072
- Jump Menu 4 if (GPRM 0 = 0)
- Jump Menu 1 if (GPRM 0 = 1024)
- Jump Menu 2 if (GPRM 0 = 2048)
- Jump Menu 3 if (GPRM 0 = 3072)
Let's take this apart and go over it. The first line we know by now is simply taking the value of SPRM 14 and copying it into GPRM 0.
The next line, and GPRM 0 ,3072 instructs this script to watch only the outcomes of two of the bits in the 16 bit register. We want to see if they are on or off. When we say and GPRM 0 ,3072, we are talking solely about bit 10 and bit 11.
Now remember, we have four outcomes: 0, 1024, 2048 , and 3072. If both bits are off we get a value of 0 which means 4:3 aspect ratio. Now that can cover either 4:3 Pan and Scan or 4:3 Letterbox. In either case, the aspect ratio is 4:3. If just bit 10 or just bit 11 is on while the other is off, we have values of 1024, or 2048 respectively. Bit 10 or 1024 is not specified as a lone bit and 2048 (bit 11) is simply reserved. If 10 and 11 are both on, then we are talking about 16:9 aspect ratio and a value of 3072.
Now, let's test this using the simulator and your preferences. In order to test this, I have created four menus. One is 16:9, and the other three are 4:3. Note the upper right-hand corner. This is the value of the GPRM 0 that we will trigger to open this menu.

Jump Menu 3 if (GPRM 0 = 3072)
Here I have my 16:9 menu as Menu 3 in the script. If GPRM 0 equals 3072, or in other words, if bits 10 and bit 11 are on, then jump to Menu 3, my 16:9 menu. Note the 16:9 menu is also defined as such in its menu property under aspect ratio.
We are going to run script as our first play. The script will determine the settings of our player, and if it finds a value of 3072 it will open our 16:9 menu. If it finds a value of 0 it will open a 4:3 menu I have assigned to Menu 4.

Jump Menu 4 if (GPRM 0 = 0)
Two other menus, Menu 1 and Menu 2, are also assigned to this script. Menu 1 and Menu 2 have text in the background that simply states a value of 1024 and the other is 2048. You will setup your script as I have.
[ Script: Bit-Wise and ]
- mov GPRM 0 ,SPRM 14
- and GPRM 0 ,3072
- Jump Menu 4 if (GPRM 0 = 0)
- Jump Menu 1 if (GPRM 0 = 1024)
- Jump Menu 2 if (GPRM 0 = 2048)
- Jump Menu 3 if (GPRM 0 = 3072)
The 16:9 menu is menu 3, Jump Menu 3 if (GPRM 0 = 3072), while the 4:3 menu is Menu 4, Jump Menu 4 if (GPRM 0 = 0). Again, create two other menus and assign them to the Menu 1 and 2. Write the value of 1024 in one as background text and the other 2048 as background text.
Set your First Play option to this script.
Let's open the simulator and setup our test.
Use the pull down menus, DVD Studio Pro > Preferences

Preferences > Simulator
Select Simulator > change the aspect ratio to 16:9, and select okay.
When you run the simulator, you should see the 16:9 menu appear.
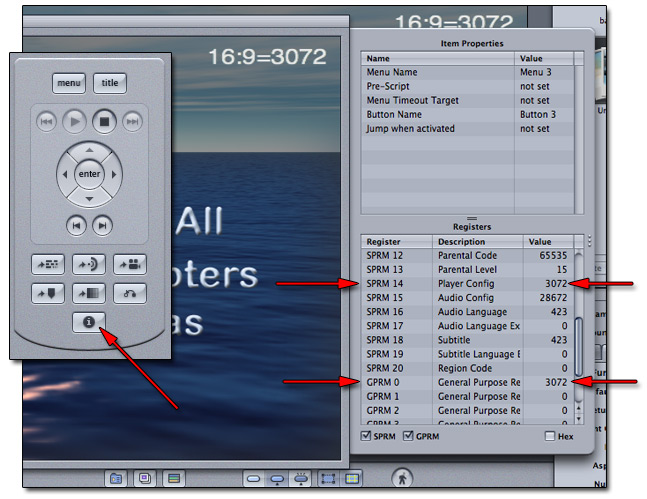
16:9 Menu Selection
Using the simulator remote, press the I [ capital i ] key to view the values of the SPRM and GPRM registers. Scroll down to where your view includes SPRM 14. You should be able to see GPRM 0 at the same time.
Note that SPRM 14 and GPRM 0 both equal 3072. This is because bit 10 and 11 of the SPRM 14 are on and all other bits are off. Let's go back to the preferences and change back to the 4:3 aspect ratio and re-run the simulator. Your 4:3 menu will now appear rather than the 16:9 menu and if you find the value of SPRM 14 and GPRM 0 you will find that the value of GPRM 0 is 0 but SPRM 14 will either be 256 or 512. I'll bet you thought it would also be 0.
We are only watching bit 10 and bit 11, so when we copy the SPRM 14 register and use and GPRM 0 ,3072 to mask bits 10 and 11, and they are both off, GPRM 0 will equal 0, but there are other bits in the SPRM that will register that 4:3 are in 4:3 Pan and Scan or 4:3 Letterbox. 4:3 Pan and Scan is bit 8 on, and 4:3 Letterbox is bit 9 on. Since we are not watching those bits, they do not exist for us, but they are there and SPRM 14 will reflect one of those values, however our and GPRM 0 ,3072 simply sees bits 10 and 11. Since both bits 10 and 11 are off, GPRM 0 will equal 0.
--That's All Folks...
[Top]
[Main] [Chapter One] [Chapter Two] [Chapter Three]
©Copyright 2003 Alex Alexzander
All Rights Reserved