| Studio Pro 2 - Menus |
December 29, 2003
DVD Studio Pro 2
All About Menus
Standard Menus vs. Layered Menus
Motion Menus: Compositing / Looping with Highlights
Aspect Ratios between Compositor and Photoshop
and Basic Scripting with three project examples
By: Alex Alexzander
[Main] [Chapter One] [Chapter Two] [Chapter Three]
Chapter Two: Motion Menus
- Compositing for motion menus
- Using shapes and drop zones for pseudo-motion menus
- Compositing / Looping menu with overlay and simple highlights
- Aspect ratios between compositor and Photoshop
- Menu tab settings for DVD Studio Pro 2
Compositing for Motion Menus
Compositing menus has become less a chore with DVD Studio Pro 2. In our prior versions and in the present version compositing a menu is still required in many cases, but how you composite that menu and if you composite that menu are two questions that have been raised with the new feature set of SP2.
Stepping back into the past a bit, I want to review a work flow common to anyone using DVD Studio Pro 1.5 where motion menus and compositing are concerned. In prior versions many times a simple 30 second preview of a couple of different tracks was a desired motion menu. This meant that you needed to create some artwork if you wanted to dress-up the two previews that would sit in the menu and you needed a way to put two preview videos on the menu at the same time. This is where compositing starts. Compositing is simply taking more than one of something and layering it to become one asset. When we watch Lord of the Rings for example, we know those backgrounds are not really on those country sides. They are added in later.

Photoshop 7 / Composite for Final Cut Pro 3
First, I have created an outline of how I wanted my menu to look with two previews on my menu graphic which I created inside Adobe Photoshop. I do this because, the compositing method I am going to use would either be Adobe After Effects or Apple's Final Cut Pro 3. In Final Cut Pro 3, users would bring in Photoshop layers and apply those layers as a single nested video track. In my example, here I have a four-layer PSD that I would then import into Final Cut Pro. The background layer is a still image of the sky, however, this could be eliminated so that we could use a full motion video track from within Final Cut Pro.
Note that I have created two empty color rectangles. I will add two video streams that I will create inside Final Cut Pro behind these two boxes so that they are not so plain and ordinary. On top of that, I have my DVD menu name. I'll also need a method of clicking on some buttons to activate all this so I will have to create a PICT based overlay map that lines up with my assets here. I'll want my button selections to go under these two gold boxes, so I left plenty of room to work with here.
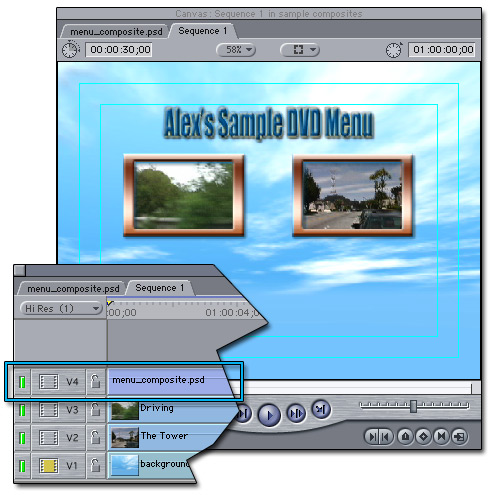
Photoshop layers composited with two video streams
Final Cut Pro 3
Once I have brought this PSD into my timeline inside Final Cut Pro 3, I would add two video streams, both at about 25% of normal size and adjusted as needed to fit my rectangular boxes.
The whole point to this is that I did not have the option to simply bring in video streams that required compressing in prior versions of Studio Pro. If you needed two 30 second previews, and perhaps a background that played full motion video for 30 seconds, you needed to bring all that into Studio Pro as a single MPEG2 asset. This method does have one very good point however. You get exactly what you are thinking. Compositing is the best way to create these kinds of menus. What Studio Pro 2 offers is a faster way to do the same things. In many ways, DVD Studio Pro 2 allows you to quickly get your ideas out and into a DVD. You can always decide to composite later if the results you are after are not as good as those done with compositing.

Motion Menu composite with Greyscale Overlay and Advanced Highlights
DVD Studio Pro 1.5.1
Here we are, after bringing in our final MPEG2 compressed menu. The two play buttons under the gold boxes are part of an advanced gray scale highlight. Off to the right side is the property inspector for the advanced highlights used to give this overlay its function and color.
With DVD Studio Pro 2, in many cases we no longer need to think this way but in many cases we still do. It really depends on the project. This section will focus on the opportunity you have to eliminate some of these chores and more dynamically to create menus with much the same results.
SP2 now offers a new component called shapes and drop zones. My menu above is not the best of motion menus. In fact the motion is in the background and the buttons are standing still, though they do have motion in them in the form of two 30-second clips. This is an ideal candidate menu to show off shapes and drop zones.
Shapes and Drop Zones with Studio Pro 2
As you just saw in the not too distant past, we worked with Photoshop to create a composite for Final Cut Pro where we mixed two video streams into a single MPEG2 file used in the SP1.5 example above. With SP2, we can now create a re-usable shape object to create those gold rectangles and then simply drop our video asset into the shape object and dynamically place the object anywhere we like in our menu. In addition to this, we can use overlay maps and even multiple sets of simple or advanced highlights as illustrated in Section Two.
I will make essentially the same menu you see in DVD Studio Pro 1.5 without the compositing aspects of using Photoshop and Final Cut Pro to create the menu. Instead, I will create the same assets such as the rectangle as a single shape object and the text on the top as a drop zone.
You can import shape objects by opening your palette, then go to the shapes tab, custom, and select import. You can learn a whole lot more about shapes in another tutorial devoted to that subject by clicking here. Drop zones can be created a few ways, but for this drop zone I will create a simple TIFF and import it as an asset the same way you import any video or audio asset. This TIFF file contains transparency information and though many applications do not support transparency in TIFF files, SP2 does.

Shape Object Designed in Photoshop
My shape object will be the rectangle you saw in the Studio Pro 1.5 demonstration menu. I have created the same shape you saw as a re-usable shape object that will act as my container for future video and still image assets for use with menus inside Studio Pro 2.
Shape objects also known simply as shapes are four-layer Photoshop documents that contain the following layers in the following order:
- Icon
- Highlight
- Shape
- Mask
Note the last layer called Mask. The entire size of this mask is where the image will go; however, we will only see the white area. The black area serves as a transparency. My shape and icon layers are the same. The image or video we drop on this object inside of SP2 will consume the entire size of this object. The shape layer will also cover some of the image. The assets you drop into the shape object go between the mask and the shape layer. The highlight layer in this example is just four pixels wide of a black line set at 100% black. Remember the simple and advanced highlights. This layer works just like those examples. I can use a simple highlight with this and change its color state just the same way we did with simple highlights. The icon layer is only there so we can see this object in the custom shape palette.
First I will add my TIFF drop zone as the title. Remember, a TIFF based asset I intend to use as a drop zone may be brought in as an asset directly into the asset bin with the asset import. Here I take my TIFF file and drag it on top of my menu, which by the way is a two-minute motion background. When I hold the object over the menu for a second without dropping it, a menu will pop up with some choices. I will select Create Drop Zone.
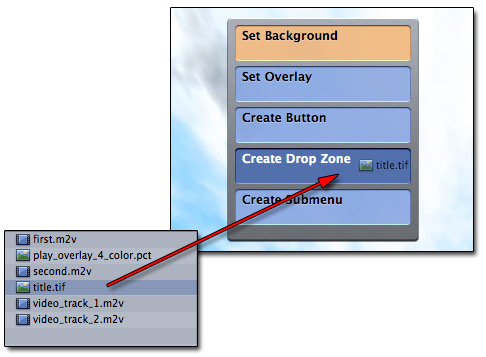
Title Drop Zone
Now I have title TIFF as a drop zone. I may drag this title anywhere I like. Even change its vertical or horizontal position and shrink it or grow it. Drop zones are flexible that way where as shape objects are not. I can resize a shape object, but I cannot rotate it at all. Both shape objects and drop zones can hold images if the drop zone is created like a shape object. This single layer TIFF drop zone for example, cannot hold a video or an image as a shape object would.
Now, lets add my gold rectangular shape object to the menu.

Shape Object for Button
Just as with the drop zone, I am going to drag my shape object from the custom palette to the menu. Remember, shapes are not imported as assets are imported into the assets bin. Shapes are imported into the shape palette. I drag my shape object over the menu and hold for a second as a menu pops up and offers to create a button or create a drop zone. I will create a button because I created a highlight layer in my shape object. I can make use of that highlight layer when I use the shape object as a button. Also take note where the red arrow is. That is my title TIFF file and a drop zone.
Next, we'll drop a video asset into the shape object.

Add Video Track to Shape Object
Here I am taking a video asset from the assets tab and dragging it over my shape object in the menu. As before, I hold onto it for a second and a menu appears. I will select, Set Asset. This adds the video asset to the shape object dynamically on my menu.
I have also added the same PICT based advanced overlay I used in the DVD Studio Pro 1.5 example to create two play buttons and finish my menu. Compare this menu to the one shown with DVD Studio Pro 1.5. This menu required no compositing where as the older one did. In this new menu, I can re-position the gold rectangles anywhere I like. Using the composited method, I have to pre-decide where they will go. I am also free to change my mind about what video assets I wish to create inside this menu. I can easily add a third and fourth rectangle if I like as well. I have a completely flexible architecture to work with.

Final Menu: DVD Studio Pro 2
So what are the limitations?
Why not always do this?
Some menus may require the use of movement not just in the form of the background, nor in the form of an object that sits still in one place on the screen. Shapes and drop zones have no keyframe capabilities as does Final Cut Pro and After Effects. Without that ability, more complex motion menus such as text moving around and then being made selectable, then moving after selection, such as in a transition menu are not possible with shapes and drop zones.
Let's build a more advanced menu where we need to keyframe text buttons on the menu for movement as well as add menu looping with simple highlights. With this kind of menu, the screen will start with a motion background, then text will appear while in movement until it becomes stationary, at which point the first menu item will become selectable in the menu.
The first step is basic compositing.
Compositing for Motion Menus
Here we have a composite for a motion menu. The background sky is a pre-rendered near two full minutes of uncompressed animation quality video. On top, we have four text layers on top of an animated background. Each layer holds its own text, which is going to be used later for a looping menu example.
I have animated the text on this menu using keyframes to define each of the text layer's end points. The red arrows are my way of letting you know each text line is animated. The play button zooms in from the left going right, while the play all button trails it. The extras button zooms in from the right side and falls into position and all the while the extras button zooms up from down below the screen. While this is going on the sky looks like a time-lapse sky and continues that action for close to two minutes. Now, the animation for the text ends just shy of ten seconds when it becomes stationary text.
Since the frames after ten seconds leave the text in one place, I have exported one of those frames to Adobe Photoshop and used it to create a PICT based overlay for simple highlights. This entire animation, in a single one minute and 45-second animation is exported to loss less animation. The part prior to ten seconds will become the start of our menu and after ten seconds will become the loop point up till the end. That is to say, we will have an animated menu where the first seconds are the text letters falling into place and animated, then after ten seconds, our highlights will become active along with the overlay. All the while we will have a full animation of the clouds drifting past in the background. You will be able to make menu selections once the text has stopped moving. The clouds in the background are always moving and will take close to two minutes to loop. This gives a seemless motion of both menu items for selection and the background.

Adobe After Effects Motion Menu Composite
When looping a motion menu you don't always go back to zero on the motion menu. I want the loop to occur after the animation of my text has taken place once. This gives my menu a seamless effect that repeats itself. You can see in the After Effects composition that at 0:00:10:00 timecode my menu text is stationary. Below I have Sound Track running two track loops. The second loop starts after 10:00 timecode. This gives me a good solo beat at the opening of the menu that progresses with a second instrument at the loop point of my menu, and loops continuously while the user is allowed to make a menu selections.

Sound Track
This sound track and animation are now exported to MPEG2 and will be used as the basis of the motion menu.
Creating a looping menu such as this is not compatible with shapes and drop zones. Adding either shapes or drop zones to this menu will not allow the loop setting to take place. The only assets allowed are the background animation, the background audio, and the overlay. The overlay has a very interesting effect when used the way we are about to use it.

Take a look at the start time code in the first box with the sky background. It starts at 00:00:00:00. The next box to the right starts at exactly 00:00:10:00 seconds after. You can see a thumbnail view in that second box which by the way is called the Loop Point. The last box is the end timecode box. Here you will note my end time code is 00:01:44:29. Let's go through how this overlay works.
When the menu is first played it starts at 0, then goes to 10 seconds, also known as the loop point in my example. Once this loop point is met, the overlay assigned to this menu becomes active and visible. This is a key point. This allows you to animate an object and apply an overlay at a specific time in the menu animation. My overlay, highlights and selection states will not appear until the loop point has been reached. My text for example starts off screen and will not be properly located for the overlay until just shy of ten seconds of time code has been reached. It would look highly awkward if the overlay were already visible where the text would end in the animation before the animated text arrived at that destination on the menu. The loop point is the signal to display the overlay. Take a look at the third box in the graphic. That is the end of the animated menu. When the end timecode is met, the new start point will be the loop point, or in my case, ten seconds of time code, not 00:00:00:00.
This is an example of a composite that is beyond the use of shape objects and drop zones. Shapes and drop zones are containers that stand motionless, but may hold still images or video. Shapes and drop zones cannot be keyframed as this menu is. If keyframes are what you need to accomplish your menu, then an outside compositor such as After Effects or Final Cut Pro is needed. Consider that your background music will not be starting at the start time code when repeating a looping menu such as this.
So you now see the use of shapes and drop zones, the opportunity you have to use them and save time. Compositing is still needed, but less now. While we're discussing compositing and exporting from Photoshop to After Effects or Final Cut Pro and back, I think I should mention aspect ratios a bit.
Aspect Ratios
Once you start to move graphics back and forth from NLE to Photoshop and back or from a compositor to Photoshop and back, you will need to understand the differences between how some applications handle pixels on the screen. Photoshop for example uses a square pixel aspect ratio where as your NTSC monitor uses a rectangular aspect ratio. When you look at Photoshop documents on an NTSC monitor, they will exhibit a stretched affect. Here is a test you can perform to see this stretch affect. Create a new document in Photoshop with the dimensions of 720 x 480. Now draw a perfect circle. Save your circle and import it into Final Cut Pro.

On the left, we see a square pixel aspect ratio at 1.0 with Photoshop. This looks like a perfect circle. On the right is Final Cut Pro 4 with that same Photoshop document imported. It is 720 x 480 and exhibits the stretch effect both here and on your NTSC monitor. Let's create another document in Photoshop and compensate for this issue using the .9 aspect ratio.
Create a new document, and this time the dimensions are 720 x 534. Draw another perfectly round circle.

Here is my Photoshop document created in 720 x 534. To compensate for the NTSC stretch we multiply 534 by .9 and that gives us a result value of 480.6. This tells us that we need to adjust the height of our circle from 534 to 480 to compensate for the stretch of NTSC. Now we need to adjust this in Photoshop; however, we do not want to adjust the circle proportionally. That would simply make the circle smaller, without adjusting for the stretch effect. When you select Image > Image Size in Photoshop, you will notice that the default pixel dimension and document size adjustments are governed by a constrained proportions option near the bottom left of the window. We just want to adjust the height, so we must make sure we de-select that check box.

Take a look at the left side. Call your attention to the red arrows. My height starts with 534. I have unchecked Constrain Proportions. If I do not un-select this, I will only make the circle smaller. Our goal is to adjust the height to compensate for the stretch effect of NTSC. Now, look to the right side. I have adjusted the height to 480. This will cause the perfect circle to take on the appearance of a squashed circle.

Here on the left we see the adjusted circle, which is now represented in square pixels since Photoshop prior to CS can only represent square pixel views. However, once you import that circle into Final Cut Pro, the circle will appear as perfectly round. This is also true of your NTSC monitor. There are two reasons this is so important to your composites. One is that you will likely create files in Photoshop that you intend to use in Final Cut Pro or After Effects during the process of creating your DVD. In addition to that, as you go from compositor to Photoshop and back, you will miss-match your work. Let me give you an example. As you saw in the prior section, I created a motion menu in After Effects. Text was keyframed and animated. I said I needed to create a PICT based overlay map for my looping menu. What that means is, I need the PICT overlay, which is created in Photoshop, to exactly match and sit above the animated text at the 00:00:10:00 and beyond timecode mark. That PICT map is created in Photoshop, which is square pixel based, however, the animation of the text was created in After Effects at .9 pixel aspect ratio because it is intended for NTSC use later on. Without adjustment, my overlay will not sit directly over the target text.

After Effects Comp Settings
Note the red arrows on my After Effects composition. This motion menu is 720 x 480 with .9 pixel aspect ratio. When I exported my frame at 00:00:10:00 timecode, I had a 720 x 480 document that I would load into Photoshop, which is a square pixel aspect ratio application. Remember the example above with the Photoshop circle created in 720 x 480. If it looks perfect at 720 x 480 it will certainly stretch when it hits NTSC. What you see in After Effects is already compensated for. When I export from After Effects to Photoshop, my graphics are already squashed because my After Effects document is in .9 aspect ratio. However, if I wish to add graphics to this exported After Effects frame inside Photoshop, which is a square pixel aspect ratio application, I need to compensate from the squashed image back to a square pixel aspect ratio. Once I have added my graphics, I then need to re-squash the image.
To do this, I will go from 480 back to 534. I do this exactly the same way we went from 534 to 480. Once my document is in 534 inside Photoshop, I am free to edit it and create my PICT overlay map. When finished with the PICT overlay, remember to squash it again as you saw above by going from 534 back to 480.
So, if anything, I hope you walk away from this with the understanding and awareness that different applications have and support various other pixel aspect ratios. As you create menus, you may need to compensate for these differences otherwise you will see misaligned graphics on your end result.
Lets go forward, and talk about some handy settings inside the menu tab in DVD Studio Pro 2.
Menu Settings

Menu Settings Options
Here are some settings that will help you proof your DVD while you are creating it inside DVD Studio Pro 2. When working within the Menu, use the pull down settings you see here. Let's go over some of these settings and why they are so helpful, starting with the red arrows at the top.
Auto Assign Buttons Now

By default, you likely have Auto Assign Buttons Continuously checked. This can cause a lot of frustration. What this does is cause the button navigation to automatically adjust itself as you create and move the buttons around on the menu you create. I find it is best to leave Continuously unchecked. The selection above that, is used to auto assign navigation just once. This means, no navigation is ever setup unless you run this top setting. A good work-flow would be to adjust all your buttons the way you like them on the screen, then select Auto Assign Buttons Now. At that point you can make any changes manually and as you move buttons, the navigation settings you already have will not change. If you decide you would like them to update automatically a second time, just run the Auto Assign Buttons Now selection a second time.
Auto Assign Buttons Continuously
As just mentioned above, this is used to automatically assign the navigation of your menu buttons as you create and move them on the GUI menu screen. This can be helpful, but you must be aware that moving buttons on the menu is affected by this setting.
Let's look to the blue arrows now.
Display Composite
This shows the full composite of your work, both backgrounds and overlays at the same time. If you want to check on just the background or just the overlay, use one of the two options above this selection.
Title Safe and Action Safe
Of course, you should be aware of these two settings. Never place your menu buttons past the title safe area. Your compositor also likely has these settings however, it is a great feature especially for button placement to have these two settings carry over into SP2.
Square Pixels and Rectangular Pixels
Square Pixels means you see it as created in a square pixel application such as Photoshop. This is extremely helpful. You can test the usefulness of this setting by importing the circle you created earlier. If you bring in a .9 pixel aspect ratio circle and select square pixel mode, you will see the squashed circle exactly as you would inside Adobe Photoshop. This is a great way to test and check your work. If you wish to see a rectangular image, which is how it will display on NTSC, then select rectangular aspect ratio.
[Top]
[Main] [Chapter One] [Chapter Two] [Chapter Three]
©Copyright 2003 Alex Alexzander
All Rights Reserved